
**Transform your kitchen with a custom wooden vent hood—a statement piece that combines functionality with craftsman appeal.** Building your own range hood cover allows you to match your kitchen’s exact aesthetic while concealing a standard insert at a fraction of retail costs, typically saving $500-$2,000 compared to pre-made designer options.
Start by selecting the right wood species: poplar offers easy workability for painted finishes, while oak or walnut provides stunning grain patterns for stained designs. Your hood will frame a commercial vent insert (the mechanical component that actually removes cooking smoke), so measure this insert precisely before cutting a single board. Most DIYers choose a chimney-style design for its straightforward construction—essentially a tapered box built from dimensional lumber or plywood with decorative trim details.
The project demands several specialized tools you’ll use infrequently: a compound miter saw for precise angle cuts, brad nailer for clean assembly, and orbital sander for professional finishing. Renting these tools makes economic sense for single-project use, particularly when tackling DIY renovation projects where purchasing would exceed your budget.
Before construction begins, verify your vent insert’s CFM rating meets local building codes, confirm adequate structural support in your ceiling joists, and hire a licensed electrician for power connections—safety isn’t negotiable when working above heat sources. Plan for 2-3 full days including construction, finishing, and installation time.
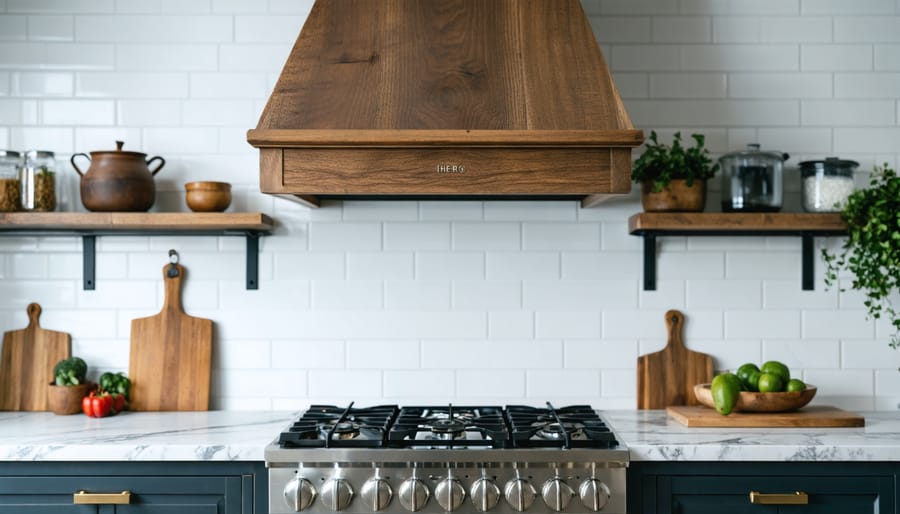
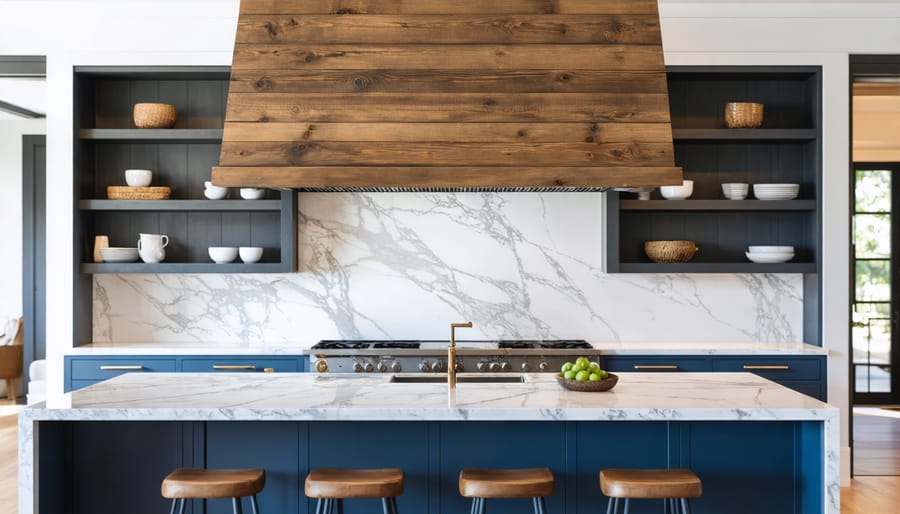
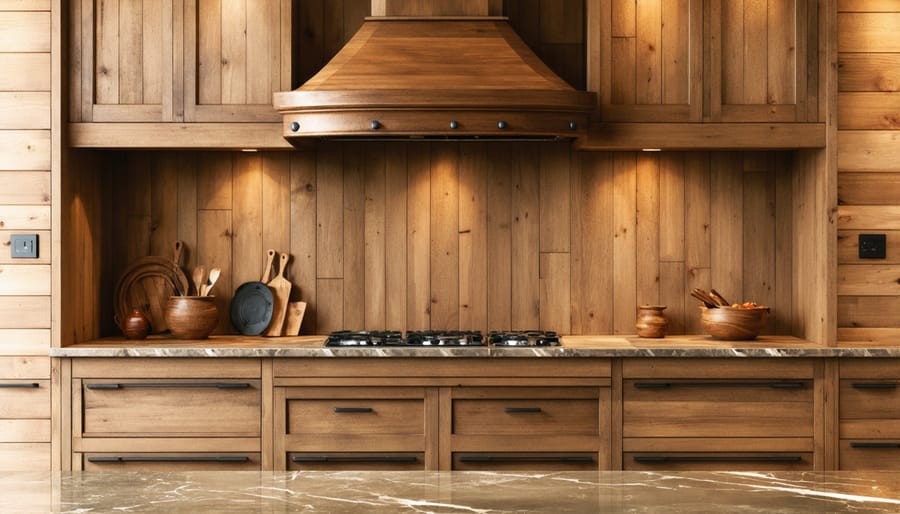
Why Choose Wood for Your Range Hood
Wooden range hoods offer distinct advantages that make them an attractive alternative to standard metal options. Unlike prefabricated metal hoods that often look generic, a wooden vent hood becomes a true focal point in your kitchen—one that reflects your personal style and craftsmanship.
**Customization and Design Flexibility**
Wood provides unmatched versatility when you want to update your kitchen aesthetic. You control every dimension, profile, and finish detail to match your exact vision. Whether you’re aiming for chunky farmhouse beams, sleek modern lines, or traditional craftsman detailing, wood adapts to your design goals. You can stain it to highlight natural grain patterns, paint it to match cabinetry, or distress it for vintage appeal—options rarely available with metal alternatives.
**Warmth and Character**
Wood introduces organic warmth that metal simply cannot replicate. In an environment dominated by hard surfaces like stone countertops and tile backsplashes, a wooden hood softens the space while adding texture and visual interest. The natural grain patterns and color variations create depth that makes your range hood feel integrated rather than industrial.
**Cost Considerations**
Building your own wooden vent hood typically costs 40-60% less than purchasing a comparable custom metal hood. Standard lumber and basic woodworking tools keep material expenses manageable, and tool rental services make specialized equipment accessible without major investment. Community reviews from fellow DIYers consistently highlight the budget-friendly nature of wooden hood projects.
**Style Compatibility**
Wooden hoods complement virtually any design direction. They’re natural fits for farmhouse and rustic kitchens but work equally well in transitional spaces. Even contemporary kitchens benefit from the textural contrast wood provides against sleek appliances and minimalist cabinetry, proving wood’s remarkable adaptability across design styles.

Essential Tools and Equipment You’ll Need
Power Tools
Building a wooden vent hood requires several essential power tools to achieve professional results. Before purchasing equipment, consider exploring tool rental options to keep costs manageable for this one-time project.
**Essential Power Tools:**
A **circular saw** is crucial for making straight cuts in dimensional lumber and plywood panels. You’ll use this extensively for cutting the hood frame and exterior panels to size.
A **drill/driver** handles both pilot holes and fastener installation. Opt for a cordless model with at least 18V for adequate power when working with hardwoods.
An **orbital sander** smooths surfaces before finishing. This tool removes mill marks and prepares wood for stain or paint application.
**Optional but Recommended:**
A **pneumatic nail gun** or brad nailer significantly speeds up assembly and provides cleaner results than hand-nailing. Many tool libraries offer these for short-term rental.
A **miter saw** ensures precise angled cuts for trim work, though careful measuring can achieve similar results with a circular saw and guide.
For comprehensive guidance on selecting quality woodworking tools and materials, consider your budget and project timeline when deciding between rental and purchase.
Hand Tools and Safety Gear
Building a wooden vent hood requires basic hand tools you likely already own or can rent affordably. Start with accurate measurements using a quality measuring tape and ensure proper alignment with a 24-inch or longer level—precision here prevents costly mistakes later. Spring clamps (at least four) and bar clamps are essential for holding pieces together during assembly and while glue dries. A carpenter’s square keeps corners true, while a stud finder locates ceiling joists for secure mounting.
For marking and fitting, keep a pencil, combination square, and utility knife handy. Don’t overlook safety gear—this isn’t optional. Safety goggles protect against wood chips and sawdust, especially when using power tools. A dust mask or respirator prevents inhaling fine particles that can irritate lungs. If you’re operating loud equipment, hearing protection preserves your hearing during extended work sessions.
Many DIY enthusiasts find they already have these basics in their toolbox. For specialized items, consider borrowing from community members or exploring rental options to keep your project budget-friendly. Remember, proper safety equipment protects you throughout the build and costs far less than treating an injury.
Materials and Hardware Checklist
Choosing the Right Wood
Selecting the right wood is crucial for both the appearance and longevity of your vent hood. Since range hoods face heat and moisture, choose species that can withstand these conditions while fitting your budget.
**Pine** offers an affordable starting point for beginners, though it’s softer and more prone to dents. It accepts stain well and works great for painted finishes. **Oak** provides excellent durability with distinctive grain patterns—red oak shows bolder grains while white oak offers better moisture resistance, making it ideal for kitchen environments.
**Maple** delivers a smooth, tight grain and superior strength, perfect if you want a clean, contemporary look. It’s harder to work with but resists warping exceptionally well. For moisture-prone areas, consider **poplar** as a budget-friendly option that’s easy to cut and paint, though it’s best sealed properly.
Avoid particleboard or MDF near direct heat sources—these materials can off-gas and deteriorate. Whatever species you choose, ensure boards are kiln-dried (moisture content below 10%) to prevent warping after installation. Many community members report success with 1×6 or 1×8 boards for the hood’s face, while using plywood for unexposed structural components keeps costs down without sacrificing stability.
Ventilation Insert Requirements
The metal insert—also called a liner or range hood insert—is the functional core of your DIY wooden vent hood. This component houses the fan, lights, and grease filters that actually ventilate your cooking area. Your wooden structure serves as the decorative cover that conceals this insert while directing airflow.
When selecting an insert, **CFM (cubic feet per minute) rating** is crucial. This number indicates how much air the fan moves. Calculate your needs by measuring your cooktop width in inches and multiplying by 10. For example, a 30-inch range needs at least 300 CFM. Professional-grade or gas cooktops may require higher ratings.
**Sizing considerations** are straightforward: the insert should be slightly narrower than your wooden hood’s interior dimensions, typically 28-30 inches for standard ranges. Measure your cooktop first, then select an insert that matches its width. Most inserts are designed for under-cabinet or wall-mount installation.
Purchase compatible inserts from home improvement stores, appliance retailers, or online marketplaces. Popular brands include Broan, Cosmo, and ZLINE, with prices ranging from $150-$600 depending on features and power. Check that your chosen model includes mounting brackets and verify whether it’s ducted (vents outside) or ductless (recirculating), as this affects your wooden hood design.
Planning Your Hood Design and Measurements
Before you cut a single board, proper planning ensures your wooden vent hood will fit perfectly and function safely. Start by measuring your range or cooktop width. Your hood should extend at least 3 inches beyond each side of the cooking surface—so for a 30-inch range, plan for a minimum 36-inch wide hood. This overlap ensures effective smoke and steam capture.
Next, determine the mounting height. Building codes typically require 24-30 inches clearance between electric cooktops and the hood bottom, or 30-36 inches for gas ranges. Check your local building codes, as requirements vary by jurisdiction. This isn’t just a suggestion—improper clearance creates fire hazards and may fail inspection.
Consider the hood’s depth projection from the wall. A depth of 18-24 inches works well for most standard ranges, though deeper cooktops need proportionally deeper hoods. The hood should cover at least 75% of your cooktop’s depth for optimal ventilation.
Sketch your design on graph paper, including these key elements: the overall dimensions, the interior cavity where your duct insert will mount, and any decorative trim details. Most DIY wooden hoods feature a simple tapered design—wider at the bottom where it meets the cooking surface, narrowing toward the ceiling or ductwork connection point.
Measure your existing ductwork or plan your new vent route. Standard residential ductwork uses 6-inch or 8-inch diameter pipes. Your wooden hood must accommodate whichever size you’re using, with the duct insert (the internal metal component with the fan) matching accordingly.
Finally, account for weight distribution. A wooden hood can weigh 50-100 pounds or more once completed. Mark wall studs during planning—you’ll need to secure mounting brackets directly into them. If your design extends particularly far from the wall, consider adding decorative support corbels that provide both structural reinforcement and visual appeal.
Take photos of your space and measurements to reference throughout your build—it’s easier than constantly re-measuring.
Step-by-Step Construction Process
Building the Frame Structure
Start by determining your hood’s dimensions based on your cooktop width—plan for the hood to extend at least 3 inches beyond each side of the range. A typical hood depth is 18-24 inches from the wall, with height varying by your ventilation insert specifications.
Cut your frame pieces from 2×4 lumber. You’ll need four vertical studs for the corners, horizontal supports at top and bottom, and cross bracing for stability. For a 36-inch wide hood, cut two vertical pieces to your desired hood height (usually 24-30 inches), plus matching pieces for the sides.
Assemble the rectangular base frame first using 3-inch wood screws, pre-drilling holes to prevent splitting. Check for square by measuring diagonally—both measurements should match. Add cross supports at the top where your ventilation insert will mount, spacing them according to the insert’s mounting bracket requirements.
Mount the frame securely to wall studs using lag bolts or heavy-duty screws. Use a stud finder to locate framing, and ensure the structure is level before final attachment. If your ventilation insert weighs over 50 pounds, reinforce wall connections with additional blocking.
Build the side frames next, creating panels that extend from wall to front. These don’t need to be as robust as the main frame but should provide stable mounting points for your decorative wood panels. Space internal supports every 16 inches for panels thicker than ½ inch.
**Safety tip:** Always wear safety glasses when cutting and drilling, and have a helper steady large frame pieces during assembly.

Adding the Exterior Panels and Trim
With your hood structure complete, it’s time to add the decorative elements that transform a functional box into a stunning focal point. Start by measuring and cutting your exterior panels—typically 3/4-inch plywood or solid wood boards—to fit each side of the hood frame. Apply wood glue to the frame edges and secure panels using a brad nailer, working from the center outward to prevent warping. For seamless joints at corners, consider using pocket hole joinery or miter cuts at 45-degree angles.
Once panels are attached, fill any visible nail holes with wood filler and sand smooth with 120-grit sandpaper. This prepares surfaces for finishing while creating professional-looking transitions between pieces.
Adding trim details elevates your hood’s appearance significantly. Corbels—decorative support brackets—add architectural interest when mounted beneath the hood’s bottom edge. Attach them with construction adhesive and finish nails, ensuring they’re level and evenly spaced. Crown molding along the ceiling junction creates a finished, built-in look. Use a miter saw for precise corner cuts, and remember that coped joints often work better than miters for inside corners.
For the bottom trim where the hood meets your range, apply decorative banding or simple flat molding to conceal any gaps. Many DIYers find that layering different trim profiles creates depth and visual interest. Before final installation, dry-fit all trim pieces to check alignment—this prevents costly mistakes and wasted material. Community feedback consistently emphasizes taking time with trim work, as these details separate amateur projects from professional results.
Installing the Ventilation Insert
With your wooden frame complete, it’s time to install the metal ventilation insert—the heart of your range hood’s functionality. Start by positioning the insert inside the frame, ensuring it sits flush with the bottom edge where it will capture cooking fumes. Most inserts include mounting brackets; secure these to the interior wooden supports using screws rated for at least 150°F to maintain fire safety.
Before finalizing the position, verify clearance requirements. Building codes typically mandate 18-30 inches between the cooktop and vent hood, depending on whether you have a gas or electric range. Check your local regulations to ensure compliance.
Connect the ductwork to the insert’s exhaust port, using aluminum ducting rather than flexible plastic, which poses fire hazards. Seal all joints with foil tape—never use standard duct tape, as it deteriorates under heat. If venting outdoors, ensure the duct run is as straight and short as possible to maximize airflow efficiency. Aim for 400-600 CFM (cubic feet per minute) for adequate ventilation in most kitchens.
Test the fan operation before completing the installation. Listen for unusual vibrations and confirm strong, consistent airflow. Address any rattling by adding rubber gaskets between the insert and wooden frame to dampen noise and vibration.
Electrical Connections and Lighting
Before connecting any electrical components to your wooden vent hood, understand this critical point: **electrical work must be performed by or approved by a licensed electrician**. Building codes require proper permits and professional installation for hardwired appliances, and DIY electrical work can create serious fire and shock hazards.
That said, understanding the basics helps you plan effectively. Most vent hoods require two electrical connections: one for the exhaust fan (typically 120V) and another for integrated lighting. Your electrician will need to install a dedicated circuit with appropriate amperage—usually 15 or 20 amps depending on your fan’s specifications.
Plan your light placement before construction begins, as you’ll need to route wiring through the wooden structure. LED puck lights or strip lighting work well for hoods and generate minimal heat. Position switches at a convenient height, typically 48-52 inches from the floor.
**Safety considerations include:**
– Maintain clearance between wood and heat-generating components
– Use fire-rated materials around light fixtures
– Install a heat shield if lights sit close to the cooktop
– Ensure all connections are properly grounded
Community members consistently recommend mapping electrical runs during the design phase rather than retrofitting later. Share your plans with your electrician early—their input can save significant time and rework.
Finishing and Protecting Your Wooden Hood
Proper finishing protects your wooden vent hood from kitchen hazards while showcasing your craftsmanship. Start with thorough preparation—sand all surfaces progressively using 120-grit, then 180-grit, and finally 220-grit sandpaper. An orbital sander speeds up this process for larger surfaces, but hand-sand edges and details for control. Always sand with the wood grain to avoid visible scratches. Remove all dust with a tack cloth before applying any finish.
**Choosing Your Finish**
Heat-resistant finishes are essential for range hoods. Water-based polyurethane offers excellent moisture and grease protection with minimal odor and quick drying times. Oil-based polyurethane provides deeper protection but requires longer cure times. For stained finishes, apply wood stain evenly with a brush or cloth, wiping away excess within 5-10 minutes. Let stain dry completely (24-48 hours) before sealing.
**Application Technique**
Apply thin, even coats rather than one thick layer—this prevents drips and ensures proper curing. Use a high-quality brush or foam applicator, working in long, smooth strokes. Most projects need three coats minimum, lightly sanding between coats with 320-grit sandpaper once dry. The final coat should cure for at least 72 hours before installation.
**Heat-Resistant Top Coat**
For areas directly above the cooktop, apply a heat-resistant clear coat rated for at least 200°F. These specialized sealers prevent discoloration and warping from rising heat. Some builders recommend marine-grade spar urethane for maximum moisture resistance in high-humidity kitchens.
**Safety Considerations**
Work in a well-ventilated area when applying finishes. Wear protective gloves and a respirator mask, especially with oil-based products. Store oil-soaked rags in water-filled metal containers to prevent spontaneous combustion—a serious fire hazard often overlooked by DIYers.
Installation and Mounting Guidelines
Proper installation is critical for both safety and functionality. Before mounting, locate wall studs using a stud finder—this tool is essential since your hood must attach to solid framing, not just drywall. Mark stud locations with painter’s tape for easy reference.
**Wall-Mounted Installation**
Begin by determining mounting height. Standard practice places the hood bottom 24-30 inches above electric cooktops or 28-36 inches above gas ranges. Mark a level reference line using a 4-foot level to ensure proper alignment.
For wall mounting, install a sturdy ledger board first—a 2×4 secured directly into at least two studs provides excellent support. Use 3-inch wood screws or lag bolts rated for your hood’s weight plus 50% safety margin. This ledger serves as your foundation, bearing most of the hood’s weight.
Position your hood on the ledger and verify it’s level before securing. Drill pilot holes through the hood’s mounting brackets into studs, then drive screws gradually, checking level repeatedly. If studs don’t align with your brackets, use toggle bolts rated for 50 pounds minimum in drywall sections.
**Island Configuration**
Island hoods require ceiling joist attachment. Use a stud finder to locate joists, then install blocking between joists if your hood doesn’t align perfectly. Heavy island hoods may need a support frame built from 2x4s attached to multiple joists. Always verify your ceiling can support the combined weight of the hood, ducting, and mounting hardware.
Regardless of configuration, have a helper support the hood during installation. Test stability by gently pulling forward—there should be zero movement. Take your time with this step; rushing compromises safety.
Maintenance and Long-Term Care
Your wooden vent hood requires regular maintenance to stay beautiful and functional. Clean grease buildup weekly using a degreasing dish soap mixed with warm water—apply with a soft cloth, working in the direction of the wood grain. For stubborn grease spots, create a paste from baking soda and water, let it sit for five minutes, then gently scrub and wipe clean. Avoid harsh chemical cleaners that can damage your finish.
Inspect the protective coating every six months. If you notice the finish becoming dull or water no longer beads on the surface, it’s time to refinish. Lightly sand with 220-grit sandpaper, remove dust thoroughly, and reapply your chosen sealer following manufacturer instructions. Most wood hoods need refinishing every 12-24 months depending on cooking frequency.
Prevent damage by running your range hood fan during and after cooking to reduce moisture and grease accumulation. Check mounting hardware quarterly to ensure everything remains secure—vibrations from the fan can loosen screws over time. Keep an eye on areas near the cooktop for heat discoloration, which indicates inadequate ventilation or clearance issues requiring immediate attention.
Common Mistakes to Avoid
Even experienced DIYers can encounter pitfalls when building wooden vent hoods. Understanding these common mistakes upfront will save you time, money, and frustration.
**Undersizing the ventilation capacity** is perhaps the most critical error. Your insert must match your cooking output—a general rule is 100 CFM per linear foot of range width for standard cooking, more for high-BTU gas ranges. Many builders focus solely on aesthetics and install an underpowered insert that can’t adequately remove smoke and grease. Always verify CFM ratings before purchasing your insert, and consider going slightly larger than minimum requirements.
**Ignoring clearance requirements** poses serious safety risks. Most building codes require 24-30 inches between the cooking surface and combustible materials like wood. Some DIYers mistakenly measure from the hood bottom rather than from the stovetop, creating a fire hazard. Always consult local building codes and manufacturer specifications for your specific insert.
**Inadequate structural support** causes sagging and potential collapse over time. Vent hoods can weigh 50-100 pounds or more, especially when constructed from solid hardwood. Secure your installation to wall studs using appropriately rated lag bolts—never rely on drywall anchors alone.
**Poor finishing choices** lead to rapid deterioration. Standard wood stains and paints aren’t designed for the heat and grease exposure above a range. Use heat-resistant finishes rated for at least 200°F, and apply multiple coats of polyurethane for moisture protection. Test your finish on scrap wood before committing to the entire project.
Cost Breakdown and Budget Tips
Building a DIY wooden vent hood typically costs between $200-$600 for materials, depending on your wood choice and design complexity. Pine or poplar boards offer budget-friendly options at $100-$250, while hardwoods like oak or walnut can reach $400-$500. Add another $50-$100 for hardware, stain, and sealant. In comparison, pre-made wooden hoods start at $800 and often exceed $2,000 for custom sizes.
**Smart Budget Strategies:**
– **Rent instead of buy**: Power tools like miter saws, nail guns, and sanders cost $30-$60 per day to rent versus $150-$400 to purchase—significant savings for one-time projects.
– **Reclaim or repurpose wood**: Check salvage yards or reuse existing cabinets for character-rich materials at fraction of retail costs.
– **Start simple**: Choose straightforward designs without intricate trim work to reduce material waste and construction time.
– **Buy the insert separately**: Purchase a quality range hood insert ($150-$400) independently rather than as part of a pre-made unit.
**Never compromise on**: Proper ventilation components, fire-rated materials near the cooking surface, or professional electrical installation—these ensure safety and code compliance.
Building a DIY wooden vent hood is one of the most rewarding DIY home improvements you can tackle for your kitchen. Not only does it create a stunning focal point, but it also allows you to customize the design to perfectly match your home’s aesthetic while saving significantly on costs.
We’d love to see how your project turned out! Share photos of your finished vent hood and any tips you discovered along the way with our community. Your experience could help fellow DIYers tackle their own builds with confidence.
Remember, if your tool collection doesn’t include everything needed for this project, rental options provide an affordable alternative to purchasing expensive equipment you’ll rarely use. Most specialty tools required for woodworking projects are readily available for short-term hire.
Ready for your next project? Consider exploring other wooden accessories like floating shelves, custom cabinet faces, or decorative trim work to continue transforming your space. Each project builds your skills and adds personalized character to your home.
Related Posts

Post a Comment