

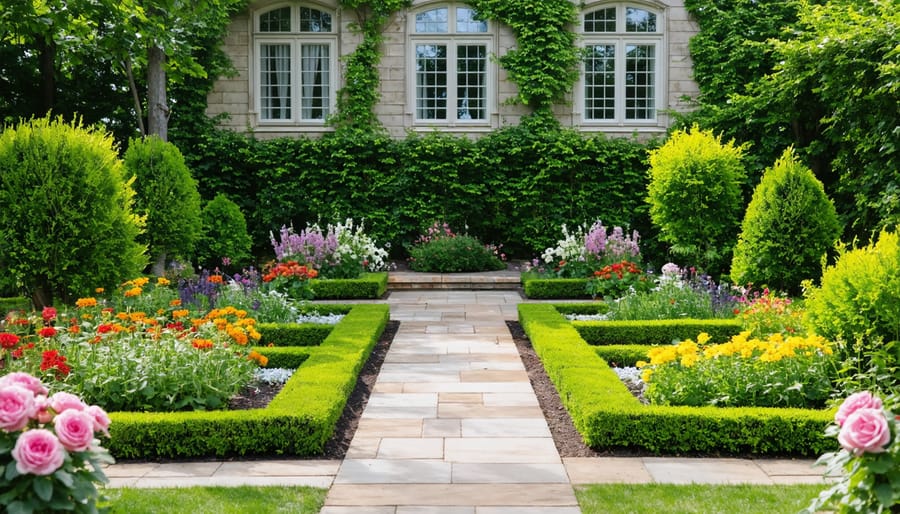
Transform your garden borders with Victorian edging—a timeless approach that combines elegant aesthetics with practical functionality. This decorative technique, popularized during the 1800s, uses materials like rope-top tiles, cast iron, or terracotta to create raised, ornamental boundaries that prevent lawn encroachment while adding distinctive period charm.
Victorian decorative garden edging remains remarkably relevant for modern landscapes, offering both visual impact and low-maintenance durability. Whether you’re restoring a heritage property or simply admiring the formal garden style of the era, understanding the authentic materials and installation methods ensures your project captures that distinctive 19th-century elegance.
The beauty of Victorian edging lies in its versatility—from intricate rope-twist patterns to simple sawtooth designs, there’s a style to complement any garden scheme. With the right tools and proper technique, you can achieve professional-looking results that enhance property value while creating clearly defined garden rooms and pathways. This guide walks you through the historical context, material options, and step-by-step installation process to help you recreate this classic garden feature with confidence.
What Makes Victorian Garden Edging Distinctive
Classic Victorian Materials and Their Modern Equivalents
Victorian gardens traditionally featured distinctive edging materials that defined their formal, elegant character. Understanding these classic options—and their modern counterparts—helps you achieve an authentic period look while working within today’s budgets and availability.
**Cast iron edging** was the premium choice in Victorian times, featuring intricate patterns and exceptional durability. Original cast iron pieces command high prices and require careful installation due to their weight. Modern alternatives include powder-coated aluminum edging that mimics cast iron’s appearance at a fraction of the cost, or heavy-duty resin reproductions that capture period detail without the rust concerns.
**Terracotta rope-top tiles** remain iconic Victorian edging elements, characterized by their twisted rope design along the top edge. Authentic Victorian tiles are still produced by specialist manufacturers, though they’re fragile and relatively expensive. Contemporary frost-resistant terracotta offers improved durability, while concrete versions provide a budget-friendly option that ages beautifully over time.
**Victorian brick edging**, often laid at angles (“dog-tooth” pattern) or on edge, creates striking borders. Reclaimed Victorian bricks deliver authenticity but can be costly. New bricks with aged finishes or traditional clay bricks achieve similar aesthetics affordably.
For DIY installation, you’ll need basic tools like a spirit level, rubber mallet, and measuring tape. Many homeowners find success mixing authentic pieces with quality reproductions—using genuine materials in focal points while extending borders with modern alternatives. Community feedback consistently shows that proper ground preparation matters more than material choice for long-lasting results.
The Victorian Design Philosophy for Garden Borders
Victorian gardeners approached their outdoor spaces with the same precision and formality they brought to interior design. Every element served a purpose, and garden edging was far more than decorative—it was essential infrastructure that defined order and sophistication.
The Victorian era championed what designers called “carpet bedding,” where intricate patterns of colourful plants created living tapestries. These elaborate designs required clear boundaries to maintain their visual impact, making edging absolutely critical. Without proper borders, carefully arranged flowerbeds would lose their geometric precision as plants spread and merged together.
Edging created distinct “garden rooms,” separating formal areas from service spaces, pathways from planting beds, and lawn from border. This structured approach reflected Victorian values of organisation and social hierarchy—even gardens had clearly defined zones and purposes. The edging itself often featured ornate patterns and details that complemented the home’s architecture.
Professional Victorian gardeners understood that proper edging also served practical functions: preventing grass encroachment, managing water drainage, and reducing maintenance time. These same principles apply to modern landscaping ideas, making Victorian-style borders both historically authentic and functionally sound for today’s homeowners.
Popular Victorian Edging Styles You Can Install Yourself
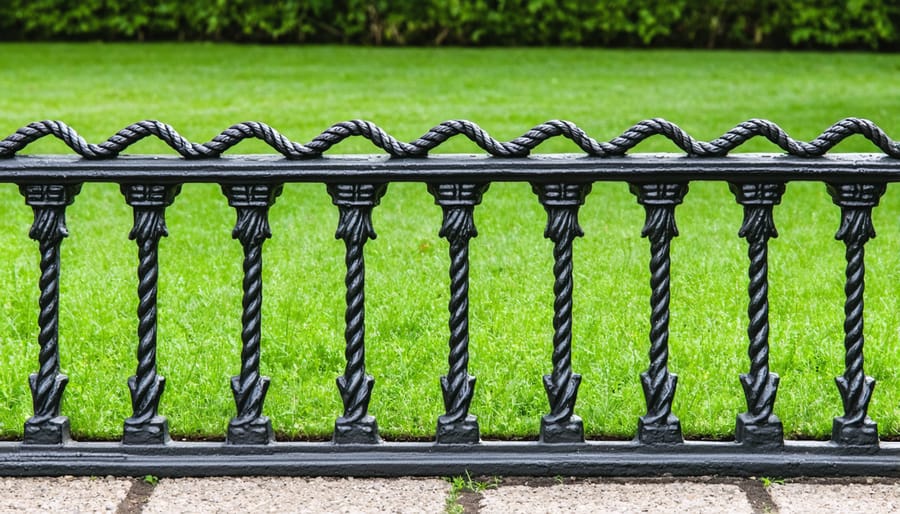
Rope-Top Tile Edging
Rope-top tiles are the quintessential Victorian garden edging, featuring their distinctive scalloped pattern that mimics twisted rope. These terracotta or clay tiles instantly add period authenticity to any garden border.
**Sourcing Materials**
Original Victorian rope-top tiles occasionally appear at architectural salvage yards, though expect to pay premium prices. Fortunately, several UK manufacturers produce faithful reproductions that are more affordable and consistent in quality. You’ll typically need 8-10 tiles per metre of edging. Check community reviews before purchasing, as quality varies significantly between suppliers—many DIYers recommend comparing thickness and finish details.
**Installation Steps**
First, mark your border line using string and stakes, ensuring gentle curves rather than sharp angles to suit the tiles’ shape. Dig a trench approximately 15cm deep and 10cm wide. Create a 5cm sand base for drainage and levelling.
Position tiles at a 45-degree angle, overlapping the scalloped edges by roughly 2cm. This creates the classic wave effect. Backfill both sides with soil, tamping firmly to secure each tile. The rope pattern should sit 5-8cm above ground level.
For curved borders, adjust the overlap slightly—tighter overlaps for sharper curves. Always step back periodically to check alignment, as corrections become difficult once backfilled.
Cast Iron and Decorative Metal Borders
Cast iron and decorative metal borders deliver an authentic Victorian look with their intricate patterns and substantial presence. These ornate edging pieces feature scrollwork, floral motifs, and geometric designs that instantly elevate garden formality.
When sourcing materials, check architectural salvage yards and antique dealers for genuine Victorian pieces—though expect to pay premium prices. Reproduction cast iron edging offers an affordable alternative, with modern manufacturers creating faithful copies of period designs. Online marketplaces and specialty garden suppliers stock various styles, from simple Gothic arches to elaborate acanthus leaf patterns.
**Installation Tips:**
Before installing, clear a level trench approximately 4-6 inches deep along your border line. Cast iron is heavy, so plan for assistance with longer sections.
Set pieces into a concrete base for stability—this prevents frost heave and ensures longevity. Mix concrete to a firm consistency and bed each section, checking alignment with a spirit level. Allow 48 hours for the concrete to cure before backfilling.
**Safety Note:** Always wear heavy-duty gloves when handling cast iron, as edges can be sharp and the material is unforgiving if dropped.
Many DIYers recommend connecting adjacent pieces with galvanized wire or metal brackets for additional security, particularly in high-traffic areas.
Brick on Edge (Soldier Course) Technique
The soldier course method remains the most iconic Victorian edging technique, featuring bricks stood vertically on their narrow edge to create a distinctive sawtooth profile. This arrangement typically elevates the brick 6-8 inches above ground level, establishing clear definition between lawn and planted borders.
**Pattern Variations**
While straight soldier courses are traditional, you can alternate brick heights or create gentle curves for added visual interest. Some Victorian gardens featured diagonal placements at 45-degree angles for decorative corners.
**Installation Methods**
*Sand-set approach*: Excavate a trench 4-5 inches deep, add compacted sand, and position bricks tightly together. This method allows easier adjustments but requires occasional maintenance as bricks may shift over time.
*Mortar-set approach*: Dig deeper (6-7 inches) and lay a concrete footing. Mortar between bricks creates permanent, stable edging ideal for sloped areas or high-traffic zones. This technique demands more skill but delivers professional results lasting decades.
According to community feedback, beginners often succeed with sand-set installations for straight runs, whilst mortar proves essential for curved designs. Both methods benefit from using a spirit level and string line to maintain consistent height and alignment throughout your border.
Stone and Terracotta Roll-Top Edging
Roll-top edging pieces feature distinctively rounded upper edges that soften garden borders while maintaining Victorian formality. These pre-formed terracotta or stone sections traditionally measure 6-9 inches tall and interlock to create continuous, elegant curves or straight lines. Installation requires digging a narrow trench to half the edging height, ensuring level placement by using a spirit level and rubber mallet. Backfill with soil on both sides, tamping firmly to secure. The rounded profile prevents chipping and creates shadow lines that enhance visual depth—a hallmark of period garden design that works beautifully along lawn edges, flower beds, and pathway borders.
Tools and Equipment You’ll Need for Victorian Edging Installation
Essential Hand Tools and Small Equipment
Creating authentic Victorian edging requires a straightforward toolkit that most DIYers can easily hire or purchase. The essential hand tools include:
- Sharp spade for cutting precise lines
- Half-moon edging tool for clean trenches
- Spirit level (minimum 1 metre) for proper alignment
- Rubber mallet for gentle tapping without damage
- Measuring tape and pegs for layout
- Garden line or string for maintaining straight edges
- Wheelbarrow for transporting materials
- Tamping tool or wooden post for compacting soil
The cleaner your initial cut, the more professional your finished edge will appear. A spirit level is particularly crucial for Victorian aesthetics where symmetry and precision matter greatly.
Never use a hammer directly on decorative stones or tiles. A rubber mallet protects your materials while providing the force needed to seat them properly. For marking out curves, which feature prominently in Victorian designs, garden marking paint proves invaluable.
A pointing trowel handles mortar work if you’re securing tiles or bricks, while a garden rake prepares the trench base for compaction. Many tool hire centres offer these items individually or as garden project kits, making Victorian edging projects accessible without significant upfront investment in 2026.
Power Tools and Heavy Equipment Worth Hiring
Installing Victorian edging requires some heavy-duty equipment that’s rarely needed for other projects, making hiring the smart choice. A **plate compactor** is essential for creating a stable base—it firmly compacts your sub-base material, preventing future settling and uneven edging. For cutting intricate Victorian patterns or trimming rope-top edging to precise lengths, a **wet saw** delivers clean, professional cuts while minimizing dust and preventing cracks in delicate ornamental pieces.
If you’re setting edging in concrete for maximum stability (recommended for sloped gardens), hiring a **concrete mixer** saves hours of manual labor and ensures consistent mix quality. These machines are available for daily or weekend hire at reasonable rates, and most suppliers provide basic operating instructions. According to community feedback, hiring these tools typically costs less than purchasing them, especially for one-off projects, while ensuring you have professional-grade equipment for optimal results.
Safety Equipment and Protective Gear
Installing Victorian edging requires proper protective equipment to keep you safe while handling heavy materials and power tools. Always wear thick work gloves when lifting cast iron or stone edging—these pieces can weigh 5-15kg each and often have sharp edges. Safety boots with steel toe caps protect your feet from dropped materials during installation.
Eye protection is essential when cutting metal or stone edging to size, as fragments can fly unpredictably. A dust mask prevents inhalation of stone dust and cement particles during ground preparation and mortar mixing. When using power tools like angle grinders or concrete saws, add hearing protection to your safety kit.
Knee pads provide crucial comfort during the prolonged kneeling required for precise edging placement and leveling. Many DIYers in our community recommend investing in quality pads, as you’ll be spending considerable time at ground level ensuring each piece sits perfectly flush. For deeper excavation work, consider back support braces to prevent strain when digging trenches for your edging foundation.
Step-by-Step Installation Guide for Victorian Garden Edging
Planning Your Layout and Taking Measurements
Before purchasing materials or hiring tools, invest time in careful planning to ensure professional results. Start by using a garden hose or rope to outline your proposed edging path—this flexible method lets you visualize curves and adjust the design before committing. Walk around your layout from multiple angles to confirm it complements your garden’s proportions and existing features.
Once satisfied, measure the total linear length of your edging path using a measuring tape. Add 10% extra to account for cutting waste and potential errors—a lesson many DIYers learn the hard way! Mark your boundaries with wooden stakes and string line for straight sections, or spray marking paint for curved areas. This creates a clear guide for excavation.
Calculate material quantities by dividing your total length by the size of individual edging pieces. Document your measurements and create a simple sketch noting any slopes or challenging areas. Many community members recommend photographing your marked layout from different angles—this visual reference proves invaluable when questions arise mid-project. Proper planning now prevents costly material shortages and ensures your Victorian edging installation proceeds smoothly.
Preparing the Ground and Creating a Solid Base
Proper ground preparation is essential for Victorian edging that stands the test of time. The Victorian trench method, named for the precision trench work common in period garden construction, ensures your edging remains stable and level for years to come.
Follow these steps to prepare your trench foundation:
- Mark out your border line using string stretched between wooden pegs, ensuring smooth curves and straight lines as your design requires.
- Excavate a trench 4-6 inches deep and approximately 6 inches wide along the marked line, using a garden spade to create clean, vertical sides.
- Compact the trench base firmly with a hand tamper or the back of your spade to prevent future settling.
- Add a 1-2 inch layer of sharp sand or crushed stone as your foundation layer, which allows for drainage while providing stability.
- Level and compact the base layer, wetting the sand slightly to help it settle and bind together.
- Check levels along the entire length with a spirit level, adjusting as needed before placing any edging materials.
Even Victorian designs often featured slight variations, but maintaining a consistent trench depth prevents unsightly dips or raised sections that compromise the authentic appearance. Check for levelness regularly during excavation rather than trying to correct everything at the end.
Community feedback consistently emphasizes taking time at this stage; a rushed foundation leads to misaligned edging that’s difficult to correct later. For larger projects, consider hiring a plate compactor to ensure professional-grade compaction and longevity.
Installing Your Chosen Victorian Edging Material
Start by preparing your trench according to the depth requirements of your chosen edging material—typically 3-4 inches for rope-top or scalloped designs. Spread a 1-inch sand base to create a stable, level foundation.
Begin installation at a straight section rather than a corner. Place your first piece and use a spirit level to check both horizontal alignment and vertical positioning. Tap pieces gently into place with a rubber mallet, never a metal hammer which can cause chipping or cracking.
For consistent height, string a guide line along your border route at the desired finished height. This simple trick, recommended by numerous DIY community members, prevents the common “wavy edge” problem that plagues first-time installers.
When approaching corners, Victorian edging typically requires cutting pieces at 45-degree angles using an angle grinder with a masonry blade—remember your safety goggles and dust mask. For curves, space pieces slightly apart on the outer edge, allowing the design to follow your garden’s contours naturally.
Backfill both sides of the edging with soil, tamping firmly to lock pieces in position. User feedback consistently emphasizes patience here—rushing this step compromises long-term stability and alignment.

Backfilling and Finishing Touches
Once your Victorian edging is positioned, backfilling is crucial for stability. Using a garden spade or shovel, carefully pack soil against the back of the edging—the lawn side—tamping it down firmly to eliminate air pockets. This creates the structural support needed to keep your decorative border straight and secure over time.
On the garden bed side, add topsoil or compost to cover any exposed base, creating a seamless transition. Many DIY enthusiasts recommend creating a slight slope away from the edging to improve drainage and prevent water pooling.
Walk the entire length, checking for inconsistencies in height and alignment. Make adjustments now while the soil is workable. Use a spirit level to verify straight runs and correct any sections that have shifted during backfilling.
Finally, water the backfilled areas lightly to help settle the soil naturally. Community feedback consistently highlights this step as essential—it reveals any settling issues before they become permanent problems, allowing you to add more fill material where needed for that crisp, professional Victorian finish.
Maintenance Tips to Keep Your Victorian Edging Looking Pristine
Regular maintenance keeps your Victorian edging looking sharp and extends its lifespan significantly. The care required depends on your chosen material, but a few universal practices apply across the board.
Key Takeaway: Annual inspections combined with material-specific care, rust prevention for iron, repointing for brick, sealant for terracotta, will extend your Victorian edging lifespan by decades while preserving its authentic period appearance.
For terracotta and ceramic edging, inspect joints annually for frost damage or shifting. Clean accumulated dirt and algae using a stiff brush and mild detergent solution, avoid pressure washers as they can erode mortar. Community feedback suggests applying a breathable sealant every 2-3 years to reduce moisture absorption and prevent winter cracking.
Cast iron edging needs annual rust checks, particularly at ground level where moisture collects. Wire brush any rust spots, treat with rust converter, and repaint with metal-specific outdoor paint. Many DIY enthusiasts recommend applying a protective wax coating before winter to repel moisture.
Stone and concrete edging requires the least intensive care. Remove weeds from joints promptly before roots cause displacement. Reset any loose pieces immediately using fresh mortar or sand, as gaps worsen quickly during freeze-thaw cycles.
Brick edging benefits from repointing every 5-7 years. Watch for efflorescence (white salt deposits), which indicates moisture issues requiring improved drainage.
Seasonal tasks matter too: clear debris buildup in autumn, check for frost heave after winter, and trim back encroaching grass in spring. Following proper landscaping maintenance practices ensures your Victorian edging remains a stunning garden feature for decades.
For repairs beyond basic maintenance, hire appropriate tools like angle grinders for cutting or mixing equipment for mortar work rather than purchasing rarely-used specialist equipment.
Cost Considerations and Where to Source Materials
Victorian edging projects can range from budget-friendly to premium investment, depending on your chosen materials and approach. Authentic reclaimed Victorian rope-top tiles typically cost £15-30 per linear metre from architectural salvage yards, while reproduction terracotta or cast concrete alternatives run £8-18 per metre from garden centres and online specialists. Natural stone copings sit at the higher end (£25-50 per metre), whereas simple brick edging offers excellent value at £5-12 per metre.
**Where to Source Materials:**
Architectural salvage yards remain goldmines for authentic Victorian pieces, though availability varies. Check local community marketplaces and estate sales for reclaimed materials at fraction of retail costs. For reproductions, specialist suppliers like Haddonstone and period garden retailers stock historically accurate designs. Standard DIY stores carry suitable alternatives including Victorian-style rope edging and decorative kerbs that capture the aesthetic at lower price points.
**Money-Saving Tips:**
Mix authentic statement pieces with reproduction materials—use reclaimed tiles at focal points and reproductions elsewhere. Consider second-choice or slightly damaged items for significant discounts, particularly for pieces that’ll be partially buried. Joining community forums often reveals where members found bargains or have surplus materials to sell.
Plan quantities carefully using precise measurements to avoid costly over-ordering. Hiring specialist cutting tools rather than purchasing them outright substantially reduces project costs, especially for one-off installations requiring diamond-blade masonry saws or plate compactors for proper bedding.
Victorian garden edging brings timeless elegance and structure to any outdoor space, transforming ordinary borders into statements of classic design. Whether you’re drawn to intricate rope-top tiles, sturdy brick patterns, or decorative cast iron finishes, there’s a Victorian edging style to complement every garden aesthetic and skill level.
Start with simpler designs if you’re new to garden projects—straight brick or stone edging provides authentic Victorian charm without complex installation. More experienced DIYers can tackle ornate terracotta or metal options that require precision cutting and placement.
Remember, the right tools make all the difference between frustration and satisfaction. Rather than purchasing expensive equipment for a one-time project, explore tool hire options that give you professional-grade machinery without the investment. Angle grinders, plate compactors, and concrete mixers are readily available to rent, making your Victorian edging project both manageable and affordable.
By choosing materials and techniques that match your confidence level while utilizing accessible tool rental services, you’ll create garden borders that honour Victorian tradition for years to come.
Related Posts
Post a Comment