
Position your bike storage where drainage naturally flows away from the unit, preventing water pooling that accelerates rust and component degradation. Ground-mounted solutions like horizontal bike sheds require level, well-drained surfaces, while wall-mounted brackets need secure fixing into masonry or solid timber studs capable of bearing 25kg per bike minimum.
Choose storage that matches your security priority level: properties in high-theft areas demand ground-anchored units with reinforced locking mechanisms and space for D-locks through frames and wheels, whilst low-risk locations can prioritize weather protection with tarpaulin covers or basic wooden shelters. Survey data from cycling communities shows that visible, well-lit storage deters opportunistic theft more effectively than hidden solutions.
Measure your available space against bike dimensions before purchasing, accounting for handlebar width (typically 60-70cm) and the clearance needed to maneuver bikes in and out comfortably. Vertical storage racks maximize narrow spaces but require upper body strength for daily use, making them less suitable for heavier e-bikes or users with mobility considerations.
Consider ventilation requirements to prevent condensation damage, particularly for enclosed storage units. Metal sheds need ventilation grilles positioned at both high and low points to create airflow, whilst fabric covers should never seal completely at ground level. User reviews consistently highlight mold and component corrosion as the primary failure point in poorly ventilated outdoor storage, even when bikes remain dry during rain.
Why Proper Bike Storage Matters More Than You Think
Leaving your bike exposed to the elements isn’t just inconvenient—it’s costly. Without proper protection, Australian weather takes a serious toll on bike components. Rain and humidity cause rust on chains, gears, and bolts, while intense UV radiation degrades rubber tires, handlebar grips, and saddles. Even a few months of outdoor exposure can lead to seized brake cables and corroded derailers, potentially costing hundreds in repairs.
Security poses another significant concern. Bikes left unsecured or poorly stored are prime targets for opportunistic theft. According to community feedback, an unlocked bike in plain view rarely lasts more than a few weeks in many suburban areas. Beyond theft, inadequate storage often means bikes get knocked over, scratched by garden tools, or damaged by falling debris during storms.
There’s also the aesthetic factor. A neglected bike leaning against your house or lying in the garden doesn’t contribute to an appealing outdoor space. If you’re investing time in backyard renovation tips and improvements, proper bike storage should be part of that plan.
Most importantly, quality storage protects your investment. A well-maintained bike retains significantly more resale value—some users report losing 40-50% of value within two years due to weather damage alone. Proper storage solutions might seem like an upfront expense, but they prevent far costlier repairs and replacements down the track while keeping your outdoor areas organized and visually appealing.
Assessing Your Space and Storage Needs
How Many Bikes Do You Actually Need to Store?
Before choosing a storage solution, take a proper inventory of what you’re actually storing. Start by counting your current bikes – include adult bikes, children’s bikes, and any speciality bikes like folding or cargo models. Don’t forget the bikes gathering dust in the garage that you might want back in rotation.
Think beyond today’s needs. If you have young children, their bikes will need replacing as they grow, and you might keep the smaller ones for younger siblings or guests. Many families find they need space for at least two extra bikes beyond their current collection.
Consider your social situation too. Do friends or extended family visit regularly and bring bikes? Will you host cycling guests? Some homeowners plan for peak capacity – that summer weekend when everyone’s round – rather than everyday use.
Factor in any planned purchases. If you’re eyeing an electric bike or planning to take up mountain biking, build that into your count now. It’s more cost-effective to buy the right-sized storage initially than to upgrade later when you’ve outgrown a compact solution.
Measuring Your Available Garden Space
Before investing in any storage solution, accurately measuring your garden space prevents costly mistakes and ensures proper bike access. Start by measuring the footprint where you plan to position your storage, noting the length and width in centimetres. Don’t forget to measure the height available, especially important if you’re storing bikes under eaves or near fences.
Next, consider clearance zones. Allow at least 60cm in front of your storage for comfortable bike removal and loading. If you’re planning a wall-mounted solution, measure how far the bikes will protrude when hung, adding an extra 30cm for manoeuvring space.
Map out your access path from the storage location to where you’ll actually use your bikes. This route should be at least 90cm wide to wheel bikes through comfortably without scraping garden features or plants. Mark any obstacles like bins, planters, or garden furniture that might create bottlenecks.
Finally, check local planning restrictions before committing. Most garden storage under 2.5 metres high doesn’t require planning permission, but rules vary by location and proximity to boundaries. If you’re in a conservation area or have a listed property, contact your local council first. Taking photos of your measured space helps when discussing options with suppliers or browsing solutions online.
Outdoor Bike Storage Solutions Ranked by Budget
Budget-Friendly Options (Under £100)
Protecting your bike doesn’t require breaking the bank. Several effective solutions cost under £100 and can be installed with basic tools most homeowners already have.
Bike covers offer the simplest protection, starting from £15. Look for waterproof, UV-resistant materials with ventilation panels to prevent moisture buildup. These work well for short-term storage but won’t deter determined thieves. Choose covers with drawstring bases and reinforced grommets for longevity.
Wall-mounted racks (£25-£60) maximize space efficiency in sheds or under carports. You’ll need a drill, spirit level, and appropriate fixings for your wall type. Masonry walls require a hammer drill and wall plugs, while wooden structures need sturdy wood screws. Most racks support 20-30kg, sufficient for standard bikes.
For those tackling DIY garden projects, pallet bike racks cost virtually nothing. Sand the pallets thoroughly, treat with exterior wood preservative, and secure them vertically to create leaning slots. You’ll need a sander (hire for £15/day), saw, and exterior screws.
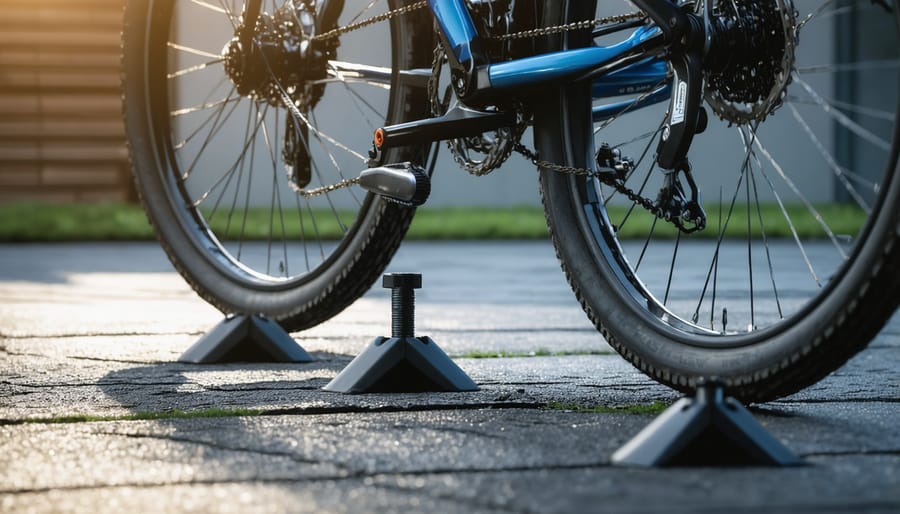
Ground anchors (£20-£50) provide excellent theft deterrence. Installation requires a heavy-duty drill, masonry bit, and spanner. Choose hardened steel anchors rated Sold Secure for insurance compliance. Install in concrete foundations for maximum security, positioning them to allow your D-lock to secure both frame and wheels. Always wear safety goggles when drilling masonry and check for underground cables before starting.
Mid-Range Solutions (£100-£500)
Stepping up from basic covers, this price bracket offers solid protection with structures that significantly extend your bike’s lifespan. You’ll find options here that balance durability with reasonable investment, typically lasting 5-10 years with proper maintenance.
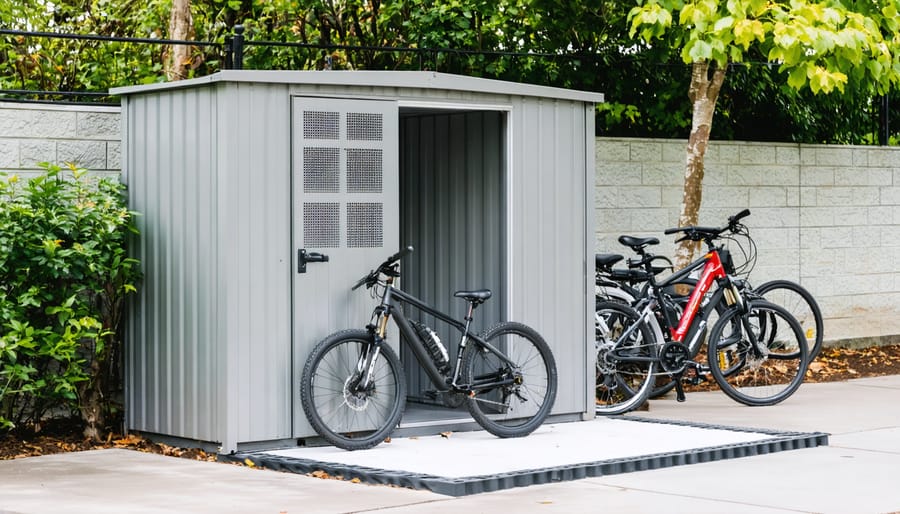
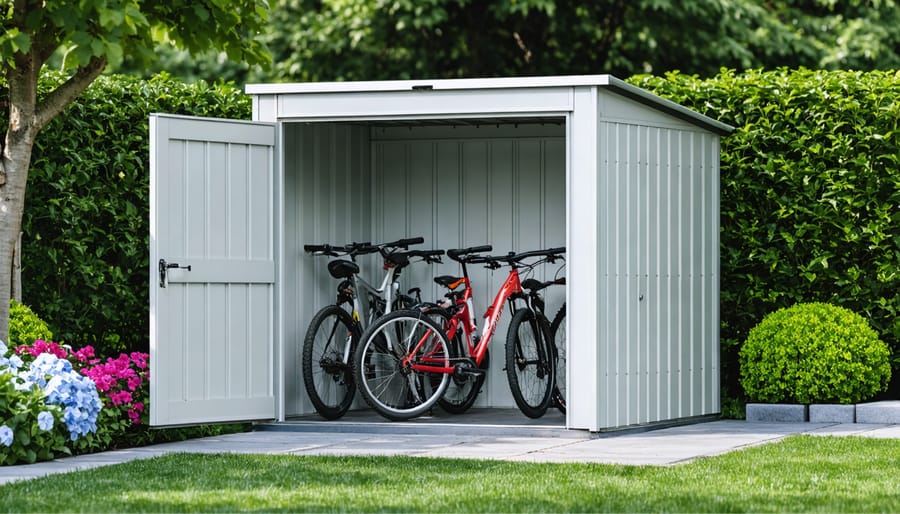
Bike sheds are the most robust choice in this range, usually constructed from metal or resin materials. Most models accommodate 2-4 bikes and provide weatherproof storage with lockable doors. The garden shed benefits apply equally to dedicated bike storage, keeping your machines dry and reducing rust significantly. Assembly typically requires 2-3 hours with basic tools like screwdrivers, spanners, and a drill. Concrete foundation slabs aren’t always essential, but level ground prevents water pooling.
Storage tents offer a portable alternative, featuring waterproof fabric over steel frames. They’re lighter to assemble than sheds, taking roughly 90 minutes, and work well if you’re renting or might relocate. The trade-off is reduced security and a shorter lifespan of 3-5 years before fabric deterioration requires replacement.
Lean-to shelters maximize space against existing walls or fences, ideal for narrow gardens. They provide overhead protection while maintaining easy access. Most come flat-packed with illustrated instructions suitable for confident DIYers.
Vertical storage systems in this price range include wall-mounted racks and freestanding towers that hold bikes upright or suspended. They’re excellent space-savers for compact areas and typically install in under an hour using masonry bits and fixings.
Community feedback consistently highlights that proper assembly is crucial. Users recommend checking fixings every six months and applying protective treatments annually to metal components. Taking time during initial setup prevents costly repairs later.
Premium Storage Systems (£500+)
When you’re investing £500 or more in bike storage, you’re looking at premium solutions that offer exceptional security, weather protection, and longevity. These systems make sense if you own high-value bikes, multiple bicycles, or e-bikes requiring charging capabilities.
Custom bike sheds represent the top tier of outdoor storage. Built from quality timber with reinforced frames, these structures typically cost £800-£2,000 depending on capacity. They offer walk-in access, ventilation systems to prevent condensation, and integrated shelving for helmets and accessories. Many homeowners appreciate that these sheds blend seamlessly with garden aesthetics while providing genuine security with solid wall construction and quality locks. User feedback consistently highlights how these eliminate the hassle of wrestling bikes in and out of cramped spaces.
Secure bike lockers (£500-£1,200) provide individual compartments with commercial-grade locking mechanisms. These steel or reinforced composite units suit households with multiple cyclists, as each person gets dedicated space. The weatherproof seals rival indoor storage quality, keeping bikes pristine year-round.
Integrated garden storage units (£600-£1,500) combine bike storage with general garden storage in one attractive package. These modular systems let you reconfigure internal layouts as needs change, making them excellent value for adaptable households.
For e-bike owners, charging-enabled storage adds £200-£400 to costs but eliminates the need to bring heavy bikes indoors. These systems include weatherproof electrical outlets and cable management.
Cost-benefit analysis: While the upfront investment is substantial, premium storage protects bikes worth thousands from theft and weather damage. Many users report these solutions lasting 15-plus years, working out to around £50 annually. If you’re storing bikes valued over £1,000 or own three or more bicycles, the investment typically pays for itself through extended bike lifespan and avoided replacement costs.
Space-Saving Vertical and Wall-Mounted Systems
When garden space is tight, vertical storage transforms your available area by using height rather than footprint. These systems are particularly valuable for terraced houses, small patios, or shared outdoor spaces where every square metre counts.
Pulley-based ceiling systems offer the most dramatic space savings, lifting bikes completely overhead. These typically comprise rope or cable mechanisms with locking carabiner clips and weight limits around 20kg per bike. Installation difficulty: moderate to challenging. You’ll need to locate ceiling joists or use specialist fixings for concrete overheads. The main challenge is ensuring secure anchor points that can handle dynamic loads. Many DIY enthusiasts find this manageable with a decent drill and stud finder, though professional installation might be worthwhile for peace of mind.
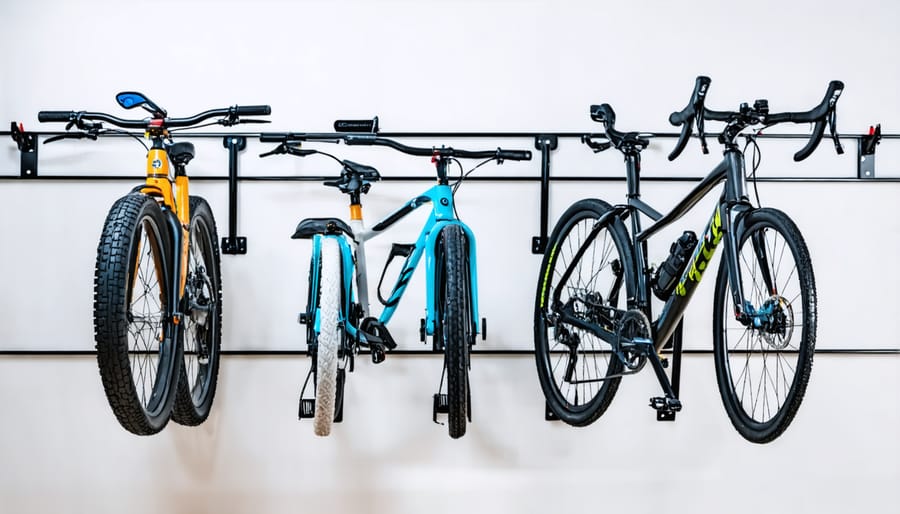
Wall-mounted horizontal racks present an easier installation option, rated as beginner-friendly. These hold bikes by one or both wheels, extending them perpendicular to the wall. Space requirement: approximately 60cm projection per bike. The key is mounting into solid masonry or wall studs, never just plasterboard. Use appropriate fixings for your wall type and always test weight capacity before trusting your bike to the system.
Folding wall racks provide flexibility, swinging flat when not in use to restore walkway space. Installation difficulty: beginner to moderate. These require slightly more robust fixings due to the leverage forces when extended, but most come with comprehensive fitting instructions and templates.
Community feedback consistently highlights that proper installation matters more than system cost. Taking time to locate solid fixing points prevents the frustration and potential damage of failed mountings.
Essential Features to Look For
Security Features That Actually Work
The most effective bike security starts with a sold secure diamond-rated D-lock paired with a secondary cable lock for wheels and accessories. According to extensive user reviews, the combination approach defeats most opportunistic theft attempts. Look for locks with 16mm hardened steel shackles as a minimum – anything thinner becomes vulnerable to bolt cutters.
Ground anchors represent your strongest deterrent when properly installed. Concrete-mounted anchors rated to withstand 3 tonnes of pull force provide peace of mind, though installation requires hiring a rotary hammer drill if you don’t own one. Position anchors in well-lit areas visible from windows to maximize their deterrent effect.
Motion-activated alarms have received surprisingly positive feedback from the cycling community, particularly 110-decibel models that alert neighbours to tampering. Some users combine these with smart security cameras, creating multiple layers of protection without significant ongoing costs.
Cover your bikes completely when stored – visible expensive components attract attention. Simple strategies like removing quick-release saddles overnight and storing them indoors eliminate easy targets. Community feedback consistently emphasizes that layered security works best: multiple locks of different types, visible anchoring systems, and environmental awareness all contribute to keeping your bikes secure. The key takeaway from user experiences? Make your bikes harder to steal than your neighbour’s.
Weather Protection: What Your Bikes Really Need
UK weather demands robust protection for outdoor bike storage. Look for solutions with an IPX4 waterproofing rating at minimum, which means protection against splashing water from all directions. Higher-rated covers (IPX5 or IPX6) handle heavier rainfall and hosepipe cleaning.
UV protection is equally crucial. British summers may seem mild, but UV rays degrade plastics, fade paint, and perish rubber components. Choose covers or storage units with UV-stabilised materials, typically indicated by a UV50+ rating. This extends the life of both your bikes and the storage solution itself.
Condensation is often overlooked but causes significant damage in our damp climate. Sealed storage without ventilation traps moisture against metal frames, causing rust within months. Select storage with built-in vents or breathable fabric panels that allow air circulation whilst blocking rain.
Material durability matters year-round. Polyester covers with PVC backing resist tearing in wind, whilst metal or resin sheds withstand temperature fluctuations better than basic tarpaulins. Consider warranties as indicators of real-world durability. Community reviews often highlight which products survive multiple British winters versus those requiring replacement within a single season.
DIY Installation Guide for Common Storage Solutions
Tools You’ll Need (And Which Ones to Hire)
Most outdoor bike storage installations require just a few essential tools. For basic shed or bike cover assembly, you’ll need a cordless drill with both drill and screwdriver bits, a spirit level, and a measuring tape. These are worth owning if you’re a regular DIYer, with quality cordless drills available from £60 upwards.
For ground anchor installation, you’ll need masonry drill bits (8-12mm depending on anchor size), a hammer, and potentially a heavier-duty drill. If you’re installing multiple anchors or working with concrete, hiring an SDS drill makes sense at around £20-30 per day rather than buying one for occasional use.
Wall-mounted solutions require wall plugs, appropriate anchors for your wall type (masonry anchors differ from brick), and a stud finder if mounting to wooden structures. A post hole digger is essential for freestanding sheds but definitely worth hiring at £15-20 daily rather than purchasing.
Safety equipment shouldn’t be overlooked: wear safety glasses when drilling and gloves when handling metal anchors. Many community members report that investing in a quality drill pays off long-term, while specialist tools like post diggers and SDS drills are perfect candidates for hiring.
Foundation and Base Preparation
A solid foundation prevents your bike storage from shifting, sinking, or collecting water that could damage your bikes. Start by assessing your chosen location’s drainage. Water should naturally flow away from the storage area, not pool around it.
For lightweight bike stands, a compacted gravel base works brilliantly. Remove turf and topsoil to a depth of 100mm, then fill with 75mm of gravel topped with 25mm of sharp sand. Compact each layer using a tamper or plate compactor, which you can hire affordably for a day’s work. This permeable base allows water to drain through whilst providing stability.
Heavier structures like sheds require concrete paving slabs or a concrete pad. Lay slabs on the same gravel and sand foundation, checking they’re perfectly level with a spirit level. For permanent installations, consider a full concrete base 100mm thick with reinforcing mesh.
Prevent moisture rising into wooden structures by adding a damp-proof membrane beneath the base. Apply weed-suppressing fabric under gravel bases to reduce maintenance.
Community feedback consistently highlights drainage as critical. Users report that even slight slopes away from storage areas prevent rust and component deterioration. Taking time with foundation preparation saves money and frustration long-term.
Safety Tips for DIY Installation
Before installing any outdoor bike storage, prioritize safety to prevent injuries and property damage. When working at height to mount wall brackets or overhead systems, always use a stable ladder with someone footing it for you. Never overreach, and ensure your ladder is placed on level ground away from power lines.
Heavy storage units like metal sheds or large bike racks require at least two people to lift and position safely. Attempting to maneuver these alone risks back injury and crushed fingers. When drilling into walls, use a cable detector to avoid hidden electrical wiring and water pipes, which could cause electrocution or flooding.
For storage solutions with lighting, ensure all electrical installations follow local building codes. Use outdoor-rated fixtures and consider hiring a qualified electrician for permanent wiring. Ground-mounted anchors and concrete bases need proper curing time before bearing weight, typically 48-72 hours.
Always wear appropriate personal protective equipment including safety glasses when drilling, work gloves when handling sharp edges, and steel-toed boots when moving heavy items. Read all manufacturer instructions thoroughly before beginning installation, and don’t hesitate to seek professional help for complex projects.
Maintenance Tips to Extend Your Storage Life
Regular maintenance keeps your bike storage solution functioning properly and extends its lifespan significantly. Whether you’ve invested in a bike shed, wall mount, or cover system, following a simple maintenance schedule protects your investment.
For shed and cabinet storage, inspect the structure quarterly for damage or wear. Check roof seals and reapply weatherproofing treatment annually, especially before winter. Tighten loose hinges and hardware, and lubricate locks with graphite powder rather than oil, which attracts dirt. Clean gutters if fitted and ensure drainage channels remain clear to prevent water pooling.
Wall-mounted systems require monthly visual checks for bracket security. Test weight-bearing bolts every three months, especially in coastal areas where salt air accelerates corrosion. Wipe down metal components with a dry cloth to remove moisture and apply rust-prevention spray twice yearly.
Bike covers need washing every two months with mild soap to remove dirt and mildew. Reapply waterproofing spray after each wash, as detergent strips protective coatings. Inspect for tears or worn elastic straps that compromise weather protection.
Ground anchor maintenance involves clearing debris from locking mechanisms monthly. Apply marine-grade lubricant to locks and chains quarterly to prevent seizure. Check concrete surrounds for cracks that might weaken anchor security.
Create a seasonal checklist that includes inspecting all fasteners, cleaning surfaces, checking weather seals, and testing locks. This proactive approach, similar to practices outlined in our outdoor maintenance guide, prevents minor issues becoming costly repairs. Document maintenance dates to establish patterns and predict when components need replacement, typically every five to seven years for quality storage systems.
Real User Experiences: What Actually Works
When we surveyed homeowners and cycling enthusiasts about their outdoor bike storage choices, several clear patterns emerged that might surprise you.
The standout winner among budget-conscious users? Simple wall-mounted hooks paired with waterproof covers. Sarah from Manchester shares: “I spent £30 total and my bikes have stayed rust-free for three years. The trick is positioning the cover so water runs off completely, not pooling on top.” Users consistently report this combination works brilliantly for two bikes maximum, but becomes awkward with more.
Wooden sheds received mixed feedback. While they offer excellent security and weather protection, nearly every DIY builder we spoke with wished they’d known about proper ventilation from day one. Tom, who built his own 6×4 shed, explains: “Condensation was killing my bike components until I installed roof vents. Now it’s perfect, but I should have factored that into my initial design.”
Metal storage boxes generate strong opinions. Positive reviews highlight durability and theft deterrence, but several users mentioned an unexpected issue: “The small ones are deceptively tight,” warns Janet from Bristol. “Measure your handlebars first. I can barely squeeze my mountain bike in, and forget about getting two bikes in there despite what the label claims.”
Bike covers alone disappointed most users unless secured properly. The consensus? They work temporarily but need replacing annually and require bungee cords or weighted bases to prevent wind damage.
The most valuable lesson from the community: whatever solution you choose, add extra weatherproofing. Apply silicone sealant to joins, ensure proper drainage, and create slight slopes to prevent water accumulation. These small preventative steps consistently separated satisfied users from frustrated ones across every storage type.
Choosing the right outdoor bike storage solution ultimately depends on your specific circumstances. Consider your available space, the number of bikes you need to store, your budget, and the security level required in your area. Weather protection is equally important, as exposure to rain, UV rays, and humidity can significantly reduce your bike’s lifespan and increase maintenance costs.
Before making a purchase, measure your space carefully and check planning restrictions if you’re considering a permanent structure. Read community reviews from fellow DIY enthusiasts who’ve installed similar systems, as their real-world experiences can highlight potential challenges or advantages you might not have considered.
Remember, proper bike storage isn’t just an expense, it’s an investment in protecting valuable equipment. A quality storage solution pays for itself by preventing rust, component degradation, and theft.
If you’re planning a DIY installation, explore local tool hire options for equipment like concrete mixers, drills, or post-hole diggers. Don’t hesitate to seek advice from online DIY communities or forums where experienced users share installation tips and troubleshooting guidance. Taking time to choose and install the right solution now means years of hassle-free bike storage ahead.
Related Posts

Post a Comment