Test concrete strength using calibrated cylinder molds within 24 hours of pouring—fill in three layers, rodding each 25 times to eliminate air pockets, then cure samples in controlled conditions matching your actual pour site. Poor quality control costs Australian builders thousands in repairs and project delays, yet most concrete failures stem from preventable testing oversights during the mixing and curing phases.
Quality control transforms guesswork into guaranteed results. When working with modified concrete containing additives like plasticizers, accelerators, or fiber reinforcement, systematic testing becomes even more critical. The compressive strength you achieve depends entirely on proper water-cement ratios, thorough mixing, and consistent temperature management—factors you can measure and control with the right approach and equipment.
Professional contractors and DIY renovation projects alike require the same fundamental quality checks. Slump tests verify workability before pouring, cylinder compression tests confirm strength after curing, and visual inspections catch surface defects early. These procedures aren’t reserved for massive commercial jobs—they’re accessible methods that protect any concrete investment, whether you’re laying a driveway or constructing foundation walls.
This guide breaks down essential quality control procedures into manageable steps, explaining which tests matter most for your specific project type, what equipment you’ll need, and how to interpret results without specialized training. You’ll learn to identify problems before they become structural failures and understand when professional testing services become necessary versus what you can reliably handle yourself.
Understanding Concrete Modification and Why Quality Control Matters
Common Concrete Modification Techniques
Concrete modification involves adding specific materials to change its properties for different applications. Whether you’re tackling concrete cutting projects or pouring a new driveway, understanding these techniques helps ensure quality results.
Chemical admixtures are liquids or powders mixed into concrete to alter its behavior. Water reducers (also called plasticizers) decrease the water needed while maintaining workability, creating stronger concrete. Accelerators speed up setting time for cold weather work, while retarders slow it down in hot conditions. Air-entraining admixtures create tiny air bubbles that protect concrete from freeze-thaw damage.
Fiber reinforcement adds small fibers throughout the mix to reduce cracking. Common types include synthetic polypropylene fibers for crack control in slabs, steel fibers for industrial floors, and glass fibers for special applications. These fibers distribute throughout the concrete, providing internal reinforcement that standard rebar cannot.
Polymer additions involve mixing latex, epoxy, or other polymers into concrete to improve adhesion, flexibility, and chemical resistance. These modifications work particularly well for repair work and overlays where bonding to existing concrete is critical.
Supplementary cementitious materials (SCMs) partially replace traditional cement with materials like fly ash, slag cement, or silica fume. These additions often improve long-term strength, reduce permeability, and can lower costs while making concrete more environmentally friendly. Each modification requires proper quality control testing to verify the concrete meets project specifications before and after placement.
The Risks of Skipping Quality Checks
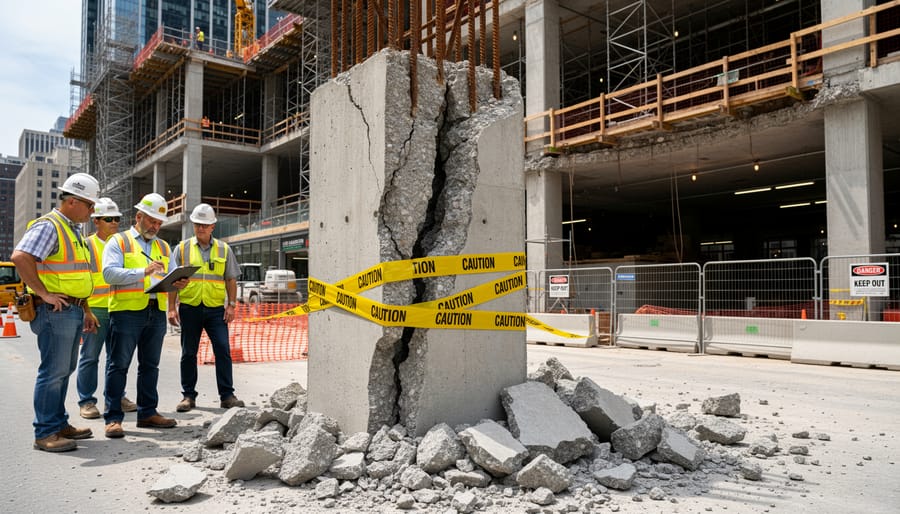
Skipping quality control checks on concrete might seem like a time-saver, but the consequences can be costly and dangerous. Structural failures represent the most serious risk—weak concrete can lead to cracking foundations, collapsing driveways, or failed load-bearing elements in deck construction projects. These issues often don’t appear immediately, making them even more problematic when discovered years later.
Surface defects like scaling, spalling, and dusting create functional and aesthetic problems that reduce property value. For homeowners, this means unsightly patios that deteriorate rapidly. Contractors face warranty claims and reputation damage when clients discover premature deterioration.
The financial impact extends beyond repairs. Failed concrete sections typically require complete removal and replacement—not just patching. A poorly mixed driveway might cost 3,000 dollars initially but require 8,000 dollars to fix within five years. Insurance rarely covers inadequate quality control, leaving property owners to absorb these expenses.
Testing concrete before it sets takes minimal time compared to dealing with failures. Basic slump tests and cylinder samples provide essential data that protects your investment and ensures safety compliance.
Essential Quality Control Tests for Modified Concrete
Pre-Pour Testing: Getting the Mix Right
Before you pour a single bucket of concrete, proper testing ensures your mix meets project requirements and won’t fail after curing. These pre-pour checks take just minutes but can save you from costly mistakes, especially when working with modified concrete containing additives like plasticizers, accelerators, or fiber reinforcement.
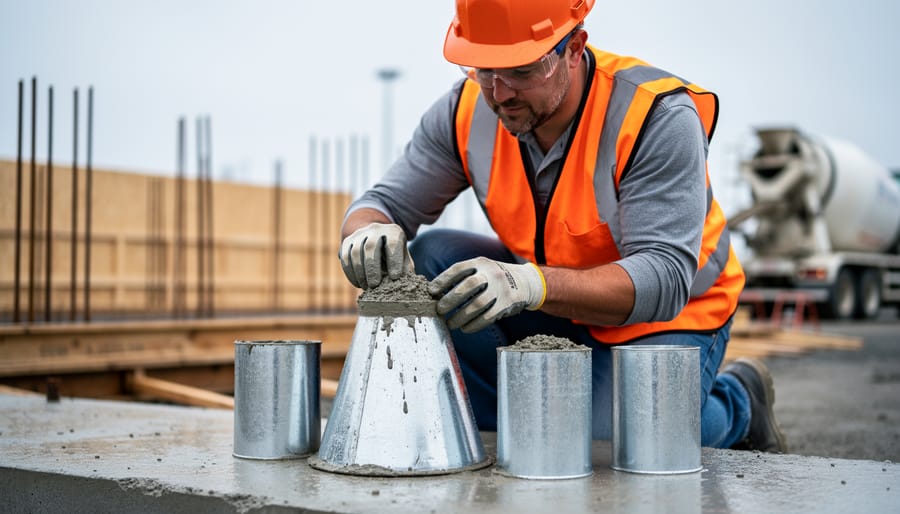
Start with the slump test, which measures workability—how easily your concrete flows and spreads. You’ll need a slump cone (available at most tool rental centers), a tamping rod, and a tape measure. Place the cone on a flat, non-absorbent surface and fill it in three equal layers, tamping each layer 25 times. Remove the cone by lifting straight up, then measure how far the concrete slumps down. Standard concrete typically slumps 3-4 inches, but modified mixes vary. Check your additive manufacturer’s specifications—plasticized concrete might slump 6-8 inches, while fiber-reinforced mixes may only reach 2-3 inches.
Next, test air content if you’re working with air-entrained concrete for freeze-thaw resistance. Portable air meters provide quick readings. Most outdoor concrete needs 5-8 percent air content, though this varies by climate and application.
Temperature matters more than many realize. Use an infrared thermometer or probe to check your mix—ideal pouring temperature ranges from 50-70 degrees Fahrenheit. Hot concrete sets too quickly, while cold concrete may not cure properly. If your mix falls outside this range, consider rescheduling or using temperature-modifying additives.
Finally, perform a visual inspection. Look for consistent color throughout the batch, proper moisture levels (not too wet or crumbly), and even distribution of aggregates and any additives like fibers. The mix should appear uniform without separation or excessive bleeding water on the surface.
Document all test results before pouring. This record proves invaluable if problems arise later and helps you replicate successful batches on future projects.
During Pour: Real-Time Quality Checks
Once the concrete starts flowing, your quality control window narrows fast. The good news? You don’t need expensive lab equipment to catch most problems before they become permanent headaches.
Start with a simple slump test to verify consistency. You’ll need a slump cone (available at most tool rental centers), a tamping rod, and a measuring tape. Fill the cone in three layers, tamping each 25 times, then lift the cone straight up. Measure how much the concrete slumps down. For most residential work, you’re looking for 4-6 inches of slump. Too wet means cracking and weak spots; too dry makes placement difficult and creates air pockets.
Watch the pour itself carefully. Segregation happens when heavier aggregate separates from the cement paste, creating weak spots. This often occurs when concrete drops more than 4 feet or gets pushed horizontally more than 20 feet. If you’re working with a chute, keep it moving and never let concrete pile up then spread it. Use a vibrator to consolidate concrete without overdoing it, which pushes aggregate to the bottom.
Temperature matters more than most DIYers realize. Concrete placed in temperatures below 40°F or above 90°F needs special handling. Keep a digital thermometer handy and test fresh concrete temperature, especially with additives that affect setting time.
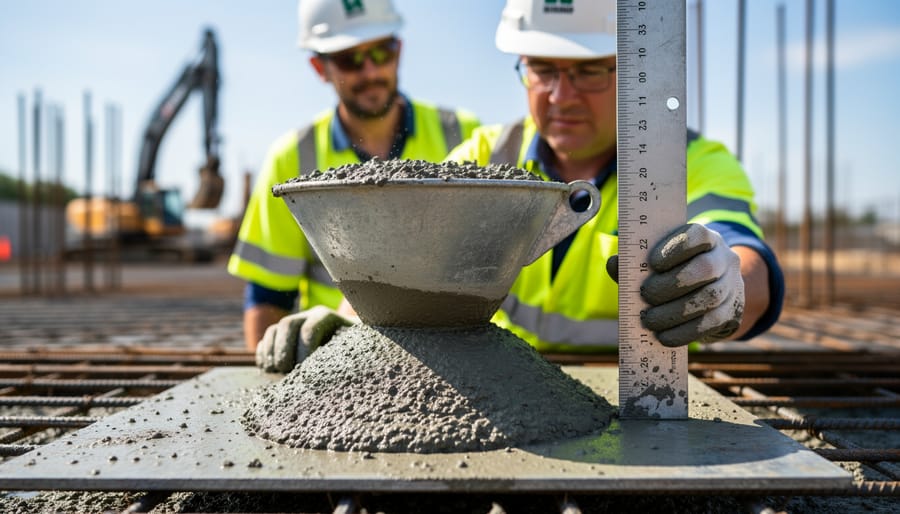
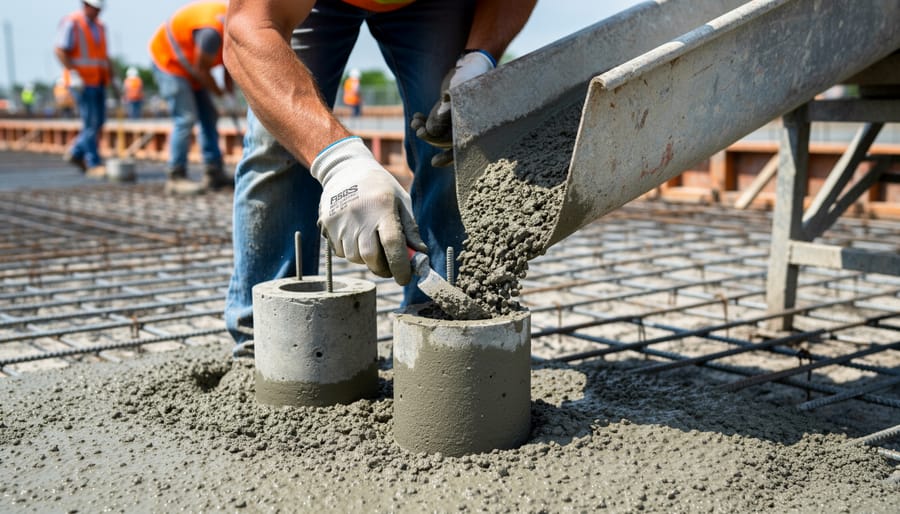
Take cylinder samples for projects where strength really matters, like structural foundations or driveways. You’ll need plastic or cardboard cylinder molds, typically 6 inches diameter by 12 inches tall. Fill them the same way as the slump cone: three layers, 25 tamps each. Make at least two cylinders per 50 cubic yards of concrete. Label them clearly with the date, location, and mix design. Most rental centers can point you toward local testing labs that will cure and break cylinders for reasonable fees, giving you documented proof your concrete meets specifications.
Post-Pour Testing: Ensuring Long-Term Performance
Once your concrete is poured, the real quality control work begins. Post-pour testing ensures your project will stand the test of time and meet structural requirements.
Proper curing is fundamental to concrete strength. During the first seven days, check that your concrete remains moist and protected from temperature extremes. Use a simple spray bottle test: if water beads up on the surface rather than absorbing, your curing compound is working. Monitor for cracks, especially at edges and corners, which signal inadequate moisture retention.
Compression strength testing is the gold standard for verifying concrete quality. This involves creating test cylinders during your pour using standard molds, then breaking them at specific intervals, typically 7 and 28 days. For critical projects like foundations, driveways, or structural elements, hiring professional testing services is worth the investment. They’ll ensure proper sample preparation and provide certified results that satisfy building inspectors. For smaller DIY projects, you can gauge relative strength through comparison, but remember that official testing requires specialized equipment and calibration.
Surface hardness tests offer a practical field alternative. The rebound hammer test, also called a Schmidt hammer, measures how hard the surface is by bouncing a spring-loaded mass against it. You can rent this tool from most equipment suppliers. Take multiple readings across your concrete surface and calculate the average. While not as definitive as compression testing, it provides valuable real-world data about surface quality.
Visual inspection remains your first line of defense. Check for uniform color, which indicates consistent curing. Look for scaling, spalling, or unusual discoloration. Run your hand across the surface to detect rough patches or weak spots. Document everything with photos, especially for larger projects, creating a baseline for future monitoring.
Specialized Tests for Different Modifications
When you’re working with modified concrete mixes, standard testing methods need adjustments to give you accurate results. Different additives and formulations change how concrete behaves, so your quality control approach must adapt accordingly.
For fiber-reinforced concrete, which includes steel, polypropylene, or glass fibers, your slump test results will differ from conventional mixes. Fibers affect workability, so expect lower slump values even with proper consistency. You’ll also need to test for fiber distribution by taking samples from multiple batch locations. Visual inspection of finished samples helps confirm even fiber dispersion throughout the mix. Consider testing compressive strength at later ages, as fiber reinforcement often provides benefits beyond the standard 28-day mark.
Self-consolidating concrete requires the slump flow test rather than traditional slump testing. This modified procedure measures how far concrete spreads on a flat surface, with acceptable ranges typically between 24-30 inches. You’ll also perform the J-Ring test to check passing ability through reinforcement and the visual stability index to ensure the mix doesn’t segregate. These specialized tests require different equipment than standard concrete testing.
High-strength mixes demand more rigorous testing protocols. Use properly calibrated testing machines capable of handling loads above 10,000 psi. Curing conditions become critical, requiring strict temperature and moisture control. Consider testing additional cylinders at 56 or 90 days since strength continues developing longer than standard mixes.
Rapid-setting formulations present timing challenges. Prepare all testing equipment before mixing begins, as you’ll have limited working time. Perform slump tests within two minutes of batching, and cast test cylinders immediately. Document exact timing for each test, since results vary significantly with elapsed time after mixing begins.
Tools and Equipment You’ll Need for Quality Control
Basic Tools Every Project Needs
Getting quality concrete doesn’t require expensive equipment. Most tool rental centers stock affordable testing tools that cover the essentials.
Start with a slump cone, the fundamental tool for measuring concrete consistency. This simple metal cone costs around $10-15 per day to hire and tells you if your mix has the right water content. Fill the cone in three layers, tamping each one, then lift it straight up and measure how much the concrete slumps down. Fresh concrete should typically slump between 75-150mm depending on your application.
A digital temperature probe is another must-have, running about $8-12 daily. Concrete temperature affects curing time and strength development. Aim for 10-30°C during placement. Temperatures outside this range can cause cracking or weak spots.
You’ll also need calibrated measuring containers for accurate batching. These graduated buckets ensure consistent water-to-cement ratios, critical when adding modifiers or admixtures. Hire costs are minimal at $5-8 per day.
Sample test cylinders let you create specimens for later strength testing. These plastic or cardboard molds cost roughly $2-5 each and are essential for projects requiring formal quality documentation. Fill them during your pour, cure them properly, and send them to a testing lab after 7 or 28 days.
Most rental centers offer package deals combining these basic tools, typically saving 15-20% compared to individual hiring. Always ask staff to demonstrate proper usage techniques before leaving the shop.

Advanced Testing Equipment for Professional Jobs
When your concrete project involves custom mixes or critical structural applications, professional-grade testing equipment becomes essential. These specialized tools provide precise measurements that basic field tests simply can’t match.
Air meters measure the exact air content in concrete, which is crucial for freeze-thaw resistance. Think of it as checking whether your concrete has the right amount of tiny air bubbles to handle winter conditions. Penetration resistance testers determine the optimal time for finishing operations by measuring how hard the concrete surface has become—essentially answering “Is it ready to work yet?”
Compression testing machines are the gold standard for verifying concrete strength. These powerful devices crush cylindrical samples to determine if your mix meets the specified compressive strength, typically measured in pounds per square inch (PSI). Rebound hammers, also called Schmidt hammers, offer a non-destructive alternative by bouncing off the concrete surface to estimate strength without damaging the structure.
The big question: Should you rent equipment or hire a testing service? For one-off residential projects, hiring a certified testing service makes sense. They’ll handle everything from sampling to lab analysis, typically costing between $300-800 depending on testing requirements. However, contractors managing multiple projects might benefit from renting equipment, especially for field tests like air content and slump measurements.
Consider your project’s complexity, local building code requirements, and whether certification is needed. Many municipalities require third-party testing verification for structural concrete, making professional services the only viable option regardless of equipment availability.
Step-by-Step Quality Control Process for Your Concrete Project
Creating Your QC Plan Before You Start
Before mixing your first batch, spend time creating a solid quality control plan. This roadmap ensures consistency and helps you catch problems early, saving both time and money.
Start by establishing acceptance criteria. What standards must your concrete meet? Define specific targets for slump (how fluid the mix is), compressive strength (measured in PSI), and any special requirements like set time or water resistance. Base these on project specifications or industry standards like ACI guidelines.
Next, determine testing frequency. For small residential projects, test each batch or every cubic yard. Larger jobs may require hourly testing or samples every 50 cubic yards. When using additives or modifiers, increase testing frequency during the first day to verify the mix performs as expected.
Assign clear responsibilities. Designate who conducts tests, records results, and makes decisions if concrete fails inspection. Even solo DIYers benefit from this step by scheduling specific quality checkpoints throughout their work.
Document everything in writing. Create a simple checklist covering mixing ratios, testing schedules, and acceptance ranges. Include spaces for recording actual results, weather conditions, and any adjustments made. Many community members recommend keeping both paper and photo records using your smartphone for easy reference and proof of proper procedures if questions arise later.
Documentation and Record-Keeping Best Practices
Proper documentation transforms your concrete quality control from guesswork into defensible proof. Think of records as your project’s black box—if something goes wrong months or years later, these documents tell the story and often determine who’s responsible.
Start by recording essential details for every concrete batch: date, time, weather conditions (temperature and humidity matter), mix design, batch ticket number, and supplier information. For each test, note who performed it, what equipment was used, the exact location where samples were taken, and all raw measurements before calculations. These specifics seem tedious until you need them.
Create a simple filing system that works for you. Many professionals use three-ring binders with dividers by pour date, while others prefer digital spreadsheets. Whatever method you choose, ensure someone unfamiliar with your project could understand it six months from now. Include photos of the testing process and sample locations—smartphones make this easy.
Chain of custody matters more than most DIYers realize. If samples go to a lab for testing, document who transported them, when, and under what conditions. Label each sample clearly with project name, location, date, and time. This prevents mix-ups and protects you if results are questioned.
Legally, documentation proves you followed proper procedures and industry standards. Insurance claims, warranty disputes, or code enforcement issues all hinge on what you can prove, not just what you remember doing. Beyond legal protection, organized records help troubleshoot problems quickly, identify patterns in test results, and refine your concrete practices for future projects.
Common Quality Control Mistakes and How to Avoid Them
Testing Errors That Give False Results
Even experienced professionals can make testing mistakes that skew results. One of the most common errors happens during sample collection—taking concrete from just one spot rather than multiple locations throughout the pour creates an unrepresentative sample. Always collect from at least three different points in the load.
Temperature issues frequently lead to false readings. Testing concrete that’s too hot or too cold compared to standard conditions (around 20°C) will give inaccurate strength results. Similarly, letting test cylinders dry out before curing or exposing them to direct sunlight compromises the results.
Improper cylinder preparation is another culprit. Failing to properly consolidate the concrete in test moulds by rodding or vibrating leaves air pockets that weaken samples, making good concrete appear substandard. Conversely, over-vibrating can push aggregate away from test areas, giving falsely high readings.
Timing matters too. Testing cylinders before they’ve reached the specified age (typically 28 days for standard tests) or storing them incorrectly between casting and testing will produce unreliable data. Keep detailed records of when samples were taken and how they were stored—this documentation helps identify whether unexpected results reflect actual concrete issues or testing problems.
Environmental Factors That Affect Test Accuracy
Environmental conditions play a crucial role in concrete testing accuracy and overall performance. Temperature significantly impacts setting times and strength development—concrete cures best between 50°F and 85°F. Hot weather (above 90°F) accelerates setting, potentially causing premature drying and cracking, while cold conditions (below 40°F) slow curing dramatically and can lead to freeze damage in fresh concrete.
Humidity affects water evaporation rates during curing. Low humidity environments increase moisture loss, requiring additional water curing or sealers to prevent surface defects. High humidity slows evaporation but may extend finishing time.
Timing matters tremendously for accurate testing. Slump tests must occur within 5 minutes of sampling, while compression test cylinders require proper curing conditions for 28 days before testing. Testing too early or late skews results significantly.
Adjustment strategies include:
– Shading work areas and using ice water in hot weather
– Insulated blankets and heated enclosures for cold conditions
– Windbreaks to reduce evaporation
– Retarding or accelerating admixtures as needed
– Adjusting water content based on aggregate moisture
Always document environmental conditions during placement and testing. These records help explain variations in test results and ensure quality standards are maintained despite challenging weather. Remember that modified concrete mixes may respond differently to environmental factors than standard mixes.
When to Call in Professional Testing Services
While many concrete projects can rely on standard mixing practices and visual inspection, certain situations demand professional quality control testing to ensure safety, compliance, and longevity.
Professional testing becomes legally required for structural concrete in commercial buildings, retaining walls over certain heights, and load-bearing residential foundations. Most councils also mandate professional testing for outdoor construction projects like driveways and substantial slabs. As a general rule, if your project requires a building permit or involves structural elements, professional QC is non-negotiable.
Beyond legal requirements, consider professional services when working with modified concrete mixes containing additives, fiber reinforcement, or specialized applications like high-strength or self-leveling concrete. Projects exceeding 10 cubic meters or using expensive materials also warrant the investment in professional testing to avoid costly failures.
Professional testing labs provide comprehensive services including slump testing, compressive strength testing (using cylinder samples cured for 7 and 28 days), air content analysis, and temperature monitoring. Many labs offer on-site technicians who collect samples, perform immediate field tests, and document results for compliance purposes.
Costs typically range from 300 to 800 dollars per testing session, depending on location and test complexity. While this seems substantial, it represents a small percentage of total project costs and provides invaluable protection against structural failures.
To work effectively with testing labs, schedule services at least one week ahead, especially during busy construction seasons. Provide clear project details including mix design, anticipated pour volume, and any special requirements. Coordinate timing carefully, as testers must be present during the pour. Request detailed reports and ensure you understand the results before final acceptance. Building a relationship with a reliable local lab creates a valuable resource for future projects.
Quality control for concrete isn’t just another line item on your project budget—it’s a smart investment that protects you from costly failures, structural issues, and rework down the line. By implementing proper testing procedures and using the right equipment, you’re ensuring that every pour meets specifications and performs as expected for years to come.
As you plan your next concrete project, remember the key takeaways: start with a clear understanding of your project specifications and required strength classes, secure access to essential testing equipment through purchase or rental options, establish a consistent testing schedule that covers all critical stages from mixing to curing, and document everything meticulously. Whether you’re working with standard mixes or modified concrete with additives, these fundamentals apply universally.
The beauty of quality control is that it becomes easier with experience. Each project teaches you something new about reading slump tests, interpreting compression results, or spotting potential issues before they become problems. That’s why we encourage you to share your QC experiences, challenges, and solutions with fellow builders and DIYers. Your insights about which testing methods worked best, how you overcame specific obstacles, or which rental equipment proved most reliable can help others avoid pitfalls and achieve better results.
We invite you to contribute your reviews, tips, and real-world experiences. Together, we can build a community resource that makes quality concrete work accessible to everyone, from weekend warriors to seasoned professionals.
Related Posts

Post a Comment