
Evaluate whether hiring a custom front door handle installation kit makes financial sense by comparing the $25-45 daily rental cost against purchasing specialized tools like mortise jigs ($80-200) and hole saws ($30-60) you’ll rarely use again. For a single installation project, rental saves you approximately 60-75% while providing professional-grade equipment that ensures precise measurements and clean cuts.
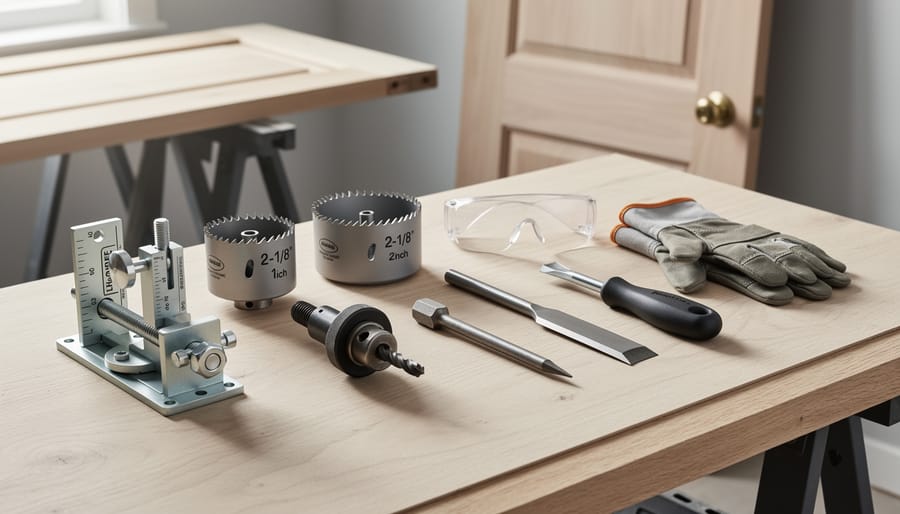
Request a complete kit inventory before booking to confirm it includes essential components: adjustable mortise jig, bi-metal hole saws (2-1/8″ and 1″ sizes), hole saw arbor, center punch, and door edge chisel. Many hire companies now bundle instruction guides and safety equipment based on community feedback, but verify these items are included rather than assuming their availability.
Reserve your kit 48 hours before your planned installation date to ensure availability, particularly during peak home improvement seasons (spring and early fall). Most rental outlets require a refundable deposit of $50-100 and valid identification, with rental periods typically starting at 4 hours for quick projects or 24 hours for comprehensive installations.
Inspect every tool upon collection by testing adjustability mechanisms and checking cutting edges for dullness or damage. Document any pre-existing wear with photos on your phone before leaving the rental location, protecting yourself from disputed damage charges. Experienced DIYers in online forums consistently report that this 5-minute inspection prevents 90% of rental disputes and ensures you’re working with equipment that delivers professional results.
What’s Actually Included in a Custom Front Door Handle Installation Kit
Specialized Drill Bits and Hole Saws
Standard drill bits simply aren’t designed for the precision demands of handle installation. Door hardware requires clean, accurate holes through various materials, and general-purpose bits often chip composite doors, splinter timber, or overheat when drilling metal security doors.
Specialized installation kits include carbide-tipped bits for composite materials, which stay cooler and prevent surface cracking. For timber doors, brad-point bits create clean entry and exit holes without tear-out. Multi-material hole saws cut the larger diameter openings needed for latch mechanisms and backplates, with adjustable pilot bits that ensure perfect alignment.
Mortising tools in professional kits carve out the recessed pockets for latch plates and strike plates. These chisel-guided systems create square, uniform recesses that flush-mount hardware properly, something impossible to achieve neatly with standard bits.
Community feedback consistently highlights that rented specialist bits save both time and materials. One reviewer noted, “I ruined my first door using regular bits from my toolbox. The hired kit’s composite-specific saw made perfect holes on the replacement door first try.”
Different handle styles require different bit configurations. Lever handles need precise 54mm bore holes, while knob sets often require 38mm. Kit labels clearly indicate which bits match your specific hardware requirements.
Template Guides and Measuring Tools
Professional installation kits include specialized templates and jigs that take the guesswork out of handle placement. These precision guides ensure your holes are drilled at exactly the right height and spacing, preventing expensive mistakes on your front door.
The centrepoint marking template is typically the first tool you’ll use. It helps you mark the exact location for your handle mechanism, accounting for the door’s thickness and the specific handle design. Most kits include adjustable templates that work with various handle styles and backset measurements (the distance from the door edge to the center of the handle).
Drilling jigs are game-changers for accuracy. These metal or heavy-duty plastic guides clamp onto your door and feature bushings that keep your drill bit perfectly perpendicular and at the correct depth. Community feedback consistently highlights how these jigs prevent the common issue of angled holes that can compromise handle operation.
Measuring tools in hire kits often include digital calipers for precise spacing verification and spirit levels to ensure horizontal alignment. Many users report that the included depth stops for drill bits saved them from drilling through their door’s exterior face, a costly error that’s surprisingly common without proper equipment.
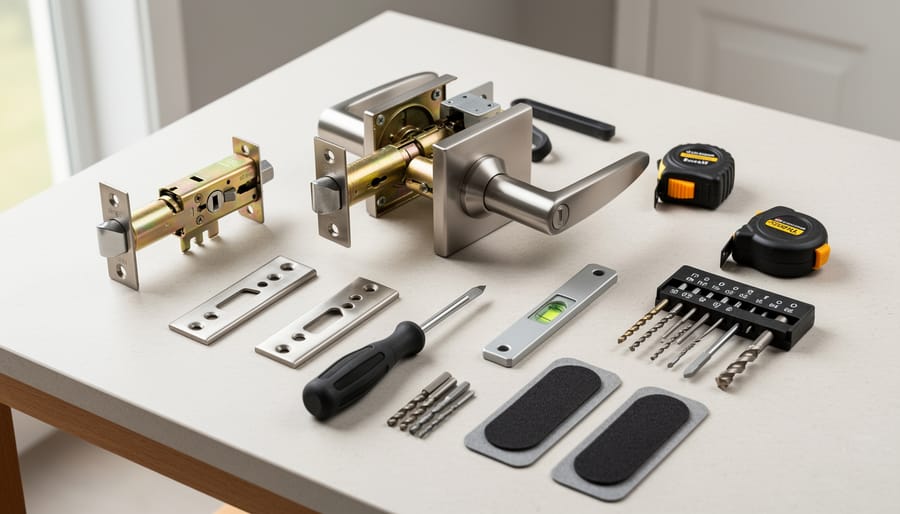
Installation Hardware and Accessories
A comprehensive installation kit includes precision chisels for mortising door edges and strike plates, ensuring clean, accurate recesses. You’ll find both flathead and Phillips screwdrivers in various sizes to handle different fastener types. Alignment jigs help position handles perfectly level, while a spirit level confirms accuracy. Many kits provide depth gauges for consistent drilling, preventing damage to your door. Holesaw bits in standard sizes (typically 25mm and 54mm) cut clean apertures for the mechanism. Templates mark drilling points precisely, eliminating guesswork. Some kits include rubber mallets for gentle adjustment and wood filler for correcting minor errors. Community members highlight that having these accessories together saves multiple trips to purchase individual items, making the hiring option particularly valuable for one-off projects.
When Hiring Makes More Sense Than Buying Your Own Tools
The One-Time Project Scenario
Let’s look at the real numbers for a typical one or two-door project. A specialized front door handle installation kit typically hires for around $15-25 per day, while purchasing the same quality tools could set you back $150-300. If you’re replacing handles on just your front door, the decision becomes clear.
Consider this breakdown: hiring a complete kit for one day costs approximately $20. You’ll finish the job in 2-4 hours, return the equipment, and you’re done. Compare that to buying individual tools – a quality hole saw set, mortise chisel set, door jig, and installation template – which quickly adds up to $200 or more. For items you’ll rarely use again, that’s money gathering dust in your garage.
The economics of hiring versus buying tools becomes even more apparent when you factor in storage space and tool maintenance. Even for a two-door project, hiring remains the cost-effective choice, saving you roughly 90 percent compared to purchasing. You get professional-grade equipment, use it when needed, and avoid the long-term commitment of ownership.
When Professionals Should Consider Hiring
Even experienced tradespeople find value in hiring specialty kits for one-off projects. When a client requests unique architectural door handles requiring specific drilling templates or uncommon bore sizes, purchasing dedicated equipment makes little financial sense. Professional contractors handling primarily standard installations benefit from hiring when faced with heritage door restoration, oversized commercial entrances, or custom mortise configurations they encounter infrequently. The rental cost often remains below a single equipment purchase while ensuring access to calibrated, maintained tools. Many pros also hire to test unfamiliar installation methods before committing to equipment investments. This approach maintains profit margins while delivering professional results across diverse projects. Community reviews from fellow tradespeople often highlight which specialty kits deliver trade-quality performance, helping professionals make informed hiring decisions.
Storage and Maintenance Considerations
Owning specialized tools comes with hidden expenses many DIYers overlook. A quality front door handle installation kit requires dedicated storage space in your garage or shed, which has real value, especially in smaller homes. Tools left unused deteriorate through rust, seized mechanisms, and perished rubber components, requiring regular maintenance even when sitting idle.
Professional-grade equipment depreciates rapidly, losing 30-50% of its value within the first year. You’ll also need to invest in protective cases, cleaning supplies, and occasional calibration or replacement parts. Insurance considerations arise too, as valuable tool collections may require additional coverage.
Community members consistently report that hiring eliminates these concerns entirely. One user shared, “I saved my limited workshop space and avoided the hassle of maintaining tools I’d only use once.” For occasional projects, rental fees prove far more economical than ownership costs when you factor in storage, upkeep, and depreciation over time.
How to Choose the Right Installation Kit for Your Door Type
Wood vs. Composite vs. Metal Doors
Your door material significantly impacts which installation kit you’ll need to hire. Wooden doors are the most forgiving, typically requiring standard drill bits and hole saws found in basic handle installation kits. These kits work well for both solid timber and engineered wood doors. However, hardwoods like jarrah or spotted gum may need carbide-tipped bits for clean, splinter-free holes.
Composite doors present unique challenges. Their layered construction of foam, steel, and glass-reinforced plastic demands specialized installation tools to prevent delamination. Look for kits featuring stepped drill bits and adjustable jigs designed specifically for composite materials. Never use excessive force, as this can damage internal reinforcement.
Metal doors, whether steel or aluminium, require the most robust equipment. Premium hire kits for metal doors include cobalt or titanium-coated drill bits, cutting lubricant, and reinforced templates. Start with pilot holes and work gradually to avoid overheating your bits. Some kits also include deburring tools to smooth sharp edges after drilling.
When selecting your hire kit, always confirm with the rental provider that it’s suitable for your specific door material to ensure successful installation and avoid costly damage.
Handle Style Considerations
Different handle styles demand unique installation techniques and specialized tools. Lever handles typically require precise alignment tools and spindle cutters, as the mechanism must operate smoothly without binding. Most hire kits include adjustable jigs that accommodate various backset measurements, ensuring your lever sits perfectly horizontal.
Knob sets present their own challenges, often needing larger bore holes than levers. Standard kits provide hole saws ranging from 54mm to 70mm diameter, plus template guides to prevent drilling errors. The depth must be exact to allow proper latch engagement.
Pull handles for modern or commercial-style doors require different drilling patterns entirely. These installations benefit from centre-punch tools and stepped drill bits included in comprehensive hire kits, helping achieve symmetrical mounting holes on both door faces.
Smart lock systems have become increasingly popular but demand extra care during installation. Beyond basic drilling tools, you’ll need cable routing equipment and often digital measuring devices to ensure proper alignment with strike plates. Many hire companies now offer smart-lock-specific kits that include smartphone-compatible levelling tools and wire management accessories, reflecting feedback from community members who’ve tackled these tech-forward installations.
Pre-Drilled vs. Non-Drilled Doors
Understanding whether your door is pre-drilled or blank will significantly impact which installation kit you need to hire. Pre-drilled doors already have holes cut for the handle mechanism and latch, making the job straightforward. You’ll only need basic installation tools like screwdrivers, a tape measure, and possibly a chisel for mortise adjustments. The kit for pre-drilled doors is typically simpler and more affordable to rent.
Blank or non-drilled doors require specialized equipment to create precise holes at the correct height and spacing. You’ll need a hole saw kit with the appropriate diameter bits, typically 2-1/8 inches for the handle and 1 inch for the latch. Some rental kits include jig templates that ensure accurate placement and prevent costly mistakes. Community feedback consistently emphasizes the importance of double-checking measurements before drilling, as errors on blank doors cannot be easily corrected. Consider renting a complete door preparation kit if you’re working with an undrilled door, as it includes all necessary cutting tools and guides for professional results.
Step-by-Step: Using Your Hired Installation Kit
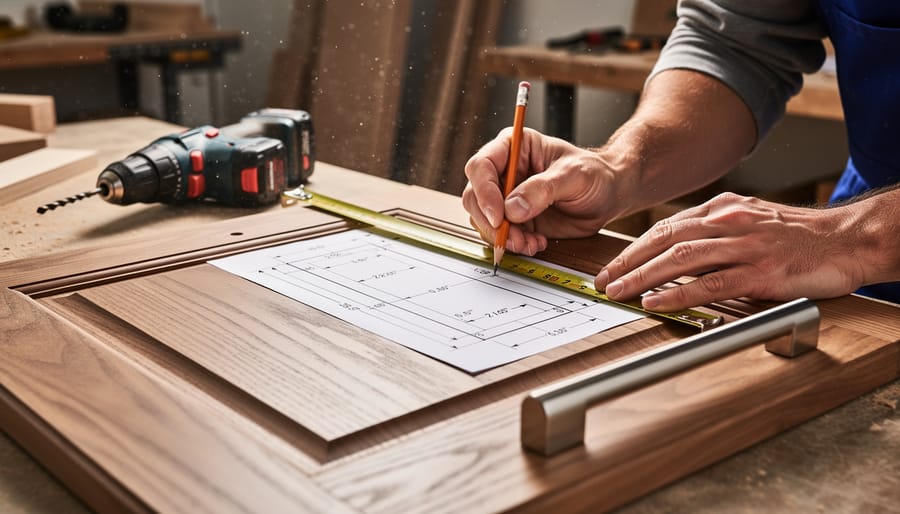
Preparation and Measurement
Proper preparation ensures a professional-looking installation and prevents costly mistakes. Start by gathering the kit’s measurement templates, typically included with professional-grade rental packages. Most kits provide clear plastic or cardboard templates that correspond to standard handle backplate sizes.
Begin by positioning the template at your desired height, usually between 900mm and 1,100mm from the floor. Use the spirit level from your kit to ensure perfect alignment, as even slight angles become glaringly obvious once installed. Mark the screw hole positions lightly with a pencil through the template guides.
Many experienced DIYers in our community recommend double-checking measurements before drilling. As user feedback consistently highlights, the phrase “measure twice, drill once” rings especially true here. Mark the spindle hole center point clearly, as this determines handle alignment on both door faces.
The kit’s drill guides prevent bit wandering on metal surfaces. Secure these firmly against your marks using masking tape to protect the door finish. For reinforced doors, consult the kit’s material-specific instructions, as these may require different drill bit sizes or additional preparation steps to avoid damaging internal door components.
Drilling and Mortising Techniques
Proper drilling and mortising techniques are essential for achieving a professional-looking installation. Start by marking your drilling points with a center punch to prevent the drill bit from wandering across the door surface. When using the spade bits included in most hire kits, drill slowly at medium speed to maintain control and produce clean edges.
For through-holes in the door face, drill from both sides to prevent splintering on the exit side. Drill halfway through from one side, then complete the hole from the opposite side using the pilot hole as your guide. This technique, recommended by experienced DIYers in community reviews, significantly reduces tear-out damage.
The mortising chisel requires a different approach. Begin by scoring the outline of your mortise with a sharp utility knife to create clean edges. Work gradually in shallow passes rather than attempting to remove material in one go. Keep the chisel perpendicular to the door surface and let the tool do the work. Many users report better results when they sharpen the chisel before starting, as rental tools can sometimes arrive slightly dulled from previous use.
Always secure the door firmly in place using clamps or a workbench before drilling to prevent movement that could result in misaligned holes.
Final Installation and Alignment
With your holes drilled and marked, you’re ready to install the handle hardware. Begin by inserting the exterior handle assembly through the prepared holes, ensuring the spindle passes cleanly through to the interior side. Thread the connecting bolts through from inside, hand-tightening them first to check alignment before using your drill or screwdriver for final tightening.
Check that both handles sit flush against the door surface without gaps. If you notice misalignment, loosen the bolts slightly and adjust the position before retightening. Many hired kits include alignment jigs that help maintain proper positioning during this stage—a real time-saver according to user reviews.
Test the handle mechanism by operating it several times from both sides. The latch should engage and retract smoothly without sticking. If resistance occurs, slightly loosen the mounting bolts as over-tightening can bind the mechanism. One community member shared that testing at quarter-turn intervals during tightening prevents this common issue.
Finally, install any decorative rosettes or cover plates, and verify that keys turn smoothly in the lock cylinder. Make minor adjustments as needed until operation feels effortless.
Safety Precautions and Common Mistakes
Always wear safety glasses when drilling to protect against metal shavings and dust. Use work gloves to prevent hand injuries from sharp edges. Before starting, check that your drill bits match the material of your door—using wood bits on metal doors is a common mistake that damages both the tool and surface. Never overtighten screws, as this strips threads and cracks door materials, often voiding manufacturer warranties. Mark drilling points accurately; incorrect placement is the most frequent error reported by community members and typically requires professional repair or complete door replacement.
What to Expect from Tool Hire Services
Rental Duration and Pricing
Most equipment rental yards offer flexible pricing options for front door handle installation kits. Daily rates typically range from $15-$30, while weekend specials (Friday to Monday) run $35-$50. Weekly rentals offer the best value at $60-$90, ideal if you’re tackling multiple doors or working around your schedule.
When considering tool rental duration, remember that most installations take 2-4 hours once you’ve prepared. A daily rental usually suffices for single door projects. Compare this to purchasing a quality kit at $150-$300, which makes hiring particularly economical for one-off jobs. Many hire shops also offer half-day rates, so always ask about available options to maximize your budget.
Condition Checks and Your Responsibilities
Before accepting your custom front door handle installation kit, conduct a thorough inspection with the hire company representative. Check for existing scratches, missing pieces, or damage, ensuring everything is documented. Take photos as evidence for your records.
When you return the kit, the same inspection process applies. Normal wear includes minor surface marks from typical use and light dust accumulation. Damage means broken drill bits, stripped screws, cracked guides, or missing components. To avoid extra charges, clean tools before return, store everything in the original case, and report any issues immediately if something breaks during use.
Pro tip from our community: Create a simple checklist at pickup matching each item against the hire agreement. This protects you from disputes and ensures you’re starting with equipment in good condition. Most hire companies appreciate organized customers and the process typically takes just five minutes, saving potential headaches later.
Support and Troubleshooting
Most rental companies offer comprehensive support to ensure your installation goes smoothly. Before you start, staff typically provide a demonstration of the kit and safety guidance. Many companies maintain dedicated helplines where you can call for real-time troubleshooting advice during your hire period.
If you encounter issues, first consult the instruction manual included with your kit. Common problems like drill bit slippage or alignment difficulties often have simple solutions. Don’t hesitate to contact the rental company immediately if tools malfunction or parts are missing—they’re invested in your success and can arrange replacements quickly.
Many hire companies also offer online video tutorials and troubleshooting guides. Customer reviews often highlight which companies provide the best support, so check community feedback before hiring.
Real User Experiences: What the Community Says
The community consensus is clear: hiring installation kits saves both money and frustration for one-off projects. Sarah from Manchester shared her experience installing handles on her Victorian door: “The jig included in the hire kit was a game-changer. Without it, I would’ve spent hours measuring and likely drilled wonky holes. Instead, it took 45 minutes total.”
Professional tradesperson James notes that even experienced installers benefit from specialty kits: “For unusual door thicknesses or vintage handles, the adjustable boring bits in hire kits are essential. Buying these tools for occasional jobs doesn’t make financial sense.”
Common challenges mentioned include underestimating preparation time. Multiple users recommend thoroughly cleaning existing holes and having wood filler on hand for adjustments. Emma’s tip resonates widely: “Watch a quick video tutorial before collecting your kit so you know exactly which components you’ll need. I wasted a day realizing I needed a specific drill bit not included.”
The community emphasizes checking kit contents upon collection. Mark’s cautionary tale: “Always test equipment at the hire shop. I discovered a faulty drill chuck only after getting home.”
Success stories consistently mention the value of hiring over buying. Most users completed installations in under two hours, with hire costs ranging from £15-30 compared to purchasing equivalent tools for £100-plus. The verdict: for DIYers tackling single projects, hiring delivers professional results without the investment or storage requirements of ownership.
Choosing to hire a custom front door handle installation kit rather than purchasing one makes excellent financial sense for one-time projects or occasional use. You’ll access professional-grade tools without the upfront investment, storage challenges, or maintenance responsibilities. For most homeowners tackling a single installation, hiring costs roughly 10-20% of what you’d spend buying equivalent tools, leaving more budget for quality hardware and finishing touches.
Hiring is particularly smart when you’re working with specialized door materials, installing high-security handles, or need precision tools you won’t use again. Professional tradespeople also benefit when taking on occasional specialty jobs outside their standard toolkit.
Before starting your project, take time to explore available kits in your area and compare what’s included. Read through community reviews from fellow DIYers and professionals who’ve used these kits—their real-world experiences offer invaluable insights about tool quality, ease of use, and potential challenges you might face.
With the right hired kit and proper preparation, you can achieve professional results while keeping your project budget-friendly. Start by researching local hire options, checking availability for your project dates, and gathering user feedback to select the best kit for your specific door handle installation needs.
Related Posts

Post a Comment