

Align all contractor bids to identical specifications before comparing prices. When you receive three quotes for deck construction and one includes railings while another doesn’t, you’re comparing apples to oranges. Create a master spreadsheet listing every component—materials, labor hours, permits, cleanup, warranty terms—then mark what each contractor included or excluded.
Break down lump-sum pricing into individual line items. If Contractor A quotes $15,000 as a single number while Contractor B itemizes $8,000 for materials and $7,000 for labor, contact Contractor A for their breakdown. This reveals where money actually goes and exposes inflated margins or suspiciously low figures that signal corner-cutting.
Standardize material specifications across all proposals. One bid might specify “pressure-treated lumber” while another lists “premium cedar decking.” Research current market prices for each material grade, then calculate what each bid would cost using identical materials. This adjustment often changes which proposal offers true value.
Request clarification on vague language immediately. Terms like “standard installation,” “basic finish,” or “typical workmanship” mean different things to different contractors. Pin down exact brands, model numbers, installation methods, and completion timelines in writing. Contractors using intentionally ambiguous language often plan to upsell you later or deliver minimum-quality work. The bid leveling process transforms confusing proposals into direct comparisons, helping you identify the contractor offering genuine value rather than just the lowest number.
What Is Bid Leveling (And Why It Matters for Your Project)

The Problem with Apples-to-Oranges Comparisons
Here’s why comparing contractor bids can feel like comparing apples to oranges. One contractor’s $8,000 deck proposal might include permit fees, while another’s $7,200 bid leaves those out entirely—suddenly that cheaper option costs more. The same happens with bathroom remodels: Contractor A includes hauling away the old fixtures in their $12,000 quote, but Contractor B’s $11,500 bid excludes disposal, which could add another $800.
Equipment and materials present similar challenges. A landscaping bid might include edger and aerator rental costs, while another assumes you’ll provide those tools yourself. Without clarifying these details, you can’t determine the true bottom line.
Community feedback from homeowners who’ve been through this process reveals a pattern: the lowest bid often becomes the most expensive project once excluded items get added back in. That’s why leveling your bids matters. By creating a standardized comparison that accounts for every included and excluded item—from permits and disposal to equipment rental and cleanup—you’ll identify which contractor truly offers the best value for your specific project scope.
How Leveling Protects You from Hidden Costs
When contractors submit bids at different levels of detail, the cheapest option often looks most attractive—until you discover what wasn’t included. This is where leveling bids becomes your financial safeguard.
By creating a standardized comparison, you’ll quickly spot which contractors have accounted for necessary expenses and which have lowballed their estimates. One bid might include disposal fees, site cleanup, and permits, while another conveniently omits them. Without leveling, you won’t notice these gaps until you’re facing unexpected charges mid-project.
The process reveals common exclusions that lead to hidden costs: equipment rental, materials delivery, protective coverings for existing structures, or daily cleanup. When you list every element side-by-side, these missing items become immediately obvious.
Community feedback consistently shows that homeowners who skip bid leveling end up paying 15-30% more than the original quote. Those who take time to compare apples-to-apples rarely face budget surprises. Think of leveling as your insurance policy against scope creep and unexpected invoices. You’re not just comparing prices—you’re verifying that each contractor understood your project requirements and priced accordingly.
The Core Elements of a Leveled Bid

Scope of Work Alignment
The foundation of fair bid comparison starts with a detailed scope of work document that leaves no room for interpretation. Before requesting any quotes, create a written specification that clearly defines every aspect of your project. Include specific materials by brand and model number where possible—stating “engineered hardwood flooring” isn’t enough when there’s a vast price difference between basic and premium products.
Break down your project into distinct phases and list exactly what you expect contractors to provide. For a deck renovation, specify whether the bid should include demolition of the existing structure, disposal of debris, new post footings, railings, staining, and cleanup. Be explicit about square footage, linear measurements, and quantities so every contractor prices identical work.
Detail any site conditions that might affect pricing. Does the contractor need to work around landscaping? Are there access limitations? Will they need to coordinate with other trades? These factors significantly impact labor costs and timeline.
Include exclusions as well—state what you’ll handle yourself, like painting or minor prep work. If you’re renting specialized equipment independently, note this so contractors don’t include it in their pricing.
Share this detailed scope document with every bidder simultaneously, and specify a deadline for questions. Document all answers and distribute them to everyone, ensuring no contractor has information advantages. This approach, sometimes called an addendum process, keeps the playing field level. When bids arrive, you’ll be comparing true apples to apples, making your decision straightforward and defensible.
Materials and Specifications
To compare bids fairly, every material must be specified with identical detail. This means stating exact brand names, quality grades, and material types rather than generic descriptions. When one contractor quotes “exterior paint” and another specifies “Sherwin-Williams Duration Premium,” you’re comparing apples to oranges. The price difference could reflect a significant quality gap, or one contractor might be cutting corners.
Vague specifications create confusion across all project types. For flooring, “luxury vinyl planks” could mean anything from budget box-store options to commercial-grade products with 20-year warranties. With lumber, “pressure-treated 2x4s” doesn’t indicate retention level or wood species, factors that affect both cost and longevity. Roofing shingles vary wildly—30-year architectural shingles from different manufacturers have completely different performance ratings and warranties.
When reviewing bids, look for specific product lines, model numbers, and grade designations. If a contractor lists generic terms like “quality materials” or “contractor-grade supplies,” request clarification in writing. Ask them to specify exact products they plan to use. This simple step reveals whether low bids reflect strategic pricing or inferior materials that will cost you more down the road.
Timeline and Project Milestones
When comparing bids, make sure each contractor is quoting for the same project timeline. A contractor offering a rushed two-week completion will likely cut corners or charge premium rates, while a leisurely six-month schedule might indicate inefficiency or availability issues.
Ask each bidder to break down their proposed schedule by phase: demolition, foundation work, framing, and finishes. This reveals who’s being realistic versus optimistic. Timing directly impacts costs—longer projects mean extended tool rentals, more site supervision, and potential weather delays. Conversely, expedited work often requires overtime pay and rush material deliveries.
Specify your ideal completion date in your initial request for quotes, then note any variations in contractor responses. A thirty-day difference between bids could account for significant price discrepancies that aren’t immediately obvious when comparing bottom-line numbers alone.
Inclusions and Exclusions List
Create a comprehensive checklist that every contractor must address in their proposal to ensure apples-to-apples comparisons. Your list should cover permits and inspections, site preparation requirements, cleanup and disposal fees, material specifications, project timeline, payment schedule, warranty details, and any subcontractor work. Be explicit about items commonly left off bids that cause confusion later, such as debris removal, equipment rental costs, utility connections, and temporary protection of existing structures. Distribute this standardized scope document to all bidders before they submit proposals, requiring them to mark each item as included, excluded, or priced separately. This approach eliminates the guesswork when one contractor quotes significantly lower because they’ve omitted disposal fees or assumed you’ll handle site prep yourself. Consider asking your community for feedback on items they wish they’d included in their checklists—experienced DIYers and contractors often share valuable insights about commonly overlooked details. When contractors return bids addressing identical scope items, you’ll quickly spot genuine value versus incomplete proposals.
Your Step-by-Step Bid Leveling Process
Step 1: Create Your Master Scope Document
Before you reach out to contractors, you need a detailed scope document that leaves no room for interpretation. This master document becomes your single source of truth when comparing bids.
Start by breaking your project into specific tasks. Instead of writing “renovate bathroom,” list each component: remove existing tile, install new waterproof membrane, lay 600x600mm porcelain tiles with 3mm grout lines, install chrome fixtures, and so on. The more specific you are, the fewer surprises you’ll encounter.
Include measurements, material specifications, and quality standards. If you want engineered hardwood flooring, specify the thickness, finish type, and even the colour range. Mention any tools or equipment you’re providing versus what the contractor supplies.
Add photos or sketches showing current conditions and desired outcomes. Many homeowners find it helpful to create a simple spreadsheet with columns for each task, materials needed, quality specifications, and timeline expectations. This format makes it easy to share with multiple contractors and ensures everyone is quoting on identical requirements. Your scope document should answer the question: could someone complete this project exactly as I envision it using only this information?
Step 2: Identify Missing or Extra Items in Each Bid
Create a simple spreadsheet with columns for each contractor’s name and rows for every item that appears in at least one bid. Start by listing major components like materials, labor, permits, and equipment rentals. Then go through each proposal line by line, marking included items with a checkmark and excluded ones with a dash or “not included.”
Pay special attention to inconsistencies in scope. For example, one contractor might include demolition and hauling while another prices only installation. Mark these differences clearly. Also note variations in material specifications—one bid might specify premium-grade lumber while another lists standard grade.
Free spreadsheet tools make this process straightforward. Google Sheets works well for most homeowners since it’s accessible from any device and easy to share with family members helping you decide. Microsoft Excel Online offers similar functionality at no cost. For a simpler approach, even a handwritten chart on graph paper can work for smaller projects with fewer variables.
As you build your comparison, create a notes column to flag questions. When you spot missing information, jot down what you need to ask each contractor. This organized approach prevents overlooking critical differences and ensures you’re truly comparing apples to apples before making your final decision.
Step 3: Calculate Adjustment Costs
Once you’ve identified what’s missing or different between bids, it’s time to calculate the actual cost adjustments. This step transforms apples-to-oranges comparisons into true like-for-like numbers.
Start by contacting each contractor to get unit prices for missing items. For example, if Contractor A included scaffolding rental but Contractor B didn’t, ask Contractor B what they’d charge to add it. Request written quotes for these additions—verbal estimates can lead to disputes later. Many homeowners find this process helps them predict project costs more accurately overall.
Create a simple spreadsheet with columns for each contractor and rows for each adjustment item. If a contractor included something others didn’t, subtract that cost from their total. If they’re missing an item, add the quoted cost. For instance, if Contractor A’s bid is $15,000 including $500 for equipment rental, but Contractor B quoted $14,200 without equipment, add $500 to Contractor B’s bid for fair comparison.
Community tip from experienced renovators: Always get adjustment quotes in writing before making your final decision, as contractors sometimes lowball add-on prices during negotiations only to increase them later.
Step 4: Compare Your Leveled Numbers
With your numbers adjusted to reflect the same scope of work, you can now make an apples-to-apples comparison. Start by simply looking at the adjusted total costs—the lowest number often indicates the most competitive bid, assuming all contractors are equally qualified.
However, price shouldn’t be your only consideration. Review each contractor’s timeline estimates, warranty offerings, and payment schedules. A slightly higher bid might include better materials, longer warranties, or faster completion times that justify the difference. Check reviews and references to gauge reliability and quality of work. Community feedback from other homeowners who’ve worked with these contractors can reveal valuable insights about communication, cleanliness, and problem-solving abilities.
Pay attention to how thoroughly each contractor itemized their bid. Detailed breakdowns suggest careful planning and transparency, while vague estimates might hide future upcharges. Consider the contractor’s experience with your specific project type and their availability during your preferred timeframe.
If two leveled bids are within 10-15% of each other, the tie-breaker often comes down to trust and communication. Which contractor answered your questions most clearly? Who seemed most invested in understanding your needs? These softer factors frequently predict project success better than minor price differences.
Common Bid Discrepancies to Watch For
Site Preparation and Cleanup
Site preparation and cleanup costs vary wildly between bids because contractors handle these differently. One bid might include complete debris removal and dumpster rental, while another expects you to handle disposal yourself. When reviewing this section, look for specifics: Does the contractor remove old materials? Who provides the dumpster, and is it included in the price? Will they protect existing landscaping, flooring, or fixtures with tarps and barriers? Final cleanup is equally important—some contractors leave job sites broom-clean, while others include vacuuming, window washing, and haul-away of all construction waste. Create a checklist of preparation and cleanup items, then ask contractors to clarify what’s included. This prevents surprise charges when you’re left with a yard full of debris or damaged property that wasn’t protected during the project.
Permits, Inspections, and Fees
Permits and inspections represent a significant variable cost between bids. One contractor might include all permit fees in their proposal while another quotes “permit fees additional” or expects you to pull permits yourself. This difference can add $500 to $5,000 depending on your project scope and local requirements.
When comparing bids, identify who handles permit applications and pays the fees. Professional contractors typically include this service because they understand local building codes and have established relationships with inspectors. If you pull permits yourself to save money, factor in your time for multiple government office visits and potential delays if paperwork is rejected.
Inspection fees often appear as separate line items. Most jurisdictions require multiple inspections throughout a project—foundation, framing, electrical, plumbing, and final. Some contractors bundle these costs while others break them out. Ask each bidder to specify exactly which permits and inspections their quote covers and request copies of fee schedules from your local building department to verify accuracy.
Tool and Equipment Rental
When comparing bids, pay close attention to how contractors handle tool and equipment costs. Some professionals include rental expenses directly in their labor rates or material costs, presenting you with one bundled figure. Others itemize equipment separately as pass-through charges, showing exactly what machinery they’ll need and for how long.
Understanding this difference helps you spot discrepancies between quotes. A bid that seems lower might not account for specialized equipment like laser levels, plate compactors, or excavators needed for your project. Conversely, a higher bid might include premium equipment that speeds up the job and improves quality.
This breakdown becomes especially relevant if you’re considering a DIY approach. When contractors list equipment separately, you get valuable insight into what tools the job requires and their typical rental duration. You can then research these same tools at rental centers to gauge whether tackling the project yourself makes financial sense.
Ask bidders to clarify their equipment approach during consultations. Request that any pass-through rentals be itemized with daily or weekly rates. This transparency lets you verify pricing against local rental shops and ensures you’re comparing apples to apples across all proposals. Remember, professional contractors often get commercial rates that differ from consumer pricing.
When to Ask for Bid Clarification
Requesting clarification doesn’t make you a difficult client—it makes you a smart one. Most contractors actually appreciate when homeowners ask questions upfront rather than dealing with confusion later. The key is timing and tone.
Ask for clarification within 2-3 days of receiving bids, while details are fresh in everyone’s mind. Don’t wait until you’ve already chosen a contractor, as this defeats the purpose of fair comparison. If a bid seems unusually low or high, that’s your signal to dig deeper. Missing information about materials, timelines, or specific tasks also warrants follow-up.
When reaching out, keep your questions specific and professional. Avoid accusations like “Why is yours so much higher?” Instead, try questions that seek understanding: “Can you help me understand what’s included in the demolition phase?” or “I noticed your bid doesn’t mention drywall installation—is that part of the framing cost or billed separately?”
Here’s a simple email template you can adapt:
“Hi [Contractor Name], thank you for submitting your bid for [project]. To help me compare proposals fairly, I have a few questions: [List 2-4 specific questions]. I’m comparing multiple bids and want to make sure I understand what each includes. Could you clarify these points by [reasonable date]? I appreciate your time.”
Keep questions brief and numbered for easy reference. If you’re comparing three bids, you might send similar questions to all contractors to gather consistent information. This approach shows you’re being thorough, not picky.
Remember, contractors who respond promptly and thoroughly to clarification requests often provide better communication throughout the entire project—valuable information in itself when making your final decision.
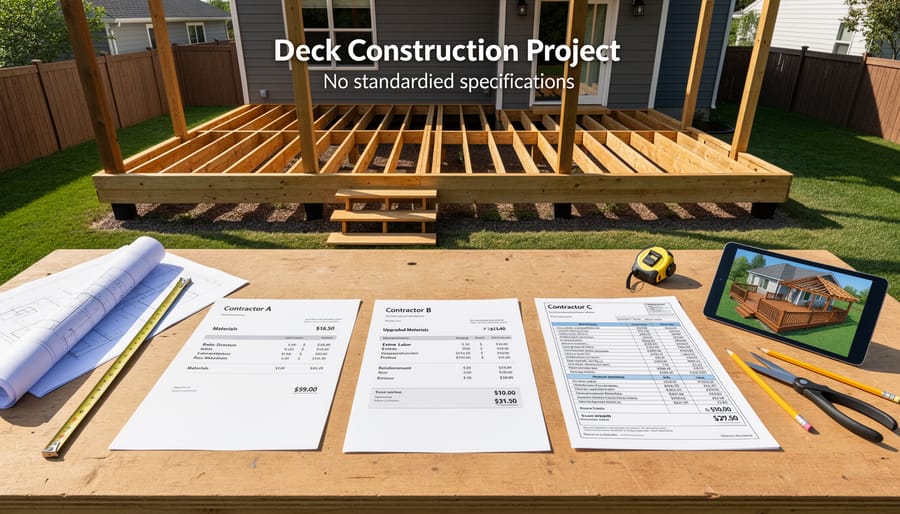
Real-World Example: Leveling Three Deck Construction Bids
Let’s walk through a real situation that demonstrates how bid leveling works in practice. Sarah, a homeowner in Portland, received three quotes to build a 12×16 foot deck in her backyard.
At first glance, the bids looked straightforward. Contractor A quoted $8,500, Contractor B came in at $7,200, and Contractor C bid $9,800. The obvious choice seemed to be Contractor B, saving Sarah over $1,000.
But Sarah took time to carefully review each proposal, and that’s when things got interesting.
Contractor A’s bid included pressure-treated lumber, composite decking, stainless steel hardware, a building permit, and a two-year warranty on workmanship. The proposal specified they’d handle all debris removal and included detailed drawings.
Contractor B’s lower bid used the same pressure-treated framing but specified standard pine decking instead of composite, regular galvanized hardware, and mentioned the permit would be “additional if required.” No warranty was listed, and the proposal stated debris removal was the homeowner’s responsibility.
Contractor C’s higher bid included premium composite decking, hidden fasteners for a cleaner look, an extended three-year warranty, permit costs, and a designer consultation to optimize the deck layout.
Sarah created a spreadsheet to level these bids. She contacted her local building department and learned the permit would cost $185. She got quotes for dumpster rental at $350 for debris removal. She calculated that upgrading Contractor B’s pine to composite decking would add approximately $1,800 based on material costs at her local supplier.
After adjustments, here’s what the leveled comparison revealed:
Contractor A remained at $8,500 for the specified scope. Contractor B’s true cost jumped to $9,335 once she added the permit, debris removal, and composite decking upgrade. Contractor C, while still the highest at $9,800, now represented only a $465 premium over the middle option, but included design services and an extra warranty year.
The surprising outcome? Contractor B, initially appearing to be the budget-friendly choice, actually became the most expensive option when leveled for comparable scope. Sarah ultimately chose Contractor A, finding the best balance of quality, service, and true cost. This example shows exactly why taking time to level bids protects you from unexpected expenses and helps identify genuine value.
Leveling bids requires time and attention upfront, but it’s an investment that pays off throughout your project. By carefully comparing apples to apples, you’ll avoid surprise costs, prevent scope disputes, and choose the right contractor for your needs rather than just the lowest number. The process becomes easier with practice, and you’ll develop an eye for red flags and missing details that might have slipped past you before.
As you prepare for your next project, keep these techniques handy. Create a simple spreadsheet to track each bid component side by side. Don’t hesitate to ask contractors clarifying questions, and remember that the most communicative bidders often make the best partners during construction. Schedule follow-up calls if written bids leave gaps in your understanding.
Here’s one final tip that can save you from major headaches: get everything in writing. If a contractor verbally promises to include something or match another bid’s scope, ask them to send an updated written proposal reflecting those changes. Verbal agreements fade from memory, but written documentation protects everyone involved.
Have you recently compared bids for a home improvement or construction project? Share your experience and any lessons learned in the comments below. Your insights could help fellow readers navigate their own bid comparisons more confidently.
Related Posts
Post a Comment