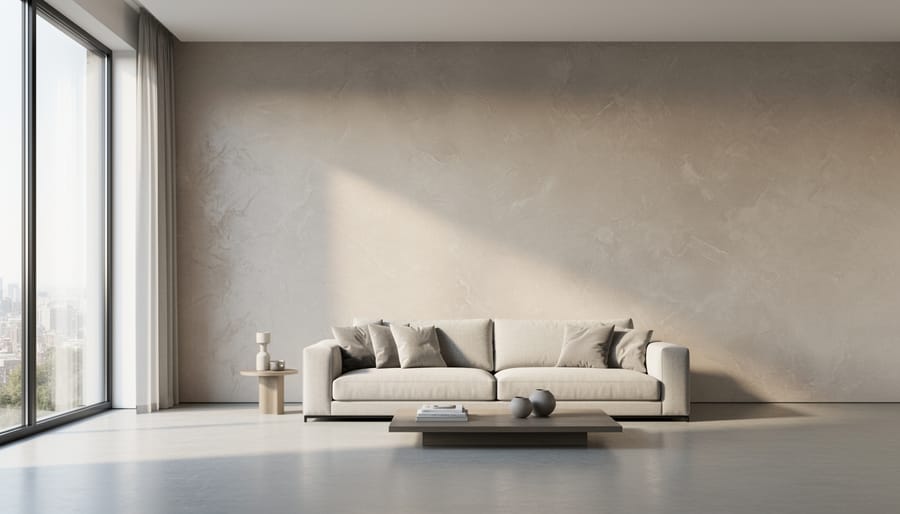
Transform bare walls into luminous, marble-like surfaces by applying modern Venetian plaster, a refined version of the ancient Italian technique now formulated with acrylic polymers for easier application and enhanced durability. Unlike traditional lime-based plasters requiring extensive curing time and specialist skills, contemporary formulations let homeowners achieve professional-looking results with proper preparation and patience.
Select the right product by understanding that modern Venetian plaster comes pre-mixed with synthetic binders that improve workability, reduce cracking, and eliminate the caustic properties of traditional lime putty. These innovations make the material safer to handle and more forgiving during application, though the distinctive polished finish still demands proper technique.
Prepare surfaces meticulously by filling all holes, sanding smooth, and applying a tinted primer that matches your final plaster colour. This foundation prevents the basecoat from showing through translucent plaster layers and ensures proper adhesion, a step that directly impacts your finished appearance.
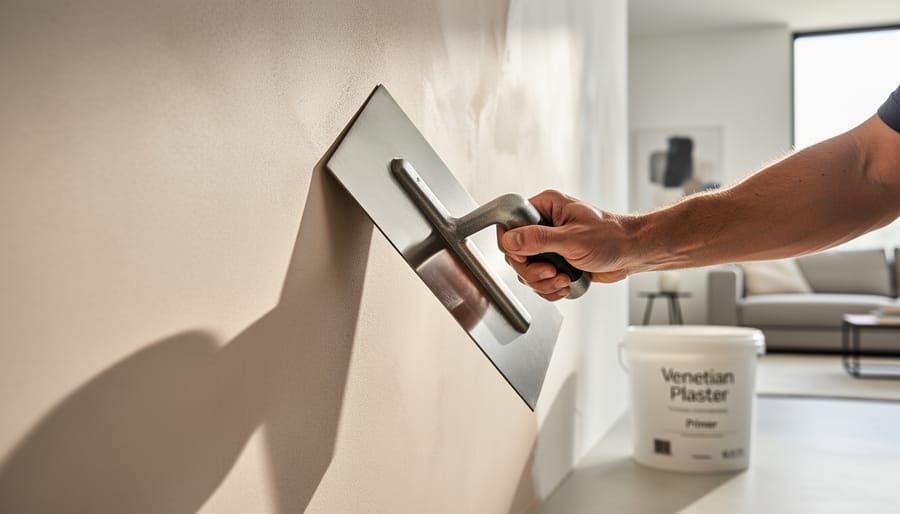
Apply plaster in thin, irregular layers using a stainless steel trowel held at a 15-30 degree angle, building depth through multiple coats rather than single thick applications. Each layer requires 4-6 hours drying time before burnishing with your trowel to activate the shine, a process that compresses the surface and brings natural variations to light.
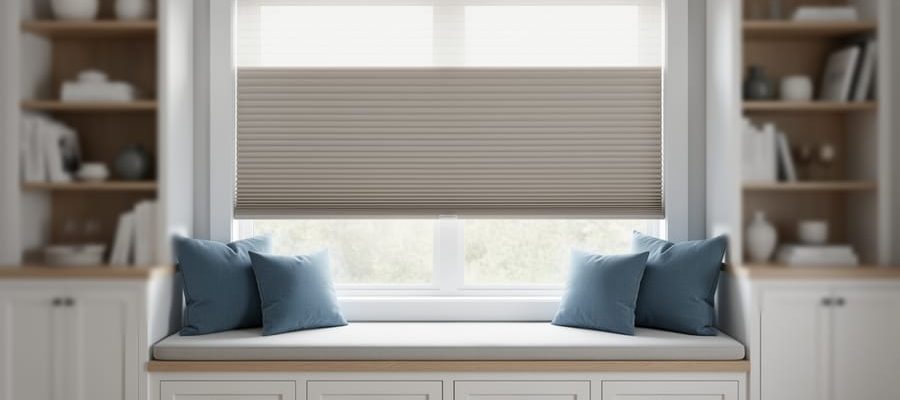
Modern Venetian plaster excels at achieving a modern look through its versatility in colour, sheen level, and texture options, from high-gloss marble effects to subtle matte finishes. The technique suits feature walls, bathrooms, and living spaces where you want architectural interest without overwhelming patterns.
Expect a learning curve with your first project, as trowel pressure, stroke direction, and timing significantly affect results, making smaller test areas or accent walls ideal starting points before tackling entire rooms.
What Makes Modern Venetian Plaster Different from Traditional Formulas
Understanding what sets modern Venetian plaster apart from its centuries-old predecessor helps you make informed decisions about your project and know what to expect during application.
Traditional Venetian plaster, also called stucco veneziano, has been used since ancient Roman times. The classic formula relies on slaked lime putty (calcium hydroxide mixed with water and aged for months or even years) combined with marble dust. This mixture creates a breathable, natural finish that develops character over time. However, traditional formulas require significant skill to apply properly, take weeks to fully cure, and can be temperamental in varying humidity conditions.
Modern Venetian plaster maintains the beautiful aesthetic of the original but incorporates contemporary materials that make it more user-friendly. Many current formulas use acrylic or polymer-based binders instead of pure lime putty. This doesn’t mean they’re inferior—quite the opposite. These synthetic additions improve workability, reduce drying time from weeks to days, and create a more consistent finish that’s forgiving for first-time applicators.
The composition changes bring several practical advantages. Acrylic-modified versions resist cracking better than pure lime, especially in homes with minor settling or temperature fluctuations. They also cure more predictably, meaning you won’t face unexpected color variations or texture issues as the plaster dries. Water resistance improves significantly too, making modern versions suitable for bathrooms and kitchens where traditional lime plaster would struggle.
Application methods have evolved alongside the formulas. While traditional application demanded extensive experience to achieve the signature burnished look, modern products often include detailed instructions and are formulated to be more forgiving during the troweling process. The material stays workable longer, giving you time to perfect each section without rushing.
That said, some premium modern plasters still use authentic lime-based formulas enhanced with modern additives that preserve the traditional breathability and natural properties while improving durability. These hybrid versions offer the best of both worlds—authentic composition with contemporary reliability.
For DIY enthusiasts, modern formulations make achieving professional-looking results more attainable. The learning curve remains, but the materials themselves won’t work against you the way temperamental traditional mixes sometimes could. Many users in our community report successful first-time applications using modern products, something rarely possible with historical formulas.
The Real Advantages Over Paint and Wallpaper
When choosing between modern Venetian plaster, paint, and wallpaper, understanding the practical differences helps you make an informed decision for your space.
Durability stands as Venetian plaster’s strongest advantage. Unlike paint that chips or wallpaper that peels, properly applied Venetian plaster becomes increasingly harder over time through a natural carbonation process. Homeowners report the finish lasting 10-15 years without touch-ups, compared to paint requiring refreshing every 3-5 years. The limestone-based material creates a surface that resists scuffing and minor impacts—particularly valuable in high-traffic hallways or family homes with children.
Moisture resistance sets Venetian plaster apart in bathrooms and kitchens. The breathable lime content naturally regulates humidity, preventing the mold growth that plagues painted surfaces in damp environments. Community feedback consistently highlights this benefit, with users noting wallpaper bubbling and peeling in these areas while Venetian plaster remains intact.
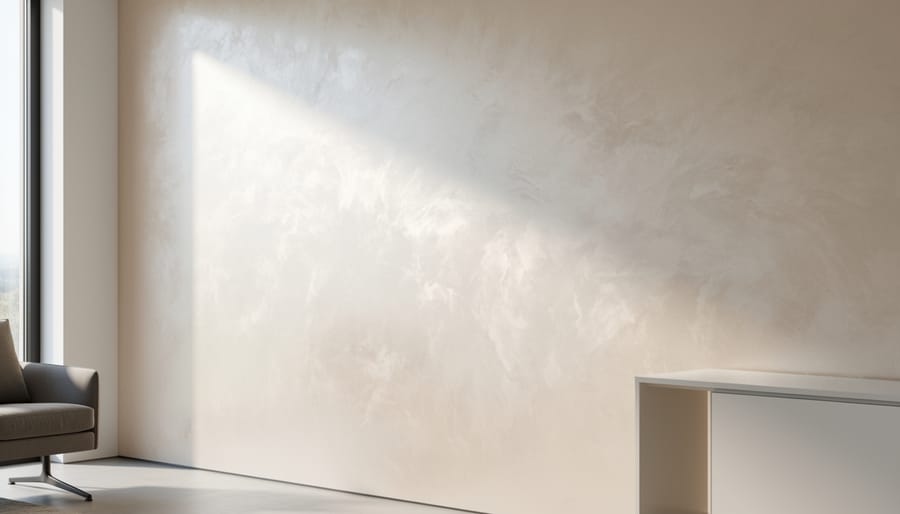
The aesthetic depth achieved through Venetian plaster simply cannot be replicated with flat alternatives. Multiple translucent layers create dimensional color variation that shifts throughout the day under different lighting conditions. This natural movement contributes to a luxurious home aesthetic that paint’s single dimension cannot match.
Maintenance requirements favor Venetian plaster for busy households. Small scratches buff out with gentle rubbing, while paint requires complete repainting of affected areas. The sealed surface repels dust and cleans easily with damp cloths—no special products needed.
Long-term value calculations reveal Venetian plaster’s true cost-effectiveness. Initial investment runs higher, but elimination of frequent repainting, superior longevity, and increased property value offset upfront costs. Real estate professionals note rooms featuring authentic Venetian plaster command premium pricing.
Where Venetian plaster truly excels: feature walls requiring standout visual impact, moisture-prone bathrooms, commercial spaces needing durable surfaces, and architectural details deserving enhancement rather than concealment.
Essential Tools and Materials You’ll Need
Surface Preparation Equipment
Proper wall preparation is essential for achieving that signature Venetian plaster finish. You’ll need several key tools to get your surfaces ready, and the good news is that many larger items are available for hire rather than purchase.
Start with a quality orbital sander or pole sander to smooth existing walls and remove any bumps or imperfections. For larger projects, consider renting a wall sander, which will save time and effort. You’ll also need various grits of sandpaper, typically ranging from 80-grit for initial smoothing to 120-grit for final preparation.
Cleaning supplies are equally important. Stock up on TSP (trisodium phosphate) cleaner or a degreasing solution, microfiber cloths, buckets, and sponges. These remove dust, grease, and residues that prevent proper adhesion.
For priming, you’ll need paint rollers, trays, and high-quality primer designed for your specific wall type. Acrylic-based primers work well for most applications, while specialty primers handle challenging surfaces like glossy paint or damaged drywall.
Don’t forget protective equipment including dust masks, safety glasses, and drop cloths. Many DIYers have shared that investing time in thorough preparation makes the plastering phase significantly easier, with smoother results and fewer frustrations down the line.
Application Tools
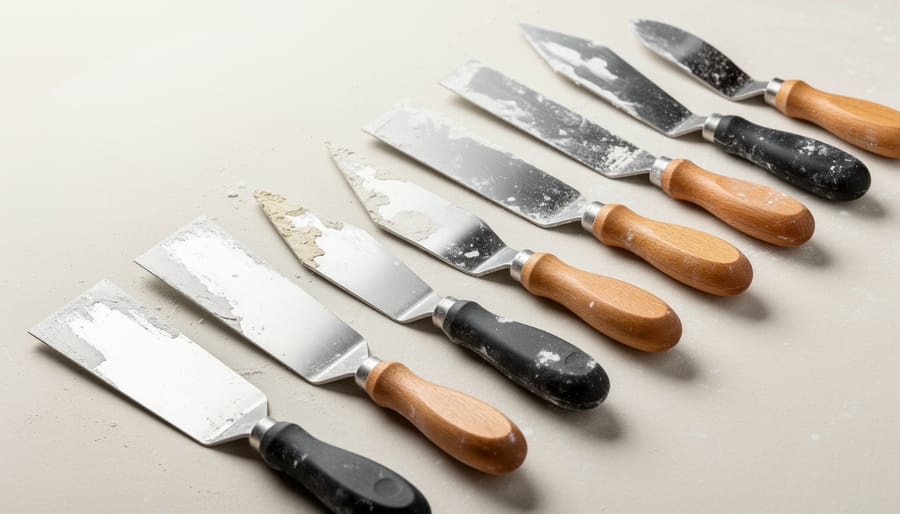
Achieving that authentic Venetian plaster finish requires specialized tools that differ significantly from standard painting equipment. The most essential tool is a stainless steel trowel, typically 4-6 inches wide with flexible blades. Quality matters here – professional-grade trowels (ranging from £30-80) feature polished surfaces that won’t leave marks, while budget versions (under £20) may have imperfections that transfer to your wall.
For beginners, start with a medium-flex trowel around 5 inches wide. This size offers good control without being overwhelming. You’ll also need a smaller spatula (2-3 inches) for corners and edges, plus a clean finishing trowel dedicated solely to the final burnishing stage.
Many DIYers find hiring professional-grade tools makes sense for one-off projects. Look for trowels with rounded corners to prevent gouging and comfortable handles for extended use.
Additional helpful tools include a hawk for holding plaster, mixing paddles for electric drills, and crucially, sandpaper (400-600 grit) for smoothing between coats. Community reviews consistently emphasize that investing in at least one quality trowel dramatically improves results, even if you economize elsewhere.
Don’t forget a clean bucket for water and lint-free cloths for wiping your trowel between strokes – these seemingly minor items prevent texture inconsistencies that frustrate many first-timers.
Material Selection Guide
Modern Venetian plaster comes in three main types. Pre-mixed products offer convenience for beginners, arriving ready to apply straight from the bucket with consistent color and texture. Powder formulas require mixing with water, giving you more control over consistency but demanding precise measurements. Custom blends allow color matching and specialized finishes, ideal for larger projects.
To calculate quantities, measure your wall area in square meters and multiply by 1.5 for typical two-coat applications. Most products cover 4-6 square meters per liter, though textured finishes use more. Always purchase 10-15% extra to account for waste and practice applications. Community reviews suggest testing small batches first to perfect your technique before committing to full coverage.
Step-by-Step Application Process for Beginners
Preparing Your Surface
Proper surface preparation is essential for achieving that signature polished Venetian plaster finish. Start by thoroughly cleaning your walls to remove dust, grease, and any loose paint using a mild detergent solution. Allow the surface to dry completely before proceeding.
Next, inspect the wall carefully for cracks, holes, or uneven areas. Fill any imperfections with a high-quality joint compound, then sand smooth once dry. Venetian plaster amplifies surface flaws rather than hiding them, so taking time here prevents disappointment later. Use a straightedge to check for flatness across the wall surface.
Apply a primer specifically designed for plaster applications. This creates proper adhesion and prevents the base coat from absorbing moisture unevenly, which can cause blotching. Tinted primers matching your plaster’s base color work particularly well and reduce the number of coats needed.
Ensure your workspace maintains temperatures between 50-80 degrees Fahrenheit with moderate humidity. Extreme conditions affect drying times and can compromise the finish. Allow primer to cure for at least 24 hours before applying your first plaster coat.
Many DIYers find that investing time in meticulous preparation makes the actual plastering process significantly easier, even for first-timers. Community feedback consistently emphasizes this step as the difference between professional-looking results and amateur attempts.
Applying the Base Coat
Apply your first coat using smooth, overlapping strokes with your stainless steel trowel held at approximately 15-20 degrees to the wall. This base layer should be thin, roughly 1-2mm thick, working the material firmly into the surface to ensure proper adhesion. Don’t worry if coverage appears uneven at this stage—transparency is normal and expected for the base coat.
Work in manageable sections of about 3-4 square feet, maintaining a wet edge to prevent visible joins. You’ll notice the plaster begins to set within 15-20 minutes, though full drying typically takes 4-6 hours depending on humidity and temperature. Resist the urge to overwork areas; multiple thin layers produce better results than one thick application.
Common troubleshooting: If you see trowel lines or ridges, you’re likely applying too much pressure or holding the blade at too steep an angle. Cracking usually indicates the coat is too thick or drying too quickly—increase ventilation gradually rather than using fans directly on the surface. Patchy adhesion often means the wall wasn’t properly primed.
Many DIYers find their first section looks rough, but this improves with practice. Community reviews consistently emphasize patience here—the magic happens in subsequent layers.
Building Depth with Additional Layers
After your base coat dries for 4-6 hours, you’re ready to build the signature depth that makes Venetian plaster so captivating. Apply your second coat using the same trowel technique, but this time work in thinner, more irregular strokes. Cross-hatching motions create beautiful texture variation—think of it as controlled randomness rather than uniform coverage.
For a subtle, contemporary finish, apply 2-3 thin layers total, allowing each to dry completely. Many DIYers find success waiting overnight between coats. For dramatic depth and luminosity, some applicators add up to 5 layers, though this requires patience and practice.
Technique variations produce different effects: short, circular strokes create a cloud-like appearance popular in modern spaces, while long, sweeping motions produce elegant, marble-like veining. One community member shared that rotating trowel angles between layers prevented repetitive patterns and added organic movement to the finish.
Each layer should be progressively thinner than the last—you’re building translucency, not thickness. The plaster becomes increasingly workable as you gain confidence. Don’t worry if early attempts look inconsistent; subsequent layers and burnishing will unify the appearance. Between coats, keep your trowel clean and occasionally dampen it slightly to prevent dragging. The transformation happens gradually, rewarding your methodical approach with that coveted three-dimensional glow.
Polishing and Sealing
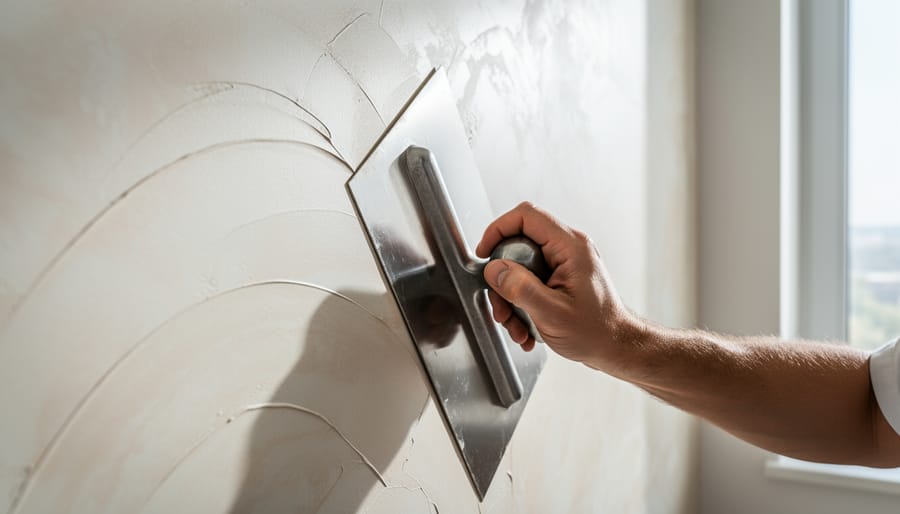
Once your final coat has dried for 24 hours, you’re ready for the polishing stage that gives Venetian plaster its signature lustrous finish. Burnishing is the process of compressing and smoothing the surface using a steel trowel or specialized burnishing tool. Hold your trowel at a shallow angle and apply firm, overlapping strokes in circular or figure-eight patterns. The friction generates slight heat, which helps close the surface and brings out the natural sheen.
The amount of burnishing determines your sheen level. Light pressure creates a subtle satin finish, while aggressive burnishing with multiple passes produces a high-gloss, marble-like appearance. Work in small sections and check your progress frequently under different lighting conditions.
Sealing is optional but recommended for high-moisture areas like bathrooms or kitchens. If you’ve achieved your desired sheen through burnishing alone, you may skip this step. For added protection, apply a breathable wax or water-based sealer 48-72 hours after your final coat. Use a clean microfiber cloth or soft brush, applying thin, even layers. Wax provides a warmer tone and enhanced depth, while water-based sealers offer more durability without altering the color.
Many DIYers report that patience during this stage makes the difference between acceptable and stunning results.
Common Mistakes and How to Fix Them
Even experienced applicators encounter challenges with modern Venetian plaster. Here are the most common mistakes and proven solutions straight from professionals and community members.
Uneven texture and visible trowel marks often plague first-timers. “I couldn’t get a smooth finish no matter what I tried,” shares DIYer Marcus T. The fix: Apply thinner coats and maintain consistent pressure with your trowel at a 15-30 degree angle. Work in small sections and keep your trowel clean between passes. Many pros recommend practicing on sample boards first to develop your technique.
Cracking typically results from applying coats too thickly or not allowing proper drying time between layers. Professional plasterer Sarah Chen advises, “Patience is everything. Each coat needs 4-6 hours minimum, even if it looks dry.” If cracks appear, lightly sand the area, apply a thin repair coat, and burnish once dry.
Poor adhesion happens when surfaces aren’t properly prepared. The plaster needs a clean, slightly textured surface to grip. Always prime appropriately and ensure walls are dust-free. If plaster is peeling, scrape back to solid material, prime again, and reapply.
Inconsistent sheen occurs when burnishing pressure varies. Community member Jake R. notes, “I pressed harder in some spots and ended up with a patchy finish.” Solution: Use consistent, firm pressure during the final burnishing stage, working in overlapping circular motions. A second burnishing pass often evens things out.
Color variations between batches plague larger projects. Mix enough material for entire walls and, as contractor Lisa Moreno recommends, “Blend batches together before applying to ensure color consistency.”
Streaking or discoloration from over-working the plaster can be fixed by applying another thin coat and re-burnishing, but prevention is easier—stop working the material once it starts setting. Listen to the plaster; it will tell you when to move on.
Cost Breakdown: DIY vs. Professional Installation
Understanding the financial commitment before starting helps you decide whether to tackle Venetian plaster yourself or call in professionals. Here’s a transparent comparison to guide your decision.
For a standard 20-square-meter room, DIY material costs typically range from $300-600, depending on the plaster quality you choose. You’ll need specialty tools including trowels, hawk boards, and potentially a power sander for polishing. Tool rental from your local hire center runs approximately $80-150 for a weekend, though purchasing basic trowels might be more economical if you’re planning multiple rooms. Factor in primer, sealers, and sandpaper, adding another $100-150 to your budget. Total DIY investment: $480-900.
The real cost consideration is time. As a first-timer, expect 15-20 hours spread across multiple days, as each layer requires drying time. This doesn’t account for learning curve mistakes or potential re-dos.
Professional installation for the same room typically costs $1,800-3,500, including materials and labor. While substantially higher upfront, professionals bring expertise that ensures proper application, reducing the risk of cracking, uneven texture, or poor adhesion. They complete the job in 2-3 days with guaranteed results.
The middle ground? Consider hiring professionals for complex areas like corners and edges while handling straightforward wall sections yourself. Some homeowners successfully fund your project through refinancing, making professional installation more accessible.
Community feedback suggests DIY works well for smaller accent walls or those with previous plastering experience, while whole-room applications benefit from professional expertise. Assess your skill level honestly—improper application can cost more to fix than hiring professionals initially.
Modern Venetian plaster is more accessible than ever for DIY enthusiasts willing to invest time in learning proper techniques. With the right tools—from quality trowels and hawk boards to appropriate surface preparation equipment—you can achieve stunning results that rival professional applications. Remember that success hinges on thorough preparation, maintaining proper plaster consistency, and practicing your application technique before tackling visible walls.
For smaller accent walls or single-room projects, DIY application is entirely feasible with patience and attention to detail. However, don’t hesitate to call in professionals for large-scale projects, complex architectural features, or high-traffic commercial spaces where flawless execution is critical. Many homeowners find a hybrid approach works well: handling preparation work themselves while hiring experienced applicators for the final finish coats.
We’d love to hear about your Venetian plaster journey. What challenges did you encounter? Which tools made the biggest difference in your project? Share your experiences, photos, and questions in the comments below. Your insights help fellow DIYers learn from real-world applications and build our community’s collective knowledge. Whether you’re just starting your research or you’ve completed multiple projects, your feedback contributes to helping others make informed decisions about their plastering endeavors.
Related Posts
Post a Comment