
Transform your spare room into an immersive 3D gaming paradise by starting with proper spatial planning—measure wall dimensions, identify power outlet locations, and map out equipment placement before purchasing a single item. Invest in acoustic panels or DIY sound-dampening solutions using affordable materials like foam tiles or heavy curtains to minimize echo and external noise that disrupts gameplay. Install appropriate lighting circuits using dimmable LED strips behind monitors and along ceiling edges to reduce eye strain while creating atmospheric depth that enhances 3D visual effects.
A successful DIY gaming room setup requires access to basic power tools including drills for mounting hardware, cable management systems, and display brackets—consider hiring specialized equipment rather than buying tools you’ll use once. Prioritize ventilation by ensuring adequate airflow through existing vents or installing supplementary fans, as gaming equipment generates significant heat that affects both performance and comfort. Budget approximately 20-30% more than initial estimates to cover unexpected requirements like additional cable runs, surge protectors, or structural reinforcements for wall-mounted displays. Most projects take 2-4 weekends to complete when working methodically through each phase.
What Makes a Gaming Room ‘Three-Dimensional’?
When you hear “3D gaming room,” you might picture complicated technology or expensive setups, but in practical terms, it simply means creating a gaming space that engages your senses from multiple angles rather than just what’s happening on your screen. Let’s break down what this actually means for your DIY project.
At its core, a three-dimensional gaming room uses spatial design principles to make you feel like you’re inside the game rather than just watching it. This involves three key elements: depth perception features, immersive sensory components, and thoughtful room layout.
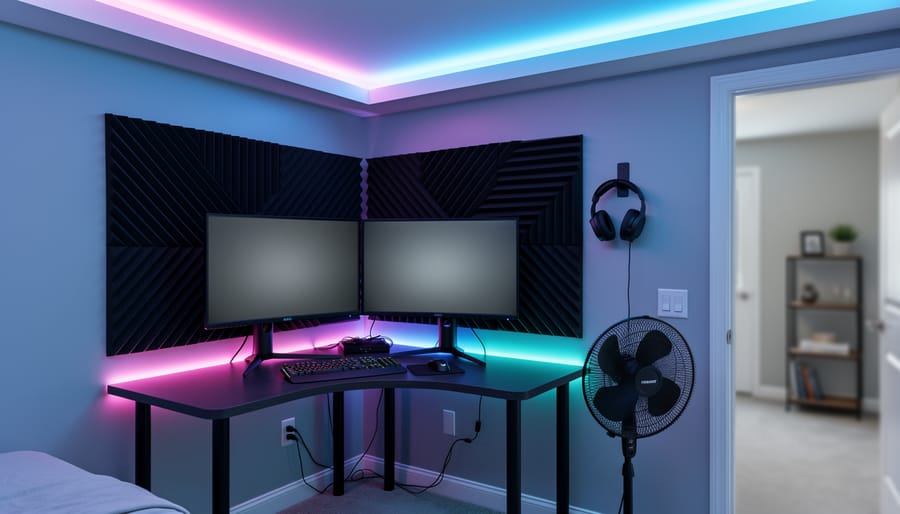
Depth perception features include lighting that responds to in-game action, creating shadows and color shifts around your physical space. Think LED strips behind your monitor or around the room perimeter that sync with gameplay. Multi-speaker audio systems also play a crucial role, positioning sound sources at different points so you hear footsteps behind you or explosions to your left, just like real life.
Immersive sensory components go beyond sight and sound. This might include tactile feedback through gaming chairs with built-in vibration, temperature control for comfort during long sessions, or even subtle aromatherapy elements some enthusiasts add. The goal is engaging multiple senses simultaneously.
The spatial design aspect considers how you physically move and interact within the room. Unlike standard gaming spaces where everything faces one direction, a 3D setup might include wraparound screens, strategic furniture placement that doesn’t block speaker paths, and cable management systems that keep the floor clear for VR movement.
What distinguishes this from a standard gaming room is the intentional layering of these elements to create environmental immersion. Standard setups focus on the screen alone, while 3D approaches treat your entire room as part of the gaming experience, transforming ordinary spaces into interactive environments you can build yourself.

Planning Your 3D Gaming Space: Measurements and Layout
Essential Measuring and Marking Tools You’ll Need
Getting your measurements right is crucial for a professional-looking gaming room. Start with a laser measure, which provides pinpoint accuracy when calculating wall distances for screen placement and speaker positioning. These typically cost between $50-150 to purchase, but many tool hire services offer weekly rentals for around $15-25, making them ideal for one-off projects.
A quality stud finder is essential for securely mounting monitors, shelving, and cable management systems. Electronic models, which detect both wood and metal studs plus electrical wiring, are worth purchasing outright at $30-60 since you’ll likely use them for future home improvements.
For marking cable runs and equipment zones on walls or floors, a chalk line proves invaluable. At under $20, this is definitely a purchase-worthy tool. Consider renting a multi-line laser level if you’re installing multiple screens or building custom shelving, as these precision instruments cost $200-plus to buy but only $30-40 weekly to hire. This approach keeps your budget focused on the gaming setup itself.
Mapping Out Your Gaming Zone for Maximum Immersion
Creating an immersive gaming zone requires careful planning of your physical space. Start by mapping your room on paper or using a simple room planner app, noting dimensions, windows, and existing furniture.
For screen placement, position your monitor or TV at eye level when seated. The ideal viewing distance is 1.5 to 2.5 times your screen’s diagonal measurement. For example, a 55-inch TV works best when you’re sitting 7 to 11 feet away. Mount screens away from windows to minimize glare, or plan to install blackout curtains if window placement is unavoidable.
Speaker positioning makes a significant difference in audio immersion. Place front speakers at ear height, angled slightly toward your seating position. If you’re installing a surround sound system, rear speakers should sit slightly above ear level and behind your primary seating area. Many gamers overlook the importance of a center channel speaker, but it dramatically improves dialogue clarity. Keep speakers at least a foot from walls to prevent unwanted bass buildup.
For VR setups, you’ll need substantial movement space. Measure out a minimum clear area of 6.5 feet by 5 feet, though 10 feet by 10 feet is optimal for room-scale VR experiences. Mark this boundary on your floor using removable tape before committing to furniture placement. Check ceiling height too since some VR games involve reaching overhead. Remove any fragile items, sharp corners, or hanging fixtures from this zone.
Consider cable management early in your planning. Overhead cable runs work well for VR headsets, preventing trip hazards while maintaining freedom of movement. For seated gaming, invest in cable sleeves or conduit to keep cords organized and protected underfoot.
Creating Depth: Wall and Ceiling Modifications
Installing Acoustic Panels for Sound Depth
Installing acoustic panels transforms your gaming room by reducing echo and creating directional sound depth that enhances immersion. The good news? This project requires minimal tools and straightforward techniques that most DIYers can master in an afternoon.
Before starting, gather your essential tools: a cordless drill, stud finder, spirit level, measuring tape, and pencil. For panels without pre-drilled holes, you’ll also need a utility knife. Always wear safety glasses when drilling overhead, and ensure your work area is well-ventilated if using adhesive mounting methods.
Begin by mapping your panel placement. Use the stud finder to locate wall studs, marking them lightly with pencil. Position panels at reflection points—typically behind your gaming monitor and on side walls at ear height when seated. A helpful tip from community feedback: avoid placing panels directly opposite each other, which can create unwanted sound bouncing.
For mounting, most panels use either impaling clips or adhesive strips. Impaling clips offer the sturdiest installation. Drill pilot holes into studs, secure the clips with provided screws, then press panels firmly onto the clips until they lock in place. Check alignment with your spirit level before finalizing each panel.
Common mistakes to avoid include over-tightening screws (which can crack panels), skipping the stud finder (leading to fallen panels), and rushing the layout phase. Take time measuring twice before drilling.
Community members recommend starting with 6-8 panels for a standard gaming room, testing your audio setup between installations to fine-tune placement for optimal sound depth and clarity.
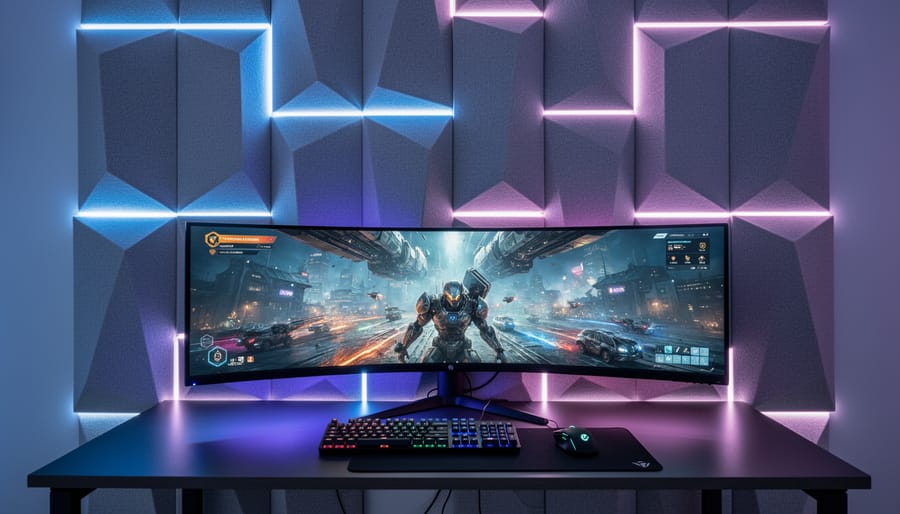
LED Strip Lighting for Layered Visual Effects
Creating layered LED lighting transforms your gaming room into an immersive visual experience. Start by planning your lighting zones: behind monitors for ambient backlighting, under desks for floor glow, and along ceiling edges for atmospheric effects. This multi-layer approach adds depth and reduces eye strain during extended gaming sessions.
For installation, you’ll need LED strip lights (choose addressable RGB for color customization), a power supply matching your strip’s voltage requirements, wire cutters, and mounting clips. Beginners should opt for adhesive-backed strips with pre-attached connectors to avoid soldering. Measure each installation area carefully before purchasing to minimize waste.
Begin installation by cleaning all mounting surfaces with isopropyl alcohol for better adhesion. Run your main power line along the least visible route, securing strips firmly at corners where peeling commonly occurs. Use cable management clips to keep wiring tidy and prevent tripping hazards.
Safety tip: Always disconnect power before cutting or connecting strips, and never exceed the maximum run length specified by your manufacturer, as this can cause voltage drop and fire risks. Test each section before finalizing the installation, and consider using a smart controller for synchronized lighting effects that respond to your gameplay.
Many community members recommend starting with a single zone to practice before tackling the entire room.
Building a Feature Wall or Gaming Backdrop
A feature wall transforms your gaming space from basic to immersive. Start by selecting your theme—popular choices include soundproofing acoustic panels, LED-backlit geometric designs, or wood slat textures that add depth.
For acoustic panels, you’ll need a cordless drill for mounting, a level, and adhesive. Measure and mark panel placement before drilling pilot holes to prevent wall damage. Many DIYers recommend renting a professional-grade drill for consistent results when working with denser materials.
Creating a wood slat wall requires a miter saw for precise cuts, an orbital sander to smooth edges, and a nail gun for secure attachment. Community reviews suggest starting with a small test section to perfect spacing before committing to the full wall.
Paint-based designs need quality rollers, painter’s tape for clean lines, and proper ventilation. A paint sprayer rental delivers professional finishes for gradient effects or complex patterns.
Always wear safety glasses when cutting or drilling, and use dust masks during sanding. Test your design layout with temporary mounting before permanent installation—user feedback consistently emphasizes this prevents costly mistakes.
Platform and Flooring Setup for Gaming Immersion
Building a Raised Gaming Platform
Building a raised gaming platform elevates your play area while creating an impressive visual focal point. This moderately challenging weekend project requires careful planning but delivers professional-looking results.
Start by measuring your designated space and determining platform dimensions. A standard gaming platform ranges from 6-12 inches high and should accommodate your gaming chair plus movement space. Sketch your design, accounting for cable management openings.
For materials, you’ll need pressure-treated 2x4s or 2x6s for the frame, 3/4-inch plywood for decking, and deck screws. The essential tools include a circular saw or miter saw for precise lumber cuts, a power drill with drill bits and a screwdriver attachment, and a carpenter’s level to ensure proper alignment.
Begin construction by cutting your frame pieces according to measurements. Assemble the perimeter frame first, using your drill to drive 3-inch deck screws at each corner. Add cross-supports every 16 inches for stability. Before securing, use your level on all sides to verify the frame sits perfectly flat, shimming underneath if needed to correct any unevenness.
Once level, attach the plywood decking with 2-inch screws every 8 inches along the frame. Cut access holes for cables before final installation.
Safety reminder: Always wear eye protection when cutting lumber and ear protection when operating power tools. If you’re uncomfortable with power tool operation, many tool rental centers offer brief tutorials, and community members often share helpful technique videos based on their own experiences.
Concealing Cables Below Floor Level
Running cables beneath your floor creates the cleanest possible gaming setup, eliminating trip hazards and visible wire clutter entirely. This approach works particularly well for ground-floor rooms with accessible subfloors or rooms with raised flooring systems.
Before starting, locate all floor joists using a stud finder to avoid drilling through structural supports. Mark your cable route from your gaming station to power outlets and equipment locations. You’ll need a combination of tools: a drill with spade or auger bits for creating access holes, fish tape or cable rods for routing wires through tight spaces, and a jigsaw if you need to create larger access panels.
For wooden subfloors, drill pilot holes at your entry and exit points, then use fish tape to guide cables through the space between joists. Cable routing equipment makes this process significantly easier, especially over longer distances. Always leave some slack in your cables to prevent tension damage.
When working with concrete floors, consider using a hammer drill to create channels for conduit, or explore surface-mounted cable raceways as an alternative. Install removable access panels at key points for future upgrades.
Community feedback consistently emphasizes the importance of labeling both ends of every cable before threading them through floors. Take photos of your cable routes for future reference, and always check local building codes regarding fire-rated cable requirements for below-floor installations.
Mounting Systems for Screens and Equipment
Multi-Monitor Arm Installation
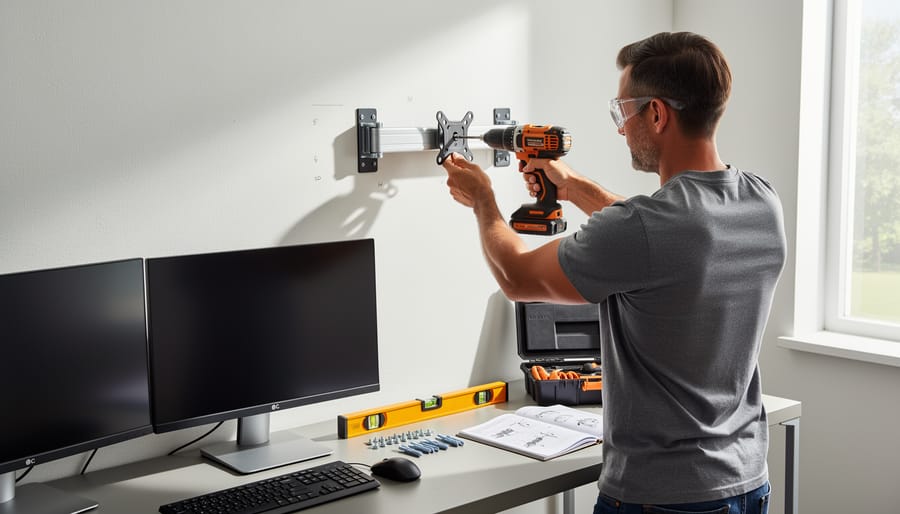
Mounting multi-monitor arms creates the ultimate 3D gaming setup by positioning screens at the perfect viewing angles while freeing up desk space. Here’s how to install them safely and securely.
Start by locating wall studs using a stud finder, which you can rent if you don’t own one. Studs provide the structural support needed for monitor arms that may hold 20-40 pounds or more. Mark stud locations with painter’s tape, then verify by drilling a small pilot hole at the marked spot. If you hit solid wood about 1.5 inches deep, you’ve found your stud.
Before drilling, check your monitor arm’s manufacturer specifications for weight limits and mounting requirements. Most arms require lag bolts that penetrate at least 1.5 inches into the stud. Position your mounting plate at the desired height, typically at or slightly below eye level when seated. Use a level to ensure the plate sits perfectly horizontal—this prevents monitor sagging and uneven positioning.
When drilling, use a drill bit slightly smaller than your lag bolts to create pilot holes. This prevents wood splitting while maintaining a secure grip. For drywall-only sections, use toggle bolts rated for at least twice your monitor’s weight, though stud mounting is always preferable.
Perform a load-bearing test before mounting expensive monitors. Hang weights equal to your monitors’ combined weight from the arm and leave overnight. Check for any movement, sagging, or wall damage. Community feedback consistently emphasizes this step—several users reported avoided disasters by catching inadequate mounting before adding their screens.
Ceiling-Mounted VR Sensor Setup
Ceiling-mounted VR sensors provide optimal tracking coverage by positioning cameras above the play area, eliminating blind spots common with desk-mounted setups. Before starting, locate ceiling joists using a stud finder, as these structural supports offer the most secure anchor points for your sensors.
For drywall installations directly into joists, you’ll need a cordless drill with a pilot bit slightly smaller than your mounting screws. Mark your sensor positions at opposite corners of your play space, typically 6-8 feet apart and angled downward at 30-45 degrees toward the center. Pre-drill pilot holes to prevent wood splitting, then attach the mounting brackets using wood screws at least 1.5 inches long.
If your ideal sensor placement doesn’t align with joists, use heavy-duty toggle bolts or expanding anchors rated for at least 10 pounds each. These specialized fasteners spread the weight load across a wider area of drywall. Drill holes sized according to the anchor manufacturer’s specifications, insert the anchors carefully, and tighten until secure but not overtightened, which could crack the ceiling material.
Safety first: always wear safety glasses when drilling overhead, and use a stable stepladder rather than chairs or tables. Keep cables organized with cable clips or conduit running along ceiling edges to prevent tripping hazards. Test your sensor stability by gently tugging the mounts before connecting expensive equipment.
Community members recommend testing your VR tracking coverage before permanently mounting sensors. Temporarily position them using adjustable camera tripods to find the optimal placement for your specific room layout and VR system requirements.
Tool Hire Versus Tool Purchase: What You Actually Need
When transforming a room into an immersive 3D gaming setup, making smart decisions about tools can save you hundreds of dollars. Here’s what community members recommend based on their actual projects.
For a one-time gaming room renovation, hiring makes the most financial sense for power tools you’ll rarely use again. Electric drills and impact drivers top the purchase list if you plan any future home improvements, typically costing between $80-$150 for decent quality models. However, specialty items like cable pullers, stud finders with deep-scanning capabilities, and laser levels are perfect candidates for hire at $15-$30 per day.
Based on user feedback, the clear winner for purchase is a basic toolkit containing screwdrivers, Allen keys, and wire strippers. One community member noted, “I used my basic toolkit at least twenty times during the setup for everything from mounting monitors to adjusting furniture.” These fundamental tools cost around $40-$60 and prove invaluable for ongoing gaming equipment adjustments.
Wall-mounting equipment presents an interesting cost comparison. A quality stud finder costs $50-$100 to purchase but only $12-$20 to hire for a weekend. Unless you’re planning multiple room projects, hiring wins here. Similarly, if you’re installing acoustic panels or soundproofing, pneumatic staplers and compressors make sense to hire at $35-$50 per day rather than purchasing equipment costing $200-$400.
Paint sprayers for accent walls are unanimous hire recommendations. Professional tradespeople in our community emphasize that quality sprayers require significant cleaning and maintenance, making the $40-$60 daily hire fee more practical than a $300 purchase that sits unused afterward.
Consider exploring different tool rental options based on your project timeline. Weekend rates often provide better value than daily pricing for gaming room setups spanning several days.
The general rule from experienced DIYers: purchase tools you’ll use quarterly or more frequently, hire everything else.
Safety Considerations for Your DIY Gaming Room Build
Building your dream gaming room should be an exciting project, but safety must come first. Before starting any work, assess the scope of your project honestly and recognize which tasks require professional expertise.
Electrical work presents the most significant risk in gaming room setups. If your project involves installing new outlets, running dedicated circuits for gaming equipment, or modifying existing electrical systems, consult a licensed electrician. Improper electrical work can cause fires, electrocution, or damage to expensive gaming equipment. Even seemingly simple tasks like mounting power strips incorrectly can create hazards.
When working with power tools for wall mounting or furniture assembly, always wear appropriate safety equipment including eye protection and work gloves. Keep your workspace clear of tripping hazards, especially when handling heavy monitors or equipment. Never operate power tools when fatigued, as this is when accidents most commonly occur.
Ventilation is critical during the finishing stages. When painting walls, applying adhesives for soundproofing materials, or installing carpet, ensure adequate airflow by opening windows and using fans. Many paints and adhesives release volatile organic compounds that can cause headaches, dizziness, or respiratory irritation in enclosed spaces. Wear a respirator mask when working with spray paints or strong adhesives, and follow manufacturer recommendations for drying times before occupying the space.
If your gaming room requires structural modifications like removing walls, reinforcing floors for heavy equipment, or significant ceiling work, always consult a structural engineer or building professional. Similarly, if you’re installing extensive LED lighting systems or smart home integration, professional assistance ensures code compliance and optimal performance. Remember, knowing when to call a professional is just as important as DIY skills.
Creating your own 3D gaming room setup is entirely achievable with the right planning, tools, and approach. Whether you’re mounting displays, running cables, installing acoustic panels, or building custom furniture, breaking the project into manageable steps makes it far less overwhelming. Remember that you don’t need to purchase every tool for a one-time project—exploring tool hire options can significantly reduce your costs while still giving you access to professional-grade equipment.
We’d love to hear about your gaming room transformation! Share photos of your setup, the challenges you overcame, and any clever solutions you discovered along the way. Your experience could help fellow DIY enthusiasts tackle their own projects with confidence. If you’ve used specific tools or techniques mentioned in this guide, leave a review to let others know what worked well for you.
The gaming room of your dreams is within reach. Start with your planning phase, gather your materials, and take it one step at a time. Your immersive gaming experience awaits, and the satisfaction of building it yourself makes every gaming session that much sweeter.
Related Posts

Post a Comment