
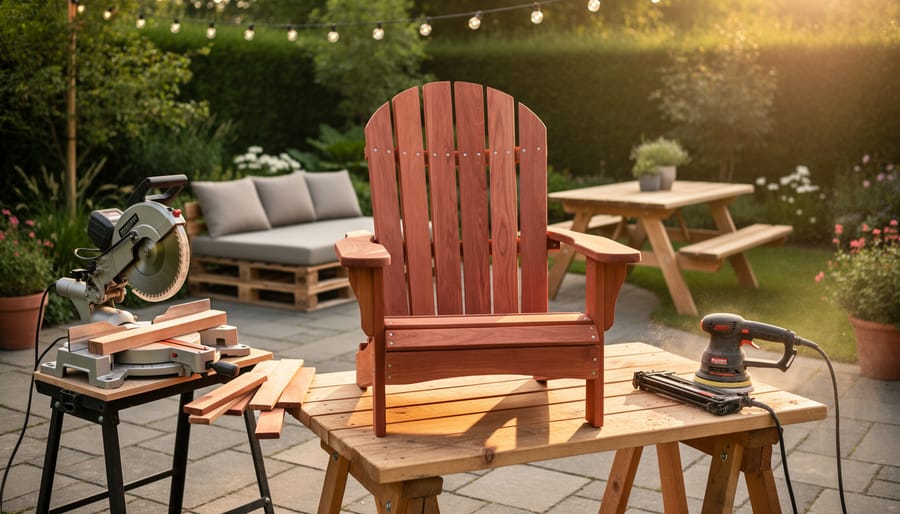
Transform your outdoor living space with custom-built furniture that costs less than store-bought pieces and perfectly fits your needs. Build a simple Adirondack chair using basic carpentry tools, requiring only cedar boards, exterior screws, and a weekend afternoon. Construct a sturdy picnic table from pressure-treated lumber with nothing more than a circular saw, drill, and measuring tape—this project suits furniture making for beginners and typically takes 4-6 hours to complete. Create a modular pallet lounge set by sourcing free shipping pallets, sanding them smooth, and arranging them into customizable seating configurations that adapt to different spaces.
Consider renting specialized tools rather than purchasing them for one-time projects. A compound miter saw ensures precise angle cuts for professional-looking joints, while a random orbital sander produces smooth, splinter-free surfaces ready for staining. A pneumatic nail gun speeds up assembly time significantly compared to manual fastening methods.
Choose weather-resistant materials like cedar, teak, or pressure-treated pine that withstand moisture and temperature fluctuations. Apply exterior-grade finishes to protect your work from UV damage and prevent wood rot. Start with straightforward designs that use basic joinery techniques before progressing to complex builds with curved elements or intricate details. Most outdoor furniture projects require similar foundational skills—measuring accurately, cutting straight lines, and joining pieces securely—making each completed piece a stepping stone toward more ambitious builds.
Essential Tools You’ll Need (And Where to Rent Them)
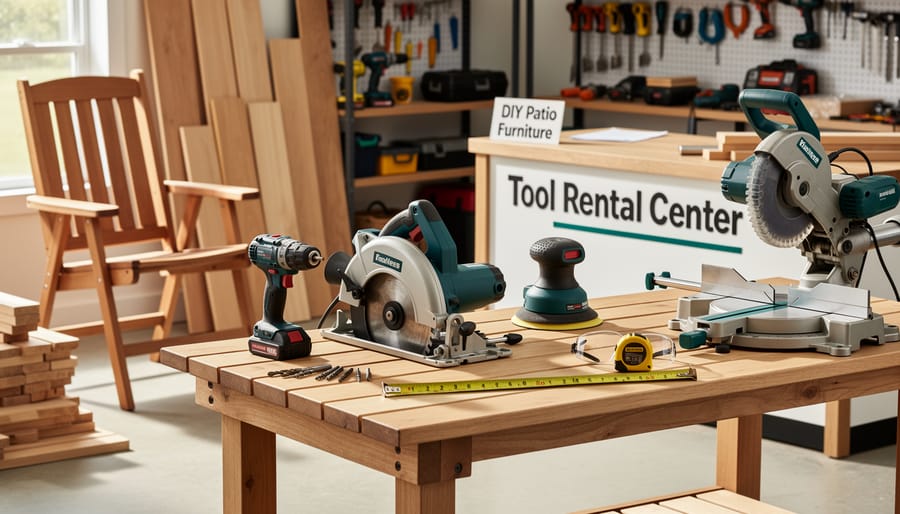
Basic Hand and Power Tools
Before diving into your outdoor furniture project, you’ll need several essential tools. A circular saw is your primary cutting tool for breaking down timber sheets and making straight cuts—expect to pay around $25-35 per day to rent. A cordless drill handles all drilling and driving tasks, typically costing $15-20 daily. An orbital sander smooths rough edges and surfaces for a professional finish, renting for approximately $20-30 per day.
Don’t overlook measuring tools like tape measures, speed squares, and levels—these ensure accuracy and are often included with tool packages. Quality clamps are crucial for holding pieces together during assembly and while glue dries, with rental rates around $5-10 per set daily.
For occasional DIYers, renting makes financial sense. The advantages of tool rental include accessing professional-grade equipment without storage concerns or maintenance costs. Most rental shops provide safety instructions and basic operation guidance—always ask questions before leaving. Consider renting for weekend rates to maximize your project time while minimizing costs.
Specialized Equipment for Advanced Projects
Taking on more ambitious outdoor furniture projects requires power tools that deliver precision and efficiency. A miter saw becomes essential when you’re cutting angled joints for Adirondack chairs or picture frames on planter boxes. This tool makes clean, accurate crosscuts and bevels that would be difficult to achieve by hand. Many DIYers rent miter saws for weekend projects rather than purchasing, especially compound sliding models that handle wider boards.
Planers help you achieve uniform thickness across boards and smooth rough-sawn lumber, which is often more affordable than pre-surfaced wood. This matters when building benches or tables where consistent dimensions affect how pieces fit together. A planer can transform budget lumber into premium-looking material.
Routers open up decorative possibilities like rounded edges, grooves, and custom profiles that elevate your furniture from basic to professional-looking. They’re particularly useful for creating drainage grooves in tabletops or decorative edge treatments on armrests.
Table saws provide the ripping capacity needed for breaking down full sheets of plywood or cutting multiple pieces to identical widths. When building storage benches or large dining tables, this consistency is crucial for proper assembly.
Before using any power tool, review the manufacturer’s safety guidelines and wear appropriate protective equipment. Consider renting these tools first to determine which ones suit your building style before investing in purchases.
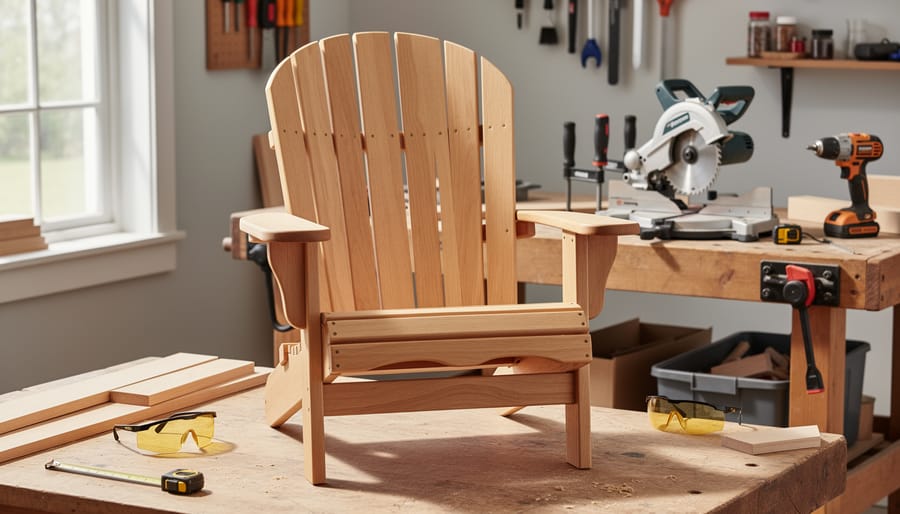
Simple Adirondack Chair: Your First Weekend Build
Materials and Cut List
Before starting your outdoor furniture project, gather the right materials to ensure a smooth build. For most projects, pressure-treated lumber is your best choice since it resists moisture, insects, and decay. Common dimensions include 2x4s for frames and supports, 1x6s or 1x4s for slats and surfaces, and 4x4s for legs on heavier pieces like benches or tables.
You’ll need exterior-grade screws (typically 2.5-inch and 3-inch deck screws) rather than nails, as they provide stronger connections that won’t loosen over time. Galvanized or stainless steel hardware prevents rust staining on your finished piece. Don’t forget wood glue rated for outdoor use, sandpaper (80-grit and 120-grit), and your chosen finish—either exterior wood stain, sealant, or paint designed for outdoor conditions.
Before cutting, inspect each board for warping, splits, or excessive knots that could weaken joints. Let lumber acclimate to your local humidity for 24-48 hours if possible. When measuring, always follow the “measure twice, cut once” rule to minimize waste. Wearing safety glasses and work gloves during material prep protects against splinters and sawdust. Organize your cut pieces by length and label them according to your project plan—this simple step saves significant time during assembly.
Assembly Instructions
Before starting any outdoor seating projects, read through all instructions completely and gather your materials in an organized workspace. Always wear safety glasses when cutting or sanding, and use hearing protection with power tools.
Begin by laying out all timber pieces and checking measurements against your plans. Pre-drill screw holes to prevent wood splitting, especially near edges. Mark drilling points clearly with a pencil before starting. When using a circular saw, ensure the blade guard functions properly and secure workpieces with clamps rather than holding them by hand.
Sand all surfaces with 120-grit sandpaper before assembly to avoid hard-to-reach spots later. Assemble the frame first, working on a flat surface to maintain square corners. Use a carpenter’s square to verify right angles at each joint before driving screws fully.
Common pitfalls include over-tightening screws, which can crack timber, and rushing the leveling process. Take time to check that legs sit evenly on the ground before finalizing attachment points. If working with treated pine, allow it to dry for several weeks before applying finish to ensure proper absorption.
Apply exterior wood stain or sealant in thin, even coats, following grain direction. Work in a well-ventilated area and allow recommended drying time between coats. Two thin coats provide better protection than one thick application. Store leftover materials properly and clean tools immediately after use to maintain their condition for future projects.
Finishing and Weather Protection
Proper finishing protects your outdoor furniture from sun, rain, and temperature changes. Start by sanding all surfaces with 120-grit sandpaper, then progress to 220-grit for a smooth finish. Always sand in the direction of the wood grain to avoid scratches.
For weather protection, apply an exterior wood stain or clear sealer designed for outdoor use. Stains penetrate the wood and provide UV protection while enhancing natural grain patterns. Clear sealers create a protective barrier without changing the wood’s color. Apply thin, even coats with a brush or cloth, allowing each coat to dry completely before adding the next. Most projects need two to three coats.
Pay special attention to end grains and joints where water absorption is highest. Consider reapplying finish annually, or when you notice water no longer beads on the surface. Community feedback shows that proper finishing can extend furniture life by several years, making this step well worth the effort for long-lasting results.
Rustic Pallet Furniture: Low-Cost, High-Impact Projects

Pallet Safety and Selection
Before diving into repurposing pallets for outdoor furniture, understanding pallet safety is essential. Not all pallets are suitable for DIY projects, particularly furniture where you’ll have regular contact.
Look for pallets stamped with “HT” (heat-treated), which indicates safe, chemical-free treatment. Avoid pallets marked “MB” (methyl bromide), as this pesticide poses health risks. Pallets stamped with “DB” (debarked) or those with no marking are generally safer options. Additionally, check for the IPPC logo, which indicates compliance with international standards.
Free pallets are often available from local retailers, construction sites, garden centres, and behind grocery stores. Always ask permission before taking them. When inspecting pallets, check for structural soundness by looking for cracks, rot, or missing boards. Avoid pallets with dark stains, unusual odours, or those used for food transport, as they may harbour bacteria or chemical residues.
Run your hands over the wood to detect splinters or rough patches that need sanding. Reject pallets with excessive warping or damage, as they’ll require more effort to repair than they’re worth for your outdoor furniture project.
Three Simple Pallet Builds
Pallets offer an excellent starting point for DIY outdoor furniture projects. These sturdy wooden platforms are often available for free or at minimal cost, and their pre-assembled structure significantly reduces cutting and joining work.
A pallet coffee table represents the simplest build, ideal for complete beginners. Start by selecting a pallet in good condition without splits, rot, or excessive staining. Sand all surfaces thoroughly to eliminate splinters and rough patches. You can stack two pallets for added height or use a single pallet for a low-profile design. Attach four caster wheels to the bottom corners using lag screws that penetrate at least two inches into the wood. For weather protection, apply exterior wood stain or sealed paint. The gaps between slats provide natural drainage and visual interest. This project typically requires only a sander, drill, and basic fasteners.
The pallet sofa frame involves slightly more complexity but remains accessible. Position three pallets vertically as the backrest and two horizontally as the seating base. Connect them using carriage bolts or heavy-duty wood screws at multiple junction points for stability. Reinforce the connection points with metal corner brackets. Add outdoor cushions to complete the seating area. Key construction note: ensure the front edge sits flush to prevent tipping when users sit down.
A planter bench combines seating with greenery. Remove every other slat from a pallet to create planting pockets. Line the interior with landscape fabric to contain soil while allowing drainage. Position the modified pallet on sturdy legs cut from four-by-four posts. The alternating solid and planted sections create an attractive, functional piece perfect for patios or garden edges.
Cedar Planter Boxes That Double as Seating
Design Planning and Dimensions
Getting your dimensions right from the start prevents costly mistakes and ensures comfortable, functional furniture. For seating projects like benches or chairs, plan for seat heights between 40-45cm from the ground, with seat depths of 38-50cm for adequate leg support. Allow at least 45cm of width per person for comfortable seating.
When building DIY wood planters or combination planter-bench designs, factor in soil depth requirements. Most flowering plants need 25-30cm depth, while vegetables and deeper-rooted plants require 40-50cm. Account for drainage holes and a 5cm gravel layer at the base.
Structural load is critical for seating. Standard outdoor benches should support at least 180kg, requiring posts or legs made from minimum 90x90mm timber. Space support legs no more than 120cm apart for adequate weight distribution. For built-in planters, use marine-grade plywood at least 18mm thick or timber framing with 19mm boards to handle soil weight, which adds approximately 120kg per cubic metre when wet.
Always sketch your design with measurements before purchasing materials, and consider user height variations. Testing mock-ups with cardboard or scrap wood helps identify comfort issues before final construction begins.
Construction Steps
Start by laying out all your cut pieces and organizing them by type. Begin frame assembly by connecting the four leg posts to the long horizontal side rails. Pre-drill pilot holes to prevent splitting, especially important when working with cedar or hardwoods. This step prevents frustration and ensures clean joints that will hold up over seasons of use.
Secure the side rails to the legs using exterior-grade wood screws or galvanized carriage bolts for maximum durability. A cordless drill makes this process significantly faster, though you can rent one if you don’t own this essential tool. Work on a flat surface and check that corners form true 90-degree angles using a carpenter’s square before fully tightening fasteners.
Next, attach the shorter front and back rails to complete the rectangular base frame. Double-check measurements as you go, since small errors compound quickly. Once the base is square and solid, add your center support beam running lengthwise for additional stability, particularly important for benches longer than four feet.
Creating proper drainage is critical for outdoor furniture longevity. Space your seat slats approximately one-quarter to one-half inch apart. This gap allows rainwater to drain freely while remaining narrow enough for comfortable seating. Use scrap wood as spacers between slats to maintain consistent gaps throughout.
For the seating surface, begin at one end and work systematically across the frame. Attach each slat with two screws at each support point, countersinking them slightly so screw heads sit flush with the wood surface. Sand any rough edges thoroughly with 120-grit sandpaper, paying special attention to corners and cut ends where splinters commonly form.
Test your completed piece before applying finish by sitting on it and checking for any wobbling or squeaking that indicates loose connections.
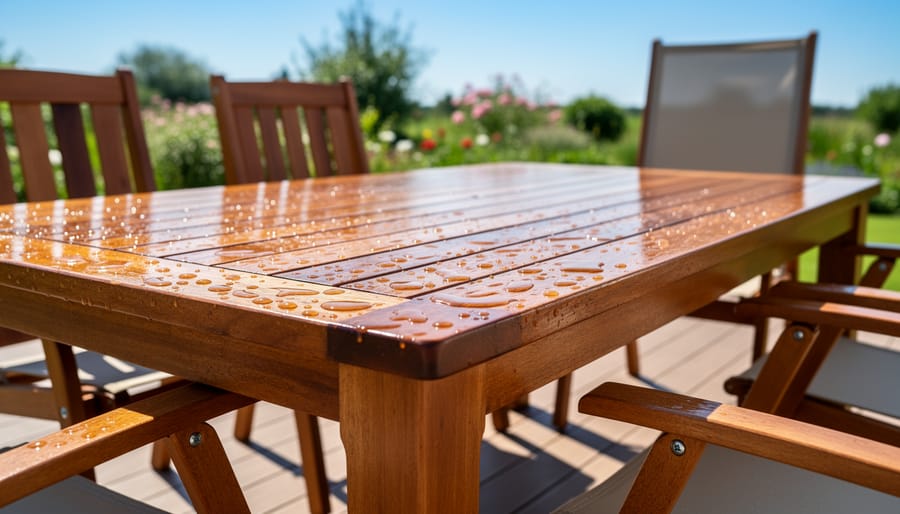
Outdoor Dining Table: A Statement Piece
Choosing Your Design and Materials
Selecting the right materials starts with understanding wood species and their outdoor performance. Cedar and redwood naturally resist rot and insects, making them premium choices that require minimal maintenance. Pressure-treated pine offers an economical alternative with excellent durability when properly sealed. For tropical hardwoods like teak or ipe, expect superior longevity but higher costs and more challenging workability.
Your design choice should balance aesthetics with structural integrity. Modern minimalist styles work well with straight lines and fewer joints, perfect for beginners. Traditional designs often require more complex joinery but offer timeless appeal. Consider your space dimensions and existing outdoor decor to ensure cohesion.
Structural stability depends on proper dimensions and joinery techniques. Use minimum 2×4 lumber for chair and bench frames, upgrading to 4×4 posts for table legs supporting heavy loads. Plan for weight distribution by positioning support beams no more than 24 inches apart on seating surfaces. Factor in wood movement by allowing 1/8-inch gaps between deck boards or tabletop planks. Always account for local weather conditions; humid climates demand more generous moisture expansion allowances, while dry regions need tighter initial fits.
Building the Tabletop
Start by selecting pressure-treated or naturally rot-resistant lumber like cedar or redwood for longevity outdoors. Inspect each board carefully, looking for straight edges, minimal knots, and consistent thickness. Arrange boards with alternating grain patterns (curved grain lines facing opposite directions) to minimize warping as the wood expands and contracts with weather changes.
For the glue-up, use waterproof wood glue rated for exterior use. Apply even beads along board edges, then clamp boards together with bar clamps spaced every 12 to 18 inches. Alternate clamp placement above and below the panel to distribute pressure evenly and prevent bowing. Wipe away excess glue with a damp cloth before it dries.
Once dry, flatten the surface using a handheld power planer or belt sander, working diagonally across the grain first, then with the grain for final smoothing. A random orbital sander handles finishing touches, progressing through 80, 120, and 180-grit sandpaper.
For edge treatment, use a router with a roundover bit to soften sharp corners, which prevents splintering and creates a more finished appearance. Sand edges smooth, ensuring they match the top surface quality. This professional touch elevates your project from basic to beautiful.
Base Construction and Assembly
Your furniture’s stability starts with the legs. For most outdoor projects, 4×4 posts work exceptionally well, providing substantial support while resisting rot when pressure-treated. Cut all four legs to identical length using a miter saw for clean, square ends. A simple trick shared by community builders: stack your legs together and mark them simultaneously to ensure perfect uniformity.
Support structures vary by project complexity. Basic benches need horizontal stretchers connecting opposite legs, positioned 4-6 inches from the ground. Tables require an apron frame directly beneath the tabletop, joined with pocket hole screws or traditional mortise-and-tenon joints. Cross-bracing between legs dramatically improves stability on uneven ground.
During final assembly, work on a flat surface initially. Attach legs to your frame using lag bolts or heavy-duty wood screws, pre-drilling to prevent splitting. Before tightening completely, check diagonal measurements from corner to corner—if they match, your piece is square.
For leveling on patios or decks, adjustable furniture feet are game-changers. Alternatively, many DIYers recommend adding felt pads or rubber bumpers under legs, which also protect deck surfaces. On grass or gravel, slightly burying leg bottoms creates remarkable stability. Always test your furniture’s sturdiness by applying weight from different angles before declaring the project complete.
Weather-Resistant Finishing Techniques
Protecting your outdoor furniture from sun, rain, snow, and humidity extends its lifespan significantly. The right finish acts as a barrier against moisture, UV rays, and temperature fluctuations that cause wood to crack, warp, or rot. Understanding your options helps you choose the best protection for your specific project and climate.
Oil finishes penetrate deep into wood fibers, enhancing natural grain while providing water resistance. Teak oil, linseed oil, and tung oil are popular choices that require reapplication every 6-12 months depending on exposure. They’re ideal for dense hardwoods and offer easy touch-up maintenance. Simply wipe on with a clean cloth, let absorb for 15-30 minutes, then buff away excess.
Exterior stains combine pigment with protective resins, offering color options while allowing wood texture to show through. Semi-transparent stains highlight grain patterns, while solid stains provide maximum UV protection and hide imperfections. Most stains last 2-4 years before requiring recoating. Apply with brushes or sprayers in thin, even coats, following wood grain direction.
Paint creates the most durable barrier against weather when properly applied. Exterior-grade acrylic latex paints resist cracking and mildew while offering unlimited color choices. Always start with quality primer designed for outdoor use. Paint typically lasts 4-6 years in moderate climates. For best results, apply two thin coats rather than one thick layer.
Sealers, including polyurethane and spar varnish, form protective film on wood surfaces. Marine-grade spar varnish contains UV inhibitors and flexibility agents that expand and contract with wood movement. These finishes need reapplication every 1-3 years but offer excellent water resistance.
Climate significantly impacts finish selection. Hot, sunny regions demand UV-resistant products with high sun protection factor. Humid coastal areas require mold and mildew-resistant formulations. Cold climates need flexible finishes that won’t crack during freeze-thaw cycles.
Regardless of finish type, proper surface preparation ensures adhesion and longevity. Sand surfaces smooth, clean away dust thoroughly, and apply finish during dry weather between 50-85 degrees Fahrenheit. Plan annual inspections to catch wear early, making maintenance simpler and extending your furniture’s outdoor life considerably.
Safety Essentials for Outdoor Furniture Projects
Before starting any outdoor furniture project, protecting yourself should be your top priority. Whether you’re building a simple bench or an elaborate dining set, following proper safety protocols prevents injuries and ensures successful results.
Start with the right personal protective equipment (PPE). Safety glasses are non-negotiable when cutting, drilling, or sanding—flying wood chips and sawdust can cause serious eye injuries. Wear hearing protection when operating power tools, especially circular saws and routers that produce sustained loud noise. A dust mask or respirator protects your lungs from wood particles, and this becomes critical when working with pressure-treated lumber, which contains chemical preservatives that shouldn’t be inhaled.
Speaking of pressure-treated wood, take extra precautions with this common outdoor material. Always wear gloves when handling it, and never burn the scraps—this releases toxic chemicals. Wash your hands thoroughly after working with treated lumber, and keep food and drinks away from your workspace.
Tool-specific hazards require your attention. Keep blade guards in place on saws, maintain a firm grip on power tools, and never bypass safety features. Unplug tools before changing bits or blades. When using unfamiliar equipment, review the manufacturer’s instructions completely—many rental centers provide helpful guidance for first-time users.
Ventilation matters significantly when applying finishes, stains, or sealants. Work outdoors or in well-ventilated areas to avoid inhaling fumes. Read product labels carefully and follow recommended drying times.
Finally, use proper lifting techniques for heavy pieces. Bend at your knees, not your waist, and don’t hesitate to ask for help moving assembled furniture. Your back will thank you, and you’ll be ready to enjoy your finished project safely.
Creating your own outdoor furniture is more accessible than you might think, especially when tool rental brings professional-grade equipment within reach without the investment of purchasing. Whether you’re crafting a simple Adirondack chair or tackling a complete pergola, starting with projects that match your current skill level builds both confidence and capability.
Begin with straightforward builds like planters or basic benches to familiarize yourself with essential tools and techniques. As your skills develop, progress to more complex pieces that transform your outdoor hangout space into something truly special. Remember that even experienced builders once started with their first cut and first assembly.
We encourage you to share your completed projects, lessons learned, and tool reviews with our community. Your experiences help others navigate their own building journeys and make informed decisions about tool rentals and project planning. Don’t hesitate to ask questions or offer advice based on what worked for you. The satisfaction of relaxing on furniture you built yourself, surrounded by family and friends, makes every step of the process worthwhile. Start planning your first project today and discover how rewarding DIY outdoor furniture building can be.
Related Posts
Post a Comment