Start by orienting your building to maximize passive solar gain—position the longest wall facing true south (in the Southern Hemisphere, north) with 60-80% of your glazing on this side to capture winter warmth while using properly sized eaves to block summer sun. Install a continuous thermal envelope using high-performance insulation with minimum R-values of R6.0 for walls and R7.0 for ceilings, ensuring absolutely no gaps at junctions, penetrations, or service points where thermal bridging occurs.
Integrate renewable energy generation from day one of your design process rather than as an afterthought. Calculate your building’s actual energy consumption using modeling software, then size your solar photovoltaic system to match or exceed this demand—most zero energy homes require 5-10kW systems depending on climate zone and occupancy. Pair this with energy-efficient mechanical systems including heat pump technology for both heating and cooling, as these deliver 300-400% efficiency compared to traditional resistance heating.
Prioritize airtightness by achieving a blower door test result of 3 air changes per hour at 50 pascals or better, using specialized tapes, membranes, and sealants at every joint. This single factor reduces heating and cooling loads by up to 40%, making your renewable energy system significantly smaller and more affordable.
Zero energy design isn’t a single revolutionary technology—it’s the intelligent combination of proven green building practices that work together synergistically. The concept is straightforward: design and construct buildings that produce as much energy as they consume annually, resulting in a net-zero energy bill and dramatically reduced carbon footprint. While this might sound ambitious, builders and DIYers across Australia are already achieving these results using accessible tools, established construction methods, and careful planning that adds only 5-10% to initial construction costs while delivering decades of energy savings.
What Makes a Building ‘Zero Energy’?
The Math Behind Energy Balance
Think of zero energy design like balancing your household budget. Just as your monthly income needs to match your expenses to break even, a zero energy building produces as much power as it consumes over the course of a year.
Here’s how it works in practice: during sunny summer days, your solar panels might generate 50 kilowatt-hours while your home only uses 30. That extra 20 kilowatt-hours gets sent back to the grid, earning you credits. Come winter, when your panels produce less but your heating demands increase, you draw those credits back. By year’s end, the energy ledger balances to zero or better.
The equation is straightforward: Energy Production minus Energy Consumption equals Zero. But achieving this balance requires two key strategies working together. First, you dramatically reduce energy consumption through superior insulation, efficient windows, and smart HVAC systems. Second, you install renewable energy systems, typically solar panels, sized to match your reduced consumption needs. It’s easier and cheaper to balance a smaller energy budget, which is why efficiency improvements always come before adding generation capacity.
Common Misconceptions About Zero Energy Homes
Let’s clear up some common myths that stop people from considering zero energy homes. First, the big one: cost. While initial construction runs roughly 5-10% higher than conventional builds, real projects show payback periods of 7-12 years through eliminated energy bills. Many builders report that smart planning and phased implementation actually bring costs closer to standard construction.
Another misconception is that you need perfect sunny weather year-round. Zero energy homes work successfully in cloudy Seattle, snowy Vermont, and across varied climates. The key is proper system sizing and energy storage, not constant sunshine. Battery technology and grid-tied systems handle seasonal variations effectively.
Some believe zero energy means living off-grid with sacrifices. Actually, most zero energy homes connect to the utility grid for backup and banking excess power. You maintain modern comforts while your net annual energy consumption hits zero.
Finally, people assume it requires exotic materials or complicated systems. Community feedback from actual builders reveals that standard construction tools and familiar techniques apply. The difference lies in attention to air sealing, insulation quality, and efficient equipment selection rather than revolutionary building methods. Real-world projects prove these homes are achievable for skilled DIYers and contractors alike.
Essential Renewable Energy Systems for Zero Energy Design
Solar Panels: Your Primary Energy Generator
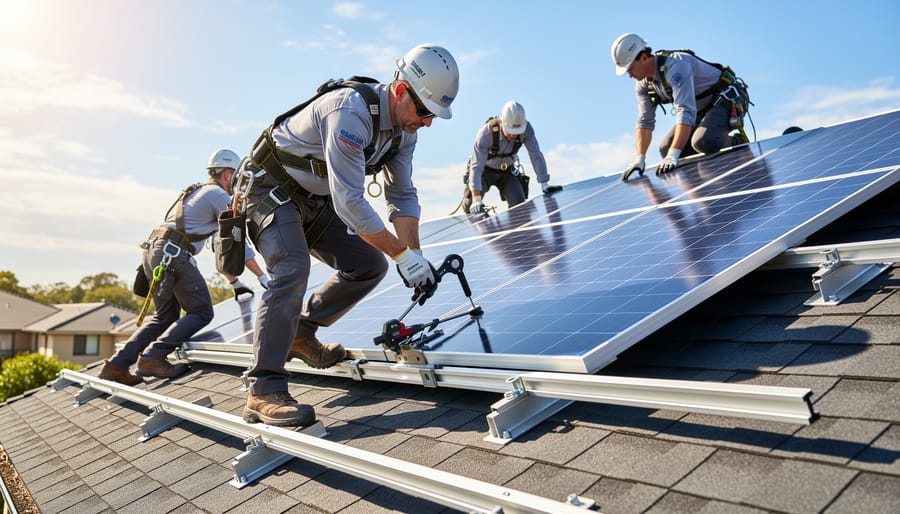
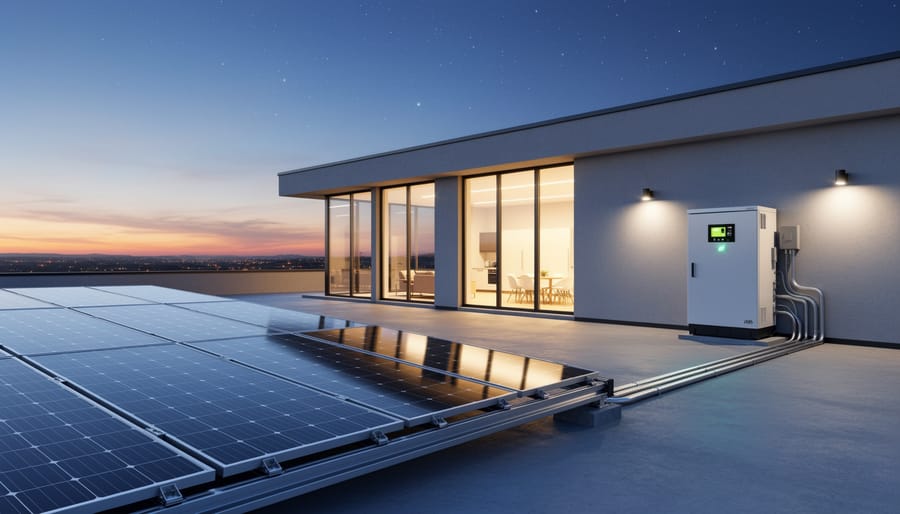
Solar panels form the backbone of any zero energy building, converting sunlight into electricity through photovoltaic (PV) cells. These panels can be traditional roof-mounted units or sleek building-integrated photovoltaic systems that serve dual purposes as both building materials and energy generators.
Placement is critical for maximum efficiency. North-facing roofs in Australia receive optimal sunlight exposure throughout the day. Panels should be angled between 20-30 degrees for most Australian locations, though adjustments may be needed based on your latitude. Avoid shaded areas from trees, chimneys, or neighbouring structures.
Calculating the right system size starts with understanding your energy consumption. Review your electricity bills to determine average daily usage in kilowatt-hours. A typical Australian home uses 15-20 kWh daily, requiring a 5-7 kW system. Commercial buildings need detailed energy audits to account for equipment, lighting, and HVAC loads.
For installation, you’ll need scaffolding for safe roof access, mounting brackets, cable management tools, and electrical testing equipment. Many hire centres stock specialized PV installation kits including torque wrenches for proper fastening and insulation testers for safety compliance.
Professional installation is recommended for electrical connections, but DIY-savvy homeowners can handle mounting systems with proper safety equipment. Always check local regulations, as electrical work typically requires licensed certification. Community forums often share real-world experiences about system performance and installation challenges specific to different Australian climates.
Solar Thermal Systems for Water Heating
Solar thermal systems harness the sun’s energy to heat water directly, offering one of the most cost-effective renewable technologies for zero energy homes. These collectors, typically mounted on roofs, contain tubes or panels filled with heat-absorbing fluid. As sunlight strikes the collector surface, it warms this fluid, which then transfers heat to your domestic water supply through a heat exchanger.
Installation requires careful planning and the right equipment. You’ll need standard plumbing tools like pipe cutters, wrenches, and soldering equipment, plus specialized items including roof mounting brackets, thermal insulation materials, and circulation pumps. A roof ladder or scaffolding system ensures safe access during installation and maintenance.
For professional results, proper sizing is essential. Calculate your household’s hot water needs, typically 40-60 litres per person daily, and choose collectors accordingly. Most residential systems require 4-6 square metres of collector area.
Maintenance involves annual checks of pump operation, fluid levels, and connection integrity. Safety note: always isolate the system before performing any maintenance work, and never work on roofs in wet or windy conditions. Many tradespeople recommend hiring specialized tools like thermal imaging cameras to verify system performance and identify potential heat loss areas, ensuring your investment delivers maximum efficiency year-round.
Geothermal Heat Pumps: Underground Energy
Ground-source heat pumps tap into the earth’s stable underground temperature to heat and cool your home with remarkable efficiency. Unlike conventional HVAC systems, these units exchange heat with the ground rather than outdoor air, reducing energy consumption by 30-60%.
The system requires burying a loop of piping either horizontally (4-6 feet deep across your property) or vertically (100-400 feet deep in drilled boreholes). Horizontal installations need significant yard space and excavation equipment like trenchers or backhoes, while vertical systems demand specialized drilling rigs but work on smaller lots. You’ll also need a backhoe or excavator for the indoor-outdoor connection trenches.
The heat pump unit itself resembles a traditional furnace and connects to your existing ductwork. Professional installation typically takes 2-5 days, depending on the loop configuration.
Economic viability depends on several factors. Upfront costs range from £10,000-25,000, but operational savings of £800-1,500 annually mean payback periods of 7-15 years. This option makes most sense if you’re building new construction (avoiding landscaping disruption), replacing an aging HVAC system, or have access to renewable heat incentive schemes. Properties using expensive heating fuels like oil or LPG see faster returns.
Community feedback consistently highlights the importance of proper soil analysis and qualified installers—shortcuts here compromise long-term performance.
Wind Turbines for Supplemental Power
Small-scale residential wind turbines can supplement solar power in zero energy designs, particularly in rural or coastal locations with consistent breezes. These systems typically range from 400 watts to 20 kilowatts, with smaller units suitable for supplementing household energy needs rather than full-power generation.
Before installation, check local zoning regulations and homeowner association rules, as height restrictions often limit turbine effectiveness. Most residential systems require towers between 30 to 120 feet tall to access consistent wind speeds above ground-level obstructions. Wind speed mapping tools help determine if your site receives adequate wind, generally requiring average speeds of at least 10 mph for cost-effective operation.
Installation demands specialized equipment including tower erection tools, concrete forms for foundation work, electrical conduit benders, and proper safety harnesses for elevated work. Many DIYers partner with professionals for the tower installation while handling electrical integration themselves. Essential components include the turbine unit, charge controller, inverter to convert DC to AC power, and battery storage if designing an off-grid system. Always ensure installations meet local electrical codes and consider hiring certified electricians for final connections to protect both safety and equipment warranties.
Building Design Strategies That Reduce Energy Demand
Orientation and Passive Solar Design
Getting the orientation right is the foundation of zero energy design—and it costs nothing but careful planning. Position your building’s longest wall facing true north (in the southern hemisphere) or true south (in the northern hemisphere) to maximize winter sun exposure while minimizing summer heat gain.
Start by analyzing your site. Note where the sun rises and sets throughout the year, identify prevailing winds, and map any shade from trees or neighboring structures. This assessment guides your building’s footprint before you break ground.
Window placement is critical. Install larger windows on the north-facing wall (southern hemisphere) to capture winter sunlight that penetrates deep into living spaces. Keep windows on the east and west walls smaller to reduce harsh morning and afternoon glare. South-facing windows should be minimal, as they receive little direct sun but can lose heat in winter.
Combine these passive design techniques with proper eave design—extend your roofline to shade high summer sun while allowing lower winter sun to enter. A simple sun angle calculator or smartphone app helps determine the ideal overhang depth for your latitude.
For DIYers and builders, getting orientation right from the start eliminates expensive mechanical heating and cooling systems down the track, making zero energy targets far more achievable.
Super-Insulation and Air Sealing Techniques
Creating an airtight building envelope is essential for achieving zero energy performance, as air leaks can account for up to 40% of heating and cooling losses. The key is combining quality super-insulation materials with meticulous air sealing techniques.
Start by sealing all gaps and penetrations before installing insulation. Use spray foam for irregular spaces around pipes, wires, and ductwork. For larger areas, consider hiring a spray foam rig to ensure proper coverage. Apply weatherstripping to all doors and windows, and use caulk for stationary joints and cracks.
Essential tools include infrared cameras (available for hire) to identify air leaks, blower door testing equipment to measure airtightness, and quality caulking guns for consistent application. Many hire centers now stock these specialized tools, making professional-grade testing accessible to DIYers.
Common mistakes to avoid include compressing batt insulation, which reduces its R-value, forgetting to seal the top plates of walls, and overlooking attic hatches. Another frequent error is installing vapor barriers on both sides of insulation, which can trap moisture and cause mold issues.
According to community feedback from builders who have tackled zero energy projects, patience during the air sealing phase pays dividends. One contractor noted that spending an extra week on thorough sealing reduced their client’s heating costs by 60%. Always verify your work with a blower door test before closing up walls.
High-Performance Windows and Doors
Windows and doors are responsible for up to 30% of heating and cooling energy loss in conventional homes, making them critical components in zero energy designs. Selecting high-performance glazing systems starts with understanding U-factor ratings, which measure how well a window prevents heat from escaping. Look for windows with U-factors of 0.30 or lower, with triple-pane options offering even better insulation in cold climates.
Low-E (low-emissivity) coatings are thin metallic layers that reflect infrared light, keeping heat inside during winter and outside during summer. When choosing windows, verify the Solar Heat Gain Coefficient (SHGC), which indicates how much solar radiation passes through. Northern exposures benefit from higher SHGC values to capture winter warmth, while southern exposures in hot climates need lower values to minimize cooling loads.
Installation quality matters as much as product selection. Air leakage around frames can undermine even the best windows, so proper weatherstripping and sealing are essential. Professional-grade caulking guns and foam applicators ensure complete air sealing around rough openings. Many DIYers find that hiring specialized installation tools like pneumatic nail guns and laser levels from equipment rental centers helps achieve professional results without permanent investment.
Community reviews consistently highlight that rough opening preparation is where many projects falter. Take time to properly flash window openings with waterproof membranes before installation. Use expanding foam sparingly in gaps, as over-application can bow frames and affect operation. Finally, verify airtightness with blower door testing to confirm your installation meets zero energy performance targets.
Energy Storage Solutions for Consistent Power
Battery Systems: Types and Installation
Selecting the right battery system is crucial for storing surplus solar energy in your zero energy design. Let’s break down your options in straightforward terms.
Lithium-ion batteries have become the go-to choice for modern installations. They’re compact, efficient, and handle 4,000-6,000 charge cycles before capacity drops significantly. While they cost more upfront (roughly £5,000-£10,000 for a typical home system), their longer lifespan and 95% round-trip efficiency make them cost-effective over time. Popular brands include Tesla Powerwall and LG Chem.
Lead-acid batteries remain viable for budget-conscious projects. These traditional batteries cost 40-60% less initially but only manage 1,000-2,000 cycles and operate at 80-85% efficiency. They’re heavier, require more space, and need ventilation due to hydrogen gas emission during charging. Consider them for workshops or outbuildings where space isn’t limited.
Emerging technologies like saltwater batteries offer safer, non-toxic alternatives, though availability remains limited. Flow batteries show promise for larger commercial applications but aren’t yet practical for residential use.
Sizing your battery bank requires calculating your daily energy consumption in kilowatt-hours and deciding how many days of backup power you need. Most homeowners target 1-3 days of storage. A qualified electrician must handle the installation, as it involves connecting to your main electrical panel and configuring charge controllers.
Safety is paramount. Always install batteries in temperature-controlled spaces (ideally 10-25°C), away from flammable materials. Ensure proper ventilation, especially for lead-acid systems. Install appropriate disconnect switches and follow manufacturer spacing requirements. Never attempt electrical connections without proper training or certification.
Grid Connection vs. Off-Grid Systems
When designing a zero energy home, you’ll need to decide between grid-connected and off-grid systems. Grid-connected systems remain tied to the utility network, allowing you to draw power when your solar panels aren’t producing enough and send excess electricity back through net metering. This arrangement credits your account for surplus energy, effectively running your meter backward. It’s the most popular choice because it eliminates the need for expensive battery storage and provides a reliable backup.
Off-grid systems operate independently, requiring substantial battery banks to store energy for nighttime use and cloudy days. While this offers complete energy independence, the upfront costs are significantly higher, and you’ll need careful load calculations to avoid running short on power.
From a regulatory standpoint, grid-connected systems typically require utility approval and interconnection agreements. Net metering policies vary by location, with some utilities offering one-to-one credit exchanges while others provide reduced rates for exported power. Check your local regulations before committing, as some areas have monthly connection fees or capacity limits that affect cost savings. Off-grid builds may face different permitting requirements but avoid ongoing utility relationships entirely.
Tools and Equipment You’ll Need for Zero Energy Projects
Solar Installation Tools
Installing solar panels requires specialized equipment beyond standard construction tools. For mounting systems, you’ll need torque wrenches calibrated to manufacturer specifications, stainless steel drill bits for roof penetrations, and flashing installation tools to maintain weatherproofing. Most installers use rail-mounting systems that demand precise measurements and secure fastening.
Electrical testing is crucial for safety and efficiency. A digital multimeter measures voltage and current output, while a clamp meter tests individual string performance without breaking circuits. Insulation resistance testers verify system integrity before connecting to your home’s electrical panel. For grid-tied systems, you’ll also need a solar power meter to measure generation accurately.
Safety gear is non-negotiable when working at height and with electrical systems. Arc-rated gloves, insulated tools, and fall protection harnesses are essential. Proper scaffolding or roof jacks provide stable working platforms.
Rather than purchasing expensive equipment for a one-time installation, consider hiring from local tool rental centers or specialized renewable energy suppliers. Many community tool libraries now stock solar installation kits. Check with regional solar cooperatives too, as members often share equipment and expertise. Always verify that hired testing equipment has current calibration certificates to ensure accurate readings and compliance with electrical codes.
HVAC and Mechanical System Tools
Installing modern HVAC systems for zero energy homes requires specialized equipment beyond standard toolkits. Heat pump installation demands refrigerant recovery machines, vacuum pumps, and manifold gauge sets to ensure proper charging and system efficiency. These precision instruments handle the refrigerant lines that transfer thermal energy efficiently, making them essential for optimal performance.
For ductwork installation, you’ll need sheet metal shears, seamers, and pop rivet guns to create airtight connections that prevent energy loss. A duct blaster testing kit helps verify system tightness, which directly impacts your building’s energy performance. Many contractors rent these diagnostic tools since they’re used intermittently.
Ventilation system setup for energy recovery ventilators (ERVs) or heat recovery ventilators (HRVs) requires core drilling equipment for exterior penetrations and flexible duct installation tools. These systems capture outgoing air’s thermal energy to precondition incoming fresh air, reducing heating and cooling demands.
Consider renting larger equipment like mini-split installation kits or commercial-grade vacuum pumps for multi-zone projects. Community reviews consistently highlight that investing in quality torque wrenches and digital thermometers pays dividends in system reliability and efficiency verification.
Diagnostic and Testing Equipment
Verifying your zero energy building’s actual performance requires specialized diagnostic equipment. Thermal imaging cameras are essential tools that reveal heat loss patterns invisible to the naked eye, showing exactly where insulation gaps or air leaks compromise your energy efficiency. These cameras display temperature variations in different colors, making problem areas immediately obvious.
Blower door tests measure how airtight your building truly is. This equipment consists of a powerful fan mounted in an exterior doorway that depressurizes the building, while gauges measure the air infiltration rate. The test quantifies exactly how many air changes per hour occur, helping you meet zero energy standards that typically require fewer than 3 air changes at 50 pascals pressure.
Energy monitoring systems track real-time power consumption and renewable energy production, confirming whether your building achieves net-zero performance. Modern monitors connect to smartphone apps, letting you identify energy-hogging appliances and verify that solar panels generate expected output.
Many tool hire centers now stock these diagnostic devices, making professional-grade testing accessible without major equipment investments. Community reviews consistently highlight thermal cameras as game-changers for troubleshooting energy performance issues.
Cost Breakdown and Return on Investment
Initial Investment vs. Traditional Construction
Zero energy construction typically costs 5-10% more upfront than conventional building methods, though this premium continues to shrink as technologies become mainstream. The extra investment primarily comes from three areas: high-performance insulation, advanced air sealing systems, and renewable energy equipment like solar panels and heat pumps.
The good news? Strategic planning can significantly reduce these costs. Purchasing materials during off-season sales, hiring contractors during slower periods, and phasing your renewable installations over time all help manage expenses. Many DIYers also find that handling insulation installation and air sealing themselves cuts labor costs substantially.
Consider the whole picture when comparing costs. While conventional construction appears cheaper initially, zero energy homes eliminate or drastically reduce monthly utility bills from day one. Most homeowners recover their additional investment within 7-12 years through energy savings, and federal tax credits plus state incentives can immediately offset 26-30% of renewable energy system costs.
Community feedback consistently shows that bundling purchases with other local builders and leveraging group-buy programs delivers the best material pricing. Working with experienced contractors who understand zero energy principles also prevents costly mistakes that plague first-time sustainable builds. The premium you pay today translates directly into decades of energy independence and lower operating costs.
Tax Credits, Rebates, and Financing Options
Making the leap to zero energy design becomes significantly more affordable when you tap into available financial support. The federal Investment Tax Credit (ITC) currently offers up to 30% back on solar panel installations, while the Energy Efficient Home Improvement Credit covers insulation, windows, and heat pumps with credits up to $3,200 annually. These aren’t complicated programs reserved for experts—homeowners and contractors alike can claim them directly on tax returns.
Beyond federal programs, your local utility company likely offers rebates for energy-efficient upgrades. Many providers give cash back for installing high-efficiency HVAC systems, water heaters, or improved insulation. Contact your utility’s customer service department to learn what’s available in your area, as amounts vary significantly by location.
Green financing options have also expanded considerably. Property Assessed Clean Energy (PACE) loans allow you to finance improvements through your property tax bill, spreading costs over 15-20 years. The payments typically transfer with the property if you sell. Many credit unions and specialized lenders now offer energy efficiency loans with favorable rates, recognizing that lower utility bills improve your ability to repay.
Community members have reported saving thousands by combining multiple incentives. One DIYer shared that stacking federal credits with utility rebates covered nearly 40% of their solar installation costs, making the project financially viable much sooner than anticipated.
Real-World Examples: Zero Energy Projects in Action
Nothing demonstrates the viability of zero energy design quite like buildings already delivering results. Let’s look at several standout projects that offer practical insights for your next build.
The Putney School Fieldhouse in Vermont shows what’s possible for larger structures. This 47,000-square-foot athletic facility achieved net-zero status through a combination of super-insulated walls, triple-pane windows, and a 440-panel solar array. The construction team reported that careful air sealing during framing proved critical—they used blower door testing at multiple stages rather than waiting until completion. This catch-it-early approach saved significant retrofit costs and headaches.
On the residential front, the Pearl Residential Community in Nevada created 120 zero energy homes as part of a planned development. What made this project particularly instructive was their systematic approach: they built one prototype, monitored it for six months, made adjustments, then scaled up production. Builders noted that standardizing window placement and mechanical room layouts streamlined the process considerably, reducing construction time by nearly 15 percent compared to initial estimates.
For commercial applications, the Denver Zuni Office Building achieved zero energy performance in an existing structure—proof that retrofits can work. The project team emphasized that energy modeling software was essential before breaking ground. They discovered that upgrading the HVAC system and adding exterior sun shades delivered better returns than initially planned rooftop solar expansion.
Key takeaways from these projects include starting with airtight building envelopes, investing in proper diagnostic equipment like thermal imaging cameras during construction, and working with energy modelers early in design phases. Several project managers also stressed the importance of training subcontractors on zero energy principles—everyone from framers to electricians needs to understand how their work impacts overall performance. Community feedback from occupants consistently highlighted lower utility bills and improved comfort as the most appreciated benefits, validating the extra upfront effort.
Incorporating zero energy design principles into your building project is more achievable than you might think, whether you’re tackling a DIY renovation or managing a professional build. The key is approaching it systematically rather than trying to implement everything at once.
Start with the fundamentals: prioritize passive design strategies and energy efficiency before investing in renewable energy systems. Focus on optimizing insulation, air sealing, window placement, and thermal mass. These foundational elements reduce your energy needs dramatically, making any solar or wind systems you add later smaller, more affordable, and more effective. Remember, the cheapest energy is the energy you never need to use.
For DIYers, begin with one room or one aspect of your home. Upgrade insulation in your attic, seal air leaks around windows and doors, or install energy-efficient lighting. Each improvement builds on the last. Professional builders can integrate these principles from the planning stage, working with architects who understand passive solar orientation and thermal envelope design.
Don’t hesitate to rent specialized equipment like thermal imaging cameras or blower door testing kits to identify energy losses. Many tools you’ll need for specific tasks are available through hire services, making professional-grade work accessible without major capital investment.
We want to hear from you. What zero energy techniques have you tried? What challenges did you face, and what worked well? Share your experiences in the comments below to help others in the community learn from your journey toward sustainable building.
Related Posts

Post a Comment