
Plan your HVAC rough-in before framing is complete. Walking the job site with your blueprints in hand lets you identify potential conflicts with structural elements, electrical runs, and plumbing stacks before they become costly problems. Mark your main trunk line routes on floor joists and verify ceiling heights will accommodate ductwork dimensions while maintaining code-required clearances.
Install your supply and return ductwork following the shortest, most direct paths possible. Every elbow and transition reduces system efficiency by 10-15%, so minimize bends and maintain consistent duct sizing throughout runs. Seal all seams with mastic or approved foil tape, never cloth duct tape, which degrades and fails within months. Support ducts every four feet using proper hangers, ensuring no sagging that creates condensation pockets or restricts airflow.
Coordinate with other trades during the rough-in phase. HVAC systems compete for limited space with plumbing, electrical, and structural components. Schedule your installation after framing and before insulation, typically when the building is dried in but walls remain open. This timing allows you to verify measurements, make adjustments, and ensure proper integration with the building envelope.
Verify local code requirements before beginning work. Duct sizing, clearances from combustibles, and support specifications vary by jurisdiction. Most municipalities require permits and inspections for HVAC rough-in work, with specific checkpoints before concealing ductwork behind walls or ceilings. Understanding these requirements upfront prevents failed inspections and expensive rework that delays project completion and frustrates everyone involved.
What Is HVAC Rough-In and Why It Matters
The Construction Timeline: Where Rough-In Fits
Understanding when HVAC rough-in happens in the construction sequence helps prevent costly delays and rework. The process follows a specific order that keeps all trades working efficiently without interfering with each other.
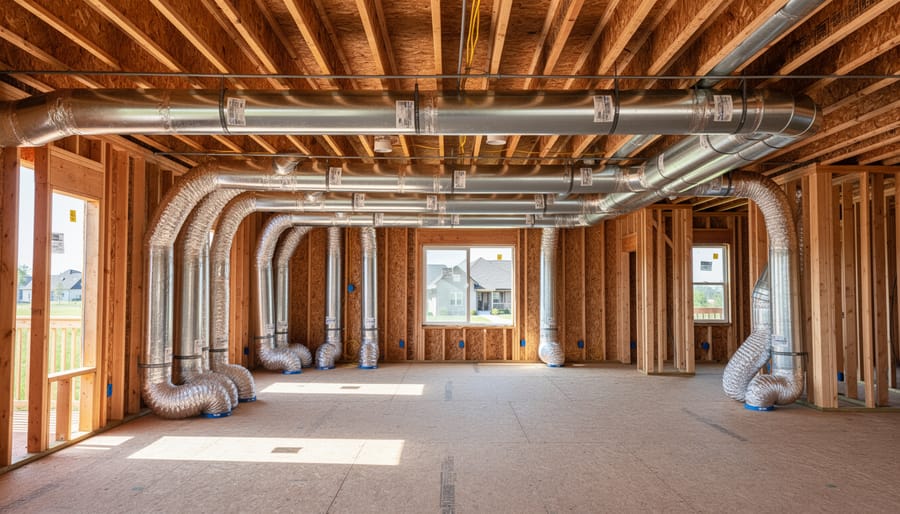
After framing work is complete and the structure is secured, HVAC rough-in typically begins alongside or shortly after electrical and plumbing work. This timing allows technicians to route ductwork through wall cavities and ceiling joists while these spaces remain accessible.
The typical sequence looks like this: foundation and framing come first, followed by rough-in work for all major systems (HVAC, electrical, and plumbing), then insulation, drywall, and finally finish work. Many contractors coordinate these rough-in trades to work simultaneously in different areas of the building, maximizing efficiency.
Before insulation and drywall installation begins, inspectors must approve all rough-in work. This checkpoint ensures everything meets code requirements and is properly positioned. Once walls are closed up, making changes becomes expensive and time-consuming, which is why getting the rough-in right matters so much.
Common HVAC Rough-In Components
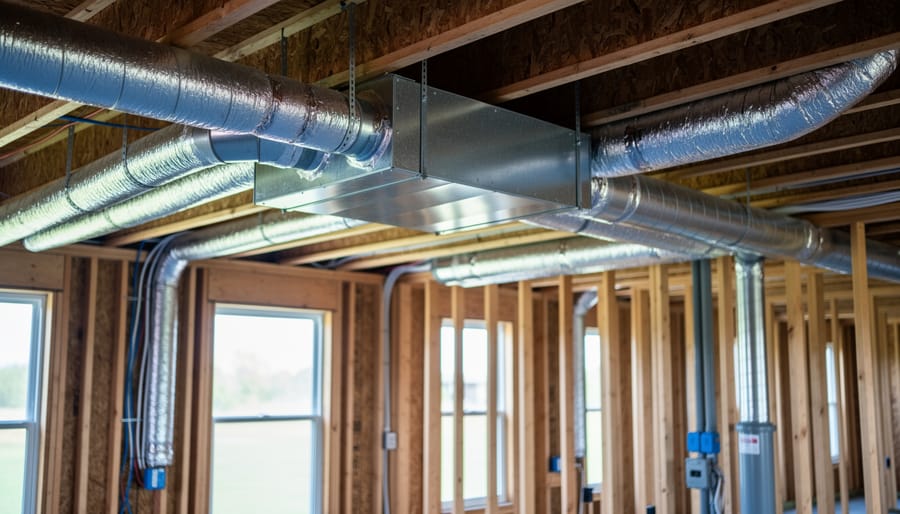
Understanding the key components of HVAC rough-in helps you plan your installation properly and avoid costly mistakes. The main trunk lines are the largest ducts that branch off from your heating and cooling equipment, distributing conditioned air throughout the house. These typically run along ceiling joists or through basements and are usually rectangular or round in shape.
Supply ducts carry heated or cooled air from your HVAC system to individual rooms, while return ducts bring air back to the system for reconditioning. Both work together to create proper air circulation and maintain comfortable temperatures.
Register boots are transition pieces that connect your ductwork to floor, wall, or ceiling vents. These metal fittings ensure a secure connection between ducts and the visible registers in your living spaces.
Equipment platforms provide stable mounting surfaces for furnaces, air handlers, or heat pumps. These must be level and properly sized to support the weight of your equipment while allowing adequate clearance for maintenance access.
Many contractors recommend reviewing installation plans with experienced professionals before starting, as proper component sizing directly impacts system efficiency and performance.
Essential Tools and Equipment for HVAC Ductwork Rough-In
Must-Have Hand Tools
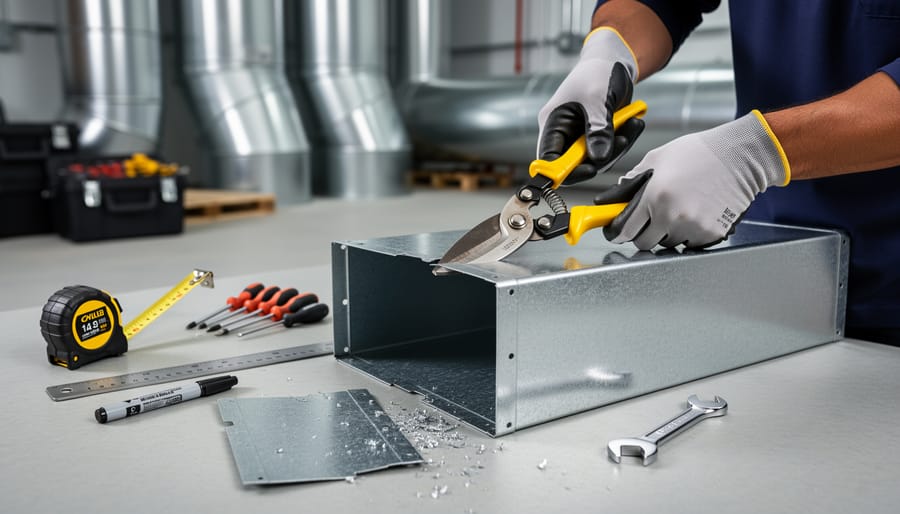
Every HVAC rough-in project requires a solid collection of hand tools to ensure accurate, professional results. Aviation snips are essential for cutting sheet metal ductwork and come in three types: left-cut (red), right-cut (green), and straight-cut (yellow). Most professionals recommend having all three on hand for different cutting angles and curves.
Accurate measuring tools form the backbone of quality ductwork installation. A 25-foot tape measure handles most duct runs, while a quality straightedge helps mark cutting lines on sheet metal. Don’t overlook a framing square for ensuring 90-degree angles at duct connections.
Levels are non-negotiable for proper duct slope and alignment. A 48-inch torpedo level works well in tight spaces, while a longer 6-foot level ensures straight runs across greater distances. Proper leveling prevents airflow issues and condensation problems down the line.
A standard claw hammer drives fasteners and adjusts metal connections, while a rubber mallet shapes ductwork without denting surfaces. For fastening, keep drill-drivers with various bits handy for self-tapping screws, plus a manual hand seamer for folding and bending sheet metal edges. These basic tools handle most rough-in scenarios efficiently.
Power Tools and Specialty Equipment
HVAC rough-in demands specialized power tools that most DIYers and even some professionals don’t use frequently enough to justify purchasing. Understanding which equipment to rent versus buy can save you thousands of dollars while ensuring you have the right tools for professional results.
For cutting and drilling, you’ll need a reciprocating saw for quickly cutting through framing members to accommodate ductwork runs. A heavy-duty hammer drill becomes essential when installing supports through concrete or masonry. Hole saws in various diameters (4″ to 8″) allow you to create clean penetrations for refrigerant lines and electrical connections.
Ductwork fabrication requires specialized equipment. Sheet metal shears, both straight-cut and offset varieties, make clean cuts without deforming edges. A duct crimper creates the necessary beads that allow sections to fit together securely. For larger projects, consider renting a slip roll former, which shapes flat sheet metal into round duct sections. An electric metal brake helps create precise bends in rectangular ductwork.
Larger equipment worth renting includes pneumatic duct stretchers for expanding duct ends, power drive Pittsburgh seamers for joining longitudinal seams, and manual notchers for clean corner cuts. If you’re working with rigid ductwork extensively, a plasma cutter provides fast, clean cuts through galvanized steel.
Most rental centers stock these tools and can provide operation tutorials. Community reviews suggest that renting specialized equipment for one or two projects costs roughly 10-15% of the purchase price, making it the economical choice for occasional use. Always verify that rental equipment includes necessary safety features and receives regular maintenance inspections.
Planning Your HVAC Ductwork Layout
Understanding Load Calculations and Sizing
Getting your duct sizing right is one of the most critical aspects of HVAC rough-in. Too small, and your system will struggle to heat or cool effectively. Too large, and you’ll waste money on materials while creating noisy, inefficient airflow.
The process starts with a load calculation, which determines how much heating and cooling each room needs. Professional HVAC designers use Manual J calculations that factor in your home’s square footage, insulation levels, window sizes, ceiling heights, and local climate. While full Manual J calculations can be complex, many online calculators and software programs can help DIY enthusiasts get reliable estimates.
Once you know the required BTUs (British Thermal Units) for each room, you can determine the cubic feet per minute (CFM) of airflow needed. A simple rule of thumb: you need about 400 CFM per ton of cooling capacity. Each room’s CFM requirement then dictates the duct size.
For residential applications, trunk lines typically range from 16 to 20 inches in diameter, while branch ducts to individual rooms usually measure 6 to 10 inches. Keep duct runs as short and straight as possible, since every bend and length reduces efficiency. As one experienced contractor noted in our community reviews, “I always size up when I’m between two sizes. The slight extra cost beats callbacks for poor airflow.”
Remember that proper sizing isn’t just about comfort. Oversized or undersized ducts can increase energy bills by 30 percent or more, making accurate calculations a worthwhile investment.
Routing Strategies That Save Money and Boost Efficiency
Smart routing strategies can dramatically reduce material costs and improve your HVAC system’s performance. The golden rule is simple: the shortest, straightest path wins. Every foot of unnecessary ductwork adds material expense and reduces airflow efficiency due to friction loss.
Start by positioning your air handler or furnace as centrally as possible to minimize total duct runs. Aim to keep main trunk lines straight and as short as feasible. Each 90-degree elbow reduces airflow by approximately 5-10%, so limit sharp bends wherever you can. When turns are unavoidable, use two 45-degree fittings instead of one 90-degree elbow to maintain better airflow.
Plan vertical drops carefully to avoid unnecessary height changes. Keep supply and return ducts on opposite sides of rooms when possible to promote better air circulation. Many DIYers make the mistake of running ducts through the longest route simply because it seems easier during installation, but this creates ongoing efficiency penalties.
Coordinate with other trades early. Plumbing, electrical, and structural framing all compete for the same space. Review your layout with framing plans before cutting anything. A duct that crosses perpendicular to joists may require costly modifications or performance-robbing transitions.
Community feedback consistently highlights one critical mistake: failing to account for future access needs. Always leave enough clearance around connections and dampers for maintenance. Document your routing with photos before walls close up. This simple step saves countless headaches during future repairs or modifications. Remember, time spent planning routing saves money on materials and prevents the frustration of reworking poorly planned installations.
Step-by-Step HVAC Rough-In Installation Process
Marking and Measuring Your Duct Locations
Accurate marking is crucial for proper airflow and system efficiency. Start by referencing your approved HVAC plans and transferring measurements to the actual jobsite. Use a chalk line to mark main trunk line positions along ceiling joists or between floor joists, ensuring clearances meet manufacturer specifications.
For register locations, measure from at least two fixed reference points like walls or doorways to avoid cumulative errors. Mark the center point of each supply register on floors, walls, or ceilings according to your design. Most contractors recommend placing supply registers on exterior walls under windows to counteract heat loss or gain. Mark these spots clearly with spray paint or lumber crayon, noting the register size alongside each mark.
Return air placements require special attention to building codes. Mark return locations in central areas, typically one per floor minimum, avoiding placement near kitchen or bathroom exhausts. Use painter’s tape to outline the full dimensions of larger return grilles, helping framers understand the required opening size.
Double-check all measurements before cutting any openings. Many experienced installers suggest having a second person verify critical dimensions. Taking photos of your marked layout provides helpful documentation and allows you to share your setup with community forums for feedback before proceeding with installation.

Installing Main Trunk Lines and Supply Ducts
Installing main trunk lines and supply ducts requires careful planning and execution to ensure efficient airflow throughout your HVAC system. Begin by locating the main plenum at your furnace or air handler, which serves as the starting point for all ductwork.
Start with the largest trunk lines first, typically rectangular or round ducts ranging from 16 to 20 inches in diameter. Position these main trunks to follow the most direct path possible while avoiding structural obstacles. Use adjustable duct hangers or metal strapping every 4 feet for horizontal runs, ensuring proper support methods prevent sagging over time. For vertical runs, secure the ductwork at each floor level.
Connect trunk sections using drive cleats and S-clips, sealing all joints with mastic sealant rather than standard duct tape, which deteriorates quickly. Apply mastic generously to create airtight connections that prevent energy loss.
When installing supply ducts branching from the main trunk, mark takeoff locations according to your layout plan. Use a drill or tin snips to create openings, then attach branch ducts using sheet metal screws and starting collars. Maintain proper pitch on all horizontal runs, sloping slightly toward the main trunk to prevent condensation buildup.
Support branch lines every 8 feet using wire hangers or metal straps attached to ceiling joists. Avoid crushing flexible ducts during installation, maintaining their full diameter for optimal airflow. Check that all connections are secure and sealed before proceeding to register boot installation.
Installing Register Boots and Return Air Boxes
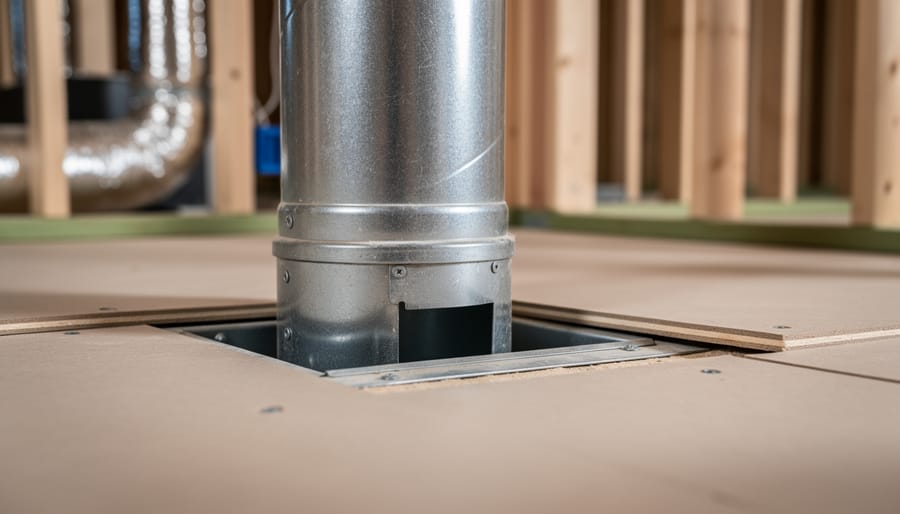
Register boots and return air boxes must be positioned carefully during rough-in to align perfectly with your finished wall surfaces. Start by measuring the exact distance from the floor or ceiling to where each boot will sit, accounting for drywall thickness (typically 1/2 inch). This ensures your registers sit flush once walls are completed.
Secure boots to floor joists or wall studs using sheet metal screws, making sure they’re level and properly oriented. The boot’s flange should extend slightly beyond the framing to accommodate drywall. For floor registers, position boots between joists and attach metal support straps if needed.
Return air boxes require solid attachment to wall studs on all sides. Cut the opening to exact specifications, then fasten the box using screws through pre-drilled holes in the mounting flanges. Check that the box depth matches your wall cavity to prevent protrusion.
A common mistake shared by community members is failing to account for drywall thickness, resulting in recessed registers that restrict airflow. Always perform a test fit with a scrap piece of drywall before final installation. Seal all seams with foil tape to prevent air leakage, and verify that each boot connects securely to its corresponding duct run.
Critical Code Requirements and Inspection Points
Clearance and Support Requirements
Proper clearances and support are critical for safe, efficient HVAC operation and code compliance. Understanding these requirements prevents costly mistakes during rough-in.
Maintain minimum clearances around all ductwork as specified by local codes. Typically, leave at least 6 inches between ducts and electrical lines, and 1 inch from combustible materials unless ducts are properly insulated. For furnace and equipment installations, allow 24-30 inches on the service side for maintenance access.
Support ductwork according to structural support standards using appropriate hangers and straps. Metal ductwork requires support every 10 feet horizontally, while flexible duct needs support every 4-5 feet to prevent sagging. Use adjustable steel hangers or perforated strap for secure mounting. Each hanger must attach to structural framing, never just to drywall or insulation.
Vertical duct runs need support at every floor penetration, with additional mid-span supports on runs exceeding 10 feet. When penetrating joists or studs, maintain structural integrity by avoiding cuts in the center third of spans where possible.
Community feedback consistently emphasizes the importance of double-checking all measurements before cutting into framing members. Pro tip from experienced installers: photograph all support locations before insulation and drywall installation for future reference during service calls.
Preparing for the Rough-In Inspection
Before your inspector arrives, ensure all ductwork is properly secured and supported according to local building codes. Inspectors typically verify that ducts are correctly sized for calculated airflow requirements, all connections are sealed with mastic or approved tape (not standard duct tape), and hangers are spaced appropriately—usually every four to five feet for horizontal runs.
Common inspection failures include improper slope on condensate drain lines (should slope at least 1/4 inch per foot), missing or incorrectly sized return air pathways, and inadequate clearances around equipment locations. Inspectors also check that supply and return registers are positioned correctly and that ductwork doesn’t create future access issues for other building systems.
Keep your approved HVAC load calculation documents, equipment specifications, and permit paperwork readily available during the inspection. Take photos of your work before covering anything with insulation or drywall—this documentation proves compliance if questions arise later.
Pro tip from the community: Many experienced installers recommend scheduling a pre-inspection walkthrough with a knowledgeable colleague to catch common oversights before the official inspection. This simple step significantly reduces callback rates and project delays.
Common Mistakes That Wreck HVAC Performance
Sizing Errors and Their Costly Consequences
Getting your duct sizing wrong during rough-in creates problems that follow homeowners for years. When ducts are undersized, your HVAC system has to work harder to push air through smaller passages, leading to increased energy bills and reduced equipment lifespan. You’ll notice weak airflow in certain rooms, uneven temperatures throughout the house, and that annoying whistling sound as air struggles through tight spaces. The system runs longer cycles trying to reach the thermostat setting, which means more wear on components.
Oversized ducts create different but equally frustrating issues. Air moves too slowly through oversized passages, reducing the system’s ability to properly dehumidify your home. This leads to that clammy, uncomfortable feeling even when the temperature seems right. The slower air velocity also allows more dust to settle in the ducts rather than being carried to filters. Additionally, oversized ducts waste valuable space in walls and ceilings and increase material costs unnecessarily.
Professional tradespeople emphasize that proper sizing calculations based on Manual D standards prevent these costly mistakes. Community feedback consistently shows that spending extra time on accurate measurements during rough-in saves thousands in retrofit costs and energy waste down the line.
Poor Support and Sealing Issues
Inadequate support and poor sealing represent two of the most common failures during HVAC rough-in, often leading to system inefficiency, noise issues, and even complete ductwork collapse. Understanding these problems and their solutions is essential for a successful installation.
Hangers and supports must be installed at proper intervals to prevent sagging ductwork. The general rule requires supports every 10 feet for horizontal runs, though heavier ducts may need closer spacing. Many DIYers make the mistake of using insufficient fasteners or installing hangers too far apart, which causes ducts to droop over time. This creates low spots where condensation pools, potentially leading to mold growth and structural damage.
When installing hangers, use appropriate materials for your duct type. Metal strapping works well for rigid ductwork, while flexible ducts require specialized saddle hangers that won’t compress the material. Avoid wire hangers that can cut into flexible duct insulation. Each support point should be firmly anchored to structural framing, never just to drywall or ceiling tiles.
Sealing issues are equally problematic. All duct connections, joints, and penetrations must be properly sealed to prevent air leakage, which can reduce system efficiency by up to 30 percent. Use mastic sealant or metal-backed tape rated for HVAC applications. Standard duct tape, despite its name, deteriorates quickly and should never be used.
Pay special attention to boot connections where ducts meet registers and returns. These transition points are particularly prone to gaps. Apply mastic generously around all seams, ensuring complete coverage. For penetrations through walls or floors, seal gaps with appropriate fire-rated materials to maintain building code compliance and prevent air infiltration.
Safety Considerations During HVAC Rough-In
Working with HVAC ductwork presents several safety hazards that require careful attention and proper precautions. Whether you’re a seasoned professional or tackling your first rough-in project, following established safety protocols protects you and others on the job site.
Personal protective equipment (PPE) is non-negotiable during HVAC rough-in work. At minimum, wear safety glasses to protect against metal shavings and debris, heavy-duty work gloves designed for sheet metal handling to prevent cuts from sharp edges, and steel-toed boots to guard against dropped materials. When working in dusty attics or crawl spaces, a dust mask or respirator prevents inhalation of insulation fibers and particulates.
Sheet metal edges are extremely sharp and can cause deep lacerations. Always deburr cut edges immediately after cutting, handle ductwork carefully by gripping reinforced edges rather than raw cuts, and store materials safely to prevent accidental contact. When using power tools like snips, shears, or drills, inspect equipment before use, maintain three-point contact on ladders, and never bypass safety guards.
Confined space work requires specific precautions. Ensure adequate ventilation in attics and crawl spaces, especially when using sealants or adhesives. Have a communication plan with others on site and never work alone in extremely tight areas. Check for adequate lighting and consider wearing a headlamp for hands-free illumination.
Ladder safety deserves special attention since much ductwork installation occurs overhead. Position ladders on stable, level surfaces, maintain three points of contact while climbing, and never overreach. For extended overhead work, consider scaffolding as a safer alternative.
Finally, be aware of existing electrical wiring and plumbing when drilling or cutting. Use a stud finder with wire detection capabilities and proceed cautiously when penetrating walls or ceilings. According to community feedback, taking an extra moment for safety checks prevents the majority of on-site accidents.
Getting your HVAC rough-in right the first time saves you significant time, money, and headaches down the road. As we’ve covered, proper planning is essential—from understanding local codes and reading blueprints accurately to selecting the right materials and tools for your specific project. Remember that ductwork installation during the rough-in phase sets the foundation for your entire heating and cooling system’s performance and efficiency.
Whether you’re a seasoned professional or tackling your first HVAC installation, taking time to measure twice, secure permits, and follow manufacturer specifications will pay dividends. Don’t rush through critical steps like load calculations, proper sealing, and supporting your ductwork correctly. These details directly impact system efficiency and long-term reliability.
If you’ve completed an HVAC rough-in project recently, we’d love to hear about your experience. What challenges did you encounter? Which tools proved most valuable? Your insights help fellow DIYers and professionals learn from real-world applications. Drop your questions or experiences in the comments below—our community thrives on shared knowledge and practical advice. Remember, investing effort in the rough-in phase now means enjoying comfortable, efficient heating and cooling for years to come.
Related Posts
Post a Comment