
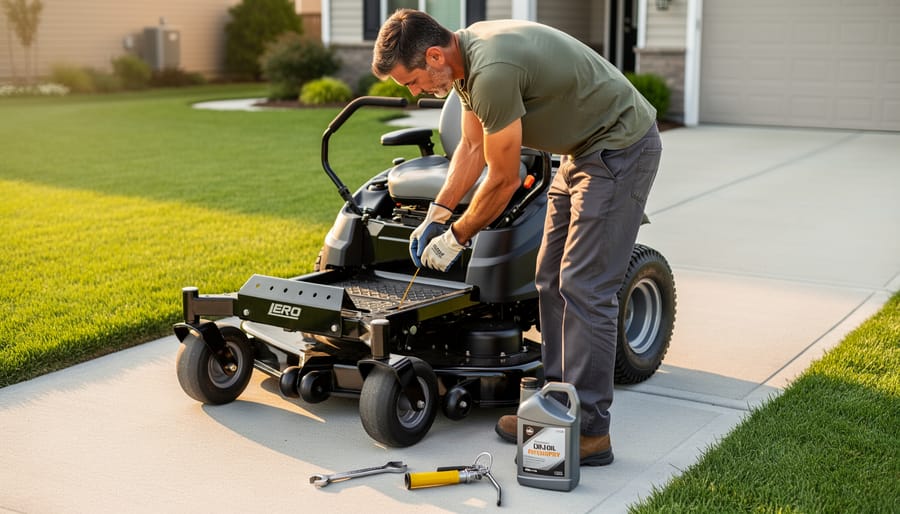
Check your engine oil before every mowing session by locating the dipstick near the engine base, wiping it clean, reinserting it fully, and ensuring the oil level sits between the minimum and maximum marks. Change the oil every 50 hours of operation or annually, whichever comes first, using SAE 10W-30 or the manufacturer’s recommended grade.
Sharpen your mower blades every 25 hours of use to maintain clean cuts that promote healthy lawn care. Remove blades with a socket wrench, secure them in a vice, and file the cutting edge at a 30-degree angle until sharp, ensuring you maintain the original bevel. Balance blades on a nail or blade balancer before reinstalling to prevent damaging vibrations.
Clean or replace air filters monthly during peak mowing season by removing the filter cover, tapping foam filters to dislodge debris, washing them in warm soapy water, and coating lightly with clean engine oil before reinstallation. Paper filters should be replaced rather than cleaned when visibly dirty.
Inspect tire pressure weekly, maintaining 10-14 PSI in rear tires and 20-25 PSI in front casters according to your model specifications. Uneven tire pressure causes scalping, uneven cuts, and accelerates wear on your deck and transmission.
Grease all fittings every 25 hours using a standard grease gun loaded with lithium-based grease, targeting wheel bearings, caster pivots, deck spindles, and any zerks marked in your owner’s manual. Most zero-turn mowers have 8-12 grease points requiring regular attention to prevent premature bearing failure and costly replacements.
Why Zero Turn Mowers Need Different Care Than Standard Riding Mowers
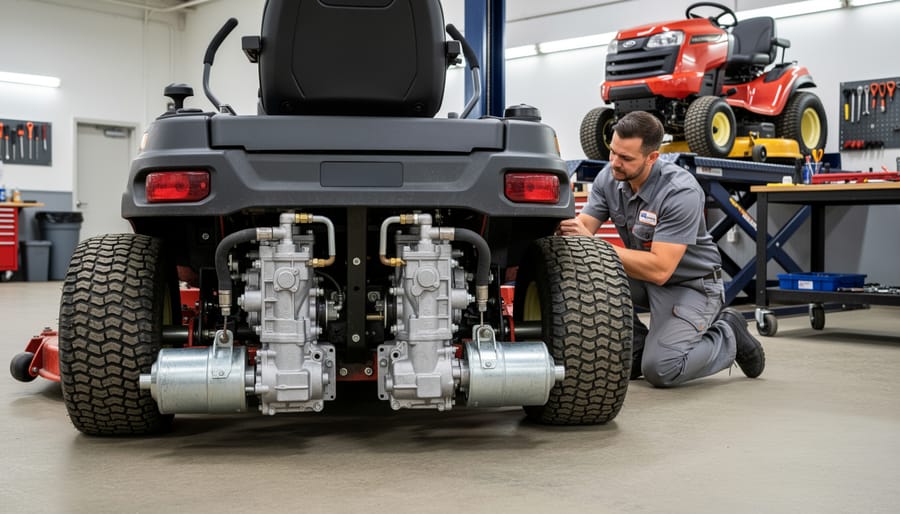
Zero turn mowers represent a significant leap in lawn care technology, but with advanced features comes the need for specialized maintenance. Unlike traditional riding mowers that use a single transmission and steering wheel, zero turn mowers operate through dual hydrostatic transmissions—one controlling each rear wheel independently. This innovative design allows for those signature tight turns and impressive maneuverability, but it also means you’re maintaining two separate hydraulic systems instead of one.
These machines typically operate at higher speeds than standard riding mowers, often reaching 8-12 mph compared to the 4-6 mph of conventional models. This increased velocity puts additional stress on components like wheel motors, belts, and spindle assemblies. What might be a minor maintenance oversight on a regular mower can quickly escalate into costly repairs on a zero turn.
Many zero turn models feature commercial-grade components designed for durability and extended use. While this is excellent for longevity, these parts require specific maintenance intervals and procedures. The hydraulic systems need particular attention to fluid levels and quality, as contaminated or low hydraulic fluid can damage expensive pumps and motors.
The weight distribution on zero turns also differs significantly. With the engine typically positioned in the rear and no steering mechanism in front, these mowers put different pressure points on tires and strain components in unique ways. Tire pressure becomes more critical, as uneven inflation directly affects tracking and can cause premature wear on the hydrostatic drives.
Understanding these fundamental differences helps explain why following manufacturer-specific maintenance schedules isn’t just a recommendation—it’s essential for protecting your investment and ensuring years of reliable performance.
Essential Tools and Supplies You’ll Need
Basic Maintenance Kit
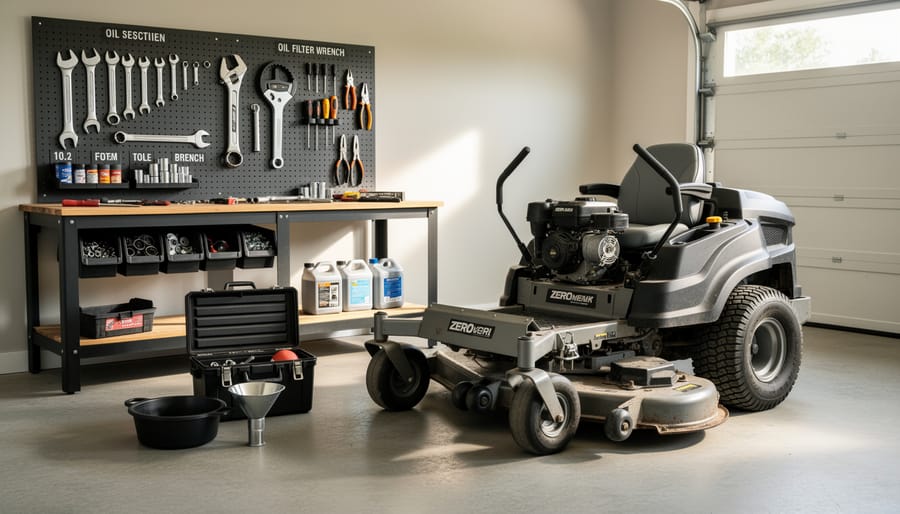
Before diving into zero turn mower maintenance, you’ll want to gather some essential tools. The good news? Most DIY enthusiasts already have these basics in their garage or toolbox.
Start with a standard socket wrench set and combination wrenches in various sizes for removing mower deck components and checking blade bolts. A quality grease gun is critical for lubricating pivot points and wheel bearings—without it, moving parts wear out prematurely. You’ll also need both flathead and Phillips screwdrivers for battery terminals and minor adjustments.
An oil drain pan makes fluid changes cleaner and easier, while a tire pressure gauge ensures proper inflation for even cutting and reduced turf damage. Don’t forget work gloves for hand protection and safety glasses when working underneath the deck.
Many homeowners find that a torque wrench helps achieve proper blade bolt tightness, preventing dangerous blade detachment during operation. Keep shop rags or paper towels handy for cleanup, and consider a basic funnel set for mess-free fluid refills.
Community members consistently recommend organizing these tools in a dedicated maintenance caddy or toolbox. This simple preparation saves time and frustration when you’re ready to tackle routine upkeep tasks on your zero turn investment.
Specialized Equipment Worth Renting
While you can certainly maintain your zero turn mower with basic hand tools, certain specialized equipment makes the job significantly easier and more accurate. Instead of purchasing these items outright, consider renting them for occasional maintenance tasks.
A blade balancer is essential for ensuring your mower blades are properly balanced after sharpening. Unbalanced blades cause excessive vibration, leading to premature wear on spindle bearings and a poor cut quality. These precision tools typically cost between $30-100 to purchase, but rental shops often have them available for a fraction of that price.
Torque wrenches are another valuable rental option, especially for critical fasteners like blade bolts and wheel nuts. Zero turn mowers require specific torque settings to prevent both under-tightening (which causes loosening) and over-tightening (which strips threads or breaks bolts). A quality torque wrench can run $100 or more, making short-term rental practical for annual maintenance.
Deck washing systems that attach to your garden hose provide professional-level cleaning without the mess of manual scraping. These systems spray water from underneath while the blades spin, removing packed grass clippings efficiently. Many rental centers stock these alongside pressure washers for comprehensive equipment cleaning. Community reviews consistently highlight these rentals as time-savers worth the modest daily rental fee.
Daily and Pre-Operation Checks That Prevent Big Problems
Visual Inspection Checklist
Before firing up your zero turn mower, a thorough visual inspection takes just five minutes but can prevent costly breakdowns. Think of this as your pre-flight checklist—it’s where you catch small problems before they become big headaches.
Start by walking around your mower and checking underneath for fluid leaks. Look for puddles or wet spots that might indicate oil, hydraulic fluid, or fuel leaks. Fresh leaks appear dark and wet, while older ones leave crusty residue. Don’t ignore even small drips—they signal seals or gaskets that need attention.
Next, check your tire pressure using a standard gauge. Most zero turn mowers require 10-14 PSI in the rear tires and 20-25 PSI in the front casters, but always verify your manufacturer’s specifications. Uneven pressure causes scalping and uneven cuts, plus it strains your transmission.
Grab a wrench and test critical bolts, particularly around the deck, wheels, and seat. Vibration naturally loosens hardware over time. Tighten anything that’s come loose, but don’t overtighten—snug is sufficient.
Inspect drive belts for cracks, fraying, or glazing (a shiny, smooth appearance). A damaged belt can snap mid-job, leaving you stranded. Replace any belt showing wear before it fails.
Finally, remove debris buildup from around the engine, pulleys, and under the deck. Grass clippings and dirt block airflow, causing overheating and reducing component life. A simple brush-down prevents these issues and keeps your mower running cooler and more efficiently.
Safety System Checks
Your zero turn mower’s safety features protect you from serious injury, so testing them regularly isn’t optional. Start with the seat safety switch, which should cut power when you stand up. With the parking brake engaged and blades off, start the engine and slowly lift yourself off the seat. The engine should immediately shut down. If it doesn’t, this switch needs immediate attention from a qualified technician.
Next, verify the parking brake holds the mower securely on a slope. Engage the brake, shift to neutral, and carefully release pressure on the controls. The mower shouldn’t roll. Test the blade engagement system by starting the mower and attempting to engage the blades while standing. The blades should not activate unless you’re seated.
Check that the blade brake stops spinning blades within five seconds of disengagement. Any delay beyond this indicates worn components requiring replacement. Additionally, inspect the operator presence control levers. When released, they should return to neutral and disengage the blades immediately.
According to community feedback, many owners skip these checks until something goes wrong. Don’t make that mistake. Safety systems can degrade gradually without obvious signs. Schedule these tests monthly during mowing season, and always before the first use after winter storage. Document any issues and address them before your next mowing session.
Oil Changes: When and How to Do It Right
Choosing the Right Oil for Your Climate
Selecting the correct oil viscosity is crucial for keeping your zero turn mower running smoothly throughout the year. Oil viscosity refers to how thick or thin the oil flows at different temperatures, indicated by ratings like 10W-30 or 15W-50. The “W” stands for winter, and the numbers represent the oil’s flow characteristics in cold and hot conditions.
For most zero turn mowers, 10W-30 oil works well in moderate climates and temperatures between 32°F and 100°F. If you operate your mower in cooler weather (below 40°F), consider switching to 5W-30, which flows better during cold starts and reduces engine wear. In consistently hot climates above 80°F, 15W-40 or 20W-50 provides better protection under high-temperature stress.
Always check your owner’s manual first, as manufacturers specify ideal viscosity ranges for your particular engine. Synthetic oils offer superior performance across wider temperature ranges and last longer than conventional oils, though they cost more upfront. Many professionals and community members report excellent results with synthetic blends as a middle-ground option.
Remember to change your oil weight seasonally if you experience temperature extremes. This simple adjustment protects your engine year-round and prevents costly damage from improper lubrication.
Step-by-Step Oil Change Process
Changing your zero turn mower’s oil is straightforward when you follow proper procedures. Most manufacturers recommend oil changes every 50 hours of operation or annually, whichever comes first.
Start by running your mower for about five minutes to warm the oil. Warm oil flows more easily and carries away more contaminants. Once warmed, park on a level surface, engage the parking brake, and turn off the engine. Remove the key for safety.
Locate the drain plug underneath the mower deck. Position an oil drain pan (typically 2-3 quart capacity) directly beneath the plug. Some community members recommend using a shallow pan with a wide opening to catch oil more effectively. Slowly remove the drain plug and let the oil drain completely, which usually takes 5-10 minutes. This is also an excellent time to inspect the drained oil for metal shavings or unusual debris, which could indicate internal engine problems.
While the oil drains, locate and remove the oil filter. Most zero turn mowers have spin-on filters similar to automotive ones. Use an oil filter wrench if it’s too tight to remove by hand. Before installing the new filter, apply a thin layer of fresh oil to the rubber gasket. This helps create a proper seal and prevents the gasket from sticking during future changes.
Reinstall the drain plug and tighten it firmly, but don’t overtighten. Hand-tighten the new oil filter, then give it an additional three-quarters turn.
Add the recommended oil type and quantity specified in your owner’s manual. Most zero turn mowers require 1.5 to 2 quarts. Pour slowly and check the dipstick frequently to avoid overfilling. Run the engine briefly, then recheck the level and top off if needed.
Blade Maintenance: Sharpening, Balancing, and Replacement
When to Sharpen vs. Replace
Knowing whether to sharpen or replace your blades can save you time and money. Start by inspecting each blade closely for damage. Minor nicks and dull edges are perfect candidates for sharpening, which you can typically do 2-3 times per season depending on usage.
However, replacement becomes necessary when blades show significant wear. Look for cracks, bent tips, or deep gouges that extend into the metal. If the blade has been sharpened so many times that it’s noticeably thinner or the sail (the angled part that creates lift) is compromised, it’s time for a new one. A blade worn down more than 1/4 inch from its original width won’t cut effectively.
As a rule of thumb shared by many landscaping professionals in equipment forums, if more than 1/2 inch of blade edge needs grinding to restore sharpness, replacement is more cost-effective than sharpening. Severely damaged blades create imbalance, which stresses your mower’s spindle bearings and engine.
Keep replacement blades on hand during peak mowing season so you’re never caught without a sharp edge. Most homeowners find replacing blades annually while sharpening between changes provides optimal cutting performance and protects their equipment investment.
Safe Blade Removal and Installation
Before removing blades from your zero turn mower, prioritize safety by disconnecting the spark plug wire to prevent accidental starts. This simple step could save you from serious injury.
To access the blades, tilt the mower deck or raise it to its highest position. You’ll need to prevent the blade from spinning while loosening the retaining bolt. The most effective method is using a blade removal tool or a sturdy block of wood wedged between the blade and deck housing. Never use your hands to hold the blade steady.
Spray penetrating oil on rusted or stubborn bolts and wait 10 to 15 minutes before attempting removal. Use a properly sized socket wrench or impact wrench, turning counterclockwise to loosen. Remember that some blades have reverse-threaded bolts, so check your owner’s manual first.
When installing new or sharpened blades, ensure the cutting edge faces the correct direction. The curved or angled portion should point upward toward the deck, while the sharp edge faces down toward the grass. This orientation is critical for proper cutting and grass discharge.
Tighten blade bolts to the manufacturer’s specified torque setting, typically between 40 and 80 foot-pounds. Over-tightening can damage the spindle, while loose blades create dangerous vibration and poor cut quality. Many DIY enthusiasts recommend marking blade positions before removal to simplify reinstallation.

Sharpening and Balancing Techniques
Proper blade sharpening starts with achieving a 30-35 degree angle on the cutting edge, which provides the optimal balance between sharpness and durability. Use a 10-inch mill bastard file or angle grinder, always following the original bevel angle. Work in smooth, even strokes from the top side of the blade only, matching the factory edge. Count your strokes on each blade to ensure equal removal of material, which is essential for maintaining balance.
After sharpening, balance is critical. An unbalanced blade creates vibration that damages spindle bearings, engine mounts, and can affect your results when maintaining healthy turf. Use a blade balancer (a cone-shaped tool available at hardware stores) or hang the blade on a nail through its center hole. The heavier side will dip down. Remove small amounts of metal from the heavy end’s back edge (not the cutting edge) until the blade sits level. Many DIYers find this step tedious but essential. As one community member noted, “I learned the hard way that skipping balance checks led to a $400 spindle replacement.” Test repeatedly until perfect horizontal balance is achieved before reinstalling.
Air Filter and Spark Plug Service
Air Filter Cleaning and Replacement
Your zero turn mower likely has one of two air filter types: foam or paper. Knowing which you have determines your maintenance approach.
Foam filters are washable and reusable. To clean them, carefully remove the filter housing cover and lift out the foam element. Tap it gently to remove loose debris, then wash it in warm, soapy water. Rinse thoroughly and squeeze out excess water without twisting, which can tear the foam. Let it air dry completely before reinstalling. Some users in our community recommend applying a light coat of clean engine oil after drying for better dust capture, though this varies by manufacturer specifications.
Paper filters cannot be washed and should be replaced when dirty. You can extend their life between replacements by gently tapping them against a hard surface to dislodge dust, but never use compressed air, which damages the filter material.
Check your air filter after every 25 hours of operation, or more frequently in dusty conditions. Replace paper filters annually or when visibly clogged. Foam filters typically last longer but should be replaced if they show tears, compression, or deterioration.
A clogged air filter reduces engine power and fuel efficiency, making this simple check one of the most cost-effective maintenance tasks you can perform.
Spark Plug Inspection and Replacement
Your spark plugs ignite the air-fuel mixture that powers your zero turn mower’s engine. Most manufacturers recommend inspecting them every 100 hours of operation and replacing them annually or every 200 hours, whichever comes first.
To inspect, start by removing the spark plug wire, then use a spark plug socket to carefully unscrew the plug. Examine the electrode tip: a healthy plug shows a light tan or gray color. Black, sooty deposits indicate a rich fuel mixture, while white or blistered electrodes suggest the engine is running too hot. Oil-fouled plugs appear wet and may signal engine wear.
Check the gap between the center and ground electrode using a feeler gauge. Most zero turn mowers require a gap between 0.030 and 0.040 inches, but always verify your specific model’s requirement in the owner’s manual.
When installing a new or cleaned spark plug, thread it in by hand first to avoid cross-threading. Then tighten to the manufacturer’s specified torque, typically 15-20 foot-pounds. Over-tightening can damage threads, while under-tightening causes compression loss. If you don’t have a torque wrench, hand-tighten the plug, then turn it an additional quarter turn with your socket wrench.
Deck Cleaning and Belt Inspection
Proper Deck Cleaning Methods
Grass clippings, dirt, and moisture accumulate under your zero turn’s deck with every mowing session, creating a thick mat that reduces cutting efficiency and can cause rust. Cleaning this buildup regularly prevents corrosion and ensures optimal performance.
Before starting any deck cleaning, disconnect the spark plug wire to prevent accidental starting. This simple safety step is essential whenever working near the blades. Raise the deck to its highest position for easier access.
For dry grass buildup, use a plastic putty knife or deck scraper rather than metal tools, which can scratch protective coatings and expose metal to rust. Work from the center outward, scraping clippings into manageable piles. Many experienced users recommend wearing gloves and safety glasses during this process, as dried debris can be surprisingly sharp.
Once you’ve removed the bulk of buildup, spray the deck underside with a garden hose. Some homeowners swear by adding a deck wash attachment that connects to your hose for easier cleaning while the mower is running, though always check your owner’s manual first. Avoid pressure washers near bearings, pulleys, and electrical components, as excessive water pressure can force moisture into sealed areas and cause premature failure.
For stubborn residue, apply a commercial deck cleaner or simple dish soap solution, let it sit for five minutes, then rinse thoroughly. After washing, let the deck air dry completely before storage. Some users recommend applying a thin coat of silicone spray to the clean deck surface, which creates a non-stick barrier that helps prevent future grass buildup.
Belt Tension and Wear Assessment
Your zero turn’s drive belts and deck belts work hard with every use, transferring power from the engine to wheels and blades. Regular inspection prevents unexpected failures mid-mow and maintains optimal performance.
Start by disconnecting the spark plug wire for safety. Locate your belts by removing the deck or protective covers, consulting your owner’s manual for specific access points. Visually inspect each belt for glazing (a shiny, hardened appearance), cracking, fraying edges, or missing chunks. Run your fingers along the belt’s underside to feel for damage you might not see.
Check tension by pressing the belt midway between pulleys. It should deflect about half an inch with moderate pressure. Too loose means slippage and reduced power; too tight causes premature bearing wear. Most zero turns feature spring-loaded tensioners that maintain proper tension automatically, but verify the spring hasn’t weakened or become disconnected.
Replace belts showing any damage, excessive wear, or if they’re more than three seasons old regardless of appearance. Many DIY enthusiasts report that keeping a spare belt on hand saves downtime during peak mowing season. When installing new belts, follow the routing diagram on your mower’s deck or in the manual precisely. Incorrect routing is a common mistake that leads to rapid belt failure.
Professional landscapers recommend photographing belt routing before removal as a helpful reference during reinstallation.
Hydrostatic Transmission Care
Checking and Changing Hydraulic Fluid
Hydraulic fluid is the lifeblood of your zero turn mower’s steering and drive system, making regular checks essential for smooth operation. Check your hydraulic fluid level every 50 hours of use or monthly, whichever comes first. To check, park on level ground, let the engine cool completely, and locate the hydraulic reservoir (usually near the rear wheels or under the operator platform). The fluid should reach the “Full” mark on the dipstick or sight glass when the system is at rest.
Most zero turn mowers need hydraulic fluid changes every 400-500 hours or annually. Signs you need a change include sluggish steering response, jerky movement, or fluid that appears dark or milky. To change the fluid, you’ll need a drain pan, new hydraulic filter, and the correct fluid type for your model.
Start by warming up the engine for a few minutes, then shut it off. Position your drain pan under the hydraulic reservoir and remove the drain plug. Let the system drain completely, then replace the hydraulic filter according to your owner’s manual. Reinstall the drain plug and refill with fresh fluid to the proper level.
Choosing the right hydraulic oil matters tremendously. Most zero turns require 20W-50 motor oil or dedicated hydraulic fluid, but always verify with your owner’s manual first. Using incorrect fluid can damage seals and reduce performance. Look for oils rated for hydrostatic transmissions, and avoid mixing different brands when topping off between changes.
Purging Air from the System
Air trapped in your zero turn’s hydraulic system can cause jerky movements or sluggish steering response, especially after changing fluid or servicing the transmission. Fortunately, purging air is a straightforward process you can handle yourself.
Start with the mower on level ground and the engine off. Raise the drive wheels off the ground using jack stands—never work under a mower supported only by a jack. With the bypass valves open (these small levers near each wheel motor allow manual movement), start the engine and let it idle. Slowly move the control levers forward and backward through their full range of motion five to six times. You’ll likely notice the motion becoming smoother as air escapes.
Next, close the bypass valves and repeat the lever movements with the wheels still elevated. The transmission should push any remaining air bubbles through the system. Finally, lower the mower, close the bypass valves completely, and test drive in an open area. The steering should feel responsive and smooth. If problems persist, check your hydraulic fluid level—low fluid often indicates leaks that need addressing before the system will function properly.
Seasonal Maintenance: Preparing for Storage and Spring Startup
Winter Storage Preparation
Proper winter storage protects your zero turn mower from cold-weather damage and ensures it’s ready to perform when spring arrives. Start by addressing fuel stabilization at least two weeks before storage. Add a quality fuel stabilizer to your gas tank according to the product instructions, then run the engine for 10-15 minutes to circulate the treated fuel throughout the system. This prevents fuel from breaking down and gumming up your carburetor during months of inactivity. Some owners prefer draining the fuel system entirely, which eliminates degradation risks but requires refilling in spring.
Battery maintenance is essential for off-season storage. Remove the battery and clean the terminals with a wire brush to remove corrosion. Store it in a cool, dry location away from concrete floors, which can drain battery charge. Consider using a battery maintainer or trickle charger to keep it at optimal charge levels throughout winter. A dead battery is one of the most common spring startup problems that’s easily preventable.
Give your mower a thorough cleaning before putting it away. Remove all grass clippings, mud, and debris from the deck, undercarriage, and engine compartment. Dried debris traps moisture against metal surfaces, promoting rust and corrosion. Apply a light coating of spray lubricant to exposed metal parts for additional protection.
Finally, focus on storing equipment properly. Cover your mower with a breathable tarp or purpose-made equipment cover in a dry, sheltered location. Avoid plastic covers that trap condensation.

Spring Startup Checklist
After months of winter storage, your zero turn mower needs a thorough wake-up call before tackling your first lawn of the season. Taking time now to properly prepare your machine prevents frustrating breakdowns and ensures peak performance when you need it most.
Start by visually inspecting the entire mower for any damage, loose parts, or signs of rodent activity. Check wiring harnesses, belts, and hoses for cracks or wear. Next, examine all fluid levels including engine oil, hydraulic fluid, and fuel. If you didn’t drain the fuel before storage, the gasoline may have degraded and should be removed and replaced with fresh fuel. Add a fuel stabilizer to prevent future issues.
Check the battery connections for corrosion and clean terminals with a wire brush if needed. If you removed the battery for winter, reinstall it and verify it holds a charge. Test the tire pressure on all wheels and inflate to the manufacturer’s recommended PSI, typically found in your owner’s manual.
Inspect the mower deck and blades closely. Sharpen or replace blades as necessary since dull blades tear grass rather than cutting cleanly, which stresses your lawn. Look for bent spindles or damaged pulleys that could cause vibration problems.
Before the first start, change the oil and filter if you didn’t do so before storage. Old oil contains contaminants that can damage engine components. Replace the air filter if it appears dirty or worn.
Finally, conduct a test run in an open area. Listen for unusual noises, check steering responsiveness, and verify all safety features function correctly. Address any concerns before beginning regular mowing operations.
Troubleshooting Common Issues Before Calling a Professional
Starting and Running Problems
When your zero turn mower refuses to start or runs rough, a few common culprits are usually to blame. Start by checking the fuel system. Old gasoline breaks down after 30 days, causing starting problems and poor performance. If your fuel has been sitting for a while, drain the tank and refill with fresh gas. A clogged fuel filter or dirty carburetor can also restrict fuel flow, so inspect and clean these components as needed.
Next, examine the spark plugs. Remove them and look for carbon buildup, cracks, or worn electrodes. Spark plugs should be replaced annually or sooner if damaged. While you’re at it, check that spark plug wires are firmly connected and show no signs of wear.
A dirty air filter restricts airflow to the engine, causing hard starting and rough idling. Clean or replace foam filters according to your owner’s manual, typically every 25 hours of operation or more frequently in dusty conditions.
Battery issues often prevent starting. Check terminals for corrosion and clean with a wire brush if needed. Ensure connections are tight and the battery holds a proper charge.
Finally, verify that all safety switches are functioning correctly. Zero turn mowers won’t start if the parking brake isn’t engaged or if you’re not properly seated. These safety features protect you but can sometimes cause starting confusion for new operators.
Cutting and Drive Issues
When your zero turn mower isn’t cutting evenly or responding properly, a few common culprits are usually to blame. Start by checking the deck level—an unlevel mowing deck is the leading cause of uneven cuts. Park on flat ground, measure from the blade tips to the surface, and adjust according to your manufacturer’s specifications. The front should typically sit slightly lower than the rear, usually by about 1/8 to 1/4 inch.
Dull or damaged blades also create ragged, uneven cuts. Inspect blades for nicks, bends, or excessive wear. Sharpen or replace them as needed—most professionals recommend sharpening every 25 hours of use.
If you’re experiencing poor traction or difficulty steering, check your tire pressure first. Unequal pressure between left and right tires causes pulling and uneven cuts. Consult your owner’s manual for proper PSI levels and adjust accordingly.
Drive belt issues often manifest as sluggish performance or slipping during turns. Inspect belts for cracks, fraying, or glazing. A worn belt should be replaced immediately to prevent further damage.
Hydrostatic transmission problems require checking fluid levels and looking for leaks. Low fluid causes weak or jerky movement. If topping off doesn’t solve the issue, you may need professional service.
Community feedback consistently highlights these areas as the most common DIY-fixable problems, saving hundreds in repair costs.
Staying on top of your zero turn mower maintenance might seem time-consuming, but it’s significantly easier and more cost-effective than dealing with major repairs or premature equipment replacement. By creating a simple maintenance schedule and sticking to it, you’ll protect your investment and ensure your mower delivers reliable performance season after season. Consider marking routine tasks on your calendar or using a maintenance log to track completed services.
Remember, you’re not alone in this journey. Our platform features a vibrant community where users share their maintenance tips, troubleshooting solutions, and real-world experiences with zero turn mowers. These community-driven reviews and user-generated content offer valuable insights you won’t find in owner’s manuals, from product recommendations to time-saving techniques for landscaping maintenance.
Don’t have all the specialized tools needed for certain maintenance tasks? Explore our tool rental options to access professional-grade maintenance equipment without the hefty purchase price. From pressure washers for deck cleaning to torque wrenches for blade installation, renting gives you access to the right tools exactly when you need them.
Related Posts

Post a Comment