
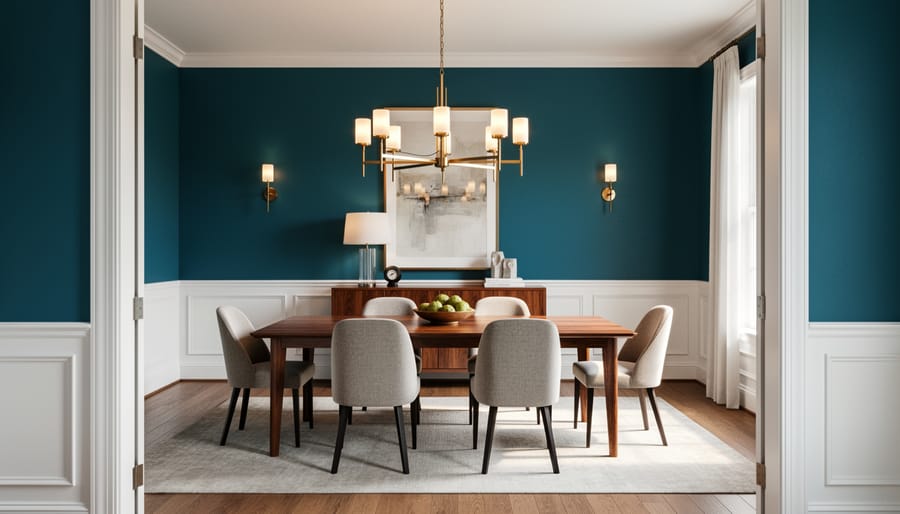
Transform your dining space into an elegant entertainment hub by layering classic design elements with modern functionality. Start by establishing a focal point with a statement chandelier positioned 30-36 inches above your dining table—the right lighting sets the mood for every gathering and defines the room’s character. Select a substantial dining table that allows 24 inches of space per person, paired with upholstered chairs that balance comfort with sophistication for those extended dinner parties.
Create visual depth through strategic wall treatments, whether that means installing wainscoting, applying a rich jewel-toned paint, or adding textured wallpaper to a single accent wall. Layer your lighting beyond the chandelier by incorporating wall sconces or a buffet lamp to eliminate harsh shadows and create warm ambiance. Consider the flow of your space carefully—allow at least 36-48 inches between the table and walls for comfortable movement when serving and seating guests.
The key to successful formal dining room design lies in balancing timeless elegance with practical durability, ensuring your space functions beautifully for both intimate family dinners and special occasions.
Understanding Your Space: The Foundation of Formal Dining Design
Measuring and Planning Your Layout
Before diving into formal dining room design, accurate measurements are essential for avoiding costly mistakes. Start by measuring your room’s length, width, and ceiling height using a laser measure, which provides more precise readings than traditional tape measures and makes solo measuring easier.
Document all measurements, including door swings, window placements, and architectural features like fireplaces or built-in cabinetry. Note the locations of electrical outlets and light switches, as these affect furniture placement and lighting plans.
Create a scaled floor plan using graph paper or digital planning apps like RoomSketcher or MagicPlan. These free tools let you visualize furniture arrangements before moving heavy pieces. Input your measurements and experiment with different layouts digitally.
For furniture placement, follow the 36-inch rule: maintain at least 36 inches between the table edge and walls or other furniture to allow comfortable chair movement. Measure your dining table dimensions and mark the space it requires when chairs are pulled out.
Many DIY enthusiasts recommend testing layouts with painter’s tape on the floor before committing to purchases. This practical approach, frequently mentioned in community reviews, helps you visualize traffic flow and ensures your formal dining room functions beautifully for both everyday use and special occasions.
Working with Architectural Elements
Your formal dining room’s existing architectural features aren’t obstacles—they’re design assets waiting to enhance your space. Start by assessing what you have: crown molding, chair rails, window casings, and doorway trim all contribute character that’s difficult to replicate.
For crown molding and trim work, consider refreshing rather than removing. A fresh coat of paint in crisp white or a contrasting color can transform tired woodwork into a stunning focal point. If your moldings need repair, a sander and wood filler can restore them to their original glory before painting.
Windows deserve special attention in formal dining rooms. Frame them strategically with floor-length curtains hung from ceiling-mounted rods to maximize height. This draws the eye upward and makes your space feel more grand. If you’re adding curtain hardware, a drill with the appropriate bits ensures secure mounting.
Doorways and openings can be emphasized with contrasting paint colors or by adding decorative casing if none exists. Wide doorways are perfect for formal dining rooms as they create a sense of occasion when entering.
When planning furniture placement, work around these permanent features rather than against them. Position your dining table to take advantage of natural light from windows while ensuring moldings and trim remain visible focal points that complement your overall design scheme.
Choosing the Right Color Palette for Formal Elegance
Classic Color Schemes That Never Fail
Choosing the right color scheme sets the foundation for your formal dining room transformation. Here are three timeless approaches that consistently deliver elegant results.
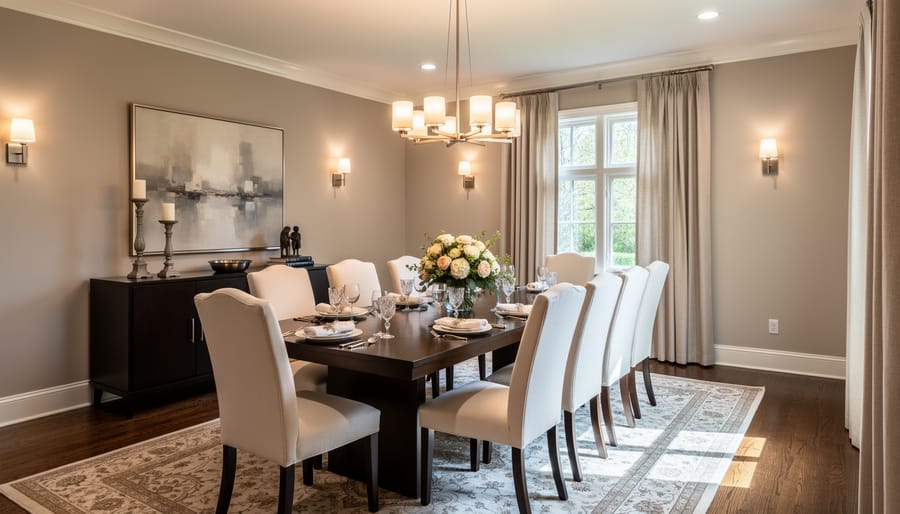
Neutral palettes remain the most versatile choice for formal spaces. Combinations like cream and taupe, soft gray with white trim, or beige with charcoal accents create a sophisticated backdrop that works with any décor style. These colors make rooms feel larger and brighter while allowing your furniture and artwork to take center stage. When painting, a neutral base means you can easily update accessories without repainting entire walls.
Jewel tones bring richness and drama to formal dining rooms. Deep emerald green, sapphire blue, or burgundy create an intimate, luxurious atmosphere perfect for evening entertaining. These bold colors work best on accent walls or in rooms with ample natural light. Pro tip from our community: test paint samples in different lighting conditions before committing to darker shades.
Monochromatic schemes use varying shades of a single color for a cohesive, calming effect. Layer different tones of blue, gray, or even warm browns through your walls, drapery, and upholstery. This approach creates visual interest without overwhelming the space. The key is incorporating at least three different values of your chosen color to avoid a flat appearance. User feedback consistently shows monochromatic rooms photograph beautifully and feel professionally designed.
Paint Selection and Application Tips
Selecting the right paint finish sets the foundation for your formal dining room’s sophisticated atmosphere. For walls, opt for eggshell or satin finishes, which offer subtle sheen while remaining easy to clean—essential for a space prone to food splatters. Matte finishes work beautifully on ceilings, minimizing imperfections and creating depth.
To calculate paint quantities accurately, measure your room’s square footage by multiplying wall height by width for each wall, then subtract window and door areas. Most paint covers approximately 400 square feet per gallon, but always buy 10-15% extra for touch-ups. Community feedback consistently recommends this buffer for peace of mind.
Essential tools include quality angled brushes for cutting in around trim, 9-inch roller frames with medium-nap sleeves for smooth walls, painter’s tape, drop cloths, and paint trays. A sturdy extension pole eliminates ladder climbing and reduces fatigue during application.
Before painting, thoroughly clean walls and fill any holes or cracks with spackle. Apply primer if you’re making dramatic color changes or working with new drywall. Professional painters recommend starting with cutting in—painting edges and corners with a brush—before rolling the main wall surfaces. Work in natural light when possible to spot missed areas, and maintain a wet edge by overlapping each stroke to avoid visible lines.
Furniture Selection: Balancing Style and Practicality
Dining Tables: Size, Shape, and Material Considerations
Selecting the right dining table transforms your formal dining room from ordinary to extraordinary. Start by measuring your space carefully—leave at least 36 inches between the table edge and walls or furniture to allow comfortable movement and chair pullout. For rectangular tables, calculate approximately 24 inches of table width per person.
Shape matters for both aesthetics and function. Rectangular tables suit traditional formal rooms and accommodate more guests, while round tables (48-60 inches diameter) encourage conversation and work well in square spaces. Oval tables offer a softer alternative to rectangular options.
Material choice impacts both appearance and durability. Solid wood tables require proper assembly tools including a power drill, Allen keys, and adjustable wrenches. Many tables arrive flat-packed, so budget 2-3 hours for assembly with a helper. Glass-topped tables need gentle handling during installation—consider renting a suction cup lifter for safer positioning of heavy glass panels.
For modifications like cutting table legs to custom heights or reinforcing wobbly connections, a circular saw and wood glue prove essential. Always work on protective drop cloths and follow manufacturer assembly instructions closely. Community reviews consistently emphasize the importance of having two people for safe table assembly, particularly for larger pieces exceeding 100 pounds.
Seating Options for Formal Comfort
Selecting the right chairs transforms your formal dining room from ordinary to sophisticated. Start by choosing chairs that complement your table’s height and style—traditional dining chairs should sit 18-20 inches from seat to floor, providing comfortable legroom beneath the table.
Don’t feel pressured to match everything perfectly. Many designers recommend mixing chair styles for visual interest: try pairing upholstered host chairs at table ends with simpler side chairs, or combine wood-frame chairs with different fabric colors in the same material family.
If you’re working with existing chairs that need refreshing, reupholstering offers an affordable update. Basic reupholstery requires just a few tools: a staple gun (which you can hire rather than purchase), screwdriver, pliers, and fabric scissors. Remove the seat by unscrewing from underneath, strip old fabric and padding, then add new foam if needed. Stretch your chosen fabric tightly across the seat, securing with staples from center outward on each side. Community reviews consistently highlight that renting a pneumatic staple gun makes this project significantly easier than using manual staplers, especially when working with thicker upholstery fabrics. This weekend project costs a fraction of new chairs while delivering custom results.
Storage and Display Pieces
Storage pieces like sideboards, buffets, and china cabinets serve dual purposes in formal dining rooms, providing essential storage while showcasing your finest dinnerware and serving pieces. When selecting these pieces, consider both proportion and placement. A sideboard should typically span 50-60% of your dining table’s length to maintain visual balance.
Before installation, identify wall studs using a stud finder, especially crucial for tall china cabinets. Heavy furniture poses tipping hazards, particularly in homes with children or pets. Use furniture anchors or anti-tip brackets, securing them directly into wall studs rather than drywall alone. Most modern cabinets include anchor points on their backing.
For sideboards and buffets, position them at least 24 inches from the table edge to allow comfortable serving access. Glass-front china cabinets benefit from interior lighting to highlight displayed items. Consider installing dimmer switches for adjustable ambiance.
Community feedback consistently emphasizes measuring doorways and hallways before purchasing large pieces. Many DIYers recommend assembling furniture in the dining room rather than attempting to maneuver fully assembled cabinets through narrow spaces. Always have at least two people when moving or installing heavy storage furniture to prevent injury and damage.
Lighting: Creating the Right Ambiance
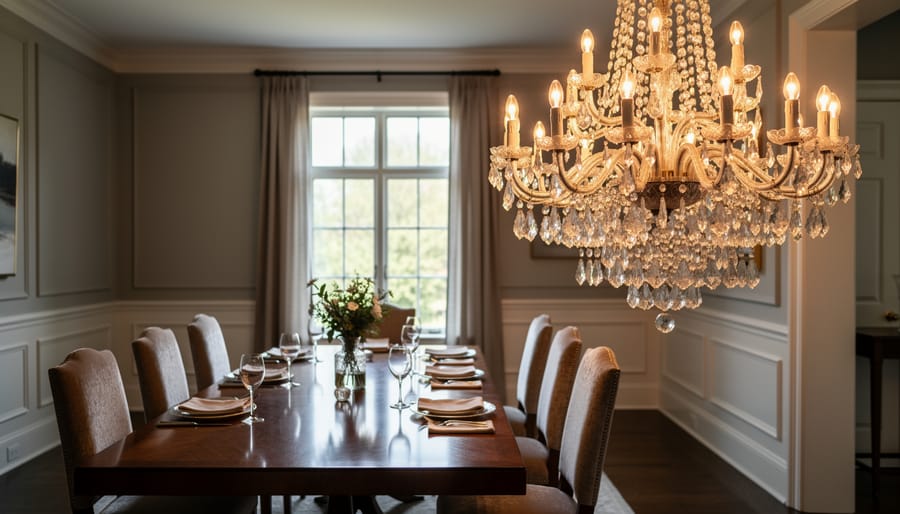
Statement Chandeliers and Installation Basics
A statement chandelier serves as the crowning jewel of any formal dining room, but selecting the right fixture requires careful consideration of your space’s dimensions. As a general rule, measure your room’s length and width in feet, add those numbers together, and convert to inches for the ideal chandelier diameter. For example, a 12×14 foot room works best with a 26-inch diameter fixture. Ceiling height matters too: hang your chandelier 30-36 inches above the table surface in rooms with 8-foot ceilings, adding 3 inches for each additional foot of ceiling height.
Before beginning installation, gather essential tools including a voltage tester, wire strippers, screwdrivers, wire nuts, and a sturdy ladder. Safety comes first: always turn off power at the circuit breaker and verify it’s off using your voltage tester before touching any wires.
Start by removing the existing fixture and examining the junction box to ensure it’s rated for your chandelier’s weight. Heavy fixtures may require additional support hardware. Connect the ground wire first, followed by neutral (white) and hot (black) wires, securing each connection with wire nuts. Carefully tuck wires into the junction box, attach the mounting bracket, and secure the chandelier canopy. Restore power and test your new centerpiece.
Community members recommend having a helper steady the ladder and support the fixture during installation, making this challenging project much more manageable.
Layering Light for Flexibility
Creating a flexible lighting scheme starts with understanding the three-layer approach: ambient, task, and accent lighting. By combining wall sconces, recessed lighting, and dimmer switches, you can transform your formal dining room from bright and practical to soft and intimate with a simple adjustment.
Begin with ambient lighting strategies using recessed downlights spaced approximately 1.2 metres apart. You’ll need a hole saw attachment for your power drill, drywall saw, and wire strippers for installation. Always turn off power at the circuit breaker before starting any electrical work and use a voltage tester to confirm wires are dead.
Wall sconces add visual interest at eye level while providing supplemental lighting. Position them 150-170 centimetres from the floor and ensure they’re equally spaced along walls. For installation, you’ll need a stud finder, masonry drill bits if mounting to brick, and appropriate wall anchors.
The game-changer is installing dimmer switches, which allow you to control light intensity for different occasions. Choose dimmers compatible with your bulb type, whether LED, incandescent, or halogen. Basic wiring knowledge is helpful, but always consult a licensed electrician if you’re uncertain about electrical work. Many DIY enthusiasts find success following manufacturer instructions, though complex installations warrant professional assistance for safety and compliance.
Wall Treatments and Architectural Details

Installing Molding and Trim Work
Installing molding and trim work elevates a formal dining room by adding architectural depth and visual sophistication. With the right tools and careful planning, this project is achievable for motivated DIYers.
Start by measuring your walls carefully. For crown molding, measure the perimeter of the room where the ceiling meets the walls. Add 10% extra to account for cutting mistakes. Chair rails typically sit 32-36 inches from the floor, while baseboards run along the bottom of walls.
Before cutting, mark your measurements clearly on the trim pieces. A compound miter saw is essential for creating precise angled cuts, particularly for corners where molding pieces meet. Most crown molding corners require 45-degree angles, but always test your cuts on scrap pieces first. Many DIYers find renting a quality miter saw more practical than purchasing one for occasional projects.
When installing, begin with the longest, most visible walls first. Apply construction adhesive to the back of each piece, then secure it using a pneumatic nail gun loaded with finishing nails. A nail gun dramatically speeds up installation compared to hammer and nails, and rentals are widely available at competitive daily rates.
For chair rails and baseboards, ensure each piece is level using a spirit level before securing. Fill nail holes with wood filler, let dry completely, then sand smooth. Finally, caulk any gaps between the trim and wall for a professional finish, and apply paint or stain to match your dining room’s design scheme.
Always wear safety glasses when cutting and installing trim to protect against flying debris.
Wallpaper and Accent Walls
Wallpaper transforms a formal dining room into a sophisticated showpiece, but proper installation requires careful planning and the right approach. Before you begin, calculate how many rolls you’ll need by measuring wall height and width, accounting for pattern repeats – typically 12 to 24 inches depending on the design.
Start by preparing your walls. Remove old wallpaper using a scoring tool and warm water mixed with fabric softener, then fill any holes or cracks with spackling compound. Sand surfaces smooth and apply primer designed for wallpaper adhesion. This prep work ensures your expensive wallpaper adheres properly and lasts for years.
Essential tools include a smoothing brush, seam roller, utility knife with fresh blades, plumb line or laser level, and a wallpaper table for pasting. Many homeowners find a steamer helpful for achieving bubble-free results, especially with heavier textured papers popular in formal spaces.
Pattern matching requires patience. Start at the room’s focal point, typically behind a sideboard or buffet. Hang your first strip using a plumb line to ensure it’s perfectly vertical – crooked wallpaper becomes increasingly noticeable as you continue around the room. Match patterns at eye level where they’re most visible, and work outward from your starting point. Take your time aligning designs at seams; rushing this step leads to obvious mismatches that detract from the elegant effect you’re creating.
Flooring Options That Elevate the Space
Hardwood, Tile, and Luxury Vinyl: Pros and Cons
Selecting the right flooring sets the foundation for your formal dining room’s elegance. Hardwood remains the classic choice, offering timeless beauty and durability that can last decades with proper care. Installation difficulty rates as moderate to challenging, requiring a miter saw, flooring nailer, and moisture meter. Expect to invest 2-3 days for a standard dining room.
Tile provides exceptional durability and moisture resistance, ideal if your dining area connects to the kitchen. Porcelain or ceramic tiles create a sophisticated look when installed properly. This option rates as moderate difficulty, needing a wet tile saw, trowel, and tile spacers. Allow 3-4 days including grout curing time.
Luxury vinyl planks offer the appearance of hardwood at a fraction of the cost, with easier installation suitable for confident beginners. Many products feature click-lock systems requiring only a utility knife, straightedge, and rubber mallet. Most DIYers complete installation in 1-2 days. Community reviews consistently praise luxury vinyl for its realistic wood grain patterns and comfortable underfoot feel, making it an increasingly popular choice for formal spaces.
Area Rugs for Added Elegance
An area rug anchors your formal dining space and adds warmth beneath the table and chairs. To select the right size, measure your dining table and add at least 24 inches on all sides. This ensures chairs remain on the rug even when pulled out, preventing them from catching on the edge. For a standard six-person table, you’ll typically need an 8×10 foot rug, while larger tables require 9×12 or bigger.
Position the rug so your table sits centered, with equal space on all sides. The rug should extend beyond the table to create a defined dining zone within the room.
Safety is paramount when installing area rugs. Use rug pads underneath to prevent slipping and protect your flooring. These grippy underlayers keep the rug flat and reduce tripping hazards. Choose a pad slightly smaller than your rug dimensions so it stays hidden from view.
For homes with children or high foot traffic, consider double-sided carpet tape around the perimeter for extra security. Community feedback consistently highlights that proper rug anchoring prevents accidents while maintaining the polished look essential for formal dining spaces.
Final Touches: Window Treatments and Accessories
Curtains and Drapery Installation
Formal window treatments add elegance and privacy to your dining room. When deciding between curtains or blinds, consider that floor-length drapery in luxurious fabrics like silk, velvet, or heavy linen creates the most formal appearance.
Before installation, you’ll need a cordless drill, spirit level, tape measure, and appropriate wall anchors. For plaster walls, use toggle bolts or metal anchors rated for the curtain rod’s weight. Brick requires masonry drill bits and plastic wall plugs, while timber studs accommodate standard wood screws.
Mount curtain rods 10-15cm above the window frame and extend 15-20cm beyond each side to allow drapes to stack without blocking light. Mark drilling points using your spirit level to ensure the rod sits perfectly horizontal. Pre-drill pilot holes to prevent cracking, especially in older plaster.
For heavy formal drapes, install double brackets with centre support for rods exceeding 180cm. Test the bracket strength before hanging curtains by applying gentle downward pressure. Consider hiring a power drill if you’re tackling multiple windows, as this speeds up the process significantly.
Layer sheers behind heavier drapes for light control and added depth. This combination provides daytime privacy while maintaining the formal aesthetic essential for dining room elegance.
Art, Mirrors, and Decorative Elements
Incorporating artwork into your formal dining room requires careful planning and the right tools. Hang artwork at eye level, typically 145-150cm from the floor to the center of the piece. Use a laser level (available for hire) to ensure perfect alignment, especially when creating gallery walls or symmetrical arrangements.
For installing mirrors, particularly large or heavy pieces, proper wall anchors are essential for safety. Always locate wall studs using a stud finder and use appropriate mounting hardware rated for your mirror’s weight. Consider hiring a rotary hammer drill for masonry walls to ensure secure installation.
When selecting decorative elements, follow the rule of three for visual balance. Choose accessories that complement your color scheme without overwhelming the space. A formal sideboard benefits from a statement centerpiece flanked by coordinating items like candlesticks or vases. Avoid cluttering surfaces by limiting decorative pieces to functional items that enhance the room’s elegance.
For wall-mounted shelving to display fine china or decorative pieces, a spirit level ensures professional results. Remember that formal dining spaces benefit from symmetry and restraint, so curate your accessories thoughtfully rather than filling every available surface.
Creating an elegant formal dining room is well within your reach as a DIY enthusiast. With careful planning and the right approach, you can transform your space without the expense of hiring professionals. Remember that many of the specialized tools needed for these projects, from floor sanders to paint sprayers and mitre saws, are available through affordable hire services. This means you can access professional-grade equipment without the commitment of purchasing items you may only use once.
As you embark on your formal dining room transformation, take your time with each stage and don’t hesitate to tackle projects in phases. Whether you’re refinishing floors, installing crown moulding, or updating light fixtures, breaking the work into manageable sections makes even ambitious designs achievable.
We’d love to hear about your formal dining room projects. Share your experiences, tips, and photos with our community. Your insights about which techniques worked best or which tool hire options proved most valuable can help fellow DIYers navigate their own transformations. Leave a review of any hired equipment you’ve used, as your feedback guides others in making informed decisions for their projects.
Related Posts

Post a Comment