
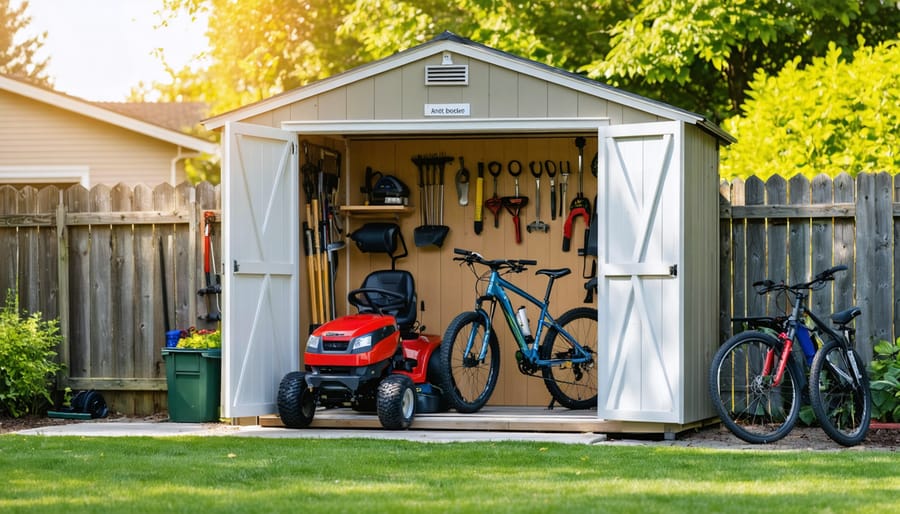
**Determine if 64 square feet meets your storage needs** by measuring your lawn equipment, bikes, garden tools, and seasonal items—then add 20% clearance space. Most homeowners find an 8×8 wooden shed comfortably houses a riding mower, two bikes, shelving units, and hand tools while leaving room to move. Sketch a rough floor plan before committing to this popular mid-size option.
**Budget between $2,500-$6,000 for materials** when building from scratch, or $3,500-$8,000 for pre-built models delivered to your property. Pressure-treated lumber foundations, T1-11 siding, and asphalt shingle roofing represent the sweet spot between durability and affordability. Pre-cut shed kits split the difference, offering easier assembly than raw materials while costing 30-40% less than fully assembled structures.
**Plan for 2-3 weekend builds** if you’re tackling this as a DIY project with moderate carpentry skills. You’ll need essential tools like a circular saw, power drill, level, and framing square—plus specialized equipment including a post hole digger and potentially a cement mixer for the foundation. Many weekend builders rent rather than purchase infrequently-used tools, saving hundreds while accessing professional-grade equipment.
**Understand your local building codes first**: structures over 100-120 square feet typically require permits in most jurisdictions, though an 8×8 shed (64 sq ft) often falls below this threshold. Still, verify setback requirements from property lines, HOA restrictions, and foundation specifications with your local building department before breaking ground. This 30-minute phone call prevents costly mistakes and potential teardown orders.
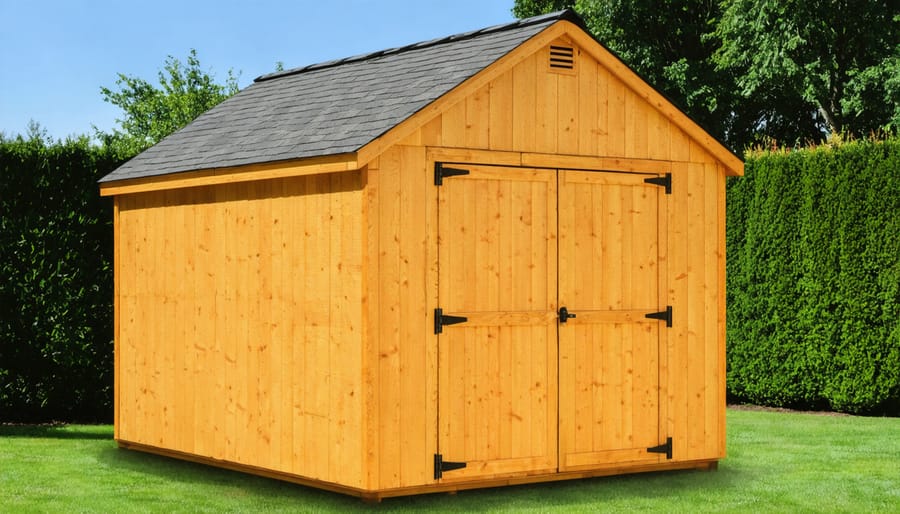
What Makes an 8×8 Wooden Shed the Perfect Size
An 8×8 wooden shed hits the sweet spot for most homeowners—it’s compact enough to fit comfortably in suburban backyards yet spacious enough to handle serious storage needs. With 64 square feet of floor space, you’re looking at roughly the size of a small bedroom, which translates to significantly more storage capacity than most people initially realize.
When comparing shed sizes, the 8×8 proves more practical than its smaller cousins. A 6×8 shed might save you a few dollars initially, but you’ll quickly feel cramped when organizing tools and equipment. Meanwhile, jumping to a 10×10 or 12×12 structure often triggers stricter building regulations and substantially higher material costs. The 8×8 dimensions allow most homeowners to maximize storage without overwhelming their property or budget.
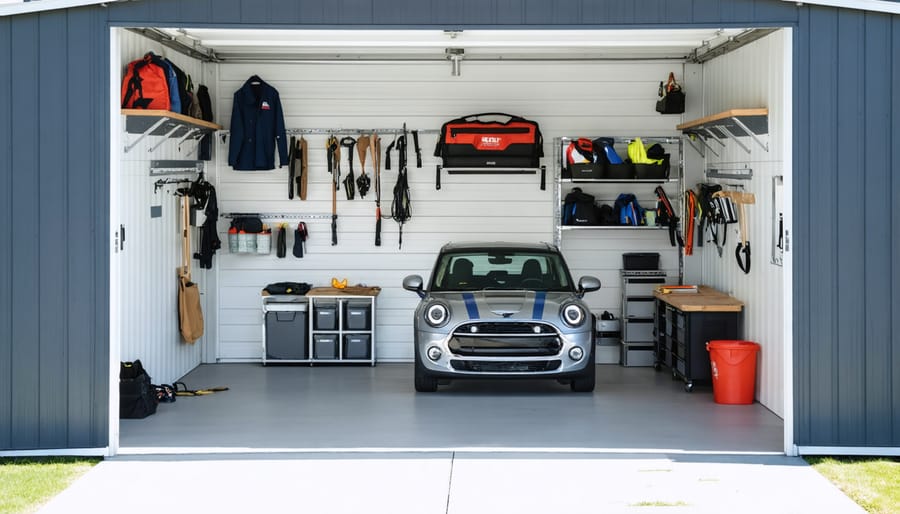
Here’s what realistically fits inside an 8×8 shed: a riding lawn mower (taking up roughly 15 square feet), two adult bicycles hung on wall mounts, a complete set of garden tools including rakes, shovels, and hoes mounted vertically, a workbench along one wall (approximately 2×6 feet), shelving units for storing paint cans and hardware, plus seasonal items like holiday decorations or patio cushions stacked overhead. Many users report comfortably storing wheelbarrows, leaf blowers, string trimmers, and even small ladders with thoughtful organization.
The permit situation adds another advantage. In most Australian jurisdictions, structures under 10 square meters (approximately 107 square feet) typically don’t require council approval, though it’s essential to verify local regulations. Your 8×8 shed falls comfortably within these limits, simplifying the construction process considerably. This makes it an ideal candidate for DIY projects or quick professional installations.
From an outdoor space planning perspective, an 8×8 footprint integrates seamlessly into most yards. You’ll maintain adequate clearance from property lines (usually requiring 1-2 meters setback) while preserving lawn space for other activities. The structure is substantial enough to justify proper foundation work yet manageable enough for weekend builders tackling their first major project.
Community feedback consistently highlights that homeowners rarely regret choosing the 8×8 size, while those who opted smaller often wish they’d invested in just a bit more space from the start.
Custom Wooden Storage: Built to Last or Built to Replace?
Wood Types That Stand Up to Weather
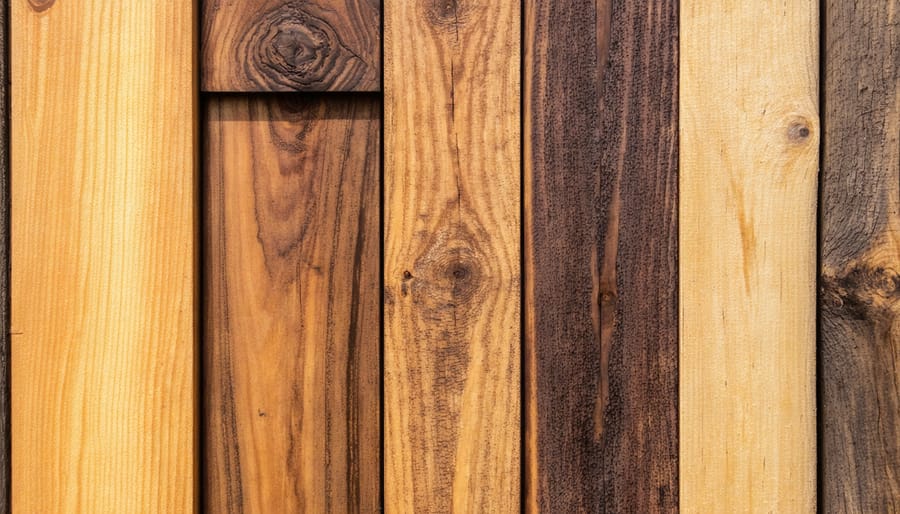
Choosing the right wood for your 8×8 shed makes all the difference in longevity and maintenance requirements. Here’s what you need to know about the most popular options.
**Cedar** is the premium choice for shed construction. Its natural oils repel insects and resist rot, making it ideal for outdoor structures. Cedar weathers beautifully to a silvery gray or maintains its warm tone with proper sealing. The downside? Expect to pay 2-3 times more than other options—typically $8-12 per board foot. However, many builders find the investment worthwhile for its 20+ year lifespan with minimal maintenance.
**Pressure-treated pine** dominates the shed market for good reason. Chemical treatment protects against rot, decay, and termites, delivering solid performance at $3-5 per board foot. It’s the same reliable material used in deck construction and building outdoor furniture. The trade-off includes a greenish tint that fades over time and the need for annual sealing. Always wear gloves when handling fresh pressure-treated lumber and let it dry thoroughly before painting.
**Redwood** offers similar benefits to cedar with excellent natural resistance to moisture and pests. It’s becoming harder to source and costs $7-10 per board foot in most regions.
**Standard pine or spruce** works if you’re on a tight budget ($2-4 per board foot), but requires regular maintenance and won’t last as long. Only consider this option if you’re committed to annual treatments and inspections.
For most DIYers, pressure-treated pine for framing and cedar for trim creates an excellent balance of durability and value.
Foundation Fundamentals You Can’t Skip
Your shed’s foundation isn’t the exciting part of this project, but it’s absolutely the most critical. Skip this step or cut corners, and you’ll be dealing with sagging floors, stuck doors, and moisture damage within a year or two. Trust me—the extra effort now saves headaches later.
**Concrete Blocks**: This is the most popular DIY option for good reason. Place solid concrete blocks (not hollow cinder blocks) at each corner and every 3-4 feet along the perimeter. The key is setting them on leveled, compacted gravel to prevent settling. Many builders in our community recommend adding blocks in the center for an 8×8 shed to support the middle joists. Cost-wise, you’re looking at $50-100 for materials.
**Gravel Base**: If you want something more substantial, a 4-6 inch compacted gravel base provides excellent drainage and stability. You’ll need a plate compactor (perfect rental opportunity) to properly compact the gravel in layers. This prevents the gradual sinking that happens when gravel isn’t adequately tamped down.
**Concrete Slab**: The premium choice costs $400-800 for an 8×8 pad, but it’s virtually maintenance-free and lasts decades. You get a perfectly level, rodent-proof floor that won’t shift or settle.
Whatever you choose, never place your shed directly on dirt or grass. Moisture wicks up through untreated wood, leading to rot and structural failure. Remember: fixing a failed foundation means lifting or rebuilding your entire shed—not a fun weekend project.
DIY Build vs. Pre-Built: The Real Cost Breakdown
Let’s break down the real numbers behind getting your 8×8 wooden storage shed, because the sticker price rarely tells the whole story.
**DIY Build from Scratch**
Building your own shed starts at around $2,500-$3,500 for materials alone. You’ll need lumber, roofing materials, fasteners, concrete for footings, and exterior-grade paint or stain. However, hidden costs add up quickly. Factor in tool expenses—unless you already own a circular saw, drill, level, and framing square, you’re looking at another $500-$800 in purchases. Smart builders explore tool rental options to slash this expense by 60-70%.
Time investment is substantial: expect 40-60 hours spread over 2-3 weekends for someone with moderate carpentry skills. First-timers might need double that. Skill level required sits at intermediate—you should understand basic framing, can cut accurately, and feel comfortable working from plans. Mistakes like improper foundation work or incorrect roof pitch can cost hundreds to fix.
Total realistic budget: $2,800-$4,200 plus your labour value.
**Pre-Fabricated Kits**
Flat-pack kits from major retailers run $3,500-$5,500 delivered. These include pre-cut lumber, hardware, and instructions. You’ll still need basic tools and 20-30 hours for assembly with a helper. The benefit? Less measuring, minimal cutting, reduced waste. The downside? Limited customization and you’re still doing the foundation work yourself.
Foundation materials add another $300-$600 depending on whether you use gravel pads, concrete blocks, or a full slab.
Total realistic budget: $4,200-$6,500 including foundation.
**Professional Installation**
Fully built sheds delivered and installed range from $6,000-$9,000. This includes everything: foundation, construction, finishing. Your time investment? Just a few hours discussing placement and signing paperwork. Zero skill required.
Many homeowners underestimate the value here. When comparing DIY vs professional services, consider permit handling, warranty coverage, and structural guarantees that pros provide.
**Hidden Costs Everyone Overlooks**
Regardless of approach, budget for permits ($150-$400), site preparation if your ground isn’t level ($200-$800), and weatherproofing upgrades like gutters ($150-$300). Don’t forget delivery fees for materials—bulk lumber delivery typically costs $75-$150.
**The Bottom Line**
DIY suits confident builders with time flexibility and tool access. Pre-fab kits work for hands-on homeowners wanting guidance. Professional installation makes sense when time matters more than money, or when your skill level doesn’t match the project’s demands. Honest self-assessment saves money—and frustration.
Essential Tools and Equipment for Your Shed Project
Building an 8×8 wooden storage shed requires the right tools for DIY projects, but you don’t need to purchase everything. Here’s what you’ll need, organized by construction phase, with smart rental recommendations to keep costs down.
**Foundation Phase Tools**
Start with measuring and layout equipment: a 30-meter tape measure, string line, and carpenter’s square for accuracy. You’ll need a post hole digger or power auger—the latter is definitely worth renting if you’re installing concrete piers or posts. A spirit level (at least 1200mm) ensures your foundation sits perfectly flat. For mixing concrete, consider renting a portable concrete mixer rather than mixing by hand, which saves hours of labor.
**Framing and Wall Construction**
Your core toolkit includes a circular saw (rentable if you don’t own one), hammer or framing nailer, drill/driver with assorted bits, and a sliding miter saw for precise angle cuts. A framing nailer dramatically speeds up construction—rental shops typically offer these by the day. You’ll also need a chalk line for marking studs, a combination square, and safety gear including eye protection and work gloves. A sawzall (reciprocating saw) proves invaluable for corrections and adjustments.
**Roofing Phase Tools**
Roofing requires specialized equipment. A pneumatic roofing nailer connects to an air compressor (both available as rental packages) and makes shingle installation significantly faster. You’ll need a utility knife with extra blades, tin snips for flashing, and a caulking gun. Safety becomes paramount here—invest in a quality roof harness and consider scaffolding rental rather than working from ladders.
**Finishing Phase Tools**
Complete your shed with a belt sander (great rental option), paintbrushes or sprayer, screwdriver set, and adjustable wrench. A jigsaw helps with door and window cutouts, while a brad nailer handles trim work beautifully.
**Smart Rental Strategy**
Focus on purchasing hand tools you’ll use repeatedly—hammers, tape measures, levels—and rent power equipment needed for just a few days. Most rental shops offer weekend rates that maximize your construction time while minimizing costs. Always inspect rental equipment before leaving the shop and ask for operating demonstrations if you’re unfamiliar with the tool.
Customization Options That Add Real Value
Interior Organization Solutions
An organized 8×8 shed maximizes your 64 square feet of space and keeps tools accessible. Here are practical interior solutions with realistic cost estimates based on community feedback.
**Shelving Systems**
Wall-mounted shelving is your best friend in compact spaces. Heavy-duty metal shelving units (16-inch depth) cost $40-$80 per unit and can hold 200-300 pounds per shelf. Install them along two walls, leaving space for larger equipment. Many DIYers recommend adjustable shelving brackets ($15-$25 per pair) for flexibility as your storage needs change. Position shelves at 12-16 inch intervals for optimal vertical storage.
**Pegboard Organization**
Pegboard walls transform vertical space into organized tool storage. A 4×8 foot pegboard panel costs $20-$35, with hook sets running $15-$30. Mount pegboards on 1×2 furring strips to create the necessary gap for hooks. This setup keeps frequently-used tools visible and within reach—perfect for hand tools, garden equipment, and extension cords.
**Ceiling Storage Solutions**
Overhead racks utilize often-wasted ceiling space for seasonal items and bulky equipment. Ceiling-mounted platforms cost $50-$120 and typically support 200-400 pounds. Install these at least 6 feet high to maintain headroom while storing items like camping gear or holiday decorations.
**Workbench Integration**
A fold-down workbench ($80-$150) provides workspace without sacrificing floor area. Mount it at 36 inches high along one wall. Community members suggest positioning it near an electrical outlet for power tool use, making your shed a functional workshop.
Total investment: $200-$500 depending on your configuration.
Windows, Ventilation, and Light
Proper ventilation and natural light transform your 8×8 shed from a damp storage box into a functional workspace. Without adequate airflow, moisture accumulates quickly, leading to mold growth, wood rot, and musty odors that can damage your stored items.
Plan for at least two vents—one high near the roof peak and one lower on the opposite wall. This creates natural cross-ventilation as warm air rises and escapes through the top vent while cooler air enters below. Standard gable vents (typically 14×24 inches) work well for sheds this size. Ridge vents offer another excellent option if you’re building from scratch.
For lighting, a simple window provides both natural light and emergency ventilation. Position it on the wall that receives the most sunlight during your typical usage hours. A 24×36-inch single-hung window offers good light without sacrificing wall storage space.
Solar tubes are game-changers for sheds without electricity. These reflective tubes capture sunlight from your roof and channel it inside, providing surprisingly bright illumination without cutting large openings in your walls. They’re particularly useful if nearby trees or structures limit window placement options.
Consider adding a small battery-powered motion light near the door for early morning or evening access when natural light isn’t available.
Security Features Worth the Investment
Protecting your investment means thinking about security from day one. An 8×8 shed can house thousands of dollars worth of tools and equipment, making it a potential target for theft.
Start with a quality lock system—consider a heavy-duty padlock hasp with a case-hardened shackle lock rated at least Grade 3 (that’s a security rating system where Grade 1 is highest). Many DIYers in our community recommend installing two hasps on opposite sides of the door, since single locks can be pried off more easily.
Upgrade your hinges to non-removable models or install them inside the door if possible. External hinges with exposed pins are security vulnerabilities—thieves can simply pop the pins and lift the entire door off. If you must use external hinges, consider hinge bolts or stud hinges that prevent removal even when pins are compromised.
For sheds with windows, add security bars or heavy-gauge wire mesh on the interior. This doesn’t mean turning your shed into a fortress—many attractive decorative grilles provide both security and curb appeal.
Don’t overlook motion-activated lighting around your shed’s entrance. Several users report this simple addition being their most effective deterrent. Battery-powered solar lights work perfectly if running electricity isn’t practical for your setup.
Step-by-Step: What to Expect During Construction
Building an 8×8 wooden storage shed is a manageable project when you break it down into distinct phases. Here’s what the process looks like from start to finish, along with realistic timeframes and critical tips to keep your project on track.
**Site Preparation (1-2 Days)**
Start by clearing and leveling your chosen location. Remove vegetation, rocks, and debris within a 10×10 area to allow workspace around your shed footprint. Check local building codes—many municipalities require permits for structures over 100 square feet (your 8×8 is 64 square feet, but regulations vary). Install a foundation appropriate for your soil conditions: concrete piers, gravel pads, or a concrete slab all work well. Common pitfall: Skipping the level check. Even a slight slope causes alignment headaches later. Use a long level or laser level to ensure your foundation is perfectly flat.
Safety consideration: Call 811 before digging to locate underground utilities.
**Floor Frame and Decking (1 Day)**
Construct your floor frame using pressure-treated 2×6 lumber on 16-inch centers. Square the frame by measuring diagonally—both measurements should match exactly. Attach ¾-inch plywood or OSB decking with exterior-grade screws. Professional installers typically complete this phase in 3-4 hours, while DIYers should budget a full day.
Common mistake: Using indoor-rated lumber for the base, which leads to premature rot.
**Wall Assembly and Raising (1-2 Days)**
Frame walls flat on your deck, then raise them into position. This approach is safer and more accurate than building walls vertically. Most 8×8 sheds use 2×4 studs on 16-inch centers with a standard 6-8 foot wall height. Brace walls temporarily until all four sides are connected and plumb. Check for square continuously throughout this phase.
Safety tip: Wall raising requires at least two people. Never attempt this solo.
**Roof Structure (1-2 Days)**
Install roof trusses or build a simple gable roof with rafters. A gable design with 4/12 or 6/12 pitch provides good water runoff and interior headroom. Secure roof sheathing (typically ½-inch plywood), add felt paper or synthetic underlayment, then install your chosen roofing material—asphalt shingles are most common for DIY projects.
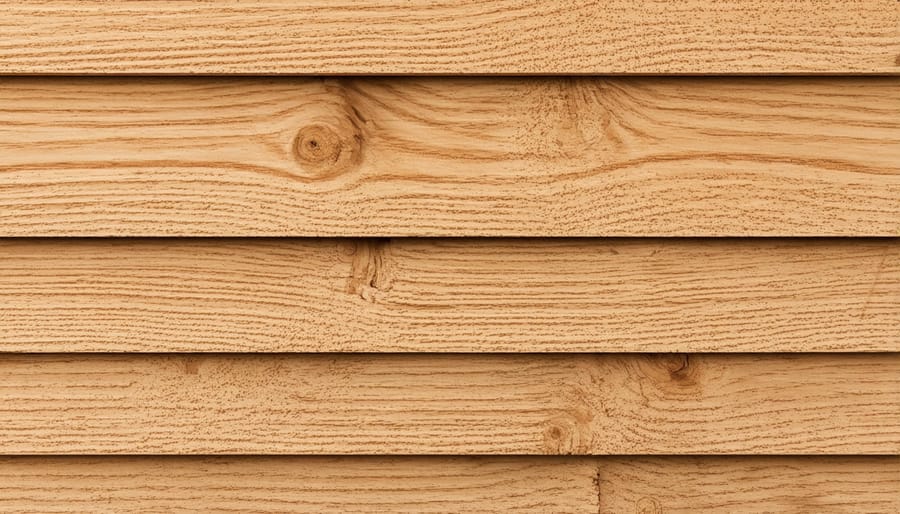
**Siding and Finishing (2-3 Days)**
Apply your exterior siding (T1-11, board-and-batten, or horizontal lap siding are popular choices), install doors and windows, then add trim. Apply primer and paint or stain for weather protection.
**Realistic Timeframes**
DIY builders typically complete an 8×8 shed in 5-8 days of actual work spread over 2-3 weekends. Professional installers finish in 2-3 days. Weather delays are common—never rush critical steps like roofing in poor conditions.
Maintenance That Keeps Your Shed Standing for Decades
A well-maintained 8×8 wooden shed can easily last 20-30 years or more, but neglect will have it sagging and rotting within a decade. The good news? Keeping your shed in top shape doesn’t require much time or specialized skills—just consistency.
**Annual Inspection Checklist**
Walk around your shed each spring and fall, looking for trouble spots before they become expensive problems. Check for loose or damaged boards, cracks in the wood, and signs of water damage near the foundation. Inspect the roof for missing or curled shingles, and clear away any debris that’s accumulated. Community members on our site consistently report that catching issues early saves hundreds in repairs later.
**Wood Treatment and Protection**
Plan to restain or reseal your shed every 2-3 years, depending on your climate. This protective barrier prevents moisture penetration, which causes rot, warping, and structural damage. Before applying any treatment, clean the surface with a mild detergent solution and let it dry completely. User reviews favor semi-transparent stains over solid colors—they let you spot problems underneath while still providing UV protection.
**Roof Maintenance Matters**
Your roof takes the biggest beating from weather. Trim overhanging branches that drop leaves and debris, which trap moisture and accelerate wear. Replace damaged shingles immediately to prevent leaks. Clean gutters (if installed) at least twice yearly. A roof inspection takes 15 minutes but prevents costly interior damage.
**Door and Window Care**
Lubricate hinges and locks annually with a silicone-based spray. Check that doors close properly—misalignment often signals foundation settling. Reseal windows with exterior caulk if you notice drafts or gaps.
**Pest Prevention Strategies**
Keep vegetation trimmed back at least 12 inches from your shed’s exterior. Store items off the floor on shelves to discourage rodent nesting. Seal any gaps or holes with steel wool and caulk—mice can squeeze through openings as small as a dime. Check regularly for termite tubes along the foundation, especially if you live in warmer climates.
An 8×8 wooden storage shed represents a smart investment for homeowners seeking to maximize their outdoor space without overwhelming their yard. Throughout this guide, we’ve explored how this compact yet capable structure can transform your storage situation, whether you’re organizing gardening tools, seasonal equipment, or workshop supplies. The key to a successful shed project lies in selecting quality materials—pressure-treated lumber for longevity, proper roofing materials for weather protection, and durable hardware that withstands the elements.
Proper installation cannot be overstated. A level foundation, accurate measurements, and attention to detail during assembly ensure your shed remains functional and attractive for decades. Whether you’re building from scratch or assembling a kit, taking time to do it right saves frustration and repair costs down the road.
We’d love to hear about your shed-building experiences. Have you completed an 8×8 shed project? What challenges did you face, and what tips would you share with fellow DIYers? Drop your stories, photos, and questions in the community section below. Your insights help others make informed decisions and avoid common pitfalls.
Ready to start your project? Don’t let tool limitations hold you back. Explore our comprehensive tool rental options to access professional-grade equipment without the hefty purchase price. From circular saws and drills to power augers for post holes, we’ve got everything you need to bring your shed vision to life affordably and efficiently.
Related Posts

Post a Comment