
Assess your grout removal project scope before committing to tool hire by measuring the total linear metres of grout lines and identifying the grout type, as this determines whether you need an oscillating multi-tool for small bathroom updates or a heavy-duty rotary grout removal tool for whole-house regrouting. Calculate your cost threshold by comparing the £25-£45 daily hire rate against purchasing a basic grout rake at £8-£15, recognizing that projects exceeding 15 square metres typically justify professional-grade tool rental. Request demonstration videos or in-store tutorials from your hire centre, since improper blade depth settings account for 60% of tile damage during DIY grout removal according to community feedback from regular renovators. Confirm the hire package includes dust extraction attachments and appropriate blade widths matching your grout line dimensions, as working without proper dust management creates health hazards and extends cleanup time by several hours. Book midweek rental periods when possible to maximize your hire duration, as many centres operate 24-hour charging cycles that allow Wednesday pickups to stretch through the weekend without additional fees.
What Is a Tile Grout Removal Tool and Why You Need One
Manual vs. Powered Grout Removal
Choosing between manual and powered grout removal tools can make a significant difference to your project outcomes. Manual tools like grout rakes and carbide-tipped scrapers require considerable elbow grease and time. For small areas or spot repairs, they’re economical and give you precise control. However, tackling an entire bathroom or kitchen manually can take several exhausting days and lead to hand fatigue, blisters, and inconsistent results.
Powered tools, available through hire services, transform the experience entirely. Oscillating multi-tools with grout removal attachments or dedicated grout removal machines can complete the same job in a fraction of the time—often reducing a weekend project to just a few hours. They deliver consistent depth and cleaner edges, which means better adhesion when you apply new grout. The vibrating or rotating action does the hard work, minimizing physical strain significantly.
According to feedback from our community members, powered tools particularly shine on larger projects or when dealing with hard, aged grout that manual methods struggle to penetrate. While hire costs are higher than buying a basic hand tool, the time savings and reduced physical toll make powered options the preferred choice for most regrouting projects beyond minor touch-ups.
Types of Grout Removal Tools Available for Hire
When hiring a grout removal tool, you’ll encounter three main categories, each designed for different project scales and requirements.
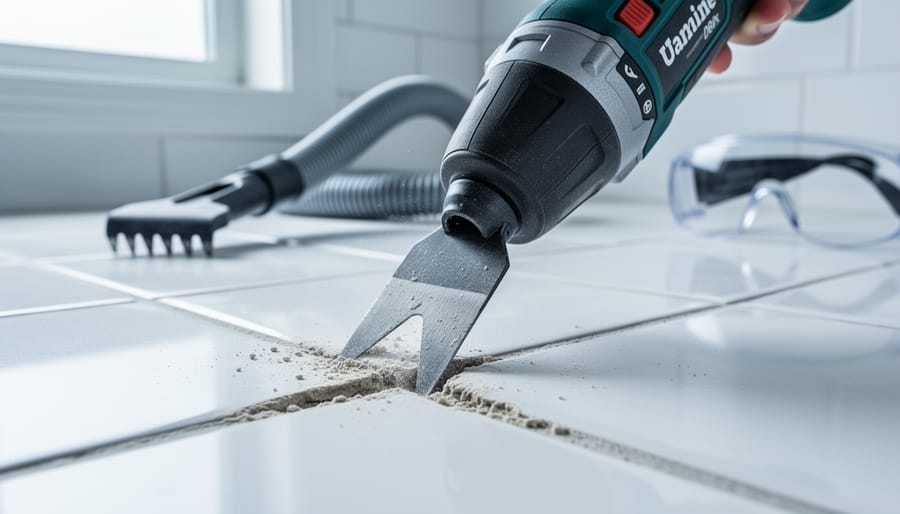
Oscillating multi-tools with grout blades are the most versatile option for DIY enthusiasts. These handheld power tools accept specialized grout removal blades that vibrate at high speeds to chip away old grout. They’re ideal for small to medium bathroom or kitchen projects, offering excellent control in tight spaces around fixtures and corners. Many hire shops stock these as they’re user-friendly and minimize the risk of tile damage when used carefully.
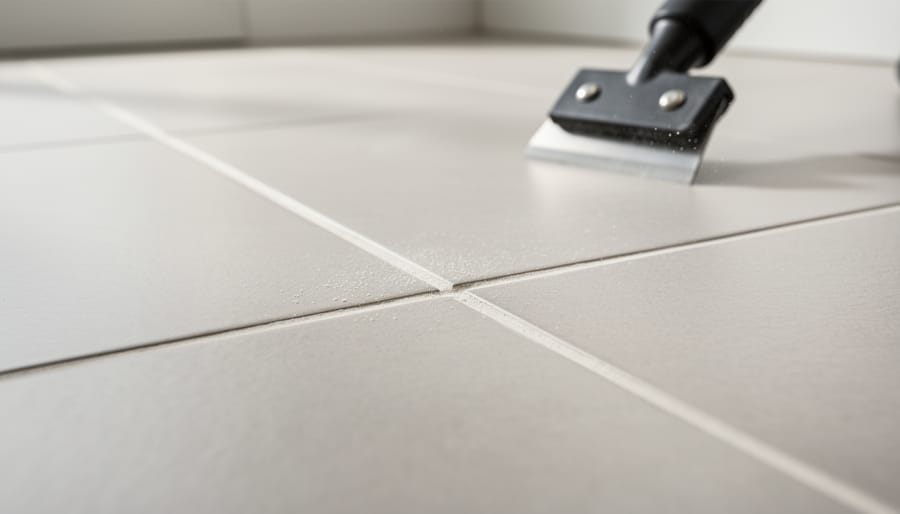
Rotary grout removal tools, sometimes called grout grabbers or grout cutters, feature spinning carbide-tipped bits that precisely cut through grout lines. They excel at removing grout from floor tiles and larger wall areas where straight, consistent lines are needed. These tools work faster than oscillating models but require a steadier hand and some practice to master. Community feedback suggests they’re particularly effective on cement-based grouts in good condition.
Dedicated grout removal machines are heavy-duty options suited for professional tradespeople or extensive renovation projects. These specialized power tools combine aggressive cutting action with dust extraction systems, making them efficient for commercial spaces or whole-house regrouting. While more expensive to hire, they significantly reduce project time on large-scale jobs. However, their power means inexperienced users should request a thorough demonstration before taking them home.
Consider your project size, tile type, and experience level when selecting which tool category best meets your needs.
When to Hire Instead of Buy
Deciding between hiring and purchasing a grout removal tool comes down to several practical factors. For most homeowners tackling a single bathroom renovation or occasional retiling project, hiring makes clear financial sense. An electric grout removal tool costs between $150-400 to purchase, while hiring from equipment rental yards typically ranges from $30-60 per day or $80-120 per week.
Consider frequency of use first. If you’re regrouting one bathroom with approximately 20 square metres of tiles, you’ll likely complete the job in one to two days. That’s a $60 hire cost versus a $300 purchase—saving you $240 for a tool you may never use again. Storage is another consideration, especially for apartment dwellers or those with limited garage space. These tools aren’t small, and they require dry storage conditions.
For professional tilers or property renovators handling multiple projects monthly, purchasing becomes cost-effective after about five to six uses. However, even professionals often benefit from the advantages of hiring over buying, including access to well-maintained equipment and no repair responsibilities.
Real-world scenario: Sarah needed to regrout her kitchen backsplash (8 square metres). She hired an oscillating tool with grout removal attachment for $40 for two days, completed the job in one afternoon, and returned it. Purchasing would have cost $250 for equipment she’d use once every few years.
The tipping point is typically three or more projects annually. Calculate your projected usage realistically, factor in storage space and maintenance costs, and remember that hire centres provide the latest models without the commitment.
How to Choose the Right Grout Removal Tool for Your Project
Assessing Your Grout and Tile Condition
Before selecting a grout removal tool, you need to evaluate your specific project conditions. Start by checking your grout’s hardness—older, cement-based grout is typically harder and requires more aggressive tools, while newer epoxy grout demands specialized equipment. Use a screwdriver or old chisel to gently test resistance in an inconspicuous area.
Measure the grout depth by examining joints carefully. Standard depth ranges from 3-6mm, but deeper joints need tools with adjustable blade lengths to avoid damaging the substrate beneath. Shallow grout lines require precision tools to prevent accidental tile repair issues.
Assess your tile fragility next. Ceramic and porcelain tiles are generally durable, but natural stone, glass, or vintage tiles crack easily under vibration. Delicate materials benefit from manual or oscillating tools rather than rotary grinders.
Consider the project scale too. Small bathroom repairs might only need handheld tools, while large floor areas justify hiring powered equipment. Check for any cracked or loose tiles beforehand, as vibration from power tools can worsen existing damage. Taking photos and notes helps when discussing your needs with rental staff, ensuring you hire the most appropriate equipment for your specific conditions.
Matching Tool Power to Project Size
Choosing the right grout removal tool depends largely on your project scope and time constraints. For small bathroom floors under 50 square feet, a basic oscillating multitool with a grout removal blade will suffice for weekend projects. These tools are lightweight, easy to control, and ideal for first-time users tackling modest regrouting jobs.
Medium-sized projects between 50-200 square feet, such as kitchen backsplashes or larger bathrooms, benefit from dedicated rotary grout removal tools. These offer more power and speed than multitools, cutting your working time roughly in half. Users in our community report completing 100 square feet in 4-6 hours with rotary tools versus 8-10 hours with basic oscillating models.
For extensive projects exceeding 200 square feet or commercial applications, consider hiring professional-grade reciprocating grout removers or angle grinders with dust extraction systems. These powerhouse tools dramatically reduce project timelines but require more experience to operate safely.
When consulting with your hire shop, be honest about your skill level and project deadline. Staff can recommend appropriate tool capacity based on both factors. Remember that rushing with an underpowered tool often leads to inconsistent results, while using oversized equipment on small jobs risks damaging surrounding tiles.
What to Expect When Hiring a Grout Removal Tool
Renting a grout removal tool is typically straightforward, though processes vary between hire companies. Most rental shops require identification and a deposit, which can range from £50 to £200 depending on the equipment value. This deposit protects against damage or loss and is fully refundable when you return the tool in good condition.
Standard hire periods usually start at a minimum of one day, with options extending to weekly or weekend rates. Daily rates are common for smaller projects, while weekly rentals offer better value for larger jobs. When calculating your needs, remember to include travel time to and from the hire shop within your rental period.
Your rental package should include the main tool, any necessary accessories like blades or attachments, and a user manual. Many hire companies now provide brief demonstrations before you leave the premises. Don’t hesitate to ask staff to show you how to operate the equipment safely and efficiently—this service is part of what you’re paying for. Some locations also offer instructional videos or guides you can access online.
Damage waivers are available at most hire centres for an additional fee, typically 10-15% of the rental cost. These waivers limit your liability for accidental damage, providing peace of mind especially if you’re unfamiliar with the equipment. Before signing any rental agreement, carefully inspect the tool for existing damage and ensure it’s documented to avoid disputes later. Always check what consumables like blades are included and whether replacements cost extra.
Safety Essentials Before You Start
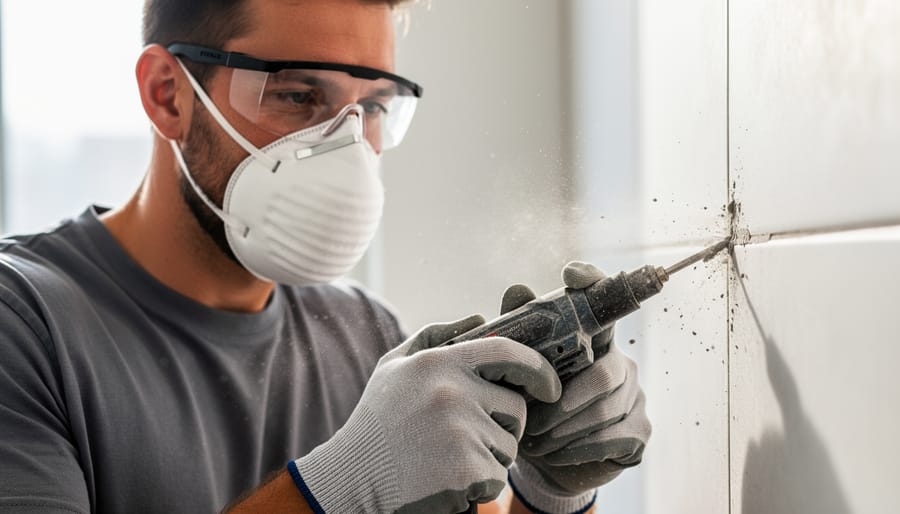
Before you begin your grout removal project, protecting yourself should be your top priority. Grout removal creates significant dust and debris that can irritate your eyes, lungs, and skin, so proper safety equipment isn’t optional.
Essential personal protective equipment includes safety goggles or a full face shield to protect against flying grout particles, which can travel at surprising speeds when using power tools. A dust mask rated N95 or higher is crucial, as silica dust from cement-based grout poses serious respiratory risks with repeated exposure. Heavy-duty work gloves will protect your hands from sharp grout fragments and vibration from power tools.
Workspace preparation is equally important. Clear the area of furniture, rugs, and decorative items. Seal doorways with plastic sheeting and tape to prevent dust spreading throughout your home. Open windows and use a fan to create cross-ventilation, directing dust outside. If working in a bathroom without windows, consider hiring an air scrubber or industrial fan for adequate air circulation.
Common hazards to watch for include electrical risks when using corded tools near water sources, so ensure you’re using a residual current device. The repetitive motion of grout removal can cause hand fatigue and strain, so take regular breaks. Always disconnect power tools before changing bits or cleaning. Finally, test your tool on an inconspicuous area first to avoid damaging tiles, and never force the tool as this increases the risk of slipping and injury.
Step-by-Step: Using Your Hired Grout Removal Tool
Preparing Your Workspace
Before you begin removing grout, proper workspace preparation will save you time and protect your surfaces from damage. Start by clearing the area of any loose items, bath mats, and toiletries. Cover your bathtub, sink, or other fixtures with thick plastic sheeting or drop cloths, securing them with painter’s tape to prevent scratches from falling tools or debris.
Dust containment is crucial during grout removal. Close doors to adjacent rooms and use damp towels along door thresholds to prevent dust migration. If working in a larger area, consider hanging plastic sheeting to create a work zone. Open windows when possible and position a fan to direct airborne particles outside, though note that grout dust is particularly fine and will settle everywhere regardless.
Organize your materials within arm’s reach before starting. Keep your hired grout removal tool, spare blades or bits, safety glasses, dust mask, vacuum cleaner, and a bucket for debris nearby. Lay out a tarp or old sheet to place tools on during breaks. Many DIYers recommend having a spray bottle of water handy to dampen surfaces periodically, which significantly reduces airborne dust according to community feedback from users who’ve tackled similar projects.
Proper Technique for Clean Grout Removal
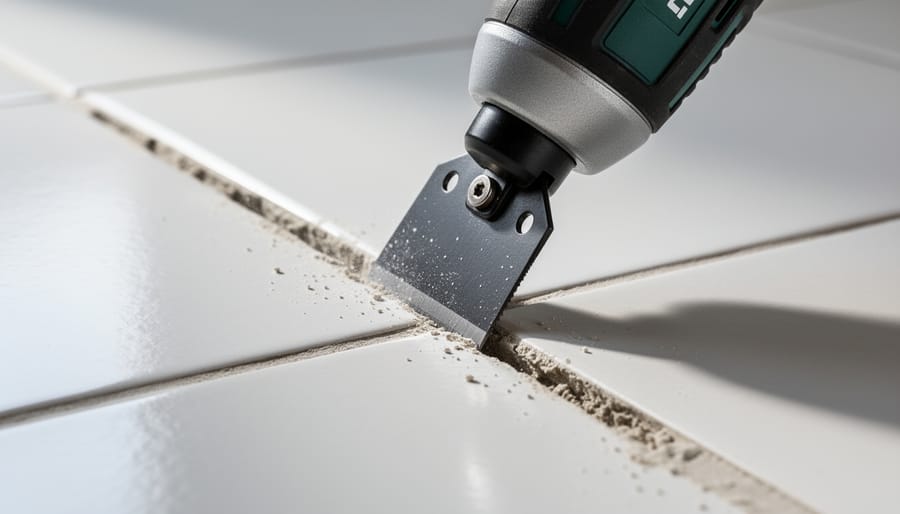
Mastering the right technique makes all the difference between a smooth regrouting job and cracked tiles. Hold your grout removal tool at a 45-degree angle to the grout line, which prevents the blade from catching tile edges. Apply steady, moderate pressure rather than forcing the tool—let the blade do the work. Move at a consistent pace, roughly one inch per second, to maintain control and achieve even depth.
For corners and edges where tiles meet walls or fixtures, reduce your speed and lighten your pressure. These vulnerable areas require extra care. Work in short, controlled bursts rather than long continuous passes, and consider switching to a narrower blade attachment if your hired tool offers this option.
Keep the tool centered within the grout line rather than wandering toward tile edges. If you notice the blade pulling to one side, stop and readjust your angle. Many DIYers find it helpful to practice on an inconspicuous area first, like behind an appliance or in a closet corner.
Watch for overheating—if the tool feels hot or performance drops, take short breaks. According to community feedback, working in 20-minute intervals with brief rests maintains both tool efficiency and your focus, preventing costly mistakes from fatigue.
Common Mistakes and How to Avoid Them
Even experienced DIYers make avoidable mistakes when using grout removal tools. One common error is applying excessive pressure, which can crack tiles or damage the tool’s blade. Let the tool do the work—use gentle, steady movements and allow the blade’s rotation or oscillation to gradually wear away the grout. Another frequent mistake is selecting the wrong blade type for your grout width or hardness. Check your grout lines before hiring and ask the rental shop for blade recommendations specific to your project. Rushing through the job often leads to uneven removal or accidental tile damage. Work methodically, taking breaks to assess your progress. Many users also forget to test the tool on an inconspicuous area first, which could reveal technique issues before they affect visible sections. Finally, neglecting to wear proper safety equipment like goggles and dust masks is surprisingly common but easily preventable. Community feedback consistently shows that patience and the right preparation make the biggest difference in achieving professional results.
Real User Experiences and Tool Ratings
Community feedback consistently highlights the Fein MultiMaster oscillating tool as a top choice for grout removal, with DIYers rating it 4.5 out of 5 stars. Users praise its precision and minimal dust production, though some note the learning curve for first-time operators. “Took about 30 minutes to get comfortable, but once I did, it made the job so much easier than hand tools,” shared one homeowner who tackled a bathroom remodel.
For larger projects, the Milwaukee rotary hammer drill with grout removal attachment receives strong marks from tradespeople, averaging 4.2 out of 5. Professionals appreciate its speed on commercial jobs, though several reviewers caution that it requires steady hands to avoid tile damage. One tiler noted, “Perfect for floor tiles, but I’d stick with the oscillating tool for delicate wall work.”
The manual grout rake gets mixed reviews, rated around 3.5 out of 5. Budget-conscious DIYers value its affordability and simplicity, but many admit regretting not hiring power tools for projects larger than small backsplashes. “My arms were exhausted after just 2 square metres,” one reviewer candidly admitted.
Common lessons learned include starting with slower speeds, wearing proper dust masks regardless of tool choice, and always testing technique on an inconspicuous area first. Several users recommend hiring tools for weekend trials before committing to purchase, calling it the best way to determine which option suits your specific project needs.
Cost Breakdown: Hiring vs. Other Options
Understanding the financial implications helps you choose the smartest option for your project. Tool hire typically costs between £15-35 per day for an electric grout removal tool, with weekly rates around £50-80 offering better value for larger jobs. Weekend packages often provide the sweet spot for most DIY projects.
Purchasing a quality grout removal tool outright ranges from £80-250 depending on features and brand. If you’re tackling multiple bathrooms or plan future regrouting projects, buying becomes cost-effective after approximately three hire periods. However, hiring eliminates maintenance costs and storage concerns.
Professional regrouting services charge £200-600 for an average bathroom, including labour and materials. While this seems expensive compared to hiring a tool for £30, factor in your time commitment (typically 8-12 hours for a standard bathroom) and skill level. First-time users might face a steeper learning curve.
Break-even analysis: Hiring makes sense for one-off projects under 20 square metres. Purchasing suits tradespeople or homeowners with multiple renovation projects planned. Professional services work best when time is limited or the project involves complex tile patterns requiring expert precision. Community reviews consistently highlight that hiring provides excellent value for single bathroom renovations while minimizing financial risk.
Hiring professional grout removal tools offers clear advantages for your renovation project. You’ll save money compared to purchasing specialized equipment, access high-quality industrial-grade tools that deliver cleaner results, and complete your work faster with the right machinery. Whether you’re tackling a small bathroom refresh or a full-scale tiling project, rental options provide flexibility without the long-term storage commitment.
Ready to get started? Browse our tool hire listings to find grout removal tools available in your area. Check out community reviews from fellow DIYers and tradespeople who’ve used these tools on real projects. Their honest feedback will help you make an informed choice and avoid common pitfalls. Take the first step toward transforming your tiled surfaces today.
Related Posts

Post a Comment