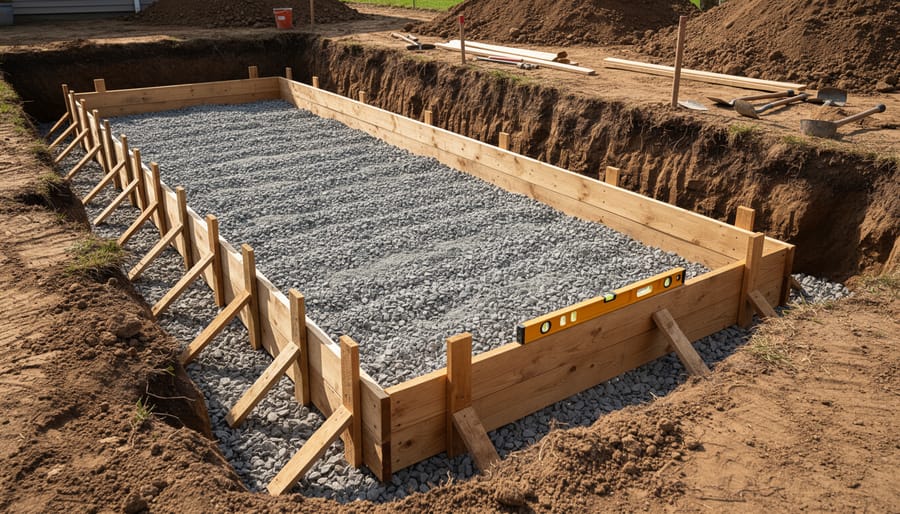
Pour a concrete foundation or slab by first excavating to proper depth—typically 4-6 inches below grade for slabs and deeper for frost lines in foundation work—then compacting the subgrade with a plate compactor to prevent future settling. Install wooden forms using 2x lumber, ensuring they’re level and properly staked every 3-4 feet to withstand concrete pressure during the pour.
Layer 4 inches of crushed gravel as a stable base, compact it thoroughly, then add 6-mil polyethylene sheeting as a vapor barrier to prevent moisture migration from below. Position steel reinforcement mesh or rebar grid 2 inches above the vapor barrier using dobies or chairs, maintaining proper spacing to ensure the concrete fully encapsulates the steel for maximum structural integrity.
Calculate your concrete needs accurately—a typical 10×10 foot slab at 4 inches thick requires approximately 1.25 cubic yards—and schedule delivery to match your crew’s working pace, as concrete begins setting within 90 minutes. Have essential tools ready: bull floats for initial leveling, hand floats and trowels for finishing, edging tools for clean borders, and grooving tools for control joints.
Plan control joints every 8-10 feet to direct inevitable cracking to predetermined locations rather than random pattern failures. For DIY projects under 500 square feet, most homeowners successfully complete the work with rented equipment and 2-3 helpers, while larger foundations benefit from professional concrete pumping services and experienced finishing crews who understand proper timing for each finishing stage.
Understanding Concrete Foundations vs. Slabs: What’s the Difference?
What Makes a Foundation Different
Understanding foundation types helps you choose the right approach for your project. A foundation serves as the structural anchor that distributes your building’s weight evenly into the ground, preventing settling and movement that can cause cracks or structural damage.
Strip foundations, also called footings, are continuous trenches filled with concrete that run beneath load-bearing walls. These are ideal for smaller structures like sheds or garage additions where weight is concentrated along perimeter walls. You’ll dig trenches typically 16-24 inches wide and below the frost line for your region.
Raft foundations, sometimes called mat foundations, are thick concrete slabs that spread across the entire building footprint. Think of them as a single, reinforced concrete pad that supports the whole structure. These work well on softer soils or when building larger structures that need uniform support.
Pier and beam foundations use vertical concrete columns (piers) sunk into the ground with horizontal beams connecting them. The building sits on top of this framework, creating a crawl space underneath. This option suits sloped terrain or areas prone to flooding, though it requires more complex formwork and planning than a simple slab pour.
When You Need a Slab Instead
A concrete slab is a flat, horizontal surface that sits directly on the ground, typically four to six inches thick. Unlike foundations that extend deep into the earth, slabs provide a simple, cost-effective base for structures that don’t require basements or deep support.
Slabs work perfectly for detached garages, garden sheds, workshops, and outdoor living spaces like patios. They’re also ideal for equipment pads, dog runs, and basketball courts. If your project sits at ground level and doesn’t need to support multiple stories, a slab is often your best choice.
Choose a slab when you’re building on stable soil in warmer climates where frost heave isn’t a concern. They’re faster to install than full foundations, usually completing in just a few days from excavation to finish. The simplified construction means lower labor costs and fewer materials.
However, slabs aren’t suitable for every situation. Skip them if you’re building on sloped terrain, need basement storage, or live in areas with severe frost. Houses requiring crawl spaces for plumbing access also need traditional foundations instead.
The key advantage? Slabs combine your foundation and floor into one efficient pour, saving time and money while providing a solid, level surface that’s ready for immediate use once cured.
Essential Tools and Equipment You’ll Need to Hire or Own
Ground Preparation Equipment
Proper site preparation starts with excavation equipment to remove soil and create the necessary depth for your foundation or slab. For most residential projects, a compact excavator or backhoe works well and is available at rental centers for daily or weekly rates. These machines handle digging tasks efficiently, though smaller projects might only require hand tools like shovels and picks.
Once you’ve excavated, compacting the subgrade becomes crucial for preventing future settling. A plate compactor (also called a vibratory plate) is essential for compacting soil and gravel base layers. These come in different sizes—smaller models work for patios and sidewalks, while larger units handle driveways and garage slabs. Make multiple passes over the area until the surface doesn’t shift underfoot.
Leveling tools ensure your base stays flat and properly sloped for drainage. A laser level saves considerable time and effort, projecting a level reference line across your work area. Combine this with a long screed board and hand tampers for fine-tuning. Many DIYers report that renting a laser level made their foundation work significantly more accurate compared to using traditional string lines alone.
Concrete Mixing and Pouring Tools
Getting your concrete mix right and properly placed requires specific equipment. For most foundation and slab projects, a portable concrete mixer (electric or gas-powered) handles batches efficiently, though many DIYers opt to rent a drum mixer for larger jobs or order ready-mix concrete for projects exceeding one cubic yard.
You’ll need heavy-duty wheelbarrows to transport mixed concrete from your mixing area to the forms. A standard contractor-grade wheelbarrow with pneumatic tires works best on uneven ground. For spreading and leveling, a screed board (essentially a straight 2×4 or aluminum straightedge) rides along your form edges to strike off excess concrete to the proper height.
Once screeded, finishing tools become essential. Bull floats smooth large surface areas and bring up the cream (a mixture of cement and fine particles). As the concrete begins to set, hand floats and trowels refine the surface. Magnesium or wood floats create a slightly textured, slip-resistant finish, while steel trowels produce a smooth, dense surface.
Rental tip: Most equipment rental centers offer concrete mixers, power trowels, and finishing tools by the day or weekend. This approach saves significant money compared to purchasing tools you’ll rarely use. Community reviews consistently highlight that renting professional-grade equipment produces better results than buying budget consumer versions.
Safety Gear You Can’t Skip
Working with concrete demands proper protection from chemical burns, flying debris, and physical strain. Start with waterproof work boots featuring steel toes and slip-resistant soles, as wet concrete is caustic and work sites are unpredictable. Heavy-duty rubber gloves protect your hands from concrete’s alkaline mix, which can cause serious skin irritation after prolonged contact. Safety glasses or goggles are non-negotiable when mixing, pouring, or cutting concrete to shield your eyes from splashes and dust particles.
Knee pads become essential during finishing work, where you’ll spend considerable time kneeling on rough surfaces. Many experienced contractors recommend gel-padded versions for all-day comfort. A dust mask or respirator is also critical when working with dry cement mix, as inhaling concrete dust can cause respiratory issues. According to community feedback, investing in quality safety gear upfront prevents injuries that could sideline your project and cost far more than the equipment itself.
Site Preparation: The Foundation of Your Foundation
Excavating to the Right Depth
Getting your excavation depth right from the start prevents costly mistakes and structural issues down the road. The proper depth depends on three key factors: your project type, regional frost lines, and regulations.
For most residential slabs like patios or shed foundations, you’ll typically excavate 8-12 inches below finished grade. This allows room for 4-6 inches of compacted gravel base plus your concrete thickness. Garage slabs often require deeper excavation to accommodate thicker concrete and additional base material for vehicle loads.
Frost line is critical in cold climates. Your footer or foundation walls must extend below the depth where ground freezes to prevent heaving and cracking. Check your local frost depth, which ranges from zero inches in warm regions to 48 inches or deeper in northern areas.
Always verify requirements with local building codes before digging. Most municipalities specify minimum depths based on soil conditions and structure type. Contact your building department or check their website for specific requirements.
Mark your excavation depth on stakes around the perimeter using string lines and a laser level, which you can rent affordably. This ensures consistent depth across the entire area and helps your excavation crew work efficiently.
Soil Compaction and Gravel Base
Proper soil compaction is the foundation of your foundation—literally. Without it, your concrete slab can crack, settle unevenly, or develop low spots that trap water. The goal is to eliminate air pockets and create a dense, stable surface that won’t shift over time.
Start by removing all organic material, debris, and loose soil from your excavated area. If you’re working with clay-heavy soil, consider moisture content—soil that’s too wet or too dry won’t compact properly. Aim for slightly moist conditions where soil holds together when squeezed but doesn’t muddy your hands.
Use a plate compactor for most residential projects. These machines vibrate at high frequencies to settle soil particles tightly together. Make multiple passes in different directions, overlapping each pass by about half the plate width. For larger areas, a jumping jack compactor works well in corners and tight spaces.
After compacting the soil, add a 4-6 inch gravel base layer using crushed stone or road base material. Avoid rounded river rock, which doesn’t lock together effectively. Spread the gravel evenly with a rake, then compact it using the same overlapping pattern. This layer provides drainage, prevents moisture from wicking up into your concrete, and creates an even working surface. Many pros recommend a final compaction test—if you can’t easily make a footprint in the surface, you’re ready for the next step.
Installing Vapor Barriers and Insulation
Before pouring concrete, proper moisture and thermal barriers protect your slab from ground moisture and temperature fluctuations. Start by laying a polyethylene vapor barrier (typically 6-mil thick, though 10-mil offers better puncture resistance) directly over compacted gravel. Overlap seams by at least 12 inches and seal with construction tape to prevent moisture intrusion from below. Many DIYers ask about skipping this step, but ground moisture can cause serious problems including mold, concrete degradation, and flooring damage down the line.
For climate-controlled spaces like basements or heated garages, add rigid foam insulation boards (usually 2-inch extruded polystyrene) on top of the vapor barrier. This prevents heat loss and reduces condensation issues. Stagger the insulation seams from your vapor barrier seams for maximum effectiveness. Use compatible tape to seal foam board joints. Take care not to puncture either layer when placing rebar or wire mesh. If tears occur, patch immediately with additional material and tape.
Building Forms That Won’t Fail You
Choosing the Right Form Materials
Selecting the right form materials ensures your concrete slab maintains its shape during the pour and curing process. Wood forms remain the most popular choice for DIYers and professionals alike. Standard 2×4, 2×6, or 2×8 dimensional lumber works well for most residential projects, with the height matching your slab depth. Choose straight boards without excessive warping to maintain clean edges.
Metal forms offer superior durability and precision, especially for larger commercial projects or curved designs. Steel or aluminum forms can be reused dozens of times, making them cost-effective for contractors handling multiple jobs. However, they require more initial investment and transportation considerations.
For thickness requirements, your forms must match or exceed your planned slab depth. A 4-inch slab needs minimum 2×4 lumber, while a 6-inch foundation requires 2×6 boards. Stake forms every 3-4 feet using 2×2 or 2×4 stakes driven at least 12 inches into the ground.
Reusable plastic forms provide a middle-ground option, combining affordability with multiple-use capability. Many rental centers stock form materials, allowing you to access quality equipment without purchasing. Community reviews often highlight that proper form selection prevents costly blowouts and ensures professional-looking results.
Setting Forms Level and Square
Getting your concrete forms perfectly positioned is crucial—even small errors multiply across larger slabs, leading to structural issues and drainage problems. Start by establishing your reference point, typically one corner stake that you’ve carefully measured and verified against property lines or existing structures.
Use a quality 4-foot or 6-foot level on top of your form boards to check for level in multiple directions. For longer spans, a laser level (available at most rental shops) saves considerable time and improves accuracy. Set it up on a tripod at the site’s center, and mark the laser line on each stake or form board. This gives you a consistent reference point across the entire project.
To ensure forms are square, apply the 3-4-5 triangle method. Measure 3 feet along one side from your corner, 4 feet along the adjacent side, then check that the diagonal between these points measures exactly 5 feet. For larger projects, multiply these numbers (6-8-10 or 9-12-15) for greater precision. This technique aligns with proper framing techniques used in construction.
Once level and square, proper bracing prevents movement during the concrete pour. Drive stakes every 3-4 feet on the exterior side of forms, screwing them securely to the boards. For taller forms, add diagonal bracing from stakes to form tops. The goal of building forms square and level is creating a rigid structure that won’t bow or shift under the weight and pressure of wet concrete.
Reinforcement Methods That Prevent Cracking
Rebar vs. Wire Mesh: What You Actually Need
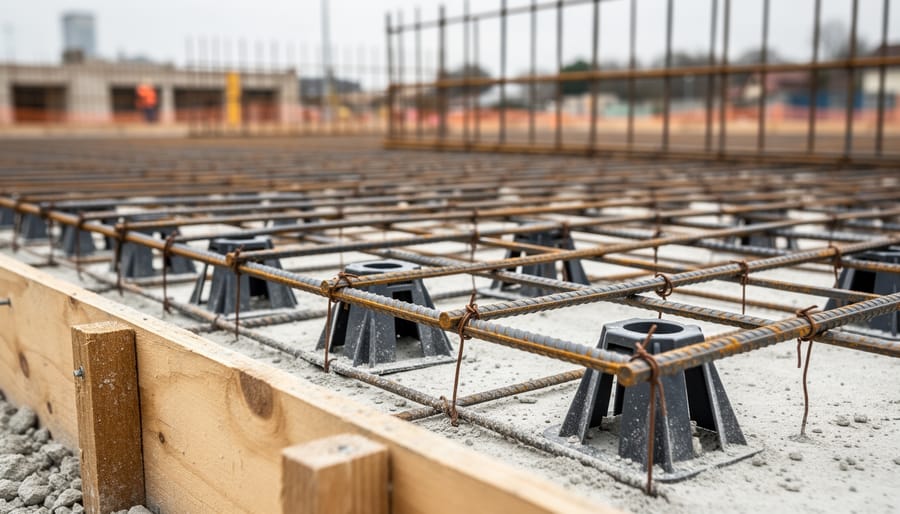
Choosing between rebar and wire mesh depends on your project’s load requirements and slab thickness. Wire mesh (also called welded wire fabric) works well for lighter residential applications like patios, sidewalks, and garage floors. It’s typically sufficient for slabs 4 inches thick or less that won’t bear heavy structural loads. Look for 6×6 W1.4xW1.4 mesh, which means 6-inch spacing with wire gauge suitable for most DIY projects.
Rebar provides superior strength for foundations, driveways with heavy vehicle traffic, or any structural slab. Use Number 3 or Number 4 rebar (3/8-inch or 1/2-inch diameter) spaced 18 to 24 inches apart in a grid pattern for typical residential foundations. The concrete thickness matters too: slabs over 5 inches generally benefit from rebar reinforcement.
Position reinforcement in the lower third of your slab’s thickness using chairs or bolsters to ensure proper concrete coverage. Community feedback from experienced contractors emphasizes that neither option prevents cracking entirely, but both significantly reduce crack width and structural problems. For projects combining both vertical foundations and horizontal slabs, rebar is typically the safer choice throughout.
Proper Placement and Spacing Techniques
Getting your reinforcement positioned correctly makes the difference between a slab that lasts decades and one that cracks prematurely. The goal is to position rebar or wire mesh in the lower third of your slab thickness, typically about 2 inches from the bottom for a standard 4-inch slab.
Rebar chairs are your essential tools here. These plastic or metal supports lift reinforcement off the ground to the proper height. For residential slabs, 2-inch plastic chairs work well and won’t rust through your concrete. Space them every 3-4 feet in both directions to prevent sagging when workers walk across or when concrete is poured.
For wire mesh, many DIYers make the mistake of placing it on the ground, planning to lift it during the pour. This rarely works in practice. Instead, set the mesh on chairs before pouring begins. This ensures consistent positioning throughout the entire slab.
Rebar spacing typically follows a grid pattern, commonly 18 or 24 inches on center depending on your engineer’s specifications or local codes. Use wire ties to secure intersecting bars together, preventing movement during concrete placement. Where bars overlap, they should extend at least 12 inches past each other and be tied at multiple points.
A helpful tip from experienced contractors: mark your chair spacing with spray paint on the subgrade before placement. This visual guide helps maintain consistent coverage and makes it easier to spot any missed areas before the concrete truck arrives.
Pouring Concrete: Timing and Technique Matter
Calculating How Much Concrete You Need
Calculating concrete volume is straightforward with the right formula. For slabs, multiply length times width times depth (all in feet) to get cubic feet, then divide by 27 to convert to cubic yards. For example, a 10-foot by 12-foot slab that’s 4 inches thick (0.33 feet) equals 39.6 cubic feet, or about 1.5 cubic yards.
Most suppliers sell concrete by the cubic yard, with typical minimums around 1 yard for small loads. Always order 5-10 percent extra to account for ground irregularities, spillage, and settling. Many ready-mix companies charge premium rates for partial loads under 3-4 yards.
Online concrete calculators simplify this process by letting you input dimensions and automatically converting measurements. These tools often include recommendations for different project types. Remember that foundation walls require separate calculations from slabs, measuring length times height times thickness. Keep your site measurements handy and discuss access requirements with your concrete supplier, as truck size and hose reach affect delivery options and costs.
The Pour Process From Start to Finish
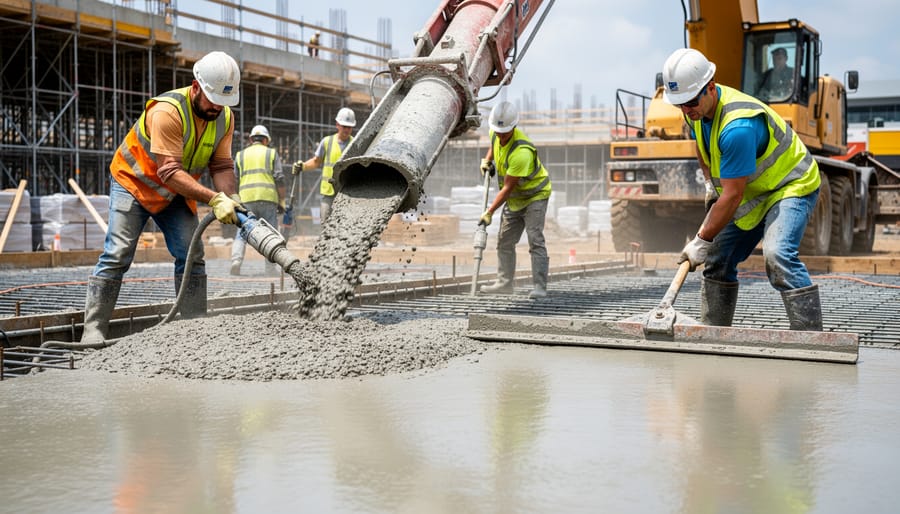
Successful concrete pouring requires careful coordination and teamwork. Start by confirming your delivery time with the concrete supplier at least 24 hours in advance, ensuring your site is fully prepared before the truck arrives. Most suppliers will only wait 5-10 minutes before charging extra, so have your crew in position and ready to work.
When the truck arrives, direct the chute to your farthest point first, working backward toward the access point. This prevents you from walking through freshly poured concrete. Pour in sections, filling each area systematically rather than dumping randomly across the site. For larger slabs, work in manageable sections between your control joints.
Assign specific roles to your helpers before starting. You’ll need someone directing the chute operator, at least two people spreading and screeding the concrete, and someone managing the flow from wheelbarrows if the truck can’t reach all areas. Communication is critical since concrete starts setting within 90 minutes in warm weather.
As each section is poured, immediately begin screeding with a straight 2×4 or aluminum screed board, using a sawing motion to level the surface. Work quickly but don’t rush the finishing steps. Keep the concrete moist during the pour by having a water hose ready, but avoid adding too much water, which weakens the mix.
Remember that concrete weighs approximately 150 pounds per cubic foot, so pace your crew appropriately. Take brief rotations on physically demanding tasks to maintain quality work throughout the entire pour. Having cold drinks and snacks available keeps energy levels up during this time-sensitive process.
Working the Concrete Before It Sets
Once concrete is poured, you have a limited window to work it properly before it begins to set. Start immediately with screeding, which means dragging a straight board (often a 2×4) across the top of your forms in a sawing motion. This levels the surface and removes excess concrete. For larger slabs, you’ll likely need two people for this step.
Next, use a concrete vibrator to eliminate air pockets that weaken the finished product. Insert the vibrator vertically at regular intervals, about 18-24 inches apart, letting it sink by its own weight. Don’t over-vibrate, as this can cause aggregate to separate. If you don’t own a vibrator, most tool rental centers stock them affordably.
After vibrating, perform initial leveling with a bull float for large areas or a hand float for smaller sections. Push the float forward with the leading edge slightly raised, then pull back flat. This embeds larger aggregate below the surface and brings finer material up, preparing the slab for final finishing.
Work systematically and watch for bleed water (moisture rising to the surface). Don’t finish while bleed water is present, as this weakens the top layer.
Finishing Techniques for Different Applications
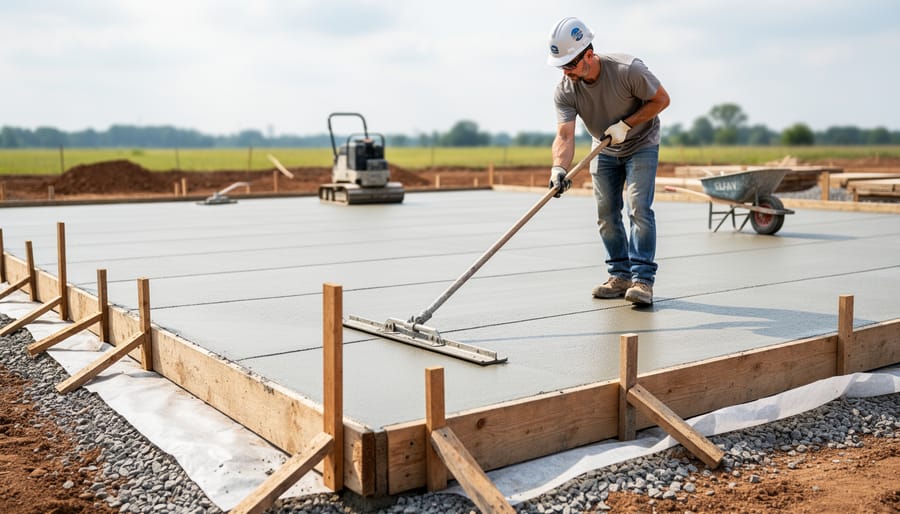
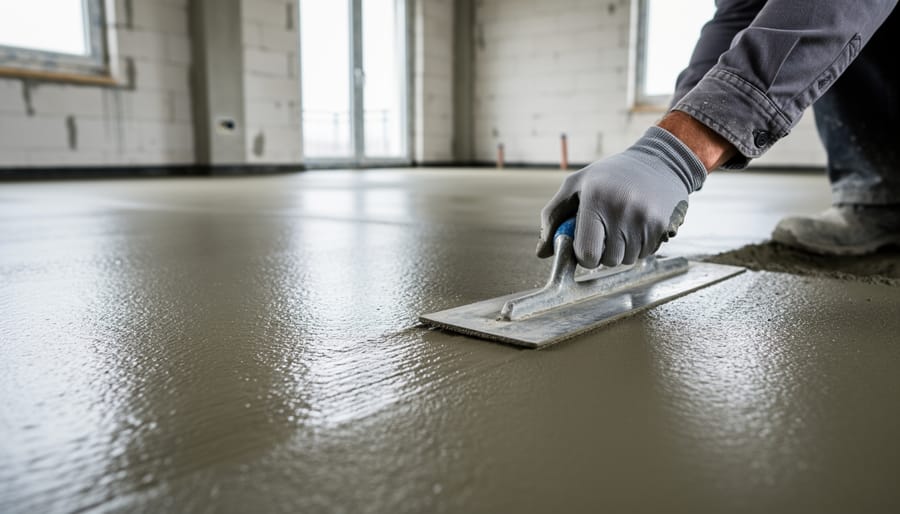
Creating a Smooth Troweled Finish
Once your concrete has been screeded level, timing becomes crucial for achieving that professional smooth finish. Wait until the surface water (called bleed water) evaporates before you begin troweling—working too early can weaken the surface.
Start with a bull float, which is a large flat tool that reaches across the slab from the edges. Push it away from you with the leading edge slightly raised, then pull it back flat. This initial pass levels high spots, fills small voids, and embeds larger aggregate below the surface. For garage and basement slabs, two passes with the bull float typically suffice.
As the concrete stiffens enough to support your weight on knee boards (usually 1-2 hours after pouring), switch to hand troweling. A magnesium hand trowel works great for this stage, producing a smooth but slightly textured finish that provides good traction—ideal for garage floors where slip resistance matters.
For an even smoother finish on indoor slabs, follow up with a steel trowel once the concrete hardens further. Use overlapping arcing motions with moderate pressure. Each successive pass should be made at different angles to eliminate trowel marks. Most DIYers find renting a power trowel unnecessary unless working on very large commercial spaces.
Textured and Non-Slip Surfaces
Creating a non-slip surface is essential for outdoor concrete slabs like patios, driveways, and walkways, where wet conditions can create safety hazards. The most common texture method is the broom finish, which you create by dragging a concrete broom across the surface while the concrete is still workable but firm enough to hold the pattern. This creates grooves that improve traction without being uncomfortable to walk on barefoot.
For a more decorative approach, exposed aggregate reveals the colorful stones within the concrete mix. After initial finishing, you use a surface retarder or carefully wash away the top layer of cement paste with a garden hose and stiff brush, exposing the aggregate underneath. This technique requires precise timing and is best attempted on smaller test areas first if you’re new to it.
Other texture options include stamped patterns, which require specialized mats and tools available at rental centers, and rock salt finishes that create a pitted surface when salt crystals dissolve. Regardless of which method you choose, always test your technique on a small practice area before tackling the entire slab. Many DIYers have shared that starting with a simple broom finish builds confidence before attempting more complex textures on future projects.
Curing: The Make-or-Break Stage Everyone Rushes
Curing Methods That Actually Work
Proper curing is what separates a durable concrete slab from one that cracks prematurely. Concrete doesn’t dry—it cures through a chemical reaction that requires moisture for at least seven days.
The wet curing method is the gold standard. Keep the concrete surface continuously moist by spraying it with water several times daily or covering it with soaked burlap. This is especially important during hot, dry weather when moisture evaporates quickly.
Curing compounds offer a convenient alternative. These liquid membranes are sprayed onto the fresh concrete to seal in moisture. They’re ideal for large slabs where constant watering isn’t practical. Apply them immediately after the surface loses its sheen but before it completely dries.
Plastic sheeting works well for smaller projects. Lay 6-mil polyethylene sheets directly on the concrete surface, weighing down the edges to prevent moisture escape. The trapped condensation keeps the concrete hydrated naturally.
Temperature matters too. Maintain concrete between 50-85°F during curing. In cold weather, use insulated blankets. In extreme heat, consider evening pours when possible.
Many DIYers skip proper curing to save time—don’t make this mistake. Those seven days of patience prevent decades of problems.
How Long Before You Can Use It
Patience is crucial when it comes to concrete curing. While concrete may look dry and solid within hours, its strength develops gradually over time. Understanding these timelines helps prevent costly damage and ensures your slab performs as designed.
For light foot traffic, wait at least 24 to 48 hours after pouring. The surface should feel firm to the touch, though the concrete is still gaining strength beneath. Weather conditions matter here—cooler temperatures or high humidity can extend this waiting period.
Vehicle traffic requires significantly more patience. Plan to wait a minimum of 7 days before driving on your new slab, though 10 to 14 days is safer for heavier vehicles like trucks or equipment. Driving on concrete too early can cause surface cracking, scaling, or permanent tire impressions that compromise both appearance and durability.
Full load bearing capacity develops over approximately 28 days, which is when concrete reaches its designed strength. This timeline applies to garage slabs supporting heavy equipment, foundation walls bearing structural loads, or any application requiring maximum performance.
Keep in mind that colder weather slows curing, sometimes doubling these timelines, while hot, dry conditions may speed initial hardening but can lead to surface issues without proper moisture retention. Many experienced builders recommend keeping the concrete damp during the first week to promote proper curing and ultimate strength.
Common Mistakes That Lead to Expensive Repairs
Poor Drainage Planning
Without proper drainage planning, water accumulates around your foundation, creating hydrostatic pressure that pushes against concrete and saturates the soil beneath. This moisture causes the ground to expand and contract with seasonal changes, leading to uneven settlement where different sections sink at varying rates. The resulting stress cracks your slab and foundation walls. Standing water also finds its way through microscopic concrete pores, causing interior dampness, efflorescence (white mineral deposits), and deterioration. Installing perimeter drains, downspout extensions, and grading your site to slope away from the foundation prevents these costly problems. Even small drainage improvements make significant differences in foundation longevity and structural integrity.
Skipping Control Joints
Control joints are planned cracks that allow your concrete to crack where you want it to, rather than randomly across your slab. Without them, your concrete will almost certainly develop unsightly cracks as it shrinks and experiences temperature changes. Think of them as pressure relief valves for your concrete.
The key is timing and spacing. Cut control joints within 6 to 12 hours after finishing, when the concrete is firm enough to support the saw but soft enough to cut cleanly. Wait too long and the concrete may have already cracked on its own. Rent a concrete saw with a diamond blade designed specifically for fresh concrete to make clean, straight cuts.
For spacing, follow the rule of thumb: multiply the slab thickness in inches by 2 to 3 to get the maximum spacing in feet. For a 4-inch slab, that means joints every 8 to 12 feet. Create a grid pattern, keeping panel dimensions roughly square. Cut joints to at least one-quarter the slab depth, so a 4-inch slab needs 1-inch deep cuts.
Many DIYers skip this step thinking their small project won’t crack, but concrete doesn’t discriminate by project size. Control joints are your insurance policy against random cracking that ruins the finished appearance.
Successfully completing a concrete foundation or slab project comes down to three essential factors: thorough preparation, proper technique, and patience throughout the process. Remember that the time invested in site preparation, precise formwork setup, and careful material planning directly impacts your final results. Rushing through the preparation stage or skipping critical steps like proper compaction and moisture barriers will likely lead to costly repairs down the road.
Whether you’re tackling a small patio slab or a more substantial foundation, having the right equipment makes all the difference. Don’t hesitate to rent specialized tools like plate compactors, concrete mixers, or power trowels rather than compromising with inadequate alternatives. Quality equipment ensures professional-grade results without the investment of purchasing tools you may only use once.
Most importantly, prioritize safety at every stage. Concrete work is physically demanding and involves potential hazards from heavy materials to caustic chemicals. Always wear appropriate protective gear, work with helpers when handling large pours, and never rush the curing process regardless of project deadlines.
We’d love to hear about your concrete project experiences. What challenges did you encounter? Which techniques worked best for you? What tools proved invaluable? Share your stories, photos, and questions in our community section below. Your insights help fellow builders learn from real-world experiences, and our community members are always ready to offer advice and troubleshooting tips. Whether you’re planning your first slab or you’re a seasoned professional, your contribution matters.
Related Posts
Post a Comment