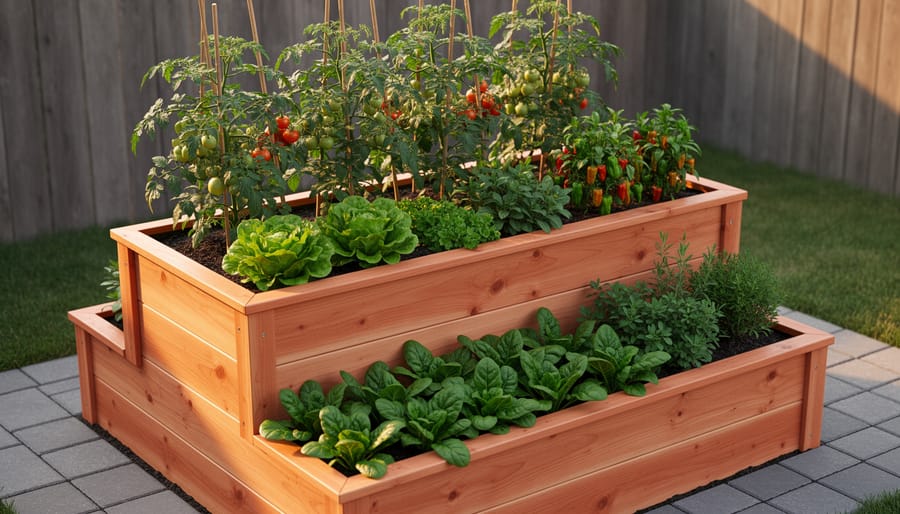
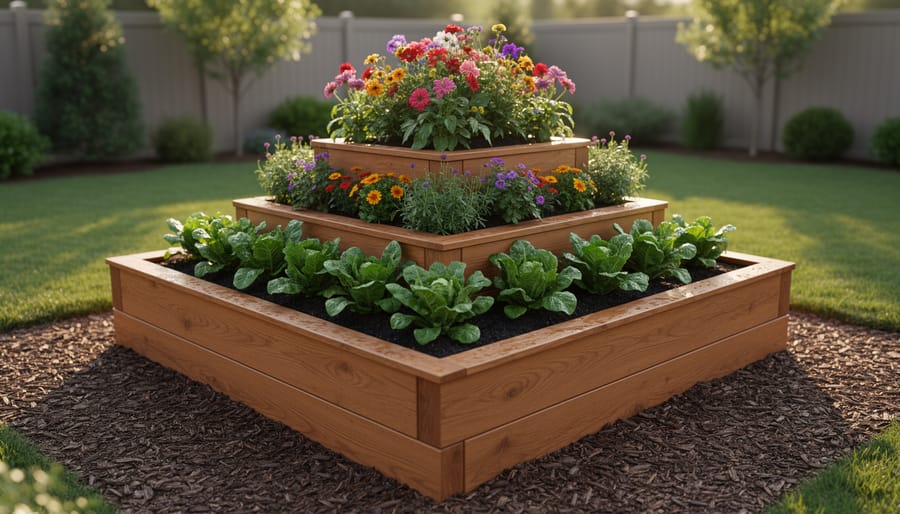
Build a three-tier raised garden bed by stacking progressively smaller frames—typically 6 feet by 3 feet for the base, 4 feet by 3 feet for the middle, and 2 feet by 3 feet for the top—creating a stepped pyramid structure that maximizes growing space in compact areas. This vertical gardening solution delivers approximately 36 square feet of planting area while occupying just 18 square feet of ground space, making it ideal for small yards, patios, or urban gardens where horizontal space comes at a premium.
Select naturally rot-resistant lumber like cedar or redwood in 2×6 or 2×8 dimensions, cutting boards to your planned tier measurements and securing corners with 3-inch exterior-grade screws or galvanized corner brackets for structural integrity. Line each tier’s interior with landscape fabric to prevent soil erosion while allowing proper drainage, then fill with a blend of quality topsoil, compost, and peat moss or coconut coir.
Position sun-loving crops like tomatoes and peppers on the top tier where they receive maximum light exposure, place medium-height vegetables like lettuce and herbs in the middle section, and reserve the bottom tier for shade-tolerant plants like spinach or root vegetables that benefit from the upper tiers’ natural shading. This cascading design naturally creates microclimates within a single structure, extends your growing season, improves accessibility by reducing bending, and transforms ordinary garden beds into attractive landscape features that enhance property aesthetics while boosting food production capacity.
Why Choose a 3-Tier Design Over Traditional Raised Beds
A 3-tier design takes the concept of a traditional raised vegetable garden and amplifies its benefits through smart vertical design. If you’re working with limited yard space, this stacked approach can triple your growing area without expanding your footprint. Each tier typically measures between 300-400mm in height, creating distinct planting zones that maximize every square centimeter.
The drainage advantage stands out immediately. Water naturally cascades from the top tier through to lower levels, preventing waterlogging while ensuring moisture reaches all plants. This gravity-fed system means you’ll spend less time worrying about overwatering specific sections. Each level also warms at different rates throughout the day, with the top tier heating earliest in the morning and retaining warmth longest. This temperature variation lets you grow cool-season crops in lower tiers while sun-loving plants thrive above.
Accessibility improves dramatically compared to ground-level beds. The stepped design reduces bending and kneeling, particularly when harvesting from upper tiers. Many community gardeners report this makes maintenance more manageable for people with mobility concerns or back problems. You can comfortably reach plants without straining, and the varied heights create natural sections for organizing crops by type or harvest schedule.
Aesthetically, tiered beds add architectural interest to flat yards. The cascading structure creates visual depth and can serve as an attractive focal point or property boundary. Some builders worry about stability, but proper construction using timber stakes or star pickets at each tier makes these beds remarkably sturdy. The key is anchoring each level independently rather than relying on a single support system.
Maintenance concerns about soil retention prove minimal when you build with proper backing boards. The stepped design actually makes soil replenishment easier since you can work on one tier without disturbing others. Initial construction requires more materials than single-level beds, but the increased growing capacity and extended accessibility quickly justify the investment.
Materials and Tools You’ll Need
Lumber Selection and Quantities
Choosing the right lumber impacts both your garden bed’s lifespan and your budget. Cedar remains the top choice among DIY builders, naturally resisting rot and insects for 15-20 years without chemical treatment. For a standard 3-tier bed (bottom tier 6’x3′, middle 4’x2′, top 2’x2′), you’ll need approximately 60 linear feet of 2×10 boards and 12 linear feet of 4×4 posts. Cedar typically costs $8-12 per linear foot, totaling $500-720 for the complete project.
Pressure-treated lumber offers a budget-friendly alternative at $3-5 per linear foot ($180-300 total), lasting 10-15 years. However, newer formulations are safer than older arsenic-based treatments. Always use ground-contact rated lumber for the bottom tier.
Composite lumber provides the longest lifespan (25+ years) but costs $12-18 per linear foot ($720-1,080 total). Based on community feedback, many builders find cedar offers the best balance of cost, safety, and durability.
Additional materials include galvanized screws (3-inch for frame assembly, estimated $15-20), landscape fabric ($10-15), and corner brackets for added stability ($20-30). Total project costs range from $225 for treated lumber to $1,145 for premium composite construction.
Essential Tools for the Job
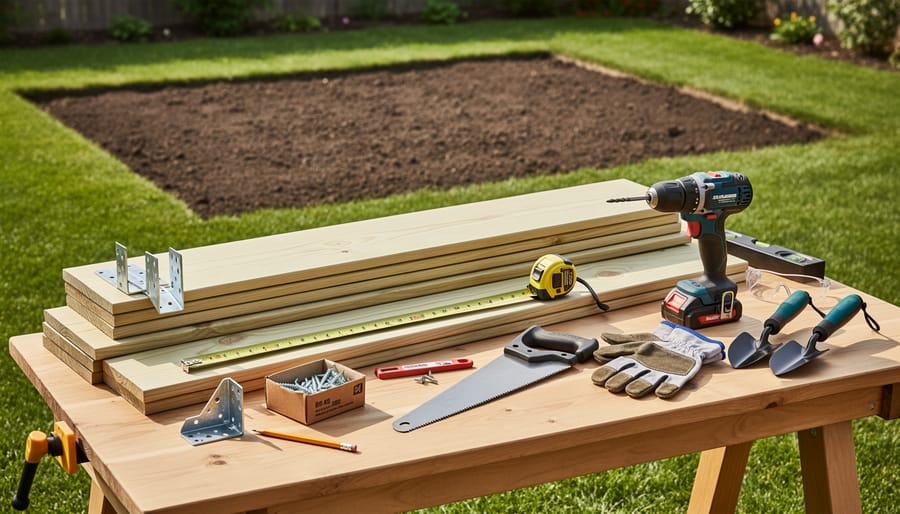
Building a three-tier raised garden bed requires a combination of essential and helpful tools. For this project, you’ll need a circular saw to cut timber to precise dimensions, though a hand saw works if you’re patient. A corded drill/driver is crucial for pre-drilling holes and driving screws – battery-powered models offer mobility but may need recharging mid-project.
A quality spirit level ensures your tiers are properly aligned and won’t lean over time, while a 5-metre measuring tape helps you mark cuts accurately. Don’t forget a carpenter’s square for checking right angles at corners. A rubber mallet is invaluable for gently tapping boards into position without damaging the wood.
Optional but highly recommended tools include a mitre saw for cleaner, faster cuts, and an impact driver which makes driving long screws through hardwood significantly easier. These power tools can be expensive for one-time DIY garden projects, making them perfect candidates for rental rather than purchase.
Safety equipment matters too. Wear safety glasses when cutting or drilling, use work gloves when handling timber, and consider ear protection with power tools. A dust mask is wise when cutting treated timber.
Community feedback suggests that renting a circular saw and impact driver for a weekend costs less than purchasing budget versions that might not last beyond this project. Many DIYers report completing their garden beds in 4-6 hours with proper tools.
Step-by-Step Construction Plans
Preparing Your Site and Planning Dimensions
Successful tiered garden beds start with proper site preparation and thoughtful dimension planning. Begin by choosing a location that receives at least 6-8 hours of sunlight daily and has good access to water. Avoid low-lying areas where water naturally collects, as excessive moisture can compromise your structure and plant health.
Once you’ve selected your spot, level the ground thoroughly. Even a slight slope can cause stability issues as you stack tiers. Use a long carpenter’s level or a laser level to check for evenness across the entire footprint. Remove any grass, weeds, or debris, and compact the soil lightly to create a stable foundation.
For optimal visual appeal and structural stability, we recommend a graduated tier system: a 48-inch by 48-inch bottom tier, 36-inch by 36-inch middle tier, and 24-inch by 24-inch top tier. This creates an attractive pyramid shape while providing adequate planting space at each level. These dimensions allow comfortable access from all sides and prevent the structure from becoming top-heavy.
Mark your footprint using stakes and string or spray paint. Double-check that corners form true 90-degree angles using the 3-4-5 triangle method: measure 3 feet along one side, 4 feet along the adjacent side, and verify the diagonal measures exactly 5 feet.
Address drainage before building. If your soil drains poorly, consider excavating 4-6 inches deep and adding a gravel base layer. This prevents water from pooling beneath your garden bed and ensures healthy root development. Proper drainage planning now saves significant headaches later.
Building the Bottom Tier Frame
Start by measuring and cutting your lumber for the bottom tier. You’ll need four pieces: two at 72 inches for the length and two at 36 inches for the width. Use a circular saw or miter saw for precise cuts, and always wear safety glasses and hearing protection when operating power tools.
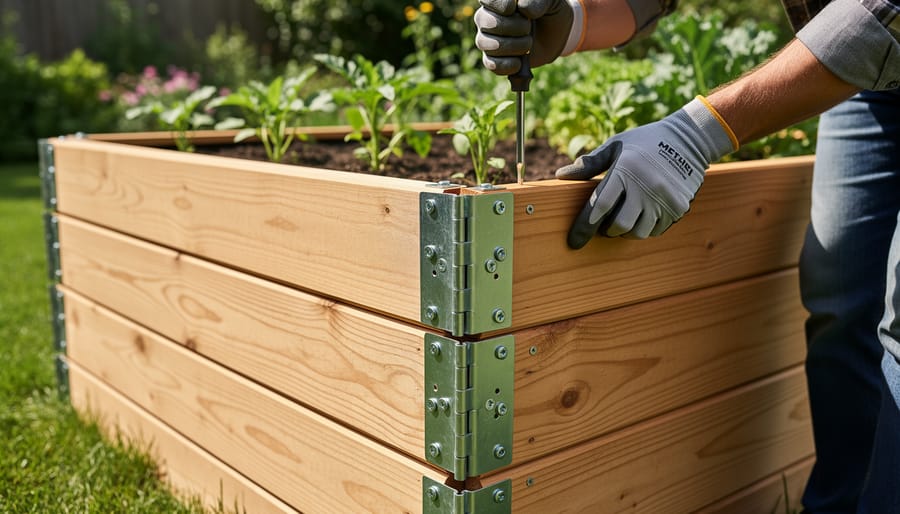
Lay out your cut pieces in a rectangular configuration on level ground. For corner joints, we recommend using simple butt joints secured with exterior-grade wood screws. Pre-drill pilot holes to prevent splitting, especially if you’re working with cedar or untreated lumber. Drive three 3-inch screws through each connection point for maximum hold.
Next, install corner posts for vertical stability. Cut four 4×4 posts to 30 inches each. Position one post at each interior corner of your base frame, ensuring they sit flush against both sides. Secure each post with four screws driven through the frame boards into the post, two per side. These posts will support the upper tiers and provide structural integrity for the entire garden bed.
Before proceeding, check that your base frame is level in all directions using a carpenter’s level. An unlevel base will create drainage problems and structural issues in your finished bed. If needed, excavate high spots or add compacted soil to low areas until the frame sits perfectly level. This extra attention now prevents headaches later.
Many DIYers in our community recommend recruiting a helper for this stage, as the assembled frame becomes unwieldy to adjust once screwed together.
Constructing the Middle and Top Tiers
With your base tier complete, you’re ready to construct the progressively smaller upper levels. The second tier should be 6-8 inches narrower than the base on all sides, while the top tier should be another 6-8 inches smaller than the middle. This stepped approach ensures stability and creates accessible planting surfaces on each level.
Cut and assemble the second tier frame using the same pocket hole technique from your base construction. Before positioning, decide whether you want a centered or stepped design. A centered layout creates symmetrical tiers stacked directly above each other, offering a formal appearance and equal access from all sides. A stepped design offsets each tier toward one direction, creating a cascading effect that maximizes sun exposure and provides easier access from the front.
Position the second tier frame carefully, ensuring it’s centered or aligned according to your chosen design. Use a level to confirm it’s sitting flat before securing. Drive 3-inch exterior screws through the second tier’s bottom frame into the first tier’s top rim at each corner and midpoint along longer sides. For added stability, install L-brackets on the inside corners where tiers meet.
Repeat this process for the top tier. On taller structures exceeding 30 inches, consider adding vertical support posts at corners. Cut 4×4 posts to run from ground level through all tiers, notching frames to fit around them. This reinforcement prevents shifting and extends the garden bed’s lifespan.
Before filling with soil, walk around your structure and check all connections. Tug gently at tier joints to identify any loose spots. Community feedback consistently shows that taking time to reinforce connections now prevents frustrating repairs later when the bed is full and planted.
Adding Finishing Touches
Once your 3 tier raised garden bed is structurally complete, these finishing touches will enhance durability, drainage, and overall functionality.
Start by lining the interior with landscape fabric. Cut pieces to fit each tier, allowing the fabric to climb several inches up the sides. This barrier prevents soil from washing through gaps while allowing water to drain freely. Secure it with a heavy-duty staple gun, spacing staples every 4-6 inches along the top edge. Many DIYers in our community recommend overlapping fabric pieces by at least 3 inches at seams to prevent soil escape.
Next, assess your drainage needs. If you’re building on compacted soil or a paved surface, drill 1/2-inch drainage holes through the bottom boards, spacing them roughly 12 inches apart. This prevents waterlogging, which causes root rot and structural damage over time.
Protect your investment by applying a wood sealant or outdoor stain. Choose products specifically rated for ground contact and vegetable gardens if you’re growing edibles. Apply two coats following manufacturer instructions, ensuring complete coverage on all surfaces, especially cut ends where moisture penetrates easily. Allow proper drying time between coats and before filling with soil.
Consider adding optional upgrades based on your gardening goals. Drip irrigation systems work exceptionally well in tiered beds, delivering consistent moisture to each level. Install the tubing before adding soil for cleaner results. Some builders add decorative or functional edges between tiers using stones or additional lumber, creating convenient planting shelves and visual interest.
Finally, add corner caps or decorative trim pieces to soften sharp edges and give your garden bed a polished appearance. These small details transform a functional structure into an attractive garden centerpiece that you’ll enjoy for seasons to come.
Filling Your 3-Tier Bed: Soil Strategies That Work
Calculating the right amount of soil for your three-tier raised bed prevents costly overbuying while ensuring your plants have adequate growing depth. Start by measuring each tier’s length, width, and depth in meters. Multiply these dimensions together to get cubic meters, then convert to liters by multiplying by 1000. For example, a tier measuring 2m x 1m x 0.3m deep needs 600 liters of soil. Add all three tiers together for your total volume requirement.
Before filling with premium soil, consider a layering approach that saves money without compromising plant health. For the bottom 10-15cm of each tier, use coarse materials like fallen branches, twigs, or inverted turf. This creates drainage space while slowly decomposing to add nutrients. One community member shared that using cardboard boxes flattened at the base reduced their soil needs by nearly 20 percent while controlling weeds.
The middle layer should consist of partially decomposed organic matter like aged compost or leaf mulch. This transition zone improves drainage while adding beneficial microorganisms. Many gardeners successfully use grass clippings, shredded paper, or even old potting mix from containers at this level.
For the top 20-30cm where roots actively grow, invest in an optimal soil mix. A reliable formula combines equal parts quality topsoil, compost, and coconut coir or peat moss. For vegetable growing, add perlite or vermiculite at 10 percent of total volume to improve aeration.
Different tiers can accommodate different mixes based on plant needs. The top tier, which drains fastest, suits herbs and Mediterranean plants preferring drier conditions. Middle and bottom tiers retain more moisture, making them ideal for leafy greens and root vegetables. Add aged manure to lower tiers for heavy feeders like tomatoes.
Consider purchasing soil in bulk bags rather than small packets to reduce costs significantly. Many suppliers deliver directly, eliminating the need for multiple trips with hired trailers.
Best Plants for Each Tier Level
Understanding which plants thrive in each tier will maximize your garden’s productivity and make maintenance easier. Each level offers distinct growing conditions, so strategic placement is key.
The bottom tier receives the most soil volume and retains moisture longest, making it ideal for deep-rooted vegetables and perennials. Plant larger specimens like tomatoes, peppers, eggplants, and zucchini here. These heavy feeders benefit from the extra soil depth and stability. Perennials such as strawberries, asparagus, and rhubarb also perform well at this level. The lower position means less bending when harvesting heavier produce, which saves your back during peak season.
The middle tier works perfectly for medium-sized plants with moderate root systems. Consider bush beans, lettuce, kale, Swiss chard, and compact cabbage varieties. This level typically offers excellent drainage while still maintaining adequate moisture. It’s also the most accessible tier for regular harvesting and maintenance tasks, making it ideal for crops you’ll pick frequently.
The top tier receives maximum sun exposure and drains fastest, creating perfect conditions for herbs and trailing plants. Basil, thyme, oregano, parsley, and cilantro thrive here where air circulation is best. Trailing plants like nasturtiums, cherry tomatoes, and certain strawberry varieties can cascade beautifully over the edges, adding visual interest while maximizing growing space.
For companion planting success, pair tomatoes with basil in adjacent tiers, plant marigolds near vegetables to deter pests, and position shallow-rooted lettuce beneath taller plants for natural shade during hot months. Many community gardeners report that this vertical arrangement naturally creates beneficial microclimates, with lower tiers staying slightly cooler and more humid than upper levels.
Maintenance Tips to Keep Your Tiered Bed Thriving
Regular maintenance keeps your tiered garden bed productive for years. Start each growing season by inspecting the structural integrity of your bed. Check all corner joints and support brackets for looseness, tightening any hardware that’s worked free. Walk around the entire structure looking for signs of wood rot, particularly where timber contacts soil. If you spot soft, discolored wood, replace those boards immediately before the damage spreads.
Soil naturally compacts and depletes over time, especially in raised beds. Each spring, top up each tier with 2-3 inches of fresh compost mixed with aged manure. This replenishes nutrients and improves drainage. Between growing seasons, conduct a soil test to check pH levels and nutrient content, adjusting amendments accordingly.
Water management requires special attention in multi-level designs. Upper tiers dry out faster than lower ones, so monitor moisture levels independently at each level. Consider installing watering systems like drip irrigation to ensure consistent moisture distribution across all tiers.
Watch for soil settling, which creates gaps between boards and reduces growing depth. Add quality topsoil when you notice these depressions forming. Check drainage holes remain clear, as blocked outlets cause waterlogging that damages both plants and timber.
Apply wood preservative or sealant annually to untreated timber beds, focusing on high-moisture areas. Community feedback suggests scheduling this task in autumn after harvest, when beds are empty and weather remains dry enough for proper curing.
Common Mistakes to Avoid
Learning from others’ experiences can save you time, money, and frustration when building your three-tier raised garden bed. One of the most common mistakes is choosing inadequate lumber. Many DIYers opt for thin or untreated wood to cut costs, only to find their beds warping or rotting within a season. Always use pressure-treated lumber or naturally rot-resistant cedar that’s at least 2 inches thick for proper durability.
Poor tier spacing is another frequent issue reported by the community. When tiers are too close together, plants compete for sunlight and root space becomes limited. Aim for at least 8-12 inches between tier levels and ensure each tier steps back far enough to allow proper light penetration to lower levels.
Neglecting drainage leads to waterlogged soil and root rot. Many builders forget to add drainage holes or use landscape fabric that blocks water flow. Drill several half-inch drainage holes in the bottom of each tier and use permeable landscape fabric that allows water through while blocking weeds.
Overloading tiers with heavy soil causes structural failure, especially in taller designs. The weight can bow sides and collapse corners. Reinforce corners with metal brackets or additional vertical supports, and consider using lighter soil mixes that include perlite or vermiculite.
Finally, skipping structural reinforcement is a recipe for disaster. User feedback consistently shows that corner bracing and cross-supports are essential, not optional. Install L-brackets at every corner joint and add horizontal cross-braces on tiers exceeding 4 feet in length to prevent bowing and ensure your garden bed lasts for years.
Alternative Design Options and Modifications
Once you’ve mastered the basic three tier design, there are plenty of creative modifications to customize your raised garden bed for your specific space and needs.
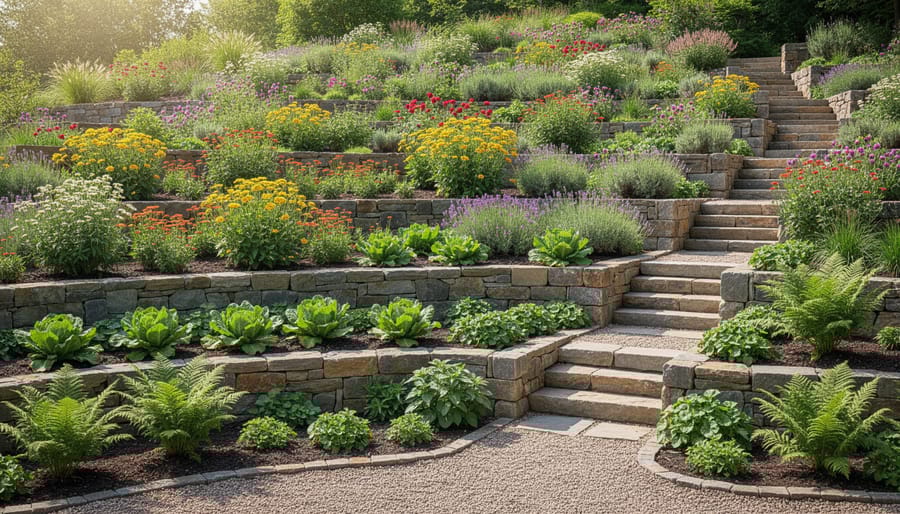
L-shaped and corner configurations work brilliantly for utilizing awkward yard spaces. Simply build two standard three tier beds and connect them at a right angle, creating a wraparound garden feature that maximizes corner areas. This design is particularly effective for sloped backyard solutions where you can follow the natural contours of your property.
Adding a trellis to the back tier transforms your bed into a vertical garden. Community member Sarah from Brisbane mounted a 1.8-meter lattice panel behind her top tier, perfect for climbing beans and tomatoes. Use timber posts secured with L-brackets to your existing frame for stability.
For a functional twist, incorporate seating by extending one side of your middle tier with a cap board wide enough to sit on. Several users recommend a 300mm wide hardwood plank, sanded smooth and treated with outdoor oil. This creates a comfortable perch for garden maintenance and relaxation.
Scaling options are flexible. Compact versions with tiers measuring 600mm wide work well on balconies or small courtyards. Conversely, ambitious gardeners have built extended versions up to 3 meters long for larger properties. Community member Dave from Perth recommends adding central support posts for beds exceeding 2.4 meters to prevent bowing.
Other popular modifications include adding wheels to the bottom tier for portable versions, installing drip irrigation between tiers, and creating removable covers for the top tier to extend growing seasons. Always maintain the stepped design principle regardless of modifications to ensure proper drainage and accessibility.
Building a 3-tier raised garden bed transforms your outdoor space into a productive, organized growing area while maximizing vertical space and improving drainage. With the right plans, materials, and tools, this project is achievable for DIYers of all skill levels in a weekend.
The key to success lies in proper planning. Start by reviewing your measurements, gathering quality materials, and ensuring you have access to the necessary tools. If you don’t own specialized equipment like a compound miter saw or power drill, remember that tool rental is a cost-effective solution that gives you professional-grade equipment without the investment.
Once you’ve completed your build, proper soil preparation and strategic plant placement will help you maximize your harvest season after season. Regular maintenance, including checking for structural integrity and refreshing soil annually, keeps your garden bed productive for years.
We’d love to see your finished project! Share photos of your 3-tier raised bed build in our community section, along with any modifications you made or lessons learned. Your experience helps fellow DIYers tackle their own projects with confidence. Whether you’re growing herbs, vegetables, or flowers, this versatile structure brings functionality and beauty to any yard.
Related Posts
Post a Comment