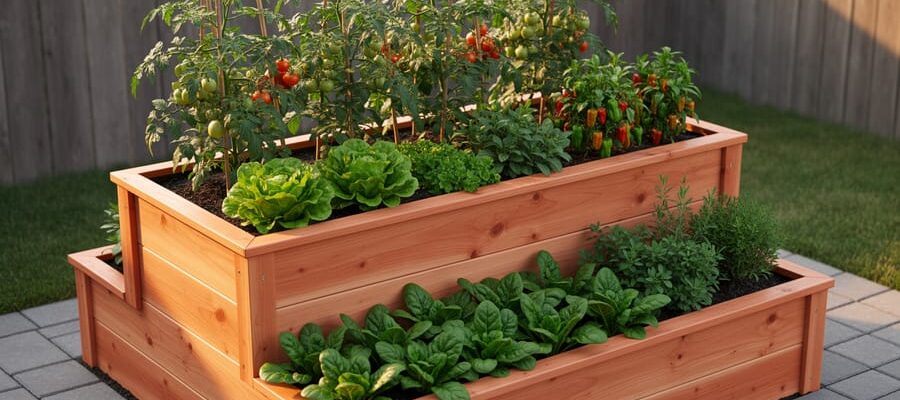
Cut your water bills by up to 60% and spend less time dragging hoses around your garden by building a PVC watering system that delivers moisture directly to plant roots. A properly designed system costs between $50-$200 for an average backyard, pays for itself within one growing season, and joins the ranks of worthwhile DIY garden projects that add lasting value to your property.
PVC pipe offers distinct advantages over rubber hoses and commercial irrigation kits. The material withstands Australian sun without degrading, maintains consistent water pressure across multiple outlet points, and allows complete customization to match your garden layout. You can expand the system as your garden grows, repair sections without replacing entire runs, and winterize components in colder climates.
This guide walks you through planning your layout based on plant water requirements, selecting the correct pipe sizes and fittings, assembling the system with basic tools available for hire, and maintaining optimal performance year-round. Whether you’re watering vegetable beds, garden borders, or potted plants, you’ll learn to create zones that deliver the right amount of water where it’s needed most.
The project requires no specialized plumbing experience. Most gardeners complete installation in a weekend using a PVC cutter, drill, and measuring tape. You’ll save money on materials, reduce water waste, and gain the satisfaction of building a system tailored precisely to your garden’s needs.
Why PVC Beats Other Garden Watering Systems
When you’re choosing materials for a garden watering system, PVC consistently outperforms the alternatives for most DIY projects. Here’s how it stacks up against other common options.
Compared to drip irrigation kits, PVC offers greater customization at a lower cost. A standard drip system for a 500-square-foot garden typically runs between $150-$300, while an equivalent PVC system costs around $75-$125 in materials. More importantly, PVC allows you to adjust spray patterns and coverage zones without purchasing proprietary connectors. One homeowner from Sheffield shared that after three seasons with drip tape, constant rodent damage and clogged emitters drove him to rebuild with PVC, which has lasted five years without replacement.
Soaker hoses might seem convenient, but they deteriorate quickly under UV exposure and require replacement every 2-3 seasons. PVC pipes, particularly Schedule 40, last 20-30 years when properly installed. The upfront investment pays off through longevity alone.
Copper piping offers excellent durability but costs 4-5 times more than PVC and requires soldering skills that many DIYers don’t have. PVC connections use simple primer and cement that anyone can master in minutes, making repairs straightforward when changes are needed.
Polyethylene (poly) tubing provides flexibility for curved layouts, which seems advantageous. However, it requires specialized barbed fittings that can leak over time and become brittle in cold weather. A Birmingham gardener reported that her poly system developed multiple leaks after just two winters, while her neighbor’s PVC system sailed through without issues.
The real advantage lies in repairability. When a PVC joint fails or you need to modify your layout, you simply cut out the section and cement in new pieces. No special tools beyond a saw are needed. This DIY-friendly characteristic means you’re never stuck waiting for professional repairs or ordering obscure replacement parts. For weekend projects where time and budget matter, PVC delivers the best balance of affordability, durability, and user-friendliness.
What You’ll Need: Tools and Materials Checklist
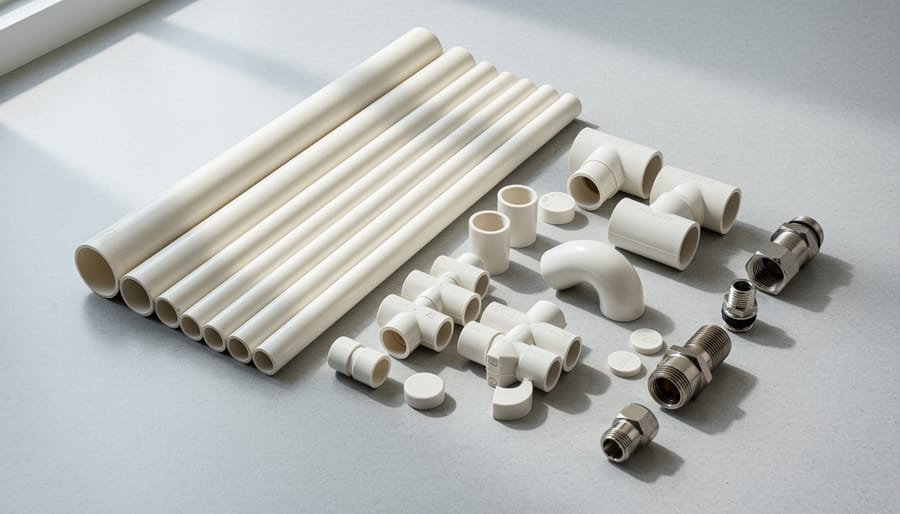
Essential PVC Components
Building a PVC garden watering system requires several key components that work together to deliver water efficiently throughout your garden. Here’s what you’ll need and what each piece does.
PVC pipes form the backbone of your system and typically come in 1/2-inch, 3/4-inch, or 1-inch diameters. For most home gardens, 3/4-inch pipe provides adequate water flow. The diameter you choose depends on your garden size and water pressure requirements.
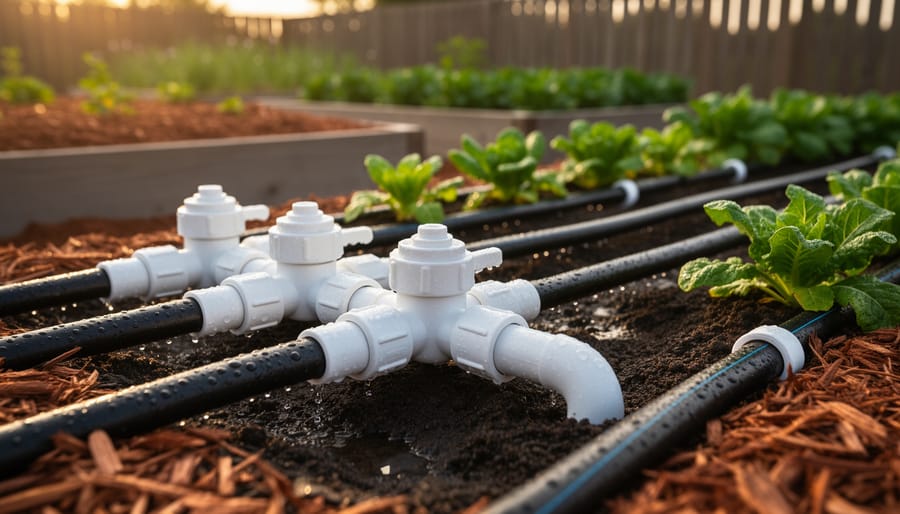
T-joints (also called tee fittings) allow you to split water flow in three directions, perfect for creating branches to different garden zones. They’re essential when you need to route water to multiple areas simultaneously.
Elbow fittings, available in 45-degree and 90-degree angles, help you navigate corners and change direction without kinking or stressing the pipe. Use 90-degree elbows for sharp turns around garden beds or structures.
End caps seal off the termination points of your system, preventing water from escaping where pipes end. They’re also useful when you want to expand your system later.
Couplings connect two straight pipe sections together, while adapter fittings allow you to transition between different pipe sizes or switch from PVC to threaded connections for attaching hoses or sprinkler heads. Many DIYers find these transition pieces invaluable for connecting standard garden equipment to their custom PVC setup.
Tools You Can Hire vs. Buy
When installing a PVC garden watering system, knowing which tools to hire versus buy can save you significant money and storage space.
For specialized equipment like pipe threaders and trenchers, hiring makes excellent financial sense. A trencher, which digs narrow channels for underground pipes, typically costs between $120-180 per day to hire. Since most residential watering systems require only 1-2 days of trenching work, this beats purchasing a $2,000+ machine that will sit idle afterward. Similarly, pipe threaders for larger diameter PVC are best hired at around $50-80 daily, as you’ll likely only need them for initial installation.
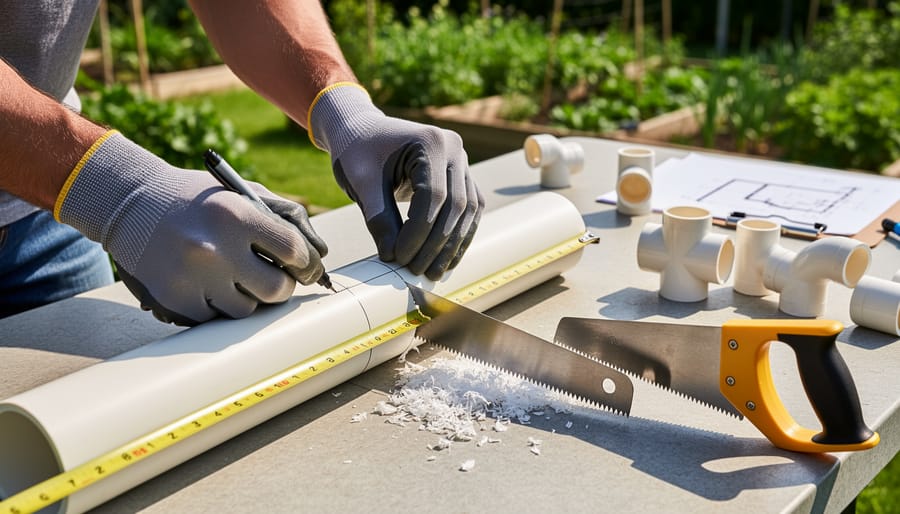
However, basic tools warrant purchasing. A quality PVC pipe cutter costs $15-30 and proves invaluable for ongoing maintenance and adjustments. You’ll use it repeatedly for repairs, extensions, and seasonal modifications. PVC primer and cement, costing around $20-25 for both, are must-haves since joints occasionally need resealing. A tape measure, hacksaw, and deburring tool complete your essential kit for under $50 total.
When hiring, book trenchers midweek when availability is better and rates sometimes lower. Plan your layout completely beforehand to maximize your hire period efficiency. Many community members report completing trenching in one intensive day with proper preparation.
For the complete range of essential watering tools beyond PVC installation, consider which items support your broader garden maintenance needs. Invest in tools you’ll use monthly; hire everything else.
Planning Your System Layout
Measuring Your Garden and Water Pressure
Before diving into construction, you’ll need accurate measurements to calculate materials and ensure proper coverage. Start by sketching your garden layout on paper, noting where your beds, plants, and water source are located. Use a tape measure or simply pace out distances (one average stride equals roughly one meter) to determine the length and width of areas requiring irrigation.
Mark your main water source—typically an outdoor tap—and measure the distance to each garden bed. This helps you plan pipe runs and determine how much PVC you’ll need. Consider applying landscaping design tips when mapping irrigation zones to maximize efficiency.
Testing water pressure requires no special equipment. Simply time how long it takes to fill a 10-liter bucket from your tap. If it fills in 30 seconds or less, you have good pressure for most systems. Slower fill times mean you’ll need to design a simpler system with fewer outlets operating simultaneously. Also note your tap’s diameter—most residential properties have 15mm or 20mm connections, which determines your starting pipe size. These measurements form the foundation of your materials list.
Designing Zones for Different Plant Needs
Effective zone design starts with grouping plants according to their water needs. Begin by walking through your garden and categorizing areas into high, medium, and low water requirement zones. Vegetables like tomatoes, cucumbers, and lettuce need frequent watering, while established shrubs and native plants require less. This assessment prevents overwatering drought-tolerant plants and underwatering thirsty crops.
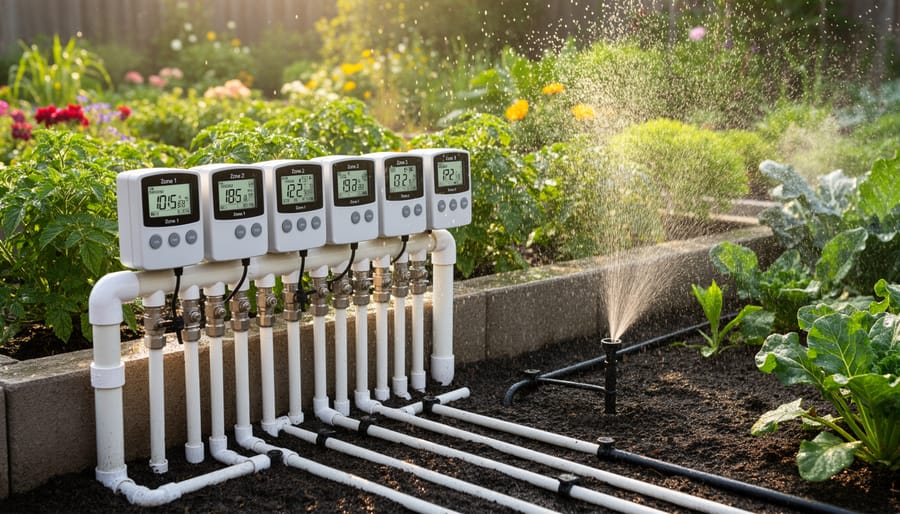
Create separate zones by installing individual control valves for each area. A typical backyard might have three zones: one for raised vegetable gardens requiring daily watering, another for flower beds needing water every few days, and a third for lawns with weekly requirements. Each zone connects to its own valve, allowing you to control watering schedules independently.
When planning valve placement, position them near your main water source and in accessible locations for future maintenance. Install valves in a protected spot like under eaves or in a valve box to prevent weather damage. Group valves together in a manifold arrangement to simplify programming and troubleshooting.
For vegetable gardens, space drip lines or soaker hoses 30-40cm apart along rows. This delivers water directly to root zones while keeping foliage dry, reducing disease risk. Flower beds benefit from adjustable drippers positioned at each plant’s base, with flow rates matching plant size. Lawn areas work best with spray heads or rotors spaced according to their coverage radius, ensuring overlapping spray patterns for even distribution.
Consider future growth when designing zones. Young plants need more frequent watering than established ones, so plan for adjustable timing. Many DIY gardeners recommend starting with conservative zone sizes, as it’s easier to combine zones later than split oversized ones requiring additional valves and piping modifications.
Building Your PVC Watering System: Step-by-Step
Cutting and Assembling the Main Lines
Start by measuring the distance between your planned connection points, adding an extra 5-10cm to account for fitting insertions. Mark your measurements clearly on the PVC pipe using a permanent marker or pencil. When cutting, use a hacksaw or PVC pipe cutter for clean, straight cuts. A pipe cutter typically provides the smoothest edge, while a hacksaw works well if you’re careful to keep the blade perpendicular to the pipe. After cutting, use sandpaper or a deburring tool to remove any rough edges or burrs from both the inside and outside of the cut end. This ensures a proper seal when joining pieces.
Before applying any adhesive, dry-fit all your components first. This means assembling the entire system without glue to verify measurements and ensure everything aligns correctly. Community feedback from experienced DIYers emphasizes this step, as mistakes become permanent once cement is applied.
When you’re ready to make permanent connections, work in sections. Apply PVC primer to both the pipe end and the inside of the fitting, which cleans and softens the plastic for better bonding. Immediately follow with PVC cement on both surfaces. Insert the pipe into the fitting with a quarter-turn twist, then hold firmly for 15-20 seconds.
Weather conditions significantly impact your work. In temperatures below 5 degrees Celsius, adhesive curing time increases substantially, sometimes requiring 24 hours instead of the standard 2-4 hours. Conversely, working in direct sunlight above 30 degrees Celsius causes cement to set extremely quickly, reducing your working time. Early morning or late afternoon sessions often provide ideal conditions for most climates.
Installing Sprinkler Heads and Emitters
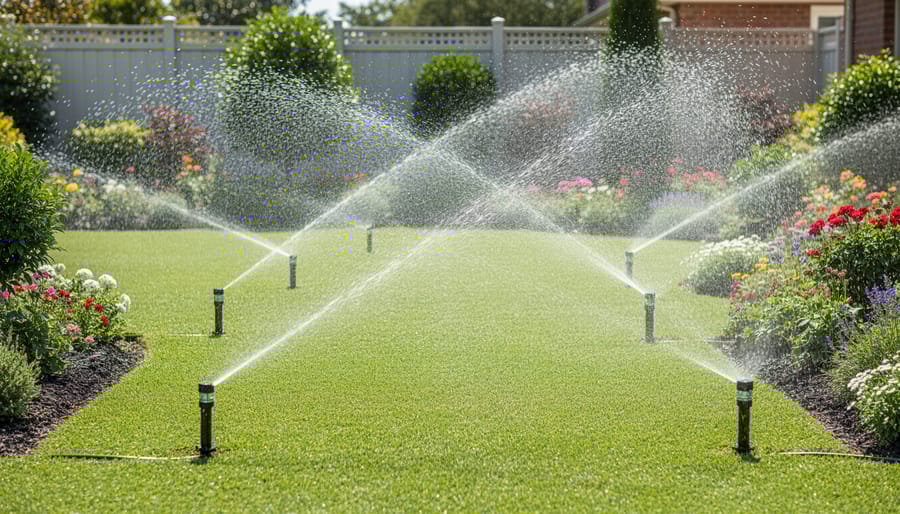
Once your PVC pipes are laid out and secured, it’s time to install the sprinkler heads and emitters that will actually deliver water to your plants. Start by marking exact locations where you need outlets, typically spacing sprinkler heads 6-12 feet apart depending on your water pressure and head type. For vegetable gardens, closer spacing ensures better coverage, while lawns can handle wider gaps.
Use a drill with a spade bit sized for your fittings, usually 3/8-inch or 1/2-inch diameter. Drill straight down into the pipe at marked locations, keeping the bit perpendicular to avoid angled holes. Remove any plastic burrs with a utility knife for clean connections. Pro tip from our community: wrap Teflon tape clockwise around threaded fittings three times before screwing in sprinkler heads to prevent leaks.
Different outlet types serve different purposes. Pop-up sprinklers work well for lawns and sit flush when not in use. Stationary sprinklers offer adjustable spray patterns for garden beds. Drip emitters provide targeted watering directly to plant roots, ideal for container gardens or water conservation.
Most sprinkler heads feature adjustable spray patterns. Rotate the top collar to change from narrow to wide coverage, typically ranging from 40 to 360 degrees. For flow rate adjustment, turn the small screw on top clockwise to decrease water output or counterclockwise to increase it. Test each head after installation, running the system for several minutes to check coverage patterns and make fine adjustments. Many DIYers recommend testing during daylight hours so you can clearly see spray overlap and dry spots that need correction.
Connecting to Your Water Source
Starting with a safe connection to your outdoor tap is essential for your PVC watering system. Most outdoor taps use a standard 3/4-inch thread, which connects easily to PVC systems using a threaded brass adapter. Before beginning, check your local building codes as many regions require backflow prevention devices to protect your home’s drinking water supply from contamination. A simple backflow preventer (also called a vacuum breaker) screws directly onto your tap and costs around £10-20 at most hardware stores.
Install a ball valve or gate valve immediately after your backflow preventer to create a convenient shut-off point for your entire system. This allows you to make repairs or winterize without accessing the main tap each time. Use thread seal tape (often called PTFE tape) on all threaded connections, wrapping it clockwise 3-4 times to prevent leaks.
A pressure regulator is worth considering if your water pressure exceeds 60 PSI, as excessive pressure can damage fittings and cause leaks. Test connections thoroughly before burying any pipes, running water for several minutes whilst checking each joint. Many DIYers recommend taking photos of your connection setup for future reference during maintenance or modifications.
Testing and Troubleshooting
Before turning on your main water supply, conduct a pressure test to catch problems early. Close all end caps and plug any open outlets, then gradually open the water valve while observing each joint and connection. Look for drips, sprays, or pooling water around fittings. Mark problem areas with tape or chalk for easy identification.
Common leak culprits include loose fittings that need additional tightening, insufficient primer application, or cement that didn’t cure fully. For minor leaks at threaded connections, try wrapping them with additional plumber’s tape. Persistent leaks at glued joints typically require cutting out the section and re-cementing with proper technique.
If you notice low or uneven pressure across your system, check for kinked flexible tubing, partially closed valves, or undersized pipe diameter for your layout. Remember that longer runs and higher elevations naturally reduce pressure. Installing a pressure gauge at your water source helps diagnose issues accurately.
Adjust sprinkler coverage by rotating heads or changing nozzles. Many DIYers in our community recommend testing your system for 15-30 minutes during initial setup, walking the entire layout to verify even water distribution. Note any dry spots or overspray, then fine-tune accordingly. Document your final configuration with photos for future troubleshooting reference.
Automation Options: Timers and Controllers
Once you’ve built your PVC watering system, you’ll need to decide between manual operation or automation. Manual systems require you to turn the water on and off each time, which works fine for small gardens or if you’re home regularly. However, automated systems offer convenience and consistency, ensuring your plants get watered even when you’re away or simply forget.
For budget-conscious DIY enthusiasts, basic mechanical timers are your entry point, typically costing between £15-30. These connect directly to your outdoor tap and allow you to set watering duration and frequency using simple dials. They’re battery-powered and perfect for straightforward watering schedules. Look for models with manual override functions so you can still water by hand when needed.
Digital timers offer more flexibility, ranging from £30-60, with programmable multi-day schedules and multiple watering cycles per day. These suit gardeners with varied plant needs, letting you run morning and evening cycles during hot weather.
Smart controllers represent the premium option (£80-150), connecting to your home Wi-Fi and smartphone apps. They provide weather-based adjustments and remote control, though they do require a power outlet near your tap. Many community reviews highlight that the water savings often offset the initial investment within a season.
Rain sensors are an excellent addition to any automated system (£20-40). They temporarily halt watering during rainfall, preventing water waste and overwatering. Installation is straightforward – mount the sensor in an open area and connect it between your timer and tap.
When programming your timer, consider your soil type and plant varieties. Clay soils need less frequent but longer watering sessions, while sandy soils benefit from shorter, more frequent cycles. Start conservatively with 15-minute sessions and adjust based on soil moisture checks. Community feedback consistently recommends early morning watering (5-7am) to minimize evaporation and disease risk.
Seasonal Maintenance and Winterization
Proper seasonal garden maintenance extends the lifespan of your PVC watering system and prevents costly repairs. In warm months, flush lines monthly to remove algae buildup and mineral deposits. Disconnect filter screens and soak them in a vinegar solution for 30 minutes, then rinse thoroughly. Inspect fittings for cracks or leaks during routine checks.
Winterization is essential in frost-prone areas. Before the first freeze, shut off your water supply and open all drain valves. Use an air compressor set to no more than 50 PSI to blow out remaining water from the lines, working from the main supply toward the end zones. Never exceed 80 PSI as this can damage fittings. Remove and store timer batteries indoors. Above-ground components should be insulated with foam pipe sleeves or brought inside.
Spring startup begins with a thorough visual inspection. Check all connections for winter damage and tighten loose fittings. Turn on water gradually, monitoring for leaks at each zone. Run each section for five minutes to clear debris that settled during dormancy. Replace cracked fittings immediately, even small cracks can worsen under pressure.
Replace components showing these warning signs: brittle or discoloured PVC (typically after 10-15 years), stripped threads on fittings, continuously leaking valves, or timers failing to maintain programming. Community feedback suggests keeping spare elbows and couplings on hand for quick repairs during peak growing season.
Building your own PVC garden watering system delivers real benefits: you’ll save time on daily watering routines and reduce water waste through efficient, targeted delivery. The investment in materials typically pays for itself within a single growing season through lower water bills and healthier plants.
If you’re new to PVC projects, start small. Install a system for just one garden bed or a section of your lawn to build confidence and understand how the components work together. You can always expand once you’ve tested your setup and made adjustments.
Remember, you don’t need to purchase every tool for a one-time project. Many of the specialized equipment like PVC cutters, hole saws, and threading tools are available through local hire services, keeping your upfront costs manageable.
We’d love to hear how your project turns out. Share photos of your completed system, water-saving results, or any clever modifications you’ve made with our community. If you encountered challenges or have questions about adapting the design for your specific garden layout, drop them in the comments below. Your experience helps fellow DIYers tackle their own watering projects with confidence.
Related Posts
Post a Comment