
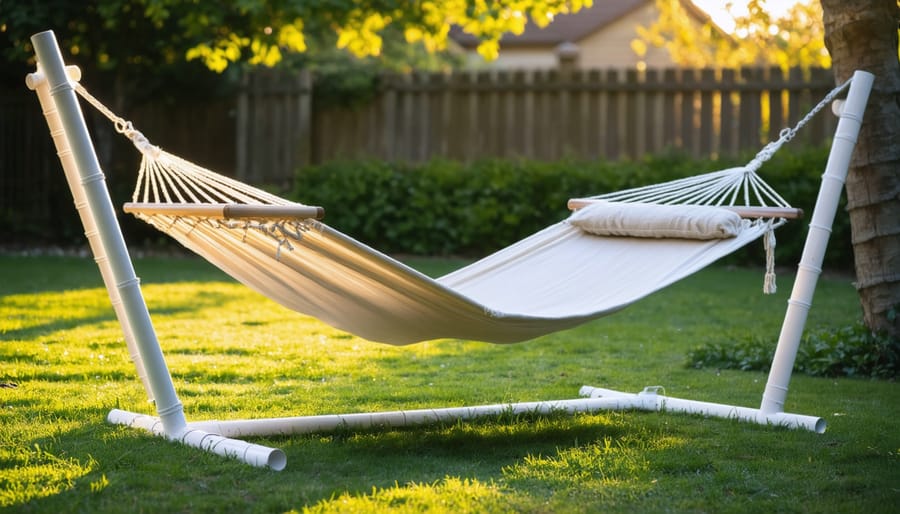
Measure your hammock’s length and add 2 feet to determine your PVC stand’s minimum dimensions—most hammocks require a 12 to 15-foot base length and 4 to 5-foot height for proper hang angle. PVC pipe stands cost between $50-$100 in materials, making them 75% cheaper than commercial metal alternatives while supporting up to 250 pounds when constructed with 1.5-inch Schedule 40 PVC and proper cross-bracing.
Cut your PVC pipes into specific lengths before assembly: two 12-foot base rails, four 5-foot vertical supports, four 3-foot cross-supports, and eight 18-inch stabilizer legs. Use a PVC pipe cutter rather than a saw for clean, burr-free cuts that fit snugly into connectors—this prevents weak joints that compromise structural integrity.
Apply PVC primer and cement to all joints simultaneously during assembly to ensure even curing time, working in a well-ventilated area. The chemical bond forms within 30 seconds, so position each piece correctly on the first attempt. Allow 24 hours for full curing before load testing.
Test your completed stand with sandbags totaling your body weight plus 50 pounds before your first use. Position the stand on level ground and inspect all joints for gaps or movement. Community feedback consistently shows that adding concrete-filled base supports increases stability on uneven terrain, though this modification reduces portability.
This straightforward construction project takes 2-3 hours and requires only basic tools: a measuring tape, PVC cutter, and permanent marker for measurements. The modular design allows for easy disassembly, storage, and modifications based on your specific space and hammock requirements.
Why Choose PVC for Your Hammock Stand?
PVC pipe has become a go-to material for DIY hammock stand projects, and for good reason. If you’re weighing up whether to tackle this build with PVC or explore alternative hammock stand designs, understanding the unique advantages of PVC will help you make an informed decision.
The most immediate benefit is cost-effectiveness. PVC pipes and fittings are significantly cheaper than timber or metal alternatives, with most complete stands costing between $50-$100 in materials. This makes it an accessible option for first-time builders or those testing out hammock camping before committing to expensive equipment.
Portability sets PVC stands apart from heavier options. A typical PVC hammock stand weighs around 10-15 kilograms, making it easy to transport to different locations in your backyard, take to the beach, or pack for camping trips. The pipes can even be disassembled for compact storage during winter months.
Weather resistance is another major advantage. Unlike timber that warps, rots, or attracts termites, PVC handles Australian outdoor conditions remarkably well. It won’t rust like steel, requires no painting or sealing, and cleans easily with a simple hose-down.
Perhaps the biggest concern newcomers have is weight capacity. Community testing and user feedback consistently show that properly constructed PVC stands using Schedule 40 pipe can safely support 110-135 kilograms. Adding reinforcement techniques like internal support rods or sand-filled pipes can increase this capacity further.
Modification is straightforward too. Need to adjust height or width? Simply cut pipes to size and reconnect. Want to upgrade components? Individual sections can be replaced without rebuilding the entire structure. This flexibility means your stand grows with your experience and changing needs.
The ease of working with PVC makes it ideal for beginners. No welding, advanced carpentry skills, or specialised tools required – just basic cutting and assembly techniques you can master in an afternoon.
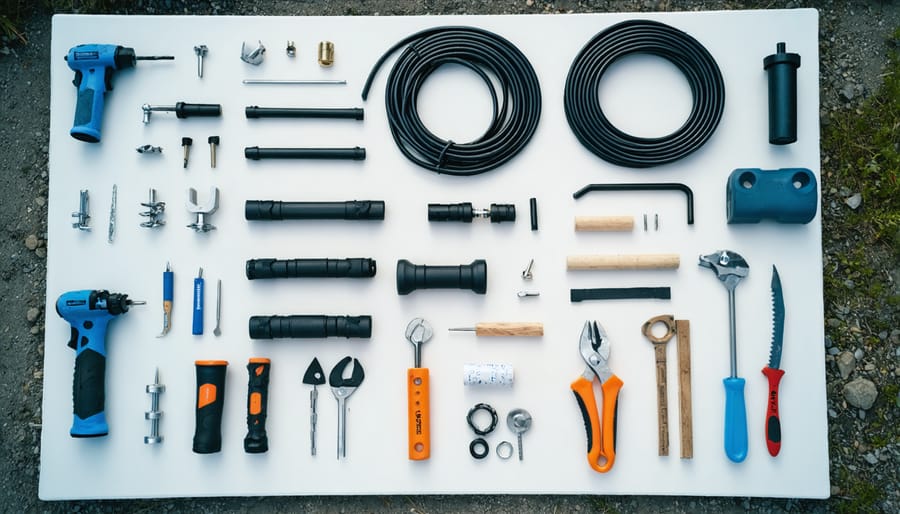
Essential Tools and Materials You’ll Need
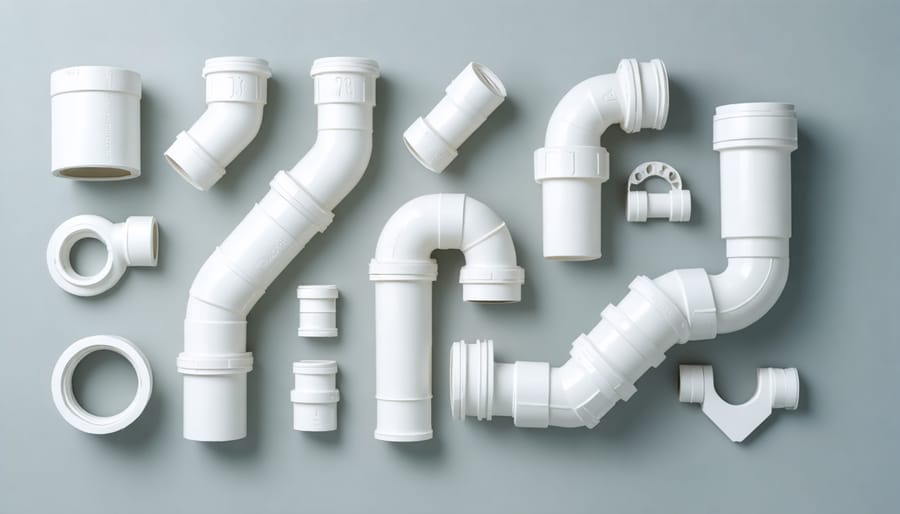
PVC Pipes and Fittings Shopping List
For a sturdy hammock stand that safely supports 250-300 lbs, you’ll need Schedule 40 PVC pipes in either 1.5-inch or 2-inch diameter. Schedule 40 refers to the pipe’s wall thickness, ensuring durability for weight-bearing applications. Here’s your complete shopping list:
Ten 10-foot lengths of 2-inch Schedule 40 PVC pipe (preferred for heavier users) or 1.5-inch for lighter loads. You’ll cut these to specific measurements during construction.
Four 2-inch PVC tee fittings (T-shaped connectors that join three pipes at right angles).
Four 2-inch PVC 90-degree elbows for creating the base frame corners.
Four 2-inch PVC cross fittings (X-shaped connectors joining four pipes).
Two 2-inch PVC end caps for finishing exposed pipe ends.
One container of PVC cement and primer for permanent bonding, or skip this if you want a portable, snap-together design.
Most home improvement stores stock these materials for under $60 total. Community builders report excellent results with 2-inch diameter for adult users, while 1.5-inch works well for children’s hammock stands. Always verify that all fittings match your chosen pipe diameter before purchasing. Keep your receipt, as you may need to exchange fittings if measurements change during assembly.
Tools Required (Buy vs. Rent)
Building a PVC hammock stand requires only basic tools, making it an excellent beginner project. You’ll need a PVC cutter or hacksaw for cutting pipes to length, a power drill with bits for creating holes, a measuring tape for accuracy, and a permanent marker for marking cut lines. A level ensures your stand sits evenly, while sandpaper smooths rough edges after cutting.
For one-time projects, consider tool rental options rather than purchasing expensive equipment. A quality PVC cutter or reciprocating saw is ideal for rental since you’ll only need it during construction. However, basic tools like measuring tapes and markers are inexpensive enough to buy outright. If you don’t own a drill, renting a corded model provides more power for drilling through multiple PVC joints. Many DIYers in our community report that renting specialized cutting tools saved them money while still delivering professional results on their hammock stand projects.
Additional Hardware and Safety Gear
To complete your PVC hammock stand, you’ll need several additional components beyond the basic pipes and fittings. PVC cement is essential for creating secure, permanent joints between pipe sections. Apply it in a well-ventilated area and allow 24 hours for full curing before use.
For hanging your hammock, install heavy-duty eye bolts (minimum 3/8-inch diameter) into the top crossbar. These should be rated for at least 400 pounds to support dynamic weight loads safely. Stainless steel carabiners rated for climbing or industrial use provide reliable attachment points between your hammock and the stand.
You’ll also need rope or chain to connect everything. Marine-grade rope (minimum 1/2-inch diameter) or galvanized chain works well, with chain offering superior durability.
Safety gear is non-negotiable during construction. Wear safety glasses when cutting PVC to protect against plastic shards. Work gloves prevent hand injuries and improve grip. A dust mask is recommended when sanding pipe edges. Always test your completed stand with sandbags or weights before use, gradually increasing load to verify structural integrity.
Step-by-Step Construction Process
Measuring and Cutting Your PVC Pipes
Accurate measurements are essential for a stable hammock stand. For a standard design, you’ll need: two 8-foot base pipes, four 5-foot leg pieces, two 6-foot crossbar sections, and connecting pieces cut to approximately 18 inches each. Mark your measurements clearly using a permanent marker and straight edge, measuring twice before cutting to avoid waste.
When cutting PVC, use a hacksaw, PVC pipe cutter, or miter saw for the straightest results. A miter saw provides the most precise, perpendicular cuts if you have access to one. Position the pipe securely in a vise or clamp to prevent rolling during cutting. Apply steady, even pressure and let the blade do the work rather than forcing it through the material.
After cutting, you’ll notice rough edges and small plastic burrs. Remove these by scraping the inside and outside edges with a utility knife or deburring tool, working in a circular motion around the pipe end. This step prevents scratching your hammock fabric and ensures fittings slide on smoothly during assembly. Alternatively, sandpaper wrapped around the pipe creates clean, smooth edges. Take time with this finishing step as it significantly impacts your stand’s functionality and longevity.
Assembling the Base Frame
Start by laying out all your base frame pieces on a flat surface according to your design. This “dry-fitting” step is essential before applying any cement, allowing you to verify measurements and identify potential issues without permanent consequences. Many experienced DIYers in our community recommend this approach, noting it prevents costly mistakes.
Begin connecting the base pipes using your PVC elbows and T-joints. For a basic A-frame design, you’ll create two rectangular bases that mirror each other. Insert each pipe end fully into the fitting until it bottoms out. Mark alignment points with a pencil where pipes meet fittings, as these references ensure proper orientation during final assembly.
Once satisfied with the dry fit, disassemble one joint at a time for cementing. Work in a well-ventilated area and wear protective gloves, as PVC cement contains strong solvents. Apply primer to both the pipe end and inside the fitting, then quickly follow with cement using the included dauber. Apply cement liberally but avoid excess that creates drips.
Immediately push the pieces together with a slight twisting motion, holding firmly for 30 seconds. The pencil marks should realign perfectly. Work systematically through each joint, allowing 15 minutes between connections for initial bonding.
According to user feedback, rushing this process is the most common mistake. Allow the full cure time specified on your cement container, typically 24 hours, before applying weight. This patience ensures maximum strength and prevents joint failure when you’re relaxing in your finished hammock stand.
Building the Vertical Supports
The vertical supports form the backbone of your hammock stand, so getting them level and properly angled is essential for safe weight distribution. Start by cutting four identical pieces of PVC pipe for your upright legs, typically 5-6 feet in length depending on your hammock’s suspension requirements.
Attach each vertical support to the base frame using PVC tee fittings. Here’s the critical part: the legs need to angle outward slightly, typically around 10-15 degrees from vertical. This A-frame configuration distributes weight more effectively and prevents the stand from tipping when occupied. Many DIY builders skip this step and create perfectly vertical supports, which can compromise stability.
To ensure proper angling, measure the distance between the bottom of each pair of legs and the top. The bottom should be 6-8 inches wider than the top measurement. Use a carpenter’s level to confirm both sides match exactly. Mark your measurements on the ground before securing the fittings.
Pro tip from our community: temporarily secure the legs with duct tape before applying PVC cement. This gives you time to make adjustments and verify symmetry. Check that opposing legs are the same height by placing a straight board across the tops and using your level.
Safety note: uneven supports can create dangerous stress points that may fail under weight. Double-check all measurements before permanently bonding joints. Once you’re satisfied with alignment, apply PVC primer and cement according to manufacturer instructions for a secure, lasting bond.
Installing the Top Crossbar
With your vertical supports assembled, you’re ready to install the top crossbar that will bear the weight of your hammock. This horizontal beam needs proper reinforcement to handle dynamic loads safely.
Start by measuring the distance between your A-frame supports. Cut your crossbar PVC pipe to span this gap, typically 8-10 feet depending on your design. Before connecting, reinforce this critical component by inserting a wooden dowel or metal conduit inside the pipe. This internal support prevents sagging and distributes weight more evenly.
Secure the crossbar to each vertical support using PVC tees or side outlet elbows. Apply PVC cement generously to create permanent, load-bearing joints. Allow 24 hours for the cement to fully cure before hanging any weight.
For anchor points, drill pilot holes through the top crossbar at two locations, spacing them according to your hammock’s dimensions, usually 6-8 feet apart. Install heavy-duty eye bolts (minimum 3/8-inch diameter) through these holes, securing them with washers and lock nuts on both sides. These will serve as your hanging points.
Safety reminder: Always test your stand’s stability with sandbags or weights before use. Many community members recommend loading it with 50 pounds more than your expected hammock weight to ensure structural integrity.
Adding Hanging Hardware and Final Touches
Now it’s time to attach the hardware that will securely hold your hammock. Start by drilling pilot holes through the top horizontal PVC pipes where you want to hang the hammock, typically about 18-24 inches from each end for proper weight distribution. Insert heavy-duty eye bolts (rated for at least 400 pounds each) through these holes and secure them with washers and nuts on the interior side of the pipe.
Thread your hanging hardware through the eye bolts. You can use chain, marine-grade rope, or adjustable straps, all of which allow you to modify the hammock height easily. Attach stainless steel carabiners to connect your hammock to the hanging hardware. Ensure all carabiners have screw-lock gates for maximum security.
Before full use, test your stand’s weight capacity safely. Start by applying pressure gradually with your hands, then sit in the hammock while keeping one foot on the ground. If everything holds steady, slowly shift your full weight into the hammock. Have someone nearby during this first test, and inspect all connections and joints for any movement or stress.
For enhanced stability, especially on soft ground or for heavier users, consider filling the base pipes with sand. Simply remove the end caps, pour play sand into the horizontal base pieces using a funnel, and replace the caps. This adds 20-30 pounds of ballast and significantly reduces wobbling. Many community members report this modification makes a noticeable difference in overall stability and comfort.
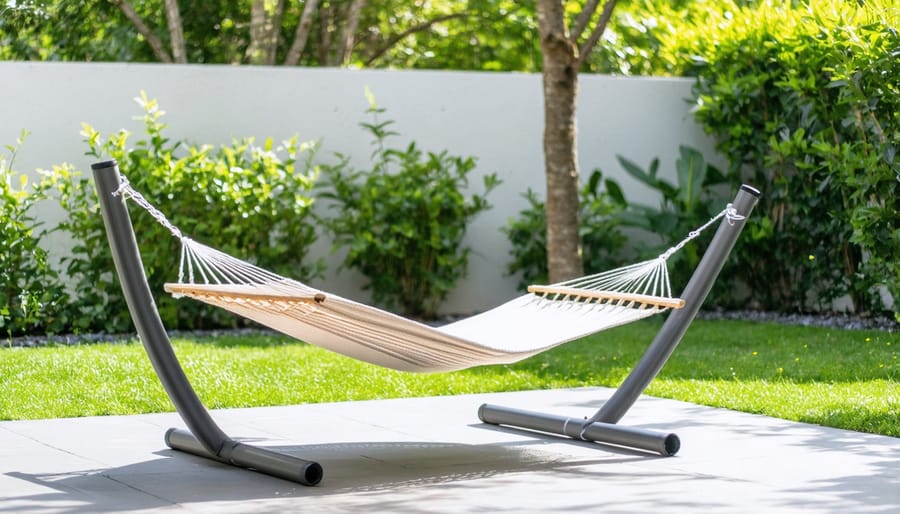
Design Variations and Customization Options
Once you’ve mastered the basic PVC hammock stand design, you can explore several variations to better suit your specific needs and space requirements.
For those who want mobility, a portable version uses shorter base legs (around 3 feet instead of 4) and replaces permanent PVC cement with slip-fit connections. This allows you to disassemble the stand for storage or transport to different locations. Some DIY enthusiasts on community forums recommend adding small wheels to the base legs for easier movement around your outdoor hangout space, though this works best on flat surfaces.
Adjustable height models incorporate threaded PVC couplers or telescope-style joints that let you raise or lower the crossbar. This modification accommodates different hammock lengths and allows multiple family members to customize their hanging height. The adjustment mechanism typically adds 20 to 30 dollars to your material costs but provides significant flexibility.
Space-saving configurations work well for smaller yards or indoor use. A triangular base design reduces the footprint by approximately 30 percent compared to traditional rectangular bases while maintaining stability. Another option is a wall-mounted hybrid that uses PVC for the free-standing side while anchoring the other end to a sturdy exterior wall, cutting material needs and costs in half.
Aesthetic improvements can transform your utilitarian PVC stand into an attractive backyard feature. Spray painting with outdoor-grade paint designed for plastics comes in various colors and adds UV protection. Many builders use wood-grain contact paper or decorative rope wrapping to disguise the PVC appearance. Before painting, lightly sand the PVC surface and apply a plastic primer for better paint adhesion.
User reviews consistently highlight that painted stands hold up well outdoors when using quality exterior paints, with minimal touch-ups needed after a full season of use.
Safety Considerations and Weight Testing
Before you climb into your newly constructed PVC hammock stand, understanding its weight capacity is essential for your safety. Standard Schedule 40 PVC pipe, commonly used in these projects, can support considerable weight when properly assembled, but it does have limitations you need to respect.
Most DIY PVC hammock stands using 1.5-inch or 2-inch Schedule 40 pipe can safely support between 250-400 pounds when built correctly. However, this capacity depends heavily on your design, joint quality, and pipe condition. Always check the manufacturer’s specifications on your specific PVC pipes, as different grades and thicknesses vary significantly.
Start your weight testing gradually. Begin by placing sandbags or other heavy objects totaling about 50 pounds in the hammock. Inspect all joints, connections, and pipe sections for any movement, cracking, or stress marks. Increase the weight in 50-pound increments, checking thoroughly after each addition. Listen for creaking sounds, which indicate stress points requiring attention.
Watch for these warning signs of structural weakness: whitening or stress marks on the PVC (called “crazing”), visible flexing at joints, loose connections that rotate easily, or any cracking sounds during use. If you notice any of these issues, stop using the stand immediately and reinforce the problem areas with additional support pipes or thicker-gauge PVC.
PVC naturally degrades when exposed to UV sunlight, becoming brittle over time. If your stand lives outdoors, inspect it monthly and consider replacing pipes every two to three years, or sooner if you notice discoloration or brittleness. Indoor stands typically last longer but still require regular inspection before each use.
Never exceed your stand’s tested weight limit, and remember that dynamic forces from getting in and out of the hammock can temporarily double the static load.
Maintenance and Weatherproofing Tips
Your PVC hammock stand will last longer with proper care and maintenance. Since PVC breaks down under prolonged sun exposure, UV protection is essential. Apply a UV-resistant spray coating designed for plastics every season, or paint your stand with outdoor-grade paint in light colors to reflect heat. Many DIY builders in our community recommend creating a removable fabric canopy or storing the stand in shade when not in use.
Check all joints and connections monthly during active use. PVC cement creates permanent bonds, but mechanical stress can cause hairline cracks over time. Inspect T-joints and elbow fittings carefully, looking for whitening or stress marks around connection points. If you spot any weakening, reinforce the joint with additional PVC cement or replace the affected section before failure occurs.
Weight distribution matters for longevity. Avoid exceeding your stand’s weight capacity, and don’t leave heavy items on the hammock when you’re not using it. This constant stress can warp pipes and weaken joints prematurely.
For off-season storage, disassemble stands with slip-fit connections and store components in a cool, dry location away from direct sunlight. Garages, basements, or storage sheds work well. If you’ve built a permanently cemented stand, cover it with a waterproof tarp or move it under a porch or carport. Clean the pipes before storage using mild soap and water to remove dirt and debris that could degrade the material. Proper winter storage can extend your stand’s life by several years, according to user feedback from experienced builders.
Common Mistakes and How to Avoid Them
Based on community feedback and user experiences, several common issues can arise when building a PVC hammock stand, but each has straightforward solutions.
Wobbling and instability top the list of complaints. This typically happens when the base legs aren’t wide enough or the ground contact points are too narrow. Community members recommend extending your base width to at least 4-5 feet and adding rubber furniture pads or PVC end caps filled with sand to each leg. If you’re working on uneven ground, adjustable feet made from threaded PVC fittings can help level your stand.
Sagging occurs when the stand can’t handle the weight or when the horizontal support bar bends under pressure. Users report success by upgrading to Schedule 40 PVC pipe with a minimum 1.5-inch diameter for all load-bearing sections. Some builders double up the top bar by running two pipes side-by-side, connected with regular T-joints. Remember that PVC has weight limits, so check your pipe’s specifications match your intended use.
Joint failures are frustrating but preventable. The most common mistake is relying solely on friction-fit connections. Experienced builders strongly recommend using PVC cement on all joints except those you might need to disassemble for storage. For temporary stands, drilling small holes through joints and inserting stainless steel bolts adds significant strength without permanent bonding.
Temperature-related issues also emerge in user reviews. PVC becomes brittle in cold weather and can soften in extreme heat. Store your stand indoors during winter months and avoid placing it in direct sunlight on very hot days. These simple precautions, shared by the DIY community, will extend your hammock stand’s lifespan considerably.
Building your own PVC hammock stand offers an affordable, customizable solution that’s perfect for any outdoor space. This project demonstrates how accessible DIY projects can be when you have the right guidance and tools at your disposal. Whether you’ve followed our basic design or added your own modifications, we’d love to hear about your experience and see what you’ve created.
We encourage you to share photos of your completed hammock stand and any improvements you’ve made to the design. Your feedback helps other builders learn from real-world experiences and discover innovative solutions they might not have considered. Community-driven reviews and user-generated content make these projects better for everyone.
Ready to tackle your next build? Visit Tool Hire to explore our equipment rental options, from PVC cutters to measuring tools. Our affordable rental solutions ensure you have professional-grade equipment without the investment of purchasing. Don’t forget to leave a review of any tools you rent to help fellow DIY enthusiasts make informed decisions for their projects.
Related Posts

Post a Comment