

Inspect your gutters twice yearly—once in late spring and again in autumn—to prevent blockages that lead to costly water damage to your roof, fascia, and foundation. Remove debris by hand using quality work gloves, starting at the downpipe and working backward to avoid pushing material into drainage points. Flush the entire gutter system with a garden hose to identify leaks and ensure proper water flow toward downpipes. Clear blocked downpipes by feeding a plumber’s snake from the top or disassembling the elbow joints at the base.
Cleaning your own gutters saves hundreds of dollars annually while giving you direct insight into your home’s drainage health. This guide walks you through the complete process with safety-first techniques, tool recommendations available through local rental services, and community-tested tips from experienced DIYers. Whether you’re tackling this task for the first time or refining your approach, you’ll learn how to work efficiently at height, recognize warning signs of gutter damage, and maintain your system between deep cleans. With the right preparation and equipment, most homeowners can complete a standard single-story house in two to three hours.
Why Your Gutters Need Regular Cleaning (And What Happens If You Don’t)
Neglecting your gutters might seem harmless, but the consequences can hit your wallet hard and compromise your home’s structural integrity. When gutters clog with leaves, twigs, and debris, water can’t flow properly through the downspouts. Instead, it overflows and pools around your foundation, potentially causing cracks, settling, and even basement flooding. Over time, this water damage can cost thousands of dollars to repair.
Your roof also suffers when gutters stay clogged. Standing water backs up under roof shingles, leading to rot, leaks, and deteriorated fascia boards. In winter, blocked gutters contribute to ice dams that can tear off gutters entirely and damage your roofline. These common gutter problems escalate quickly when left unaddressed.
Pest infestations are another unwelcome surprise. Mosquitoes breed in stagnant gutter water, while birds, rodents, and insects nest in the debris. These unwanted guests can eventually find their way into your home’s interior spaces.
Your landscape takes a beating too. Overflowing gutters create erosion channels in garden beds, wash away mulch, and damage plants directly below the roofline.
So how often should you clean? Most homes need gutter cleaning twice yearly, typically in late spring and early autumn. However, if you have overhanging trees, particularly pines or gum trees, you’ll need quarterly cleanings. Homes in heavily wooded areas might require even more frequent maintenance. Properties with minimal tree coverage can sometimes extend to annual cleaning, though twice yearly remains the safe standard.
Regular maintenance prevents expensive repairs and keeps your home protected year-round. The small time investment pays significant dividends in avoided damage.
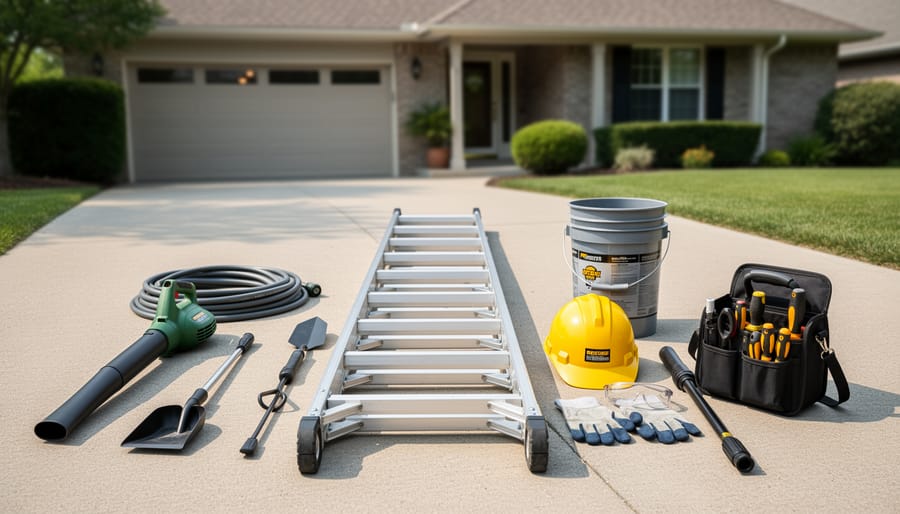
Essential Tools and Equipment You’ll Need
Safety Gear (Non-Negotiable)
Before you climb that ladder, investing in proper safety equipment is essential. Start with heavy-duty work gloves that protect against sharp metal edges, rusty nails, and rotting debris while maintaining good grip. Safety glasses or goggles are critical to shield your eyes from flying dirt, leaves, and potential encounters with wasps or spiders. Choose sturdy, closed-toe footwear with excellent tread—slip-resistant work boots are ideal for maintaining stability on ladder rungs. Wear long sleeves and pants made from durable fabric to protect your skin from scratches and insect bites. Many experienced DIYers recommend keeping a dust mask handy, especially if you’re sensitive to mold or pollen that accumulates in gutters. Community members also suggest wearing a cap or hat to prevent debris from falling into your hair. Remember, gutter cleaning involves working at height with sharp, dirty materials, so cutting corners on safety gear simply isn’t worth the risk.
Cleaning Tools You Can Buy or Rent
Getting the right tools makes gutter cleaning safer and more efficient. Here’s what you’ll need and what our community recommends for buying versus renting.
A sturdy extension ladder is essential. For most single-story homes, a 20-foot ladder works well, while two-story houses need 28 feet or longer. Community members emphasize that ladder stability matters more than price, with many suggesting renting a professional-grade fiberglass ladder for occasional use rather than buying a cheaper aluminum one.
Gutter scoops are inexpensive plastic tools designed to fit inside standard gutters. Most users recommend buying one for under ten dollars rather than renting. A basic bucket with an S-hook lets you hang it from your ladder, keeping both hands free for cleaning.
Garden hoses with spray nozzles are must-haves for flushing debris after scooping. For higher gutters, consider a gutter cleaning wand, which attaches to your hose and features a curved end that reaches gutters from the ground. Community feedback is mixed on these, with some users loving the convenience while others find them less effective than traditional methods.
Wet/dry vacuums with gutter attachments receive high marks from experienced DIYers, especially for spring cleaning when leaves are dry. These specialized attachments typically cost between thirty and sixty dollars. Unless you clean gutters frequently, renting a heavy-duty shop vacuum might be more economical than purchasing.
The consensus from our community is clear: invest in quality safety equipment like ladders through rentals, but buy the smaller, frequently-needed items outright.
Pre-Cleaning Safety Check: What You Must Do First
Before you climb that ladder, take fifteen minutes to complete these essential safety checks. This preparation can prevent serious accidents and ensure your gutter cleaning goes smoothly.
Start by inspecting your ladder thoroughly. Check for loose rungs, cracks, bent sections, or worn feet. Extension ladders should have functioning locks, and all ladder feet must have non-slip pads intact. If your ladder shows any damage, don’t use it. Many tool rental locations offer ladder rentals if yours isn’t up to the task.
Check the weather forecast carefully. Never clean gutters when rain is expected, during windy conditions, or when surfaces might be icy. Wet leaves and debris make gutters slippery, and wind can destabilize your ladder. Wait for a clear, calm day with dry conditions.
Always notify someone before starting work. Tell a family member or neighbor what you’re doing and how long you expect the job to take. Having a spotter present is even better. They can stabilize the ladder, hand you tools, and get help immediately if something goes wrong.
When positioning your ladder, follow the 4-to-1 rule: for every four feet of ladder height, position the base one foot away from the wall. Place the ladder on firm, level ground, never on soft soil or unstable surfaces. Extend the ladder at least three feet above the roofline for safe mounting and dismounting. Consider using ladder stabilizers or standoffs to prevent gutter damage and improve stability.
Finally, clear the area below of obstacles, pets, and children before ascending.
Step-by-Step Gutter Cleaning Process
Step 1: Position Your Ladder and Start at the Right Spot
Start your gutter cleaning at the downspout location, as this is where debris tends to accumulate most heavily. Working from this point outward allows you to push material toward the downspout opening, making removal easier and more efficient.
Position your ladder on stable, level ground, ensuring all four feet make solid contact with the surface. Place it at approximately a 75-degree angle from the ground—the base should be one foot away from the wall for every four feet of ladder height. Never lean the ladder directly against the gutter itself, as this can cause damage and create an unstable working platform. Instead, position it against the fascia board or use a ladder standoff attachment to protect your gutters.
Plan to work in 3-4 foot sections to minimize how often you need to reposition. This distance keeps you centered on the ladder, preventing dangerous overreaching that causes most ladder-related injuries. Always maintain three points of contact when climbing, and never stand on the top two rungs.
Keep your bucket or collection container within easy reach, hooking it securely to the ladder if possible. This setup allows you to work efficiently while staying balanced and safe throughout the cleaning process.
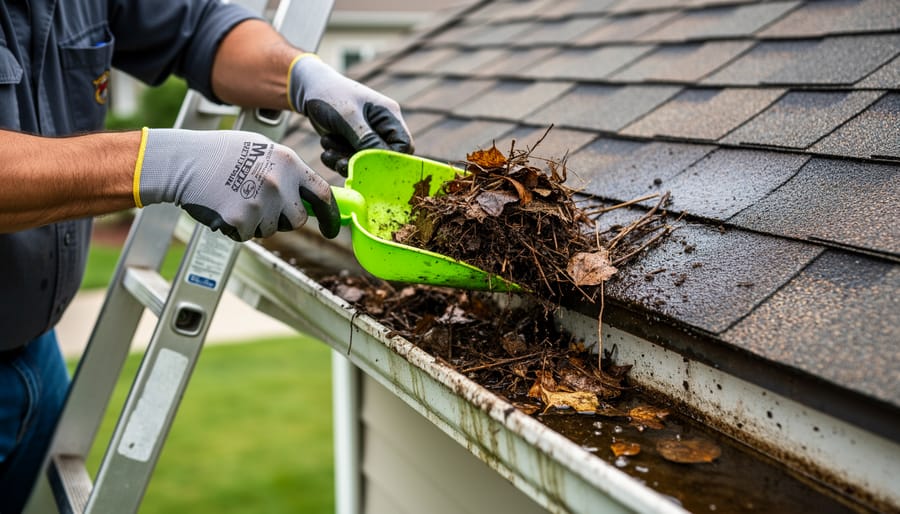
Step 2: Remove Large Debris by Hand
Once you’ve positioned your ladder safely and assessed the gutter situation, it’s time to tackle the bulk of the debris. Start at the downspout and work your way along the gutter, using either a plastic gutter scoop or your gloved hands to remove leaves, twigs, and accumulated muck. A gutter scoop, available at most hardware stores or tool rental outlets, makes this job easier with its curved design that matches the gutter profile without scratching the surface.
Work in small sections, dropping debris into a bucket hooked to your ladder or directly into a tarp spread on the ground below. Many DIYers find the bucket method more efficient as it prevents multiple trips up and down the ladder. Wear thick work gloves to protect against sharp objects, rusty nails, or hidden debris that could cause injury.
For stubborn, compacted material, break it up gently with the scoop rather than forcing it, which could damage your gutters. As you progress, check for any signs of rust, holes, or separated seams that might need repair later.
Once you’ve cleared a section, transfer the debris to garden waste bags or your green bin, following proper disposal methods for organic yard waste in your area. This initial cleanout typically removes 80-90% of blockages, preparing your gutters for the flushing stage.
Step 3: Clear Downspouts and Check for Blockages
Once your gutters are clean, turn your attention to the downspouts. These vertical pipes frequently clog with compacted debris, preventing proper drainage. Start by running water from your garden hose into the top of each downspout. If water backs up instead of flowing freely through the bottom, you’ve found a blockage.
For stubborn clogs, a plumber’s snake (also called a drain auger) works exceptionally well. Feed the snake into the downspout from either the top or bottom opening, rotating as you push to break up the blockage. Many homeowners report success using this method after water alone fails to clear the obstruction.
If the clog persists, try the hose method with increased pressure. Insert the hose into the downspout from the bottom and turn on full pressure. The upward force often dislodges debris that gravity-fed water cannot remove. For particularly difficult blockages, a pressure washer provides extra cleaning power, though use caution to avoid damaging older downspouts.
You’ll know you’ve succeeded when water flows freely from the bottom opening without backup. Test by running water through your gutters and watching for smooth, uninterrupted flow through each downspout. According to community feedback, this final water test prevents future surprises during the next rainfall.
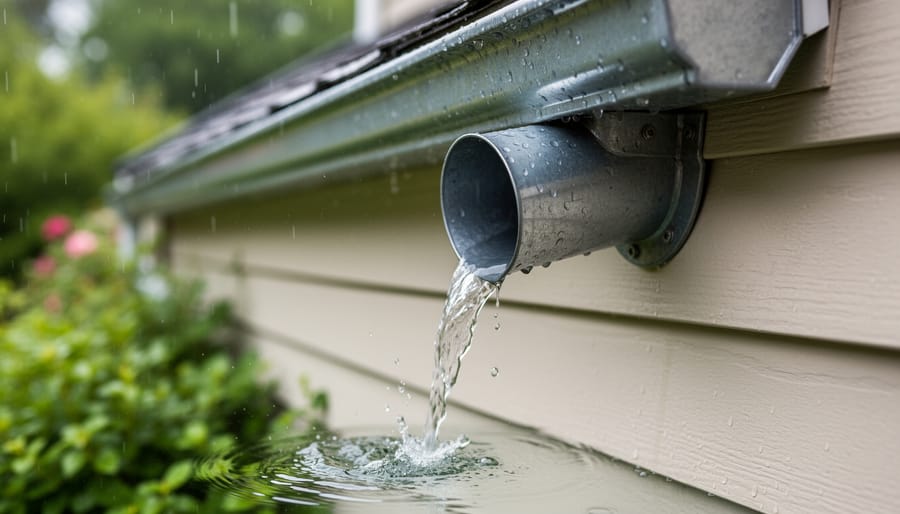
Step 4: Flush the System with Water
Once you’ve removed the bulk of debris, it’s time to test your gutters with water. Starting at the end farthest from the downspout, use a garden hose to flush the entire system. Begin with moderate water pressure and work your way toward the downspout, watching how water flows through the channels.
This step serves two purposes: removing any remaining small particles and identifying potential problems. Watch carefully as water moves through the gutters. Proper flow means water runs smoothly toward the downspout without pooling. If you notice standing water, you’ve likely found a sagging section that needs adjustment.
While the water runs, inspect for leaks at the seams and joints. Small drips indicate failing sealant, while larger streams suggest separated sections that need reattachment. Check that water exits cleanly through downspouts without backing up. A slow-draining downspout often means a clog further down that requires additional clearing.
Pay attention to how gutters handle the water volume. Any overflow at the edges signals improper pitch or overwhelmed sections. Many DIYers in our community recommend marking problem areas with tape while the system is wet, making repairs easier once everything dries. This testing phase prevents surprises during the next heavy rainfall.
Step 5: Inspect for Damage and Make Minor Repairs
Once your gutters are clean, take time to inspect them thoroughly. Check for loose fasteners (the brackets or spikes holding gutters to your fascia board) and tighten or replace them as needed. Look for separated joints where gutter sections meet—these can often be resealed with gutter sealant available at most hardware stores. Examine the entire system for rust spots, which can be wire-brushed and treated with rust-inhibiting primer, and small holes that you can patch with metal flashing and roofing cement.
These minor repairs are typically DIY-friendly and prevent bigger problems down the road. However, call a professional if you find extensive rust damage, large holes or cracks, significant sagging that suggests structural issues, or if downspouts are improperly draining near your foundation. Many homeowners in our community report that catching these issues early saved them from costly water damage repairs later. Document your findings and consider taking photos to track problem areas over time.
Common Mistakes That Make the Job Harder (or Dangerous)
Even experienced DIYers make mistakes when tackling gutter maintenance, and learning from others can help you avoid unnecessary risks or setbacks.
One of the most dangerous habits is overreaching while on the ladder. Community members consistently report near-misses from stretching too far to grab one more handful of debris instead of climbing down and repositioning. As one homeowner shared, “I thought I could just lean a bit more, and suddenly the ladder shifted. Never again.” The safest approach is to reposition your ladder frequently, even if it feels tedious.
Working in the wrong weather conditions ranks high among common errors. Wet gutters become slippery, and rain-soaked debris weighs more and sticks stubbornly. Several users reported that cleaning after a few dry days made the job dramatically easier and safer. Wind is equally problematic, as it can destabilize ladders and blow debris back into your face.
Skipping protective gear seems minor until you experience the consequences firsthand. Gloves protect against sharp metal edges, hidden nails, and decomposing organic matter that harbors bacteria. Safety glasses prevent debris from falling into your eyes when you’re looking upward. One community member learned this the hard way: “I got an eye infection from gutter muck. Those safety glasses are non-negotiable now.”
Finally, forgetting to secure your ladder properly creates avoidable hazards. Place it on level ground, use stabilizer arms if available, and have someone spot you when possible. Taking these extra minutes significantly reduces your risk of serious injury.
Time-Saving Tips from Professional Tradespeople
Professional tradespeople have refined their gutter cleaning process over thousands of jobs, and their techniques can cut your cleaning time in half. The most valuable tip is working with a partner—one person on the ladder handling debris while the other manages tools and moves the ladder saves countless trips up and down.
Before you even touch the ladder, lay a large tarp beneath your work area. This simple step means debris falls onto the tarp for easy disposal rather than scattering across your lawn and garden beds. One community member shared that using an old shower curtain works perfectly and folds up for storage afterward.
Organize all your tools within arm’s reach before climbing up. Use a bucket with a hook to hang from your ladder, keeping both hands free for cleaning. Many professionals recommend filling this bucket with your hand scoop, brush, and spray nozzle attachment before starting.
Timing matters too. Clean gutters when debris is slightly damp but not soaking wet—usually a day or two after light rain. Bone-dry leaves blow everywhere, while saturated debris becomes unnecessarily heavy. Early morning work also means cooler temperatures and better visibility.
A popular community hack involves using a leaf blower with a gutter attachment for initial debris removal, then following up with water to clear remaining residue. This two-step approach significantly reduces hands-on scrubbing time.
When to Rent Professional-Grade Equipment
For multi-story homes above two levels, seriously clogged downspouts, or gutters with compacted debris and tree root intrusion, professional-grade equipment can transform an impossible job into a manageable afternoon project. Renting a quality telescoping ladder system or gutter vacuum typically costs $40-$80 per day, compared to $200-$400 for professional cleaning services.
Community members consistently recommend wet/dry shop vacs with gutter attachments for ground-level cleaning of severely clogged systems. User Sarah M. from Portland notes, “The 12-gallon shop vac I rented saved my back and cleared 60 feet of packed leaves in under two hours.” For homes with multiple stories, telescoping pressure washer wands receive high marks, though users caution about potential shingle damage if pressure settings aren’t carefully monitored.
Consider rental equipment when dealing with ice dams, hardened sediment, or years of neglected buildup that standard tools can’t handle. Calculate your costs: if the rental plus your time equals or exceeds professional service fees, evaluate whether the learning experience and future savings justify the DIY approach. Many rental centers offer half-day rates, making cost-effective solutions even more accessible for straightforward cleaning projects.
Cleaning your own gutters is entirely manageable when you have the right tools and follow proper safety procedures. With a sturdy ladder, protective gloves, and basic cleaning equipment, most homeowners can tackle this essential maintenance task confidently. The key to success lies in establishing a regular maintenance schedule, ideally inspecting and cleaning gutters at least twice yearly or after severe weather events.
Remember that many specialized tools, from gutter scoops to pressure washers, are available for rental if you don’t want to invest in equipment you’ll use infrequently. This makes DIY gutter cleaning even more accessible and cost-effective.
Always prioritize safety by ensuring stable ladder placement, never overreaching, and working with a helper when possible. We’d love to hear about your gutter cleaning experiences and any tips you’ve discovered along the way. Share your insights with our community to help fellow DIY enthusiasts tackle their projects with confidence.
Related Posts

Post a Comment