
Interior sun shades for windows cut cooling costs by up to 33% while protecting furniture from UV damage that can fade fabrics in as little as six months. If you’re battling scorching afternoon glare, skyrocketing energy bills, or prematurely aging interiors, the right window treatment makes an immediate difference.
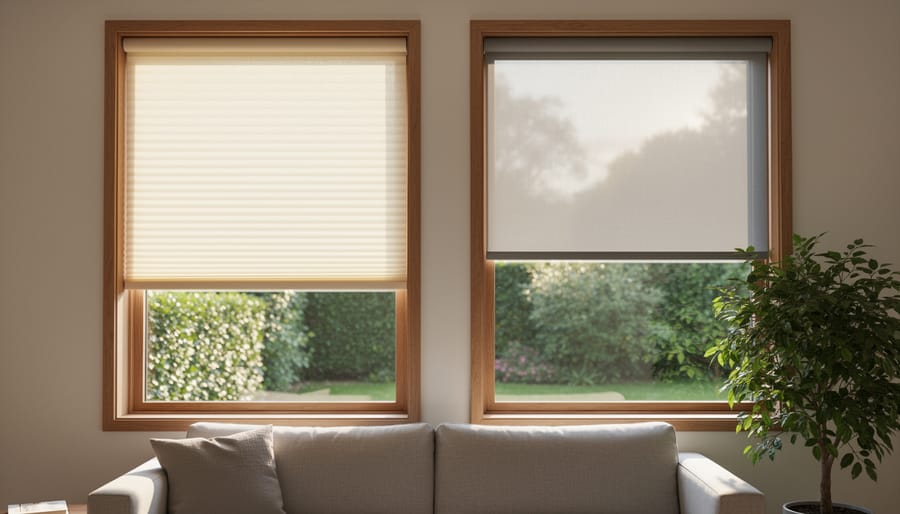
Choose cellular or honeycomb shades for maximum insulation—their air-pocket design traps heat in winter and blocks it in summer, creating a thermal barrier that reduces HVAC workload. Roller shades with solar screen fabric block 90-99% of UV rays while maintaining outward visibility, perfect for home offices where you need natural light without screen glare. Layer sheer shades behind blackout options for flexible light control throughout the day, adjusting opacity based on sun position.
Measure windows accurately before purchasing, accounting for inside-mount versus outside-mount installations—inside mounts sit within the window frame for a clean look, while outside mounts cover more surface area for superior light blocking. Most modern shade systems install with basic tools in under 30 minutes per window, requiring only a drill, level, and tape measure.
The investment pays for itself through reduced energy consumption, typically within 2-3 years, while immediately improving comfort and protecting furnishings worth thousands of dollars from irreversible sun damage.
Why Interior Sun Shades Matter More Than You Think
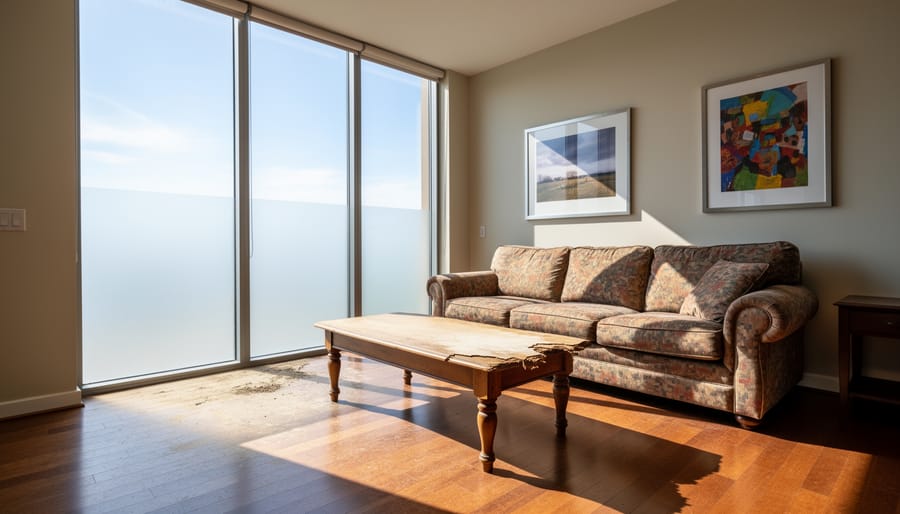
If you’ve noticed your favourite couch fading near the window or felt that afternoon heat blast when you walk into certain rooms, you’re experiencing exactly why interior sun shades matter. These aren’t just decorative window treatments—they’re solving real problems that cost Australian homeowners hundreds of dollars each year.
Start with UV damage. That streaming sunlight contains ultraviolet rays that bleach your furniture, carpet, and artwork over time. You might not notice it daily, but compare the colour of a rug under your dining table to the section near your window—the difference tells the story. Interior sun shades block up to 99% of harmful UV rays, helping protect furniture from sun damage without sacrificing natural light entirely.
Then there’s the heat issue. Windows account for 25-35% of residential heating and cooling energy use. When summer sun pours through untreated glass, your air conditioner works overtime. Many homeowners discover their cooling bills drop by 15-25% after installing quality sun shades. Before upgrading your cooling system, consider whether your windows are making it work harder than necessary.
Screen glare creates another daily frustration. Whether you’re working from home or trying to watch television, that bright reflection makes screens nearly impossible to see during certain hours. Sun shades eliminate this problem while maintaining your view outside.
Privacy matters too, especially for street-facing windows. Interior shades let you control visibility from outside without creating a dark, cave-like interior. You choose when you want openness and when you need seclusion—something standard curtains can’t always deliver effectively.
Types of Interior Sun Shades: Finding Your Best Match
Roller Shades and Solar Shades
Roller shades and solar shades are the go-to choice for DIY window treatments, offering excellent sun protection without requiring professional installation. These shades feature a simple roll-up mechanism that makes them easy to operate and install in under an hour per window.
The key to choosing the right shade lies in understanding fabric openness percentages. This measurement indicates how tightly woven the material is. A 1% openness provides maximum privacy and glare reduction while still allowing some natural light through. A 5% openness offers better outward visibility and a lighter feel, making it ideal for rooms where you want to maintain views. For complete darkness, opt for blackout roller shades, which are perfect for bedrooms and home theaters.
Solar shades specifically filter UV rays while reducing heat gain, helping lower your energy bills. Many homeowners report up to 15% savings on cooling costs after installation.
For installation, you’ll need a drill, level, measuring tape, pencil, and the included mounting brackets. Most roller shades come with inside or outside mount options, allowing flexibility based on your window frame depth. The brackets simply screw into place, and the shade clicks in securely. Community reviews consistently highlight how beginner-friendly these installations are, with most first-timers completing the job without issues.
Cellular (Honeycomb) Shades
Cellular shades, sometimes called honeycomb shades, feature a distinctive structure with air pockets that trap heat, making them champions of energy efficiency. The honeycomb design creates insulating barriers between your window and room, reducing heat transfer in both summer and winter. This dual benefit means lower energy bills while protecting your space from harsh sunlight.
You’ll encounter two main options: single cell and double cell. Single cell shades offer basic insulation and sun control at an affordable price point, typically featuring one layer of cells. Double cell shades add a second honeycomb layer, doubling the insulating power and providing superior energy efficiency. While they cost more upfront, many homeowners report noticeable reductions in heating and cooling costs.
Energy efficiency ratings vary by manufacturer, but look for shades with high R-values, which measure insulation effectiveness. Some models achieve R-values between 3 and 5, comparable to some wall insulation. Community reviews frequently highlight how these shades reduce room temperature by several degrees during peak summer hours while maintaining privacy and gentle, filtered light throughout your home.
Roman Shades and Woven Wood Shades
Roman shades and woven wood shades offer a softer, more decorative approach to sun control, but it’s important to understand their limitations. These fabric-based or natural material options add warmth and texture to your space while providing moderate light filtering and heat reduction. However, they typically block less heat than cellular or roller shades, making them better suited for windows that don’t receive intense direct sunlight.
Roman shades work well in living rooms and bedrooms where you want style combined with basic sun protection. The fabric folds create an elegant look when raised, though this stacking means they don’t completely disappear like some alternatives. Woven wood shades bring organic texture and work particularly well in casual spaces, but gaps between the natural fibers allow some light and heat penetration.
User feedback consistently highlights these as strong secondary options when aesthetics matter as much as function. They perform best on east or north-facing windows, or when layered with curtains for enhanced protection. For south or west-facing windows experiencing significant heat gain, consider pairing them with more efficient solutions or choosing them only if temperature control isn’t your primary concern.
Vertical Blinds and Panel Track Shades
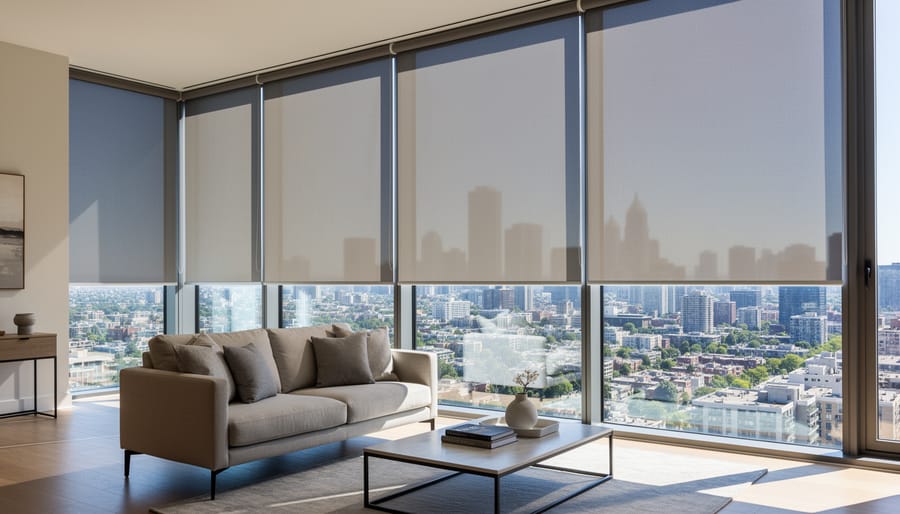
Vertical blinds and panel track shades excel at covering expansive areas like sliding glass doors, patio doors, and large picture windows. These systems feature individual slats or fabric panels that slide horizontally along a track, allowing you to control light from either side of the opening.
Vertical blinds typically use 3.5-inch slats made from vinyl, fabric, or faux wood that rotate to adjust light levels and stack neatly to one side when fully open. Panel tracks consist of wider fabric panels (usually 16 to 24 inches) that glide smoothly across the opening, making them ideal for modern aesthetics and floor-to-ceiling windows.
Installation considerations for these larger projects differ from standard window treatments. You’ll need to mount a sturdy headrail that can support the weight of multiple panels across wider spans. Check that your wall anchors or ceiling joists can handle the load, especially for installations spanning 8 feet or more. Measure carefully at multiple points since larger openings may have slight variations in height.
Community reviews highlight that vertical solutions work particularly well for rooms with frequent door access, as panels quickly stack away without obstructing pathways. However, some users note that vertical blinds require occasional realignment to keep slats tracking properly, while panel tracks generally need less maintenance but require more clearance space when stacked open.
Interior Shutters
For those seeking a more permanent solution than fabric blinds or cellular shades, interior plantation shutters offer exceptional durability and precise light control. These solid panels feature adjustable louvres that tilt to direct sunlight while maintaining privacy and ventilation. Constructed from wood, composite, or vinyl materials, shutters withstand daily use far better than most temporary options and can last decades with minimal maintenance. They’re particularly effective at blocking heat transfer when fully closed, complementing exterior window shading options for comprehensive temperature control. Installation requires accurate measuring and mounting hardware, with custom-fitted shutters providing the cleanest finish. While professional installation ensures proper alignment, experienced DIYers can tackle the project using basic tools. Community reviews consistently highlight their ability to increase property value and their timeless aesthetic appeal that suits various interior styles.
What to Look for When Choosing Interior Sun Shades
UV Protection Rating and Fabric Performance
Understanding fabric performance starts with the UPF rating, which measures how much UV radiation penetrates the material. UPF 15-24 offers good protection, blocking 93-95% of rays, while UPF 25-39 provides very good protection at 96-97%. Fabrics rated UPF 40-50+ deliver excellent protection, blocking 98% or more of harmful UV rays—comparable to what you’d want in quality outdoor clothing.
The openness factor is equally important but often confusing. This percentage indicates how much light passes through the weave. A 1% openness factor means the fabric is tightly woven with tiny holes, blocking 99% of direct light while still allowing some view. A 5% openness provides more visibility and airflow but less UV protection, while 10% offers maximum outward visibility with reduced blocking capability.
Darker fabrics generally perform better at absorbing UV rays, though modern solar screens use specialized coatings to enhance protection regardless of color. When shopping, look for products that clearly state both UPF rating and openness factor. Community reviews frequently mention that 3-5% openness strikes the best balance for most rooms—providing solid protection without making spaces feel cave-like while maintaining reasonable outward views.
Heat Reduction and Energy Efficiency
Interior sun shades can meaningfully reduce your cooling costs, though understanding the real numbers helps set proper expectations. Quality cellular or honeycomb shades typically offer R-values between 2 and 5, meaning they provide measurable insulation against heat transfer. For context, R-value measures thermal resistance—the higher the number, the better the insulation performance.
In practical terms, homeowners commonly see 15-25% reductions in cooling costs when using appropriate window shades, particularly on south and west-facing windows during peak summer months. Reflective or light-colored shades work best, bouncing solar radiation back outside before it converts to heat inside your home.
However, shades alone won’t eliminate cooling needs entirely. They work most effectively when combined with other strategies like proper ventilation and temporary cooling solutions during extreme heat events. Installing shades close to the glass maximizes efficiency by trapping the air pocket between shade and window, creating an additional insulation barrier. For DIY enthusiasts, this means paying attention to mounting hardware that minimizes gaps along the sides and bottom of your shades.
Light Control vs. Privacy vs. View
Choosing interior sun shades means balancing three key factors: light control, privacy, and outside view. Understanding this trade-off helps you select the right shade for each room’s purpose.
Sheer or light-filtering fabrics offer the best view preservation while softening harsh sunlight. They’re ideal for living rooms where you want natural brightness and outdoor connections, but they provide minimal privacy during daytime and virtually none at night with interior lights on.
Blackout shades deliver maximum light control and complete privacy, making them perfect for bedrooms and home theaters. The downside? You lose your view entirely when they’re closed, and the room becomes quite dark.
Room-darkening fabrics strike a middle ground, blocking significant light and glare while maintaining some view. These work well in home offices where you need to reduce screen glare but still want to see outside.
For spaces requiring flexibility, consider dual-shade systems or top-down/bottom-up styles that let you adjust coverage throughout the day. Many homeowners in our community recommend starting with light-filtering shades in shared spaces and blackout options in bedrooms, then adjusting based on actual use patterns rather than assumptions.
DIY Installation: What You Need to Know Before You Start
Tools and Materials Required
Installing interior sun shades requires minimal specialized equipment, making this an accessible DIY project for most homeowners. You’ll need a tape measure for accurate window measurements—precision here prevents costly ordering mistakes. A pencil marks drilling points on your wall or window frame. A spirit level ensures your brackets sit perfectly horizontal, preventing crooked shades that won’t operate smoothly.
For mounting, a cordless drill with appropriate drill bits handles most installations. Masonry bits are essential for brick or concrete surrounds, while standard twist bits work for wooden frames. A screwdriver set tightens bracket screws securely. Many hire shops stock quality drills if you don’t own one.
Depending on your shade type, you might need scissors or a utility knife for trimming fabric or cutting cords to length. A step ladder provides safe access to top-mounted brackets—never overreach from chairs. Some installations benefit from a stud finder, a handheld device that locates solid timber behind plasterboard for secure fixing points. Keep safety glasses handy when drilling overhead to protect against falling debris.
Measuring Your Windows Correctly
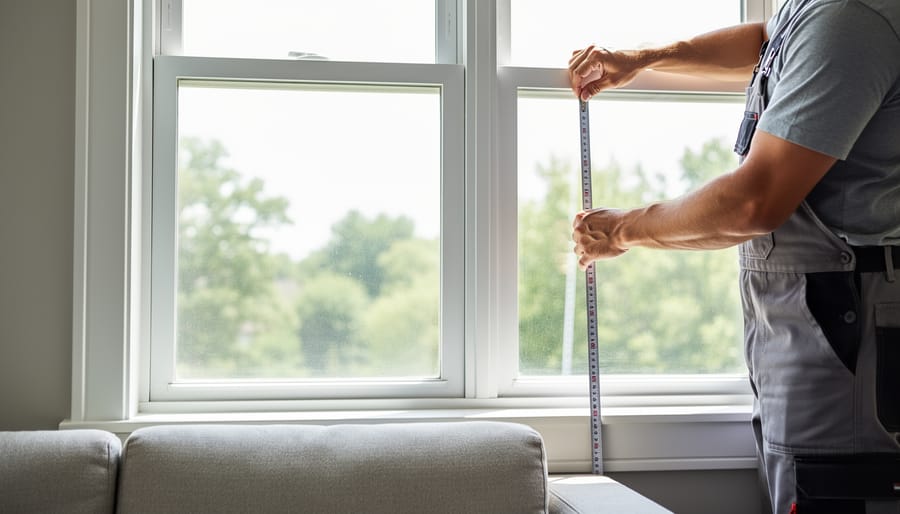
Getting accurate measurements is essential before purchasing your interior sun shades. Two mounting options exist: inside mount, where shades fit within the window frame, and outside mount, where they’re installed on the wall or frame exterior. Inside mounting creates a cleaner, built-in appearance but requires precise measurements since there’s minimal room for error.
For inside mounts, measure the window’s width and height at three points (top, middle, bottom for width; left, center, right for height). Record the smallest measurements to ensure proper fit. Outside mounts require measuring the area you want covered, typically adding 5-10cm beyond the frame on each side for optimal light blocking.
Common mistakes include measuring the window frame instead of the opening, failing to account for handles or locks that protrude, and rounding up measurements when you should round down for inside mounts. Our window installation guide offers additional measuring tips. Always double-check your measurements and consider ordering samples to test fit before committing to your final purchase.
Installation Difficulty by Shade Type
Not all window shades require the same level of installation skill. Roller shades and cellular shades top the DIY-friendly list—most homeowners can mount them with basic tools like a drill, level, and measuring tape in under 30 minutes per window. Vertical blinds fall into the moderate category; while the brackets install easily, getting the louvers aligned properly takes patience.
Roman shades present a challenge for beginners due to precise mounting requirements and fabric handling. Professional tradespeople note that customers often underestimate the complexity here. Solar screens require the most expertise, particularly for exterior mounting that involves removing existing window components and ensuring weathertight seals.
Community feedback consistently shows that inside-mount installations prove trickier than outside-mount options across all shade types. Tradespeople recommend customers consider professional installation when dealing with oversized windows (over 72 inches), unusual window shapes, or when replacing multiple windows throughout a home. The time saved and warranty protection often justify the cost, especially for higher-end materials.
Real User Experiences: What Works and What Doesn’t
We’ve gathered feedback from hundreds of homeowners who’ve tackled sun shade projects, and their experiences reveal valuable insights worth considering before you start your installation.
The standout winner among DIYers? Cellular shades consistently earn praise for their straightforward installation and immediate impact on room temperature. Sarah from Manchester notes: “I installed cordless cellular shades in my south-facing bedroom and saw a noticeable difference within days. The rooms stays cooler without cranking up the air conditioning.” However, several users warn that cheaper cellular options develop creases and lose their insulating properties within 18 months, so investing in quality pays off.
Roller shades generate mixed reviews. While praised for their sleek appearance and easy cleaning, multiple homeowners report frustration with motorized versions. James, a tradesperson, shares: “The motor failed after two years, and replacing it cost nearly as much as new shades. Stick with manual chain-operated if you’re budget-conscious.”
Roman shades receive love for aesthetics but complaints about maintenance. “They look gorgeous but collect dust like nobody’s business,” reports Lisa from Birmingham. “Factor in regular vacuuming or they’ll look dingy fast.”
The biggest lesson learned? Measure three times, order once. Nearly every respondent mentioned measurement errors causing delays and additional costs. Pro tip from the community: when measuring for inside-mount shades, check all four corners as window frames are rarely perfectly square.
Unexpected benefits mentioned include improved sleep quality with blackout options, reduced furniture fading, and lower energy bills averaging 15-20% according to users who monitored consumption. The consensus? Proper research and quality materials trump rushing into cheap solutions every time.
Maintenance and Longevity: Making Your Investment Last
Regular maintenance keeps your interior sun shades functioning effectively for years. The cleaning approach depends on your shade material. For fabric shades, vacuum weekly using a soft brush attachment to prevent dust buildup. Most fabrics tolerate spot cleaning with mild soap and water, but always test an inconspicuous area first. Roller shades with vinyl or polyester coatings simply need wiping with a damp cloth. Cellular shades require gentle care—compressed air works well for removing dust from their honeycomb structure without damaging delicate pleats.
Common issues are often DIY-fixable. If cords tangle or fray, replacement cord kits are available at hardware stores and typically cost under twenty dollars. Stiff mechanisms usually just need lubrication with silicone spray. One homeowner shared that cleaning the track channels with a vacuum and applying lubricant solved their stuck roller shade problem immediately. For motorized shades, check batteries before calling for repairs.
Knowing when to repair versus replace saves money. Minor issues like broken cords, loose brackets, or small tears justify repairs, especially on quality shades under five years old. However, significant fabric deterioration, warped materials, or obsolete mechanisms often mean replacement makes more financial sense. User feedback consistently shows that mid-range and premium shades lasting seven to fifteen years with proper care, while budget options typically need replacing after three to five years. Protecting shades from excessive moisture and avoiding harsh chemicals during cleaning significantly extends their lifespan, maximizing your initial investment.
Choosing the right interior sun shades for your windows is an investment that pays dividends in comfort, energy savings, and furniture protection. Whether you’re dealing with afternoon glare in your home office or fading upholstery in your living room, there’s a solution that matches your needs and budget. Take time to assess your specific requirements: consider the direction your windows face, your privacy needs, and whether you prefer light filtering or room darkening options. Don’t overlook the installation process either. Many shades are genuinely DIY-friendly, though measuring accurately is crucial for a proper fit.
We’d love to hear about your experience with sun shades. What challenges are you facing with sun exposure in your home? Have you installed window treatments yourself, or do you have tips to share with the community? Drop your questions and insights in the comments below. Your feedback helps fellow homeowners make better decisions and tackle their projects with confidence.
Related Posts

Post a Comment