
Turn off the water source immediately—whether it’s a burst pipe, leaking appliance, or overflowing fixture—to prevent further flooding. Remove standing water within the first 24-48 hours using a wet vacuum or submersible pump, as this critical window determines whether you’ll face simple cleanup or extensive mold remediation. Document all damage with photos and videos before touching anything for insurance purposes, capturing water lines on walls, damaged belongings, and the source of the leak.
Water damage escalates quickly, with mold growth beginning within 24 hours and structural issues developing as moisture seeps into flooring, drywall, and framing. The average homeowner faces costs ranging from minor fixes to thousands in restoration, but swift action significantly reduces both damage and expenses. Whether you’re dealing with a small leak or major flooding, understanding the proper sequence of assessment, extraction, drying, and restoration makes the difference between salvageable repairs and permanent loss.
This comprehensive water damage recovery guide walks you through each critical phase with clear, actionable steps. You’ll learn which professional-grade tools to rent for effective moisture removal, how to identify hidden water pockets that lead to long-term problems, and when DIY efforts should give way to professional assessment. Most importantly, you’ll discover proven techniques used by restoration professionals that are entirely accessible to homeowners equipped with the right tools and knowledge. Time matters tremendously in water damage situations—let’s get your home back to dry, safe conditions efficiently and affordably.
How Water Damage Starts (And Why You Need to Act Fast)
The 24-Hour Window: Why Time Matters
When water invades your home, the clock starts ticking immediately. Understanding this timeline helps you prioritize your response and prevent escalating damage.
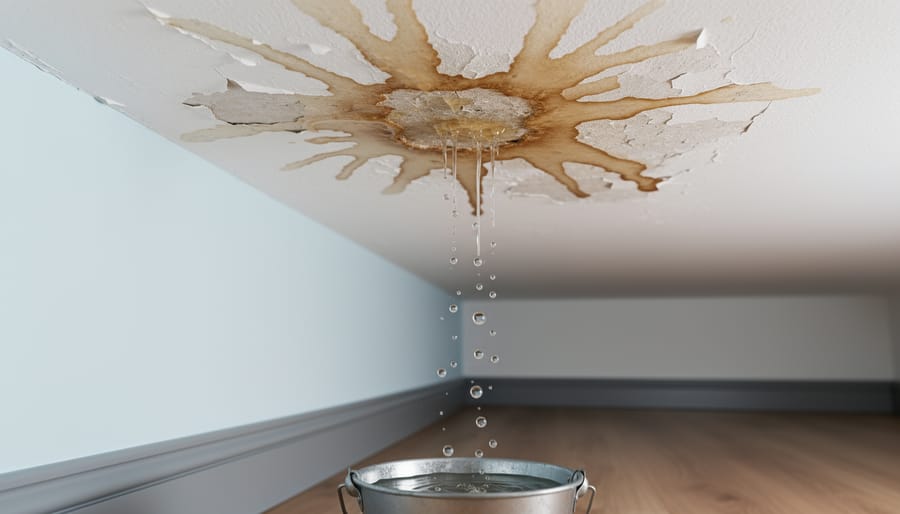
Within the first 24 hours, water begins breaking down materials like drywall and wood flooring. Furniture absorbs moisture, causing swelling and warping. Metal surfaces may start showing early signs of tarnish or rust. More concerning is what you can’t see—moisture seeping into wall cavities, under flooring, and into insulation.
The mold timeline is particularly critical. Mold spores, which exist naturally in every home, need only moisture and organic material to begin colonizing. While visible growth typically appears within 24-48 hours, the microscopic process starts much sooner. In as little as 12 hours under ideal conditions (warm temperatures and high humidity), spores can begin germinating.
This is why immediate action matters. Every hour of delay allows water to spread further into building materials, increases the likelihood of mold establishment, and raises your overall restoration costs. Professional restoration companies often cite the 24-hour mark as the dividing line between straightforward cleanup and more complex remediation requiring specialized equipment and techniques.
The good news? Taking prompt action within this window dramatically improves your outcome and can often prevent permanent damage to your home’s structure and belongings.
Warning Signs You’re Already Dealing With Water Damage
Catching water damage early can save you thousands in repairs and prevent serious health hazards. Here’s what to watch for in your home:
Start with a visual inspection. Water stains on ceilings, walls, or floors appear as discolored patches, often yellowish or brown. Check around windows, doors, and plumbing fixtures where leaks commonly originate. Peeling or bubbling paint and wallpaper signal moisture trapped beneath the surface.
Use your nose as a detection tool. A persistent musty or earthy odor, especially in basements, bathrooms, or crawl spaces, indicates mold growth from hidden moisture. Don’t ignore this warning sign, even if you can’t see visible damage.
Look for structural changes like warped floorboards, sagging ceilings, or soft spots in walls and floors. These indicate prolonged water exposure that’s compromising your home’s integrity.
Monitor indoor humidity levels. Condensation on windows, damp feeling air, or humidity consistently above 60% creates ideal conditions for water damage and mold growth. Consider renting a moisture meter to check suspect areas for hidden dampness.
Touch suspect surfaces. They may feel damp, cool, or spongy when water damage is present. Act quickly when you spot these signs to minimize damage and restoration costs.
Essential Tools for Water Damage Assessment and Removal
Detection and Assessment Tools
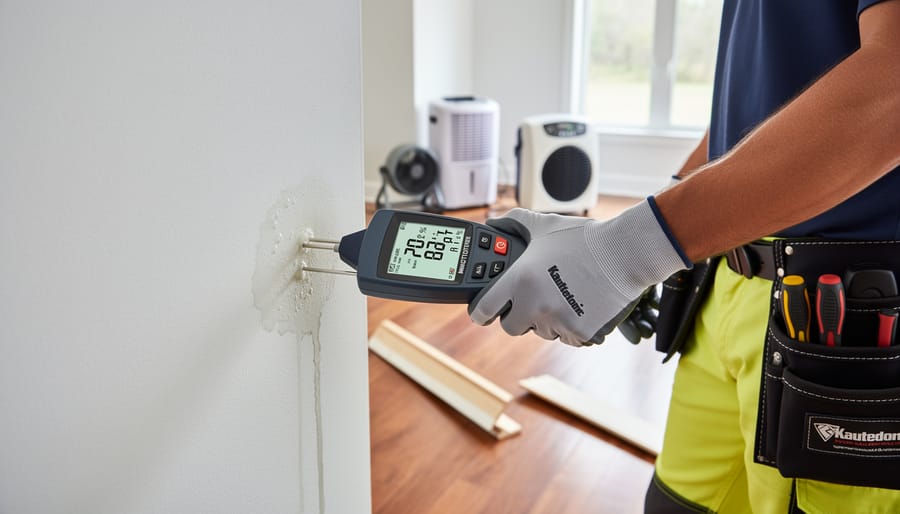
Identifying hidden water damage requires the right detection equipment. A moisture meter is your first line of defense—this handheld device measures water content in walls, floors, and ceilings by inserting pins into the material or scanning the surface. Look for readings above 15-20% moisture content, which typically indicates a problem requiring attention.
Thermal imaging cameras reveal temperature variations that signal moisture presence behind surfaces. These cameras create color-coded images showing cooler areas where water may be trapped, making them invaluable for detecting leaks you can’t see. Many tool rental centers now offer these professional-grade cameras at daily rates.
Hygrometers measure relative humidity levels in your home’s air. Normal indoor humidity should sit between 30-50%. Readings consistently above 60% create conditions for mold growth and suggest ongoing moisture issues.
These tools are available at most equipment rental shops, making professional-level assessment accessible without major investment. Community reviews consistently emphasize starting with a moisture meter for basic detection, then upgrading to thermal imaging for complex situations. Remember to document all readings with photos and notes—this information proves essential for insurance claims and helps restoration professionals develop effective treatment plans.
Water Extraction Equipment
When water invades your home, choosing the right extraction equipment can mean the difference between a quick cleanup and prolonged damage. Here’s what you need to know about each option.
Submersible pumps are your best choice for removing large volumes of standing water from basements, crawl spaces, or flooded rooms. These workhorses can pump hundreds of litres per minute and handle water depths from a few centimeters to several feet. Use them for major flooding situations where you need to clear significant water quickly.
Wet/dry vacuums excel at removing smaller water accumulations and are perfect for extracting water from carpets, upholstery, and hard-to-reach corners. They’re ideal for moderate water damage scenarios and offer the versatility to switch between wet and dry cleanup tasks. Most models hold 20-80 litres, making them manageable for most homeowners.
Water extractors (also called carpet extractors) are specialized machines designed specifically for removing water embedded deep within carpets and padding. They apply pressure while simultaneously extracting moisture, making them essential when carpets are salvageable. Use these after initial water removal to prevent mold growth in flooring materials.
For cost-effective access to this equipment, tool hire services offer significant advantages over purchasing. Local hire shops typically charge between $30-80 per day for submersible pumps and $20-50 for wet/dry vacuums, while water extractors run $40-100 daily. Many hardware chains and specialty rental companies stock these items, and booking ahead ensures availability during emergencies. Community reviews often highlight which local providers offer the best-maintained equipment and most helpful guidance.
Drying and Dehumidifying Tools
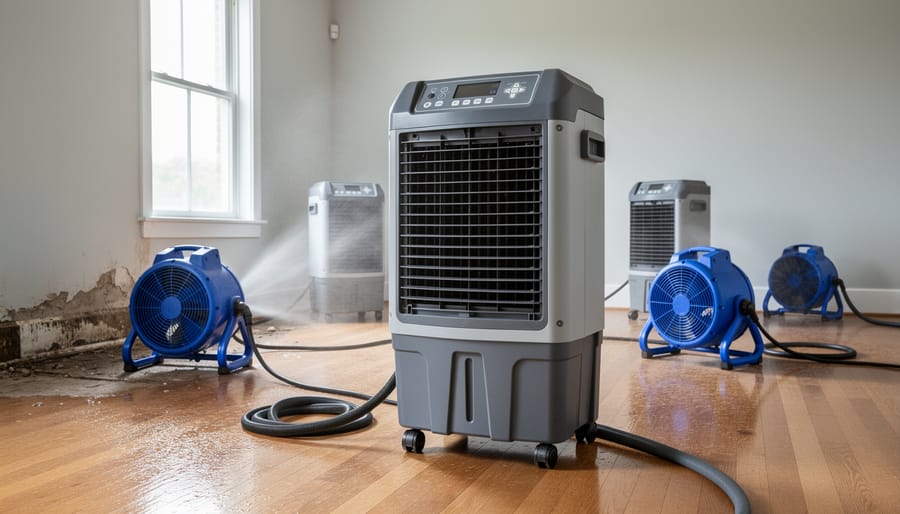
Getting water out of your home quickly is critical to preventing mold growth and structural damage. Industrial fans, also called air movers, create powerful airflow that speeds up evaporation significantly faster than household fans. Position these low-profile units at angles to create circular airflow patterns throughout affected rooms, directing moisture toward open windows or dehumidifiers.
Commercial dehumidifiers are essential partners to air movers. Unlike residential models that might remove 30-50 pints daily, rental-grade dehumidifiers extract 150+ pints per day. Place them in central locations with doors closed to maximize efficiency. Empty collection tanks every 4-6 hours, or connect drain hoses if available.
For typical basement flooding or burst pipe scenarios, plan on renting equipment for 3-5 days minimum. Severe cases may require 7-10 days. Monitor moisture levels with an inexpensive moisture meter, available at most hardware stores. Your goal is readings below 16% in wood and 4% in drywall.
Most rental centers offer daily or weekly rates, with weekly typically providing better value. According to community feedback, expect to pay around $50-80 daily for air movers and $75-100 for commercial dehumidifiers. Many homeowners recommend renting multiple air movers rather than just one for faster results. Run equipment continuously, checking progress daily until materials feel completely dry to the touch.
Step-by-Step Water Damage Cleanup Process
Step 1: Safety First – What to Check Before You Start
Before you begin any water cleanup, your safety must come first. Start by turning off electricity to affected areas at your circuit breaker—never enter standing water while power is still on, as this creates serious electrocution risk. If you can’t safely reach your electrical panel, call an electrician immediately.
Next, assess structural stability. Water damage can compromise floors, ceilings, and walls. Look for sagging, bulging, or visible cracks. If you notice any of these warning signs, evacuate and contact a structural engineer before proceeding.
Understanding water contamination categories is crucial. Category 1 is clean water from sources like broken supply lines. Category 2, or gray water, comes from appliances like dishwashers and may contain contaminants. Category 3, black water, includes sewage or flooding and poses serious health risks. For Categories 2 and 3, consider professional help.
Always wear protective equipment: waterproof boots, rubber gloves, safety goggles, and an N95 mask minimum. For black water situations, upgrade to full protective gear including coveralls. Document everything with photos for insurance purposes before starting cleanup. These precautions protect both your health and your home restoration success.
Step 2: Stop the Water Source
Before attempting cleanup, your top priority is stopping additional water from entering your home. If you’re dealing with a burst pipe, leaking appliance, or plumbing failure, locate your main water shutoff valve immediately. This valve is typically found near your water meter, in the basement, crawl space, or where the main line enters your home. Turn it clockwise until fully closed—you may need a wrench for corroded valves.
For smaller leaks, apply temporary fixes while you arrange permanent repairs. Plumber’s tape, pipe clamps, or even rubber patches secured with hose clamps can slow minor drips. Keep a bucket underneath to catch remaining water. If the source is a malfunctioning appliance like a washing machine or dishwasher, turn off its individual supply valve and unplug the unit.
During heavy rain or flooding, use sandbags or plastic sheeting to redirect water away from entry points. Clear gutters and downspouts to prevent overflow. If water is entering through your roof, place tarps or buckets strategically until professional repairs can be completed.
Remember, safety comes first—never attempt repairs near electrical panels or outlets without shutting off power to affected areas. These quick actions will minimize damage and give you breathing room to plan your next restoration steps.
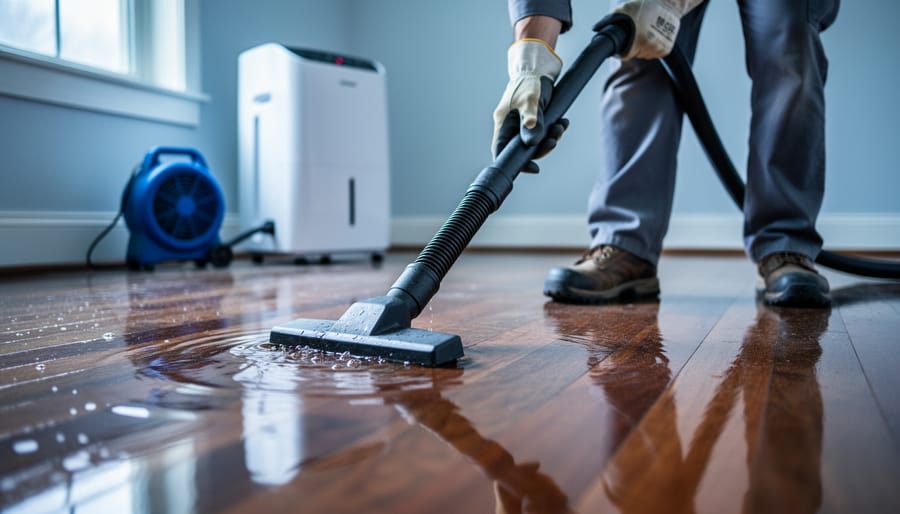
Step 3: Remove Standing Water
Once you’ve identified the source and ensured electrical safety, it’s time to remove standing water as quickly as possible. The faster you extract water, the less damage it will cause to your floors, walls, and belongings.
For shallow water (under 2 inches), a wet/dry vacuum works efficiently for most DIY cleanup jobs. These versatile machines can handle both water extraction and debris removal. For deeper flooding, consider renting a submersible pump, which can move hundreds of gallons per hour. Position the pump at the lowest point of the flooded area and direct the discharge hose away from your foundation to prevent water from seeping back inside.
Work systematically from one area to another, and remember that porous materials like carpets and padding will need multiple passes to extract absorbed water. As you work, take detailed photos and videos of the water level, damaged items, and your cleanup process. This documentation proves invaluable when filing insurance claims.
Dispose of extracted water properly by directing it to storm drains or appropriate drainage areas, never into areas where it could contaminate water supplies. Keep all receipts for equipment rentals and supplies, as many insurance policies cover these emergency mitigation costs. Community members recommend starting extraction within the first 24-48 hours to prevent mold growth and structural damage.
Step 4: Dry Out and Dehumidify
Once standing water is removed, proper drying is essential to prevent mold growth and structural damage. Position air movers (high-velocity fans) at 45-degree angles toward wet walls and floors to maximize airflow. Space them 10-15 feet apart for optimal circulation. Place dehumidifiers in central locations, ensuring they have adequate drainage access since they’ll collect significant moisture.
Create cross-ventilation by opening windows and doors when outdoor humidity is lower than indoor levels. If outside humidity is high, keep everything sealed and rely on mechanical dehumidification instead. Industrial-grade dehumidifiers available at rental centers can remove 10-20 times more moisture than household units, dramatically reducing drying time.
Monitor progress using a moisture meter, checking wall cavities, flooring, and structural materials twice daily. Record readings to track improvement. Drywall should read below 1% moisture content, while wood framing should drop below 16%.
Typical drying timeframes vary by materials: carpet padding takes 2-3 days, drywall 3-5 days, and hardwood flooring up to two weeks. Continue running equipment until moisture readings stabilize at normal levels for 24-48 hours. Don’t rush this process as premature equipment removal can allow moisture to redistribute, restarting the clock.
Step 5: Clean and Sanitize
Once the area is thoroughly dry, deep cleaning and sanitization become critical to prevent health hazards and mold growth. Start by applying antimicrobial treatments to all affected surfaces. These solutions kill bacteria and mold spores that thrive in damp conditions. You can rent commercial-grade foggers or sprayers from tool rental centers to ensure even coverage across large areas.
Assess each water-damaged item carefully. Porous materials like carpet padding, insulation, and drywall often cannot be salvaged if contaminated by Category 2 or 3 water (greywater or blackwater). Non-porous items like metal, plastic, and sealed wood can typically be cleaned and disinfected. When in doubt, prioritize safety over sentiment.
For salvageable items, use a combination of cleaning methods. Hard surfaces need scrubbing with disinfectant solutions, while fabrics may require professional cleaning or hot water washing. Having the right DIY renovation tools makes this process more manageable.
Apply EPA-registered antimicrobial products to walls, floors, and structural elements. Pay special attention to hidden spaces like wall cavities and under cabinets where moisture lingers. Document your cleaning process with photos for insurance purposes and monitor treated areas for several weeks to catch any emerging mold growth early.
Material-Specific Restoration Techniques
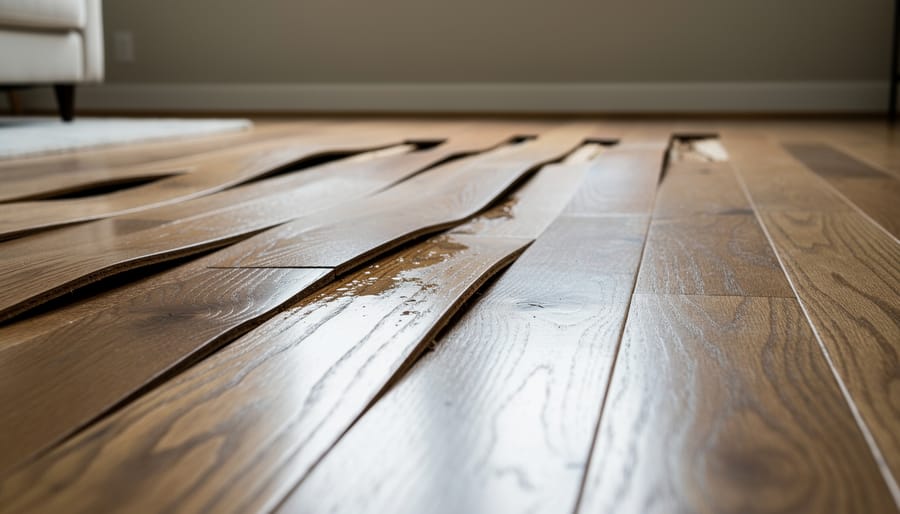
Hardwood Floors and Carpeting
Water-damaged flooring requires quick assessment to determine if it can be saved. For hardwood floors, act within 24-48 hours to prevent warping, cupping, and mold growth. If water hasn’t penetrated deeply and the boards remain structurally sound, specialized drying can save your investment. However, floors saturated for extended periods or showing significant warping typically need replacement.
Start by removing standing water with wet vacuums, then focus on extraction. Floor drying mats, available at tool rental centers, are game-changers for hardwood restoration. These specialized mats create a seal over the floor and draw moisture from beneath the surface using suction and airflow. Position them strategically across affected areas and run them continuously for 3-5 days, monitoring moisture levels with a moisture meter.
For carpeting, extract water immediately using commercial carpet extractors. Lift carpet edges to dry the padding underneath, as it holds significant moisture. If padding stays wet beyond 48 hours, replace it to prevent mold. Complement extraction with air movers and dehumidifiers to accelerate drying. Regular cleaning hardwood floors after restoration helps maintain their recovered condition and prevents residual damage.
Drywall, Insulation, and Ceiling Materials
Water-damaged drywall, insulation, and ceiling materials can’t simply dry out and remain safe. Once these porous materials absorb water, they become breeding grounds for mold within 24-48 hours and lose their structural integrity. Start by assessing the damage: press firmly on affected drywall to check for softness or crumbling, which indicates you’ll need to remove and replace these sections.
Before removal, protect yourself with N95 respirators, safety goggles, and gloves since damaged materials may contain mold spores or contaminants. Use a utility knife to score along studs and joists, creating clean removal lines. A reciprocating saw makes quick work of cutting larger sections, while a pry bar helps remove damaged material without affecting surrounding areas.
For insulation, anything that’s been wet must go. Fiberglass and cellulose insulation lose all R-value when saturated and won’t recover even after drying. Remove at least 12 inches beyond the visible water line, as moisture wicks horizontally through materials.
Disposal requires heavy-duty contractor bags rated for construction debris. Many communities have specific requirements for water-damaged building materials, so check local regulations. Rent a dumpster for larger projects to avoid multiple trips to disposal facilities, keeping your workspace safer and more efficient throughout the restoration process.
Personal Belongings and Furniture
Act quickly to protect your belongings after water damage. Start by photographing everything for insurance claims before moving items. Remove wet textiles, books, and documents to a dry area immediately—mould can develop within 24-48 hours. For important papers, freeze them in sealed bags to prevent further deterioration while you arrange professional document restoration.
Furniture requires careful attention. Wooden pieces should be dried slowly using fans and dehumidifiers rather than direct heat, which causes warping and cracking. Remove drawers and cushions, wiping surfaces with clean cloths. Upholstered furniture often needs professional assessment, especially if contaminated by sewage or floodwater.
Professional restoration services typically cost between $200-$500 for furniture pieces but become worthwhile for antiques, family heirlooms, or extensive damage. Commercial-grade air movers and dehumidifiers, available through rental services, can help you manage moderate damage independently. Once dried and restored, consider how you update your interiors with water-resistant materials to prevent future losses.
DIY vs. Professional Help: Making the Right Choice
Deciding whether to handle water damage yourself or call in professionals depends on three key factors: the extent of damage, the water source, and timing.
You can typically manage DIY cleanup when dealing with clean water (from supply lines or rain) affecting a small area under 10 square feet, discovered within 24-48 hours. These situations often require basic extraction tools, fans, and dehumidifiers available at rental centers. The cost savings can be substantial, with DIY projects ranging from $200-500 in equipment rentals versus $2,000-5,000 for professional services.
However, professional help becomes necessary for category 2 or 3 water (gray water from appliances or black water from sewage), structural damage, mold growth, or flooding that affects multiple rooms. Professionals have specialized moisture detection equipment, industrial-grade extractors, and antimicrobial treatments that aren’t readily available to homeowners. They also understand building codes and proper drying techniques that prevent long-term issues.
Insurance considerations play a crucial role in this decision. Most policies require immediate action to prevent further damage, but some insurers mandate professional remediation for claims over certain amounts. Always document everything with photos and keep receipts, whether you choose DIY or professional services. Contact your insurance company before starting work, as unauthorized DIY efforts might affect coverage.
A hybrid approach often works best: handle immediate water extraction yourself to prevent further damage, then consult professionals for assessment. Many restoration companies offer free inspections, helping you understand the scope before committing. If moisture meters reveal saturation beyond surface level or you detect musty odors within 72 hours, professional intervention prevents costly mistakes. Remember, improper drying creates hidden problems that multiply expenses later.
Preventing Future Water Damage
Regular Maintenance Checklist
Prevention truly is your best defense against costly water damage. Start by conducting seasonal inspections of your home’s vulnerable areas. Every spring and fall, examine your roof for damaged shingles, check gutters and downspouts for proper drainage, and inspect your basement or crawl space for moisture signs. Look for water stains on ceilings and walls that might indicate hidden leaks.
Appliance maintenance deserves regular attention too. Inspect washing machine hoses every six months for cracks or bulges, replacing them every five years regardless of appearance. Check the drain pan under your water heater annually and test the pressure relief valve. Clean refrigerator drip pans and examine ice maker connections for wear. Your dishwasher hoses and seals should also get periodic inspections.
Installing early warning systems gives you peace of mind and valuable response time. Water leak detectors are affordable monitoring devices that alert you to moisture before major damage occurs. Place them near water heaters, under sinks, behind washing machines, and in basements. Many models connect to smartphone apps, sending instant notifications even when you’re away. Some homeowners in our community recommend battery-powered models for areas without electrical outlets, while others prefer smart home-integrated systems for comprehensive monitoring.
Tools Worth Owning for Prevention
Investing in early detection equipment can save you thousands in repair costs. Water leak detectors are affordable game-changers, with basic models starting around $20. These battery-powered sensors sit near water heaters, under sinks, or by washing machines, sounding an alarm when moisture is detected. For comprehensive protection, consider smart water sensors that send alerts to your phone, typically priced between $40-80 each.
A moisture meter is another essential tool, costing $25-50, that helps you detect hidden dampness behind walls or under flooring before it becomes visible damage. This handheld device takes the guesswork out of assessing whether materials have fully dried after cleanup.
Every homeowner should also keep basic plumbing tools on hand: an adjustable wrench for tightening loose connections, pipe tape for minor leaks, and a basin wrench for hard-to-reach fixtures under sinks. These simple tools, totaling under $50, let you address small issues before they escalate.
For ongoing monitoring, automatic water shutoff valves provide ultimate protection. While pricier at $300-500 installed, they detect unusual flow patterns and shut off your main water line automatically, protecting your home even when you’re away. Many insurance companies offer discounts that help offset this investment.
Real Stories: How Homeowners Tackled Water Damage
When water flooded Sarah’s basement after a burst pipe, she acted quickly but learned some valuable lessons. “I rented an industrial wet/dry vacuum within the first hour,” she shares. “That decision saved my carpet padding and subflooring.” Her total equipment rental cost $85 for three days, which included the vacuum and two commercial fans. She avoided the $3,500 professional estimate by handling cleanup herself, though she recommends having a helper for moving furniture.
Mike from Portland faced a different challenge when his washing machine leaked overnight. “I didn’t realize water had seeped under the laminate flooring until I noticed soft spots a week later,” he explains. His biggest mistake was waiting. The delay meant replacing 200 square feet of flooring instead of just drying it out. His advice: use a moisture meter immediately, even if surfaces look dry. He rented one for $15 per day and wishes he’d done it sooner. Total damage cost him $1,200 in materials and tool rentals.
Jennifer’s story offers hope for renters. After a roof leak damaged her bedroom, she documented everything with photos and worked with her landlord to rent dehumidifiers and air movers. “The rental shop explained exactly how long to run each piece of equipment,” she notes. She spent $120 on rentals over five days but prevented mold growth that could have cost thousands.
The common thread in these stories: quick action, proper equipment, and thorough drying made the difference between manageable repairs and extensive damage. Each homeowner emphasized that renting professional-grade tools was more affordable and effective than using household fans and towels.
Water damage at home can feel overwhelming, but with the right approach, it’s absolutely manageable. As we’ve covered, quick action combined with proper knowledge makes all the difference between minor repairs and extensive restoration costs. The good news is that you don’t need to own expensive professional equipment to tackle water damage effectively.
Tool hire services put commercial-grade dehumidifiers, industrial fans, moisture meters, and extraction equipment within reach at a fraction of the purchase price. This means you can access the same tools professionals use without breaking the bank. Before renting, take advantage of community-driven reviews from people who’ve dealt with similar situations. Their real-world experiences can guide you toward the most effective equipment for your specific needs.
Remember, whether you’re a seasoned DIYer or handling your first emergency, you’re not alone in this process. Our platform connects you with both the tools and the collective wisdom of a community that’s been where you are. Act quickly, work systematically, and don’t hesitate to consult user feedback when choosing your equipment. With these resources at your fingertips, you’re well-equipped to restore your home and prevent future damage.
Related Posts

Post a Comment