
Check power tool air vents and motor housings every use for sawdust accumulation—a quick 30-second compressed air blast prevents overheating failures that sideline projects. Clean and lubricate hand tool pivot points monthly with a drop of machine oil to maintain smooth operation and prevent rust that degrades cutting precision. Inspect electrical cords before each session for fraying or exposed wires, replacing damaged cords immediately rather than risking shock or fire hazards.
Routine maintenance separates reliable equipment from costly replacements. Most tool failures stem not from heavy use but from neglected simple tasks that take minutes to complete. A circular saw maintained weekly lasts years longer than one cleaned annually. Battery-powered tools perform consistently when terminals are wiped clean monthly. Even basic wrenches and screwdrivers benefit from quarterly inspections that catch wear before it causes stripped fasteners or rounded bolt heads.
The maintenance approach depends on usage frequency and tool type. Professional contractors running equipment daily require different schedules than weekend DIYers, yet both follow the same fundamental principles: clean after use, lubricate moving parts regularly, store properly, and address minor issues before they escalate. This systematic approach costs little in time or money while delivering substantial returns through extended tool life, maintained performance, and avoided mid-project breakdowns.
Understanding what to maintain, when to perform specific tasks, and how long each takes transforms maintenance from overwhelming obligation into manageable habit. The following examples organize essential maintenance actions by frequency, providing realistic timeframes for implementation across common tool categories.
Why Most Tool Maintenance Schedules Fail (And How to Fix Yours)
Most maintenance schedules sound great on paper but gather dust in reality. The problem? They’re either too vague (“inspect regularly”) or impossibly detailed, turning a five-minute task into a dreaded chore. According to community feedback from professional contractors, nearly 60% admit they’ve skipped scheduled maintenance because the plan was unrealistic for their workflow.
The core issue is the difference between reactive and proactive maintenance. Reactive maintenance means fixing things after they break—replacing a burnt-out motor, sharpening a blade that’s already damaged your workpiece, or dealing with a corroded battery terminal that’s left you unable to start a job. Proactive maintenance involves simple, scheduled actions that prevent these failures entirely. One homeowner shared how ignoring a table saw’s alignment check for six months resulted in dangerous kickback and a $400 motor replacement that could have been prevented with a 10-minute quarterly inspection.
The real-world costs add up quickly. For DIYers, a failed drill mid-project means losing momentum and making emergency trips to rental shops or buying replacements. Professional tradespeople face harder consequences: lost billable hours, disappointed clients, and reputation damage. One electrician calculated that a single cordless drill failure cost him four hours of productivity and nearly $300 in lost revenue, while the preventive maintenance would have required just 15 minutes monthly.
Common schedule failures include setting unrealistic frequencies (daily tasks that really only need weekly attention), lacking specific action steps, and ignoring the actual usage patterns of your tools. A weekend warrior doesn’t need the same schedule as a full-time carpenter. The fix is creating a flexible, tiered system based on actual tool use rather than arbitrary timelines. Track when you actually use each tool, then build maintenance around those patterns. Start with just three high-priority items, master those habits, then expand your routine gradually.
Daily Maintenance: Quick Checks That Save Thousands
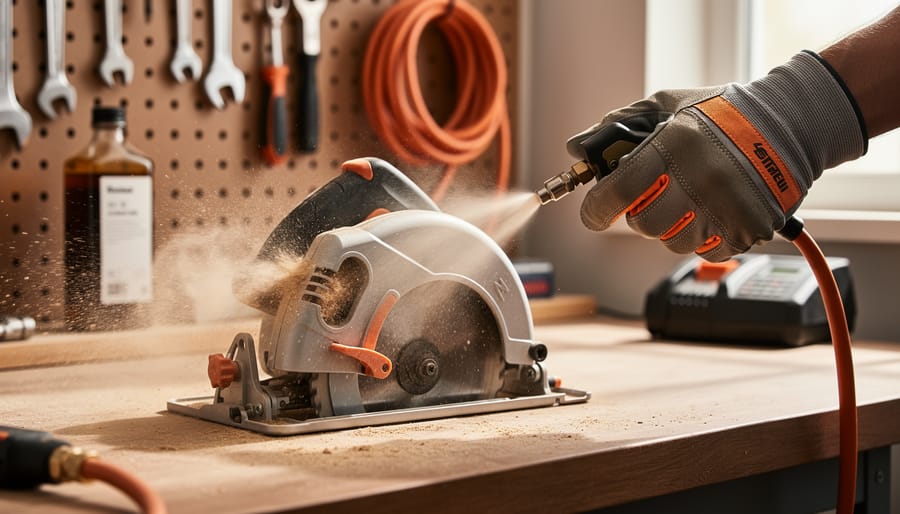
Power Tools: Post-Use Essentials
After each power tool session, spend five minutes on these post-use essentials to extend equipment life and maintain peak performance. Start by unplugging the tool and removing all dust and debris using a soft brush or compressed air—accumulated sawdust and particles can infiltrate motors and cause overheating. Pay special attention to ventilation slots where buildup restricts airflow.
Next, inspect the power cord from plug to tool body. Look for fraying, cuts, exposed wires, or damage to the plug itself. A compromised cord creates serious shock hazards and should be replaced immediately rather than taped. According to community feedback from professional contractors, cord damage is a leading cause of preventable tool failures.
Check bits, blades, and attachments for dullness, chips, or cracks. Dull cutting edges force motors to work harder, reducing efficiency and tool lifespan. Remove and clean these components, then store them separately in protective cases to prevent damage.
Finally, wipe down the tool body with a slightly damp cloth to remove residue, then store in a dry location away from temperature extremes. Hanging tools on pegboards or placing them in fitted cases prevents accidental drops and keeps dust off between uses. This two-minute storage routine dramatically reduces repair costs over time.
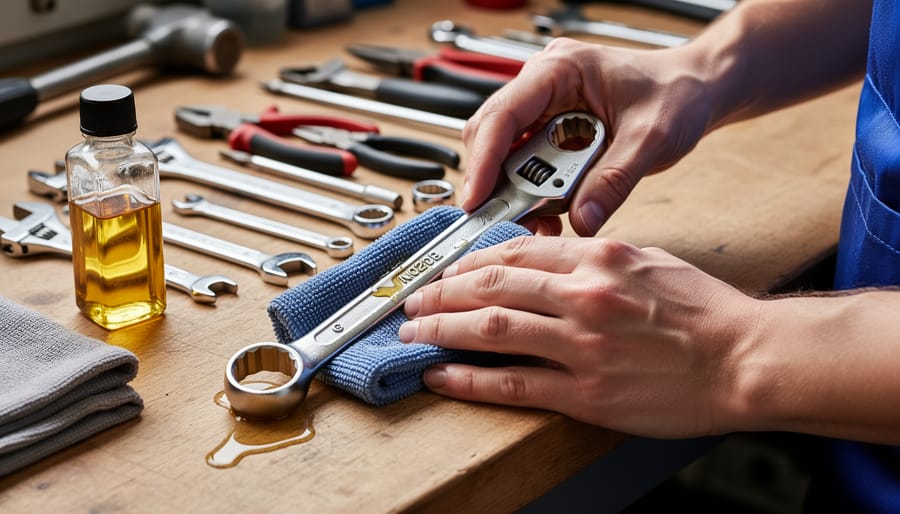
Hand Tools: The 5-Minute Wipe-Down Routine
After each use, invest just five minutes to protect your hand tools and extend their lifespan significantly. Start by wiping down each tool with a clean, dry cloth to remove moisture, sawdust, oil residue, and any accumulated debris. Pay special attention to joints and pivot points where moisture tends to hide.
Next, inspect metal surfaces for early signs of rust, which appears as orange or brown spots. If you catch rust early, remove it immediately with fine steel wool or a wire brush. For tools that passed inspection, apply a thin layer of protective oil using a clean rag—machine oil or specialized tool protectant works well. This creates a barrier against humidity and corrosion.
Check wooden handles for splinters or cracks that could cause injury during your next project. Sand rough spots smooth and treat dry wood with linseed oil periodically.
Finally, store tools in their designated spots where they won’t knock against each other. Hang cutting tools like saws and chisels to protect their edges, and keep frequently-used items within easy reach. Proper storage positioning prevents accidental damage and makes your next project start more efficiently.
Garden and Outdoor Equipment
After each use, remove dirt, grass clippings, and debris from lawn mowers, hedge trimmers, and other outdoor equipment using a stiff brush or compressed air. Caked-on material promotes rust and hides potential problems. Inspect cutting surfaces—mower blades should be sharp without nicks, while chainsaw chains need proper tension and sharp teeth. Check air filters monthly during heavy use; a clogged filter reduces power and increases fuel consumption. For gas-powered equipment, use fresh fuel and add stabilizer if storing for more than 30 days, as old fuel causes starting issues. Examine handles and guards for cracks that could compromise safety. Many professionals recommend keeping a maintenance log, especially if you’re renting equipment frequently—community reviews often mention how proper care extends rental value and prevents unexpected breakdowns during critical projects.
Weekly Maintenance Examples for Heavy-Use Tools
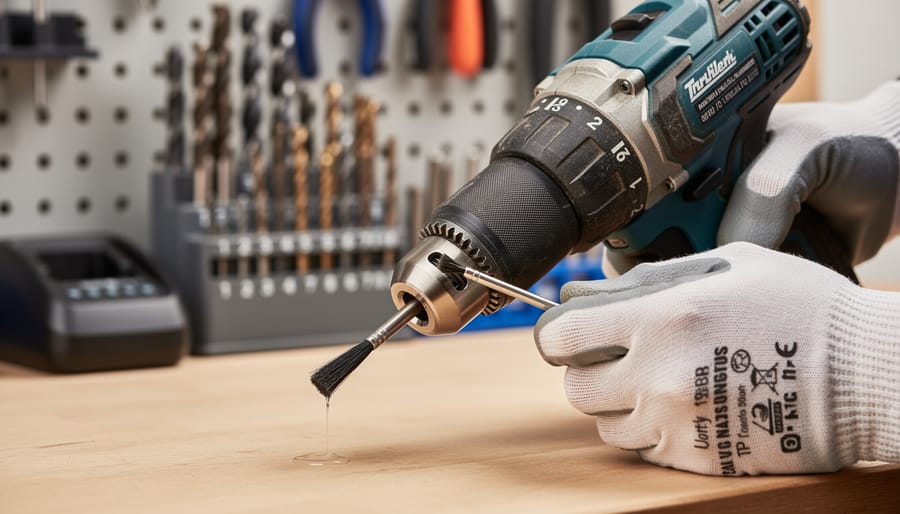
Cordless Drills and Impact Drivers
Your cordless drills and impact drivers need regular attention to maintain peak performance. Start by inspecting the chuck monthly—this is the part that holds drill bits in place. Remove any dust or debris with compressed air, then apply a single drop of machine oil to the chuck’s teeth. Rotate it by hand several times to distribute the lubricant evenly.
Battery health directly impacts runtime and tool longevity. Check battery contacts for corrosion or debris every few weeks, wiping them clean with a dry cloth. Store batteries at room temperature with a partial charge (around 40-50%) if you won’t use them for extended periods. Most users report in community reviews that proper battery storage extends their lifespan significantly.
Clean ventilation ports monthly using a soft brush or compressed air to prevent motor overheating. Blocked vents are a common cause of premature motor failure, according to professional tradespeople feedback.
Finally, verify your torque settings before major projects. Incorrect settings can strip screws or damage materials. Consult your manual to ensure the clutch engages at appropriate resistance levels, adjusting as needed for different applications.
Circular Saws and Angle Grinders
These high-speed power tools demand regular attention to prevent dangerous malfunctions. Start each session by inspecting the blade guard—it should move freely and snap back into position without sticking. A damaged guard is a serious safety hazard that needs immediate replacement before you make another cut.
Check the bearings by spinning the blade or disc by hand when the tool is unplugged. You should feel smooth rotation without grinding, wobbling, or excessive play. Rough movement indicates worn bearings that reduce cutting precision and increase motor strain.
Carbon brushes wear down with use and need inspection every three months for frequent users. Most circular saws and angle grinders have accessible brush caps you can unscrew. Replace brushes when they’re shorter than 1/4 inch—many professionals keep spare brushes in their toolbox to avoid downtime.
Test the safety switch monthly by ensuring the tool won’t start accidentally and stops immediately when released. A sticky or unresponsive switch compromises your control during operation. Community feedback consistently highlights that this simple check prevents countless injuries and extends tool life significantly.
Compressors and Pneumatic Tools
Air compressors require consistent attention to prevent moisture buildup and maintain optimal performance. Start by draining the moisture tank daily after use—simply open the drain valve at the tank’s bottom until water stops flowing. Accumulated moisture can cause rust and contaminate your air supply, leading to tool damage and reduced efficiency.
Weekly, inspect all hose connections for leaks by listening for hissing sounds or applying soapy water to joints and watching for bubbles. Tighten any loose fittings immediately, as air leaks waste energy and reduce tool performance. Check intake filters for dust accumulation and clean or replace them according to manufacturer specifications—a clogged filter forces your compressor to work harder and shortens its lifespan.
Monthly calibration of pressure gauges ensures accurate readings and safe operation. Compare your gauge against a known accurate reference gauge, and if readings differ by more than 5 PSI, replace the gauge. Community feedback consistently highlights that neglecting these simple tasks leads to premature compressor failure and costly repairs. Many users report extending equipment life by years through these basic practices, making this maintenance routine one of the most cost-effective investments you can make in your pneumatic tools.
Monthly Deep-Dive Maintenance Tasks
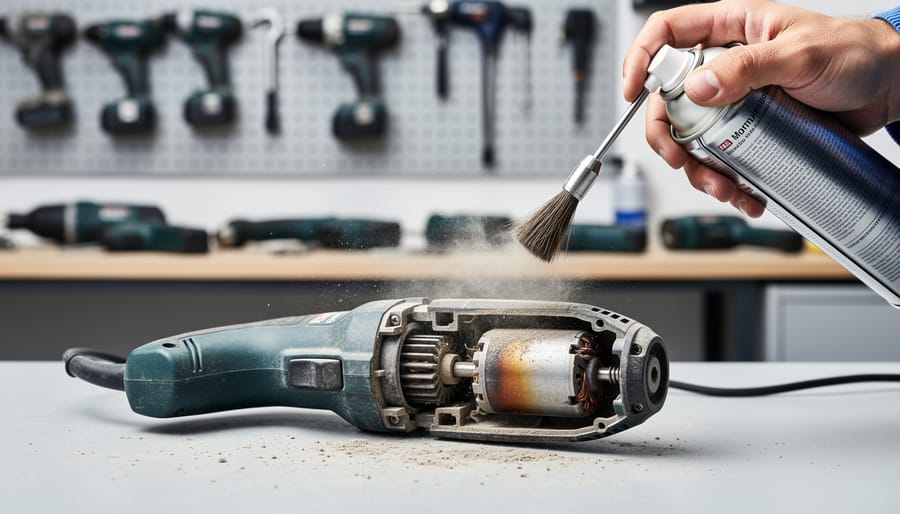
Power Tool Motors and Internal Components
Power tools work harder when their internal components receive regular attention. Every three months, unplug your tools and carefully open the casings following the manufacturer’s instructions. Use compressed air to blow out accumulated dust and debris from around the motor and fan blades, as buildup can cause overheating and reduced performance. Community members frequently report that this simple step extends motor life significantly.
Inspect moving parts like gears and bearings for signs of wear or damage. Apply a small amount of manufacturer-recommended lubricant to pivot points and gear assemblies, but avoid over-lubricating as excess grease attracts more dust. Check carbon brushes (the small blocks that contact the motor’s rotating parts) for wear—they should be replaced when they’re less than a quarter-inch long.
Don’t skip testing safety features like trigger locks, blade guards, and emergency stops during each inspection. These components protect you from injury, and worn springs or catches can fail when you need them most. Replace any cracked housings or damaged switch assemblies immediately. User reviews consistently emphasize that catching worn components early prevents costly repairs and dangerous malfunctions down the track.
Cutting and Shaping Tool Calibration
Keeping your cutting tools accurate prevents wasted materials and ensures safety. Start with alignment checks every month or whenever you notice irregular cuts. For table saws, use a combination square to verify the blade sits perpendicular to the table at exactly 90 degrees. Check that the miter gauge tracks parallel to the blade using a reliable straightedge. Miter saws need similar attention—confirm the blade drops straight and that preset angle stops (45 and 90 degrees) remain accurate.
Dull blades create dangerous kickback and poor results. Inspect cutting edges weekly during heavy use. Professional blade sharpening services restore precision better than DIY methods for carbide-tipped blades, though standard steel bits can be touched up with appropriate files. Replace blades showing missing teeth, warping, or excessive wear.
Fence systems drift over time. Monthly, verify your table saw fence remains parallel to the blade across its entire length—measure at both the front and back of the blade. Adjust according to your manufacturer’s instructions. Clean guide rails and lubricate moving parts to maintain smooth operation. Community members report that catching fence misalignment early prevents costly mistakes and extends tool life significantly.
Battery and Electrical System Health
Battery-powered tools require specific maintenance to maximize lifespan and performance. Start by understanding deep cycling—fully discharging and recharging batteries at least once per month prevents memory effect in older nickel-cadmium batteries and calibrates lithium-ion battery indicators. For daily-use tools, avoid leaving batteries on the charger continuously after they’ve reached full charge.
Clean battery contacts every two weeks using a dry cloth or pencil eraser to remove oxidation and debris that impede electrical flow. Inspect both the battery terminals and tool receptacle contacts. If you notice white or green buildup, use a cotton swab lightly dampened with rubbing alcohol.
Test charge retention quarterly by fully charging a battery, letting it sit unused for one week, then checking if it still powers your tool effectively. Significant power loss indicates battery degradation requiring replacement.
For smart tools with Bluetooth connectivity or digital displays, check manufacturer websites monthly for firmware updates. These updates often improve battery management systems and fix performance issues. Users in our community report that updating firmware resolved charging problems in several popular drill models, extending battery life by months.
Store batteries at 40-50% charge in cool, dry locations when not in use for extended periods to prevent capacity loss.
Seasonal Maintenance: Preparing Tools for Heavy Use or Storage
Pre-Season Equipment Prep
Before peak usage seasons—whether it’s spring landscaping, summer construction projects, or autumn cleanup—your equipment deserves a thorough once-over. This comprehensive check extends beyond your quarterly maintenance plan by focusing on anticipated workload demands.
Start with a visual inspection of all moving parts, looking for cracks, excessive wear, or loose components. Replace any parts showing 70% wear or damage rather than waiting for complete failure—this includes belts, blades, brushes, and seals. Test equipment under actual working conditions, not just idle operation, to identify performance issues that only appear under load.
Check all fluid levels and replace if they’ve been sitting idle during the off-season. Old fuel and oil can gum up engines and reduce lubrication effectiveness. Verify all safety features function properly—guards, emergency stops, and switches should respond instantly. Complete safety equipment verification including eye protection, gloves, and hearing protection before storing them with your tools.
Document your findings and create a replacement parts list. This proactive approach prevents mid-project breakdowns when rental availability is limited and your schedule is tight.
Winterizing and Long-Term Storage
When you’re putting tools away for the season or extended periods, proper winterization prevents costly repairs and ensures they’re ready when you need them again. Here’s how to protect your investment during storage.
Start with fuel stabilization for any gas-powered equipment. Add fuel stabilizer to a full tank of fresh gasoline, then run the engine for five minutes to circulate the mixture through the carburetor and fuel lines. This simple step prevents varnish buildup that can clog jets and make spring startups impossible. For equipment you won’t use for more than 30 days, this process takes just minutes but saves hours of troubleshooting later.
Remove batteries from cordless tools and store them at 40-50% charge in a cool, dry location between 50-77°F. Fully charged or completely drained batteries deteriorate faster during storage. Check battery charge every two months and top up if needed—many users report battery failure after winter simply from neglecting this step.
Apply a light coating of machine oil or rust preventative spray to metal surfaces, especially on blades, bits, and unpainted areas. Wipe away excess to avoid attracting dust. This creates a moisture barrier that prevents rust formation in humid conditions.
Climate-controlled storage is ideal, but if you’re using an unheated garage or shed, place silica gel packets or moisture absorbers near your tools. Avoid storing equipment directly on concrete floors—use shelving or pallets to prevent condensation damage. Cover tools with breathable fabric rather than plastic tarps, which trap moisture and accelerate corrosion.
Creating Your Personalized Maintenance Schedule
Tracking Tools and Usage Patterns
Keeping track of when your tools were last serviced helps prevent unexpected breakdowns and extends equipment life. The simplest analog method is a maintenance log notebook kept in your workshop—just jot down the date, tool name, and tasks completed. For each power tool, note the total runtime hours using a simple tally system or the built-in hour meter if available.
Digital options include smartphone apps designed for equipment tracking or basic spreadsheet templates where you can set automatic reminders. Many professionals photograph their tool’s hour meter monthly and store images in dated folders on their phones—a quick visual record that’s hard to dispute.
Identify high-priority items by considering three factors: frequency of use, replacement cost, and downtime impact. A table saw used daily in a professional shop demands more rigorous tracking than a specialty tool used quarterly. Tools critical to your income or project deadlines should top your maintenance priority list.
Community members report success with color-coded tag systems—attach colored zip ties to tools indicating their next service month. Others swear by the “first Sunday” rule: dedicating the first Sunday of each month to reviewing logs and completing scheduled maintenance. Choose whatever system you’ll actually stick with consistently, as the best tracking method is the one you use regularly.
Setting Realistic Maintenance Windows
The key to successful routine maintenance isn’t just knowing what to do—it’s creating a realistic schedule you’ll actually follow. Time-blocking transforms maintenance from an overwhelming burden into manageable chunks.
Start by assessing your tool inventory and grouping equipment by maintenance needs. For professionals, Monday mornings work well for quick inspections (10-15 minutes) before the workweek begins. DIY enthusiasts might prefer Saturday mornings when there’s no pressure to rush into projects. The crucial part is consistency, not perfection.
Batching similar tasks saves significant time and mental energy. Instead of cleaning tools individually throughout the month, designate one afternoon for all cleaning tasks. Group air filter changes, blade sharpening, and oil checks together since they often require similar supplies and workspace setup. This approach reduces the friction of starting maintenance tasks—you’re already in “maintenance mode” rather than switching mindsets repeatedly.
Seasonal planning templates help prevent forgotten tasks. Create a simple calendar:
Spring: Deep-clean outdoor power equipment, inspect cords and hoses after winter storage, service lawnmowers before heavy use.
Summer: Focus on cooling systems, check for heat-related wear, maintain air compressors working overtime.
Fall: Prepare equipment for storage, replace worn parts before they’re needed urgently, service heating tools.
Winter: Indoor tool maintenance, organize workshops, plan repairs during slower project periods.
Community feedback consistently shows that 30-minute weekly sessions plus quarterly deep-dives work better than sporadic marathon maintenance days. Start small—even 10 minutes weekly builds the habit that protects your investment.
When to Service vs. When to Replace: Making Smart Decisions
Not every problem requires a replacement. Understanding when maintenance is enough versus when it’s time to upgrade saves money and prevents frustration. Here’s how to make informed decisions about your tools.
Start with the 50% rule as your baseline framework. If repair costs exceed 50% of the replacement value for the same tool, replacement typically makes better financial sense. Factor in the tool’s age too—a two-year-old quality drill worth repairing differs from an eight-year-old model nearing obsolescence.
Watch for these warning signs that maintenance won’t solve your problem: frequent breakdowns requiring multiple repairs within six months, discontinued parts that are increasingly difficult to source, significant power loss that cleaning and standard maintenance don’t restore, or safety concerns like cracked housings or damaged guards that compromise user protection. Worn-out bearings producing excessive vibration, motors overheating despite proper ventilation, and visible frame cracks also signal it’s replacement time.
Consider your usage history before deciding. Tools used heavily for professional work wear faster than occasional DIY equipment. If you’ve pushed a consumer-grade tool into professional service, upgrading to commercial-grade equipment makes sense. Similarly, if you only need a tool occasionally, explore equipment rentals rather than purchasing replacements.
Document your maintenance history. Tools with consistent care records justify repair investments because you’ve already protected their longevity. Neglected tools with unknown service histories often hide additional problems that surface after initial repairs.
Community feedback provides valuable perspective. Check user reviews about specific model reliability and common failure points. Fellow users often share whether particular tools are worth repairing or known for cascade failures where one problem leads to multiple expensive repairs.
Community Tips: Real Users Share Their Maintenance Wins
We asked our Tool Hire community to share their best maintenance discoveries, and the response was overwhelming. Here’s what real users told us works in the field.
“I ignored cleaning my circular saw after every job for months,” admits Mike T., a deck builder from Bristol. “Cost me £180 in repairs when sawdust packed into the motor housing. Now I spend two minutes with compressed air after each use. Haven’t had an issue since.”
Sarah L., a weekend DIYer, swears by her maintenance calendar: “I set phone reminders for monthly checks. Sounds excessive, but I caught a frayed power cord on my angle grinder before it became dangerous. That five-minute inspection potentially saved me from injury.”
The community’s favorite maintenance product? White lithium grease, mentioned by 47% of respondents. “It’s brilliant for drill chucks and moving parts,” says contractor James P. “One tube lasts ages and prevents so much wear.”
Plumber Rachel M. shared her biggest lesson: “I learned the hard way that ‘waterproof’ tools still need drying. Left my impact driver in the van after a wet job, and moisture corroded the battery contacts. Now everything gets wiped down before storage, even if it takes an extra minute.”
The consensus? Small, consistent actions beat sporadic deep cleans. As Tom K. puts it: “Maintenance isn’t glamorous, but neither is hiring replacement tools mid-project because yours failed.”
Establishing a maintenance routine doesn’t have to be overwhelming. The key takeaway from these examples is that small, consistent efforts prevent costly repairs and unexpected downtime. A quick five-minute daily wipe-down and inspection can catch problems before they escalate, while dedicating just thirty minutes monthly for deeper cleaning and lubrication keeps tools performing like new for years.
Start simple rather than trying to implement everything at once. Choose one category of tools you use most frequently and build your maintenance habit around those first. Once that becomes second nature, gradually expand to other equipment. Remember, a weekend spent on preventive maintenance beats an entire week dealing with broken tools during a critical project.
Your experience matters to our community. What maintenance practices have saved you time and money? Have you discovered clever shortcuts or learned lessons the hard way? Share your own maintenance tips, tricks, and real-world experiences in the comments below. Your insights help fellow DIYers and professionals avoid common pitfalls and build better routines. Together, we can create a comprehensive resource that goes beyond the basics and reflects what actually works in real workshops and job sites.
Related Posts

Post a Comment