

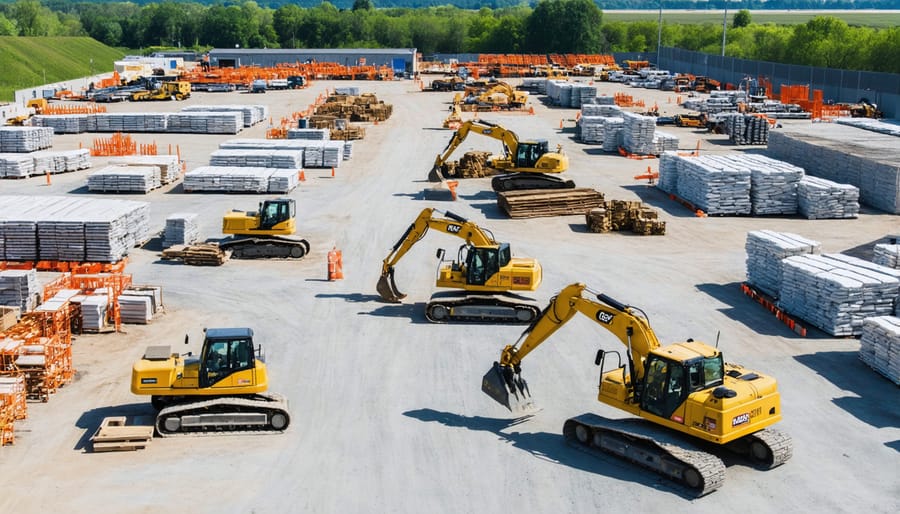
**Designate a flat, accessible zone near your construction site where materials, equipment, and prefabricated components can be systematically stored and staged.** A construction laydown yard—essentially your project’s outdoor warehouse—keeps expensive machinery protected, organizes deliveries chronologically based on installation schedules, and reduces costly delays caused by misplaced materials or cluttered work zones.
**Map your yard layout before breaking ground.** Divide the space into designated zones: heavy equipment parking closest to site access points, materials storage organized by trade sequence (foundations first, finishing materials last), and a clearly marked loading/unloading area that won’t bottleneck deliveries. Ground conditions matter—compact soil or lay gravel to prevent equipment from sinking and materials from water damage.
**Calculate space requirements using the 1.5x rule:** your laydown yard should occupy at least 150% of your estimated material footprint to account for access pathways, equipment maneuvering, and unexpected deliveries. For residential renovations, this might mean 500-1,000 square feet; commercial projects often require acres.
**Implement security and accountability systems from day one.** Fencing, adequate lighting, and check-in/check-out logs prevent theft and track material usage. High-value items and power tools should occupy the most visible, secure section. Weather protection—tarps, temporary structures, or elevated pallets—preserves material integrity and protects your investment.
**Success hinges on treating your laydown yard as a dynamic workspace, not passive storage.** Regular reorganization as project phases progress keeps workflows efficient and safety hazards minimized.
What Exactly Is a Construction Laydown Yard?
A construction laydown yard is a designated staging area where materials, equipment, and tools are temporarily stored and organized during a project. Think of it as your project’s command center—a dedicated space where everything you need lives until it’s ready to be deployed on-site.
Unlike general storage areas that simply warehouse items long-term, a laydown yard is dynamic and strategic. It’s specifically designed for active projects, with materials arranged for easy access based on when they’ll be needed. The yard serves as a buffer zone between suppliers and your work site, allowing you to receive deliveries, inspect materials, and coordinate logistics without disrupting active construction.
For large commercial projects, laydown yards can span several acres and accommodate heavy machinery, steel beams, prefabricated components, and construction vehicles. These spaces often include temporary fencing, security lighting, and designated zones for different material types. On major infrastructure projects, you might see separate areas for electrical equipment, plumbing supplies, and heavy structural components.
However, laydown yards aren’t just for massive developments. Even smaller residential renovations benefit from this concept. If you’re tackling a home addition or major remodel, your driveway or a corner of your property can function as a mini laydown yard. Here you’d stage lumber deliveries, organize rental equipment like scaffolding or concrete mixers, and keep materials protected from weather until installation day.
The key difference? A laydown yard is actively managed with project timelines in mind. Materials are positioned strategically—what you need first stays most accessible, while later-phase items are stored toward the back. This organized approach reduces handling time, minimizes material damage, and keeps your project flowing smoothly.
Why Laydown Yards Matter for Load Handling
Reducing Equipment Movement and Double Handling
Smart placement of materials in your laydown yard directly impacts project efficiency. Every time you move equipment or materials, you’re spending labor hours and increasing the risk of damage. The solution? Think through your material flow before anything arrives on site.
Position frequently-used items near access points and workspace areas to minimize transport distances. For example, place scaffolding components close to where they’ll be erected rather than at the far end of your yard. Heavy materials that require lifting equipment should be stored along clear pathways wide enough for machinery to maneuver safely.
Group related materials together—keeping all your electrical supplies in one zone and plumbing materials in another prevents unnecessary back-and-forth trips. This also helps crews quickly locate what they need without searching multiple areas.
Consider the project timeline when organizing your space. Materials needed in the early construction phases should be most accessible, while items for later stages can sit further back. As work progresses, reorganize your yard to maintain this logical flow.
Creating designated zones with clear markings and maintaining updated inventory lists helps everyone understand where items belong, reducing confusion and duplicate handling. This systematic approach saves time, reduces material damage from excessive movement, and keeps your project running smoothly.
Safety Benefits of Organized Material Staging
A well-organized laydown yard dramatically reduces workplace accidents and creates a safer environment for everyone on site. When materials are properly staged, you’ll establish clear pathways between storage zones, eliminating the confusion and congestion that lead to incidents. Workers can move confidently through designated walkways without navigating obstacle courses of scattered equipment.
Proper organization minimizes tripping hazards by keeping materials stacked neatly and securing loose items that could shift underfoot. Ground-level storage should be clearly marked with safety and visibility indicators, especially in areas with heavy foot traffic or equipment movement.
Weight distribution becomes manageable when you designate specific zones for heavy materials. This prevents ground collapse, trailer overloading, and unstable stacks that could topple onto workers. Implementing a systematic layout means heavier items sit on reinforced surfaces while lighter materials occupy standard areas.
Controlled access zones around heavy equipment protect inexperienced workers from dangerous machinery. By creating physical barriers or designated operator-only areas, you reduce unauthorized equipment use and accidental contact with moving machinery. This segregation also allows skilled operators to work efficiently without constantly monitoring for pedestrians entering their workspace.
Protecting Your Hired Equipment and Materials
A well-organized laydown yard acts as your first line of defense for protecting hired equipment and materials. When rental tools and machinery sit exposed without proper planning, you’re risking costly damage from weather, theft, and accidental impacts—expenses that often fall on you, the renter.
Start by designating covered areas or tarped zones for weather-sensitive equipment like power tools and electrical generators. Position heavier machinery on firm, level ground to prevent tipping or sinking into mud. Create clear pathways between stored items to reduce the risk of accidental collisions during movement.
Security matters too. Keep high-value rental equipment in well-lit areas visible from site offices, and consider temporary fencing for overnight protection. Many hire companies require photographic evidence of proper storage conditions—taking these precautions protects both your deposit and your project timeline.
According to community feedback from contractors, organizing your laydown yard by equipment type and project phase makes daily checks easier, helping you spot potential damage early before minor issues become major insurance claims.
Planning Your Laydown Yard: The Essential Steps
Assessing Your Space Requirements
Calculating your laydown yard space starts with understanding three key factors: project duration, material volume, and equipment footprint.
**Basic Space Formula:**
Total area needed = (Material storage × 1.5) + Equipment parking + Access corridors
The 1.5 multiplier accounts for safe spacing and maneuvering room—a critical safety consideration often overlooked by first-timers.
**Real-World Example:**
For a two-story home addition, you might need:
– Lumber and materials: 400 sq ft
– Scaffolding and tools: 200 sq ft
– Vehicle turning radius: 300 sq ft
– Safety buffers (×1.5): 450 sq ft additional
**Total: approximately 1,350 square feet**
Consider vertical storage options like material racks to reduce your footprint by 20-30%. Community feedback from experienced contractors suggests always adding 15% extra capacity for unexpected deliveries or scope changes.
**Pro Tip:** Walk your intended space with measuring tape and spray paint. Mark out major equipment locations before materials arrive. This hands-on approach, recommended by numerous DIY community members, prevents costly repositioning later. Remember, inadequate space leads to double-handling materials—wasting both time and money while increasing injury risk.
Choosing the Right Location
Selecting the right spot for your laydown yard can make or break your project’s efficiency. Start by considering **proximity to the work area**—the closer your materials are to where you’re actually building, the less time and fuel you’ll waste on transport. However, don’t sacrifice other critical factors for a few saved metres.
**Ground conditions** are equally vital. Your laydown area needs stable, level ground that can support heavy materials and equipment without sinking or becoming muddy. Poor drainage turns yards into swamps after rain, damaging materials and creating safety hazards. Look for naturally well-draining areas or plan to add gravel or crushed stone as a base layer.
**Access matters enormously**. Delivery trucks need clear routes in and out without tight turns or low-hanging obstacles. Measure gateway widths and check overhead clearances before committing to a location.
For **large commercial sites**, you’ll have more flexibility to designate specific zones for different materials. On **constrained residential properties**, get creative—consider using your driveway, arranging for temporary street permits, or coordinating just-in-time deliveries to minimize storage needs.
Finally, don’t overlook **security**. Fencing, lighting, and visibility from nearby buildings help deter theft and vandalism of valuable materials and equipment.
Zoning Your Laydown Yard
A well-organized laydown yard functions like a well-organized toolbox—everything has its place, and you can find what you need quickly. Start by dividing your space into clear zones based on how you’ll use materials and equipment.
Create a **heavy equipment zone** near your site entrance for machinery like excavators and loaders. This allows easy access for deliveries and transport without crossing through other work areas. Position your **material storage zones** by type: lumber in one area, concrete supplies in another, and metal materials separate from moisture-sensitive items.
Designate a **hazardous materials zone** (fuels, chemicals, paints) away from ignition sources and high-traffic areas. This space needs proper containment, clear signage, and restricted access—safety regulations require it, and your insurance will thank you.
Place **high-turnover items**—tools and supplies you use daily—closest to your work site. Think of this as your “hot zone” where accessibility trumps long-term storage.
Use simple visual markers like painted lines, cones, or barriers to define boundaries. Label each zone clearly so everyone on your team knows where materials belong. This system reduces search time, prevents material damage, and keeps your project moving efficiently.
Ground Preparation and Surface Considerations
Ground stability determines whether your laydown yard functions smoothly or becomes a muddy liability. For **temporary setups** lasting under six months, ground protection mats (also called access mats or rig mats) offer quick installation over existing soil. These interlocking panels distribute weight and prevent rutting without permanent site alteration—ideal for rental equipment staging.
**Short-term yards** (6-12 months) typically need a compacted gravel base, usually 4-6 inches of crushed stone, to handle heavy loads and drainage. This prevents equipment from sinking during wet conditions while remaining cost-effective.
**Permanent laydown yards** warrant paved surfaces—asphalt or concrete—for maximum durability and cleanliness. While initially expensive, paving eliminates dust, improves safety, and reduces long-term maintenance.
**Ground stabilization becomes critical** when you’re working with clay soils, high water tables, or expect heavy equipment traffic. Signs you need stabilization include visible rutting, standing water, or difficulty maneuvering loaded vehicles. Always assess soil bearing capacity before placing heavy materials—consulting a geotechnical engineer for large projects prevents costly surprises and ensures your staging area supports operational demands safely.
Load Handling Equipment for Laydown Yards

Forklifts and Telehandlers
Forklifts and telehandlers become essential when your laydown yard handles palletised materials, heavy equipment, or needs to stack supplies vertically to maximise space. Forklifts excel on flat, paved surfaces and are ideal for loading/unloading trucks, while telehandlers (reach forklifts) offer extended boom reach—perfect for placing materials at height or accessing tight spots on uneven ground.
When renting lifting equipment, expect daily rates from $200-$400 for standard forklifts, whilst telehandlers typically cost $300-$600 daily depending on lift capacity and reach. Tool rental costs decrease significantly with weekly or monthly bookings.
**Operator requirements matter**: Most jurisdictions require formal certification (forklift licence) to operate these machines legally. DIYers should factor in training costs and time, or hire a qualified operator alongside the equipment. Professional contractors often have licensed operators on staff, making these machines more cost-effective for commercial projects.
**Practical tip**: For smaller residential projects, consider whether manual pallet jacks or hiring labourers might be more economical than forklift rental plus operator certification.
Cranes and Lifting Equipment
Selecting the right lifting equipment for your laydown yard depends on your project scope and material handling needs. **Mobile cranes** offer flexibility for moving loads across the yard and positioning materials precisely, while **tower cranes** work best for vertical lifts on multi-story projects with fixed staging areas. **Rough terrain cranes** excel in unpaved or uneven yards, a common scenario for developing sites.
Safety should drive every lifting decision. Ensure adequate clearance from power lines, establish exclusion zones around operating cranes, and verify ground conditions can support the crane’s outriggers and load weight. All lifts require proper rigging, load calculations, and clear communication protocols.
**When deciding between operator hire versus equipment-only rental**, consider these factors: Operated crane hire includes certified professionals who understand load charts and safety requirements—essential if your team lacks lifting experience. Equipment-only rental costs less but requires you to provide qualified operators with current certifications. For occasional lifts, operated hire typically proves more cost-effective and safer. Frequent material handling may justify investing in operator training and equipment rental. Always verify insurance coverage regardless of your choice, as lifting operations carry significant liability risks.
Manual Handling Tools and Smaller Equipment
Not every material handling challenge in your laydown yard requires heavy machinery. For smaller projects or confined spaces, manual handling tools offer practical, cost-effective solutions that significantly improve safety and efficiency.
**Pallet jacks** are workhorses for moving palletized materials like bagged cement, bricks, or packaged supplies. These wheeled tools let one person safely transport loads up to 2,500kg across level ground—far better than attempting manual lifting that risks back injury. Hand-operated models are simple to use and don’t require fuel or charging.
**Trolleys and dollies** provide versatile load support for awkward items. Platform trolleys handle sheet materials, while sack trucks excel at moving stacked boxes or smaller equipment. Choose models with pneumatic wheels for rough yard surfaces.
**Load straps and securing devices** prevent materials from shifting during movement. Ratchet straps are essential when moving items on trolleys or temporarily securing stacked materials.
**Wheelbarrows and dump carts** remain invaluable for loose materials and waste removal. Modern models with dual wheels offer better stability on uneven ground.
These manual aids reduce worker fatigue, minimize injury risk, and speed up material positioning. Many hire centres offer daily or weekly rentals, making them accessible even for short-term projects. Community members often report that investing in quality manual handling tools pays off quickly through improved productivity and fewer strain-related incidents.
Best Practices for Laydown Yard Operations
Material Labeling and Inventory Systems
Keeping track of materials prevents costly delays and duplicate orders. Start with **basic signage**—waterproof tags or spray-painted labels identifying material types, delivery dates, and project phases. Color-code areas using simple systems: blue for plumbing supplies, red for electrical, yellow for lumber.
For rental equipment, maintain a **written log** noting arrival dates, condition reports, and scheduled return dates. This prevents expensive late fees and helps you track what’s been returned.
**Digital solutions** make tracking easier for larger projects. Free apps like Google Sheets work well for basic inventory lists that crews can update from their phones. Purpose-built construction management apps like Sortly or AssetPanda offer barcode scanning and photo documentation.
**User tip from the community**: Take smartphone photos of material stacks and equipment daily. It creates a visual record that’s invaluable for insurance claims and settling delivery disputes.
Whichever system you choose, consistency matters more than complexity—a simple system everyone actually uses beats a sophisticated one that gets ignored.
Access Control and Security
Securing your laydown yard protects expensive rental equipment and materials from theft, vandalism, and unauthorized access. For smaller residential projects, basic measures like temporary fencing and motion-sensor lighting may suffice, while commercial sites typically require more robust solutions.
Start with perimeter fencing—chain-link or solid panels work well depending on visibility needs. Install adequate lighting to eliminate dark spots where intruders might hide, focusing on entry points and high-value storage areas. Clear signage indicating “Private Property” and “24-Hour Surveillance” (if applicable) serves as an effective deterrent.
Implement access control appropriate to your project scale. For DIY projects, a simple padlock and gate may be enough. Larger sites benefit from logged entry systems or security personnel during off-hours. Consider designating a single entry/exit point to monitor traffic flow effectively.
Keep a detailed inventory of all equipment and materials, including rental items. This helps track what’s on-site and quickly identify missing items. Many equipment rental companies appreciate clients who take security seriously—it may even influence your rental rates or deposit requirements.
Maintenance and Housekeeping
Keeping your laydown yard organized and safe requires consistent attention. Think of maintenance as protecting your investment—both in materials and equipment. Here’s a practical approach broken down by frequency.
**Daily Tasks:** Walk the entire yard each morning to spot hazards like debris, pooling water, or damaged fencing. Check that proper equipment storage protocols are being followed—tools should be returned to designated areas, not left scattered. Verify that fire extinguishers are accessible and signage remains visible.
**Weekly Responsibilities:** Inspect ground conditions for rutting or erosion that could affect vehicle movement. Test lighting systems to ensure safe operations during early mornings or evenings. Review your inventory against your tracking system to catch discrepancies early. Clear drainage paths to prevent water accumulation.
**Monthly Checklist:** Conduct thorough inspections of fencing, gates, and security equipment. Service access roads by filling potholes or grading as needed. Evaluate your layout efficiency—are materials positioned logically for current project phases? Document all maintenance activities for compliance records. Organize a yard cleanup day to address accumulated waste and reorganize as your project evolves.
Regular maintenance prevents small issues from becoming costly problems while keeping your site compliant with safety regulations.
Common Laydown Yard Mistakes to Avoid
Even experienced contractors can fall into common laydown yard traps that create costly delays and safety hazards. Learning from these mistakes helps you set up a more efficient staging area from the start.
**Poor Drainage Planning**
One of the most frequent complaints from site managers involves inadequate drainage. Without proper grading and water management, your laydown yard transforms into a muddy quagmire after rain, making equipment movement dangerous and material retrieval nearly impossible. Before placing materials, assess the natural slope and create drainage channels that direct water away from high-traffic zones. Consider adding gravel or crushed stone in areas prone to pooling. Community feedback consistently shows that investing in proper drainage upfront saves significantly more than dealing with stuck equipment and water-damaged materials later.
**Inadequate Access Routes**
Many DIYers and small contractors underestimate the turning radius needed for delivery trucks and mobile equipment. Creating access lanes that are too narrow or poorly positioned leads to damaged materials, torn-up ground, and frustrated deliveries. Plan primary routes at least 12-15 feet wide, and map out where trucks will enter, turn, and exit before materials arrive. Mark these routes clearly and keep them clear of obstructions.
**Overloading Storage Areas**
Piling materials too high or concentrating heavy equipment in one zone can cause ground subsidence and create collapse risks. Distribute weight across your available space, paying attention to ground-bearing capacity. If you notice rutting or sinking, immediately redistribute loads and consider reinforcing the area with aggregate base.
**Mixing Incompatible Materials**
Storing reactive materials together—like certain chemicals near metals, or treating lumber alongside concrete—can cause contamination and damage. Separate your yard into designated zones based on material compatibility and environmental sensitivity. User experiences repeatedly highlight how simple segregation prevents expensive material losses and potential safety incidents that could shut down your entire project.
Whether you’re managing a large commercial build or tackling an ambitious home renovation, proper laydown yard planning is essential for keeping your project running smoothly and safely. A well-organized staging area reduces material damage, minimizes delays, and helps your team work more efficiently—saving both time and money in the process.
The principles we’ve covered apply to projects of all sizes. Even a modest backyard extension benefits from designated zones for materials, clear pathways, and thoughtful equipment placement. The key is adapting these strategies to your specific site constraints and project requirements.
We’d love to hear from you! What laydown yard challenges have you faced on your projects? Do you have any organizational tips or lessons learned that could help fellow builders and DIYers? Share your experiences in the comments below—your insights could make someone’s next project significantly easier.
Ready to get started? Browse our platform to find the equipment and tools you need for your construction project. From excavators to safety barriers, we connect you with quality hire options backed by real community reviews.
Related Posts

Post a Comment