Start by walking your entire property with a notebook during different times of day, mapping sun patterns, wet spots after rain, high-traffic areas, and views you want to hide or highlight. This assessment reveals exactly where to place patios, plantings, and pathways based on how water moves, where shade falls, and how your family actually uses the space.
Design functional zones that match your lifestyle needs before selecting a single plant. Divide your yard into purpose-driven areas like outdoor dining, play spaces, vegetable gardens, or privacy screening. Each zone should have clear boundaries and connect logically to others through defined pathways, preventing the scattered, disconnected look that plagues many DIY projects.
Choose grading and drainage as your foundation, not an afterthought. Slope soil away from structures at a minimum 2% grade, install French drains in persistently wet areas, and position rain gardens to capture runoff. Poor drainage undermines everything else you build, killing plants and creating muddy, unusable areas.
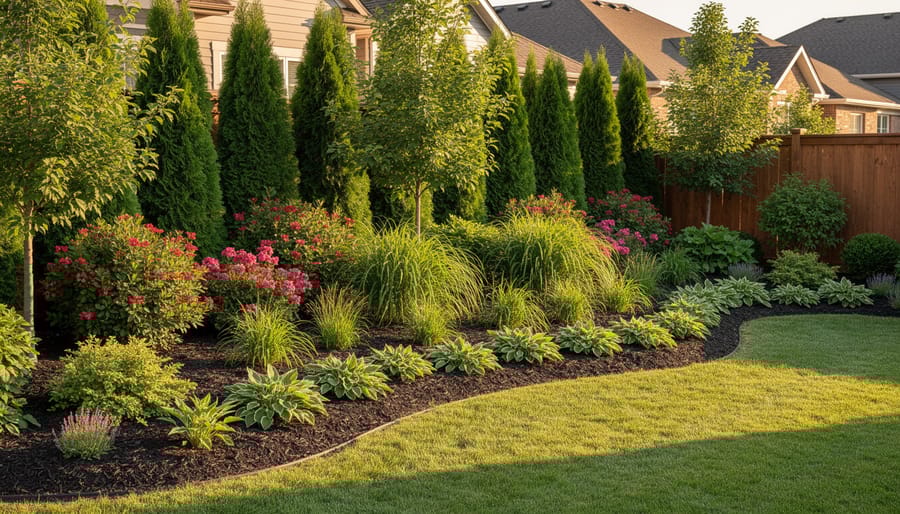
Layer plants by height and function rather than decorative appeal alone. Place tall evergreens for year-round screening, medium shrubs to define spaces and block wind, and low groundcovers to suppress weeds and reduce maintenance. This three-tier approach creates depth while solving practical problems like noise reduction and erosion control simultaneously.
What Makes a Landscape Actually Functional
A truly functional landscape goes far beyond curb appeal. It’s about creating outdoor spaces that solve real problems, reduce your workload, and actually get used by your family. Think of it as outdoor home improvement that pays dividends every season.
The foundation of functional design rests on three interconnected pillars. First, usability means your landscape serves your lifestyle. A family with young children needs durable play areas and clear sightlines from the house. Empty nesters might prioritize low-maintenance garden beds and entertaining spaces. Second, sustainability addresses long-term viability through proper drainage solutions, native plant selection, and efficient irrigation placement. Third, aesthetics tie everything together, but they follow function rather than lead it.
Proper landscape design actively reduces maintenance time. Strategic plant placement minimizes weeding and watering needs. Hardscaping like gravel paths or mulched beds cuts down on mowing edges. During backyard renovation planning, homeowners who prioritize function often discover they can cut weekly yard work by 30-50%.
Functional landscapes also solve property challenges head-on. Soggy areas become rain gardens that manage runoff naturally. Steep slopes transform into terraced beds that prevent erosion while adding visual interest. Dead zones under trees turn into shade gardens with appropriate groundcovers.
The value proposition is straightforward: outdoor spaces you’ll actually use increase your living area without adding square footage. A well-designed patio with proper screening becomes a summer dining room. A fire pit area with comfortable seating extends entertaining seasons.
According to community feedback from DIY renovators, functional design thinking upfront saves both money and frustration. One homeowner noted that addressing drainage issues during initial design prevented thousands in foundation repairs later.
The Site Assessment: Understanding What You’re Working With
Mapping Sun and Shade Patterns
Understanding where sunlight hits your property throughout the day directly impacts which plants will thrive and how you’ll actually use your outdoor spaces. Start by observing your yard at three key times: morning (8-10 AM), midday (12-2 PM), and late afternoon (4-6 PM). Walk your property with a simple notepad or use your smartphone to photograph the same spots at each interval.
Full sun means six or more hours of direct sunlight, partial sun or partial shade means three to six hours, and full shade means less than three hours. Mark these zones on a rough sketch of your yard. Pay special attention to shadows cast by buildings, fences, and mature trees, as these shift dramatically between seasons. A spot that’s sunny in summer might be shaded in winter when the sun sits lower in the sky.
This mapping exercise takes just one day but saves you from costly mistakes like planting shade-loving hostas in blazing sun or positioning a patio where you’ll be squinting through dinner. Many DIYers in our community recommend repeating this check during different seasons if you’re planning a major project. Remember that deciduous trees create different shade patterns when leafless, affecting winter sun exposure for both plants and gathering areas beneath them.
Identifying Drainage and Water Flow
Understanding how water moves across your property is essential before designing any landscape. Start by observing your yard during and after rainfall. Notice where puddles form, which areas stay soggy longest, and where water flows fastest. These observations reveal natural drainage patterns you’ll need to work with or redirect.
A simple test involves marking wet spots with flags during rain, then photographing them for reference. Watch for water pooling near foundations, pathways that become streams, or areas where soil erodes. Community members often report that ignoring these signs leads to costly fixes later.
Common drainage problems include negative grading (slopes toward buildings), compacted soil preventing absorption, and low spots collecting runwater. Solutions range from straightforward to complex. French drains redirect water underground using perforated pipes and gravel. Swales are shallow, planted channels that guide water naturally. Rain gardens transform problem areas into attractive features that absorb excess moisture. For properties with elevation changes, check out these sloped yard solutions that address both drainage and usability.
Your local tool rental center can provide laser levels or transit levels to accurately measure grades and plan proper water flow away from structures.
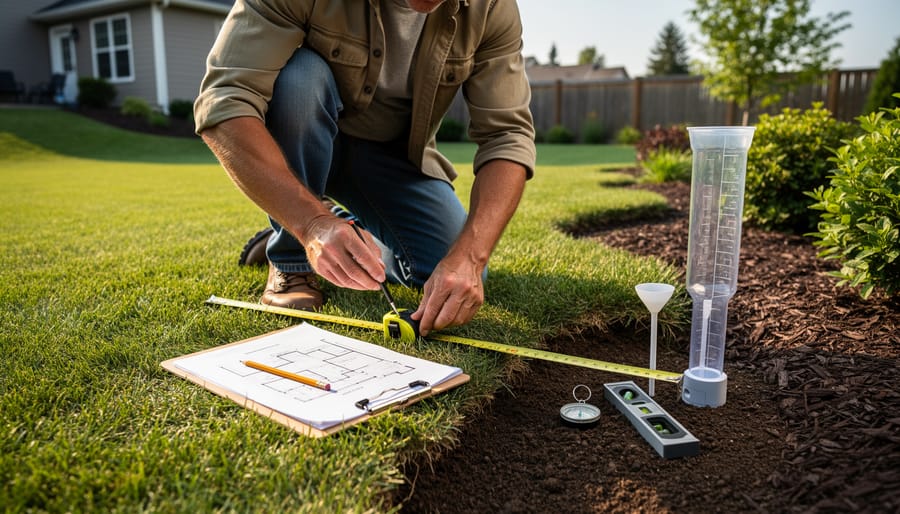
Soil Testing Made Simple
Understanding your soil is the foundation of successful landscape design—literally. Before you start digging or planting, invest time in basic soil assessment. It will save you money and frustration down the road.
Start with a simple jar test: fill a clear container halfway with soil, add water, shake vigorously, and let it settle for 24 hours. You’ll see distinct layers showing your soil composition—sand settles first at the bottom, followed by silt in the middle, and clay on top. This visual breakdown tells you about drainage potential and nutrient retention.
Next, check drainage by digging a 12-inch hole, filling it with water, and timing how long it takes to empty. Water should drain within 4-6 hours for most plants. Faster means sandy soil that needs organic matter; slower indicates clay that requires amendment or special plant selection.
For pH and nutrient levels, pick up an inexpensive home testing kit from your local rental center. Most rentals also stock professional-grade soil probes if you’re testing multiple areas.
When should you call professionals? Consider lab testing if you’re planning extensive edible gardens, dealing with suspected contamination, or facing persistent plant failure. Community members often share trusted local testing lab recommendations—check reviews before choosing. Professional results provide detailed nutrient breakdowns and specific amendment recommendations that guide smart design decisions.
The Essential Tools and Equipment for DIY Landscape Projects
Getting your landscape project from paper to reality requires the right tools, but you don’t need to break the bank building a collection you’ll rarely use. Smart DIYers know when to invest and when to rent.
For the planning phase, start simple. A 100-foot measuring tape, garden hose (for laying out curved beds), stakes, and string line are your foundation. Add spray paint for marking hardscape locations. These basics cost under $50 and you’ll use them repeatedly.
Ground preparation demands more substantial equipment. A quality spade and garden rake are worth purchasing—community members consistently rate these as must-own tools. However, for tilling new beds or leveling larger areas, rent a rototiller or sod cutter. These machines cost $400-800 to buy but only $60-90 per day to rent. According to user feedback, most homeowners need them just once or twice per project.
For hardscaping, hand tampers work fine for small paver patios, but rent a plate compactor for areas over 100 square feet. The compaction quality justifies the $75 daily rental fee. One community member noted, “I tried doing my walkway with a hand tamper—took three times longer and the pavers still settled unevenly.”
Essential purchases include a wheelbarrow, level, rubber mallet (for pavers), and quality gloves. A digging bar proves invaluable for rocky soil and costs around $30—far cheaper than emergency chiropractor visits.
For plantings, invest in bypass pruners, a transplanting spade, and a soil knife. These tools improve with use and quality matters. Rent an auger for planting multiple trees or large shrubs; drilling holes manually becomes exhausting quickly.
Safety equipment isn’t optional. Steel-toed boots, work gloves, and eye protection should be in every DIYer’s kit before starting any project.
The golden rule from experienced community members: If you’ll use it three times or more, consider buying. Otherwise, rental shops are your friend. Many offer weekend rates that maximize your project time while minimizing costs.
Core Design Principles That Make Landscapes Work
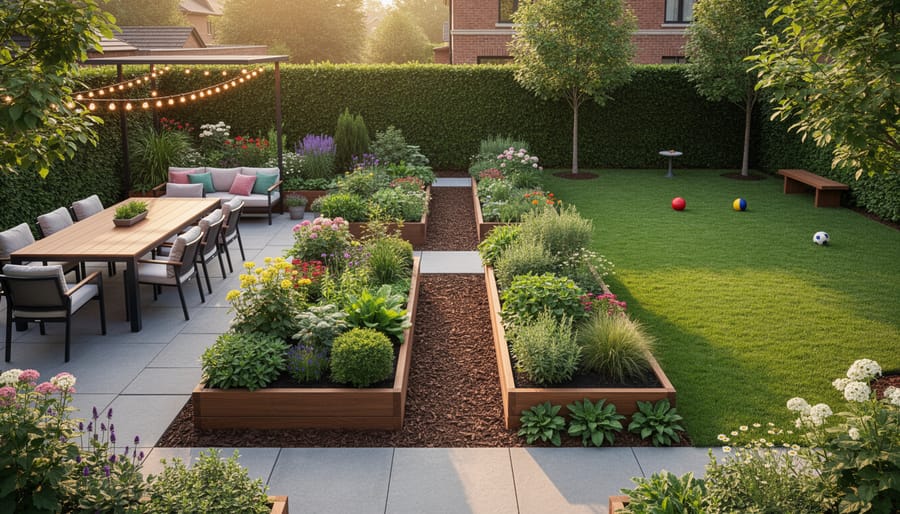
Zoning Your Space by Function
Think of your landscape like a house—each outdoor area should serve a specific purpose. Dividing your yard into functional zones creates organized, usable spaces that actually work for your lifestyle rather than just looking pretty.
Start by identifying your must-have zones. Common categories include entertaining areas (patios, outdoor kitchens), play spaces (lawn areas, playsets), garden beds (vegetables, flowers), and utility zones (tool storage, compost, trash bins). Walk your property and mark potential locations based on sun exposure, existing features, and proximity to your home.
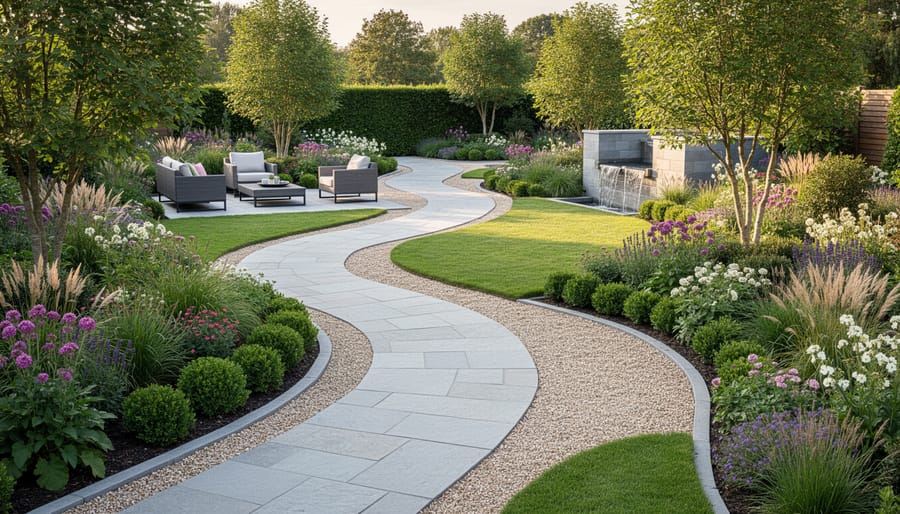
Consider traffic flow between zones. People naturally take the shortest path, so work with this tendency rather than against it. Main pathways should be at least 4 feet wide for comfortable two-way traffic, while secondary paths can be narrower at 2-3 feet. A simple measuring tape and some spray paint or garden stakes help visualize these routes before committing to hardscaping.
Create effective transitions between zones using changes in materials, elevation, or plantings. A low hedge can separate the utility area from your entertaining space without requiring a full fence. Stepping stones signal movement from lawn to garden. Level changes, even just 6-8 inches, naturally define boundaries while adding visual interest.
Many DIYers find sketching zones on graph paper helpful before breaking ground. Community feedback consistently emphasizes this planning step—users report fewer regrets and better long-term satisfaction when they map zones first. Test your layout by placing temporary markers or furniture in position, then live with it for a week before making permanent changes.
Scale and Proportion: Getting Sizes Right
One of the most common landscape design mistakes is getting the scale wrong—choosing elements that feel cramped or completely overwhelm your space. The fix starts with simple measurements and proportions that anyone can master.
Start with your home’s footprint as your baseline. A good rule of thumb: patios should be at least 12×12 feet for basic seating, but ideally match the width of the adjacent interior room. Too small, and furniture feels squeezed. For walkways, main paths need 4-5 feet width for two people to walk comfortably side-by-side, while secondary garden paths work fine at 2-3 feet.
Planting beds gain impact when they’re at least 3-4 feet deep—shallow strips look like afterthoughts. If you’re working with a two-story home, deeper beds (6-8 feet) help balance the vertical mass. Use a measuring wheel or long tape measure to mark these dimensions before digging.
When adding features like arbors or pergolas, measure twice. A structure should feel substantial but not blocking. Community feedback consistently shows that vertical elements work best when they’re proportional to nearby structures—roughly two-thirds the height of a single-story wall creates pleasing balance.
Test your layout with stakes and string before committing. Walk through the marked spaces. Does the patio accommodate your actual furniture? Can you navigate paths with a wheelbarrow? These practical checks prevent costly resizing later.
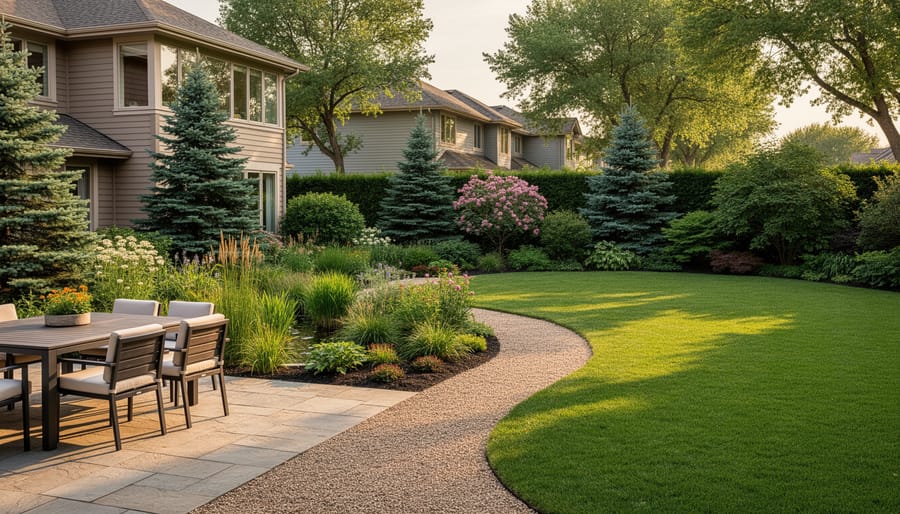
Creating Natural Flow and Movement
A well-designed landscape should guide people naturally through the space without forcing awkward detours or confusing choices. Think about how water flows downhill, taking the path of least resistance—your pathways should feel just as intuitive.
Start by observing how people already move through your yard. Before installing formal paths, many homeowners find that foot traffic creates natural desire lines showing the most direct routes between frequently visited areas. Rather than fighting these patterns, work with them. Position paths where people want to walk, not where you think they should go.
For pathway width, aim for at least 3-4 feet for primary routes to allow comfortable passage and wheelbarrow access. Secondary paths can be narrower at 2 feet. Use rental plate compactors to create stable bases that prevent settling and puddling.
Visual flow matters equally. Create sightlines that draw the eye toward focal points like specimen plants, water features, or seating areas. Avoid placing tall elements that block views to appealing destinations. Curve pathways gently around obstacles rather than creating sharp angles—this encourages exploration and makes small spaces feel larger.
Transitions between different landscape zones should feel gradual. Use overlapping plantings or gradually changing materials rather than abrupt borders. For example, transition from patio to lawn by introducing groundcovers or stepping stones that soften the boundary.
Community feedback consistently emphasizes keeping pathways clear of overhanging plants that drip water or drop debris, maintaining both visual clarity and practical usability year-round.
Hardscape Fundamentals: Building the Bones of Your Landscape
Patios and Outdoor Living Areas
Successful outdoor living spaces begin with proper sizing—plan for at least 12 square feet per person for dining areas and 16-20 square feet per seating group. Before breaking ground, check local building codes for setback requirements and permit needs.
Foundation work is critical for longevity. Excavate 6-8 inches deep, accounting for 4 inches of compacted gravel base plus your paving material thickness. A plate compactor (available at most rental centers) ensures proper base compaction, preventing future settling and cracking. Create a minimum 2% slope away from structures for drainage—that’s roughly 1/4 inch per foot.
Material selection impacts both function and maintenance. Concrete pavers offer durability and easy replacement of individual units. Natural flagstone provides character but requires more skill to install level. Poured concrete is budget-friendly but can crack in freeze-thaw climates without proper control joints every 8-10 feet.
For drainage, consider permeable pavers or leave gaps between stones where water infiltration is important. In heavy clay soils, install a 4-inch perforated drain pipe in the gravel base, sloped to daylight or a dry well.
Community feedback consistently emphasizes planning electrical and gas lines before installation—running conduit during excavation saves costly retrofitting later for lighting, heaters, or outdoor kitchens.
Pathways That Actually Make Sense
Pathways should be wide enough for actual use—48 inches minimum for primary routes where two people can comfortably pass, and at least 36 inches for secondary paths. Many homeowners make walkways too narrow, forcing people to walk single-file or worse, cut across the lawn instead.
Choose materials based on how the path will be used. Gravel works well for informal garden paths but shifts underfoot, making it less ideal for high-traffic areas or accessibility needs. Pavers, flagstone, or concrete suit main entryways where stability matters. Community feedback consistently shows that smooth, level surfaces reduce tripping hazards and work better for wheelchairs, strollers, and delivery carts.
Route pathways where people naturally walk. Before installing anything, observe traffic patterns for a week—you’ll spot the desire lines where grass is worn thin. These show the most intuitive routes. Avoid sharp corners; gentle curves feel more natural and improve sightlines around landscaping.
For safety, ensure adequate lighting along evening routes and maintain a slight slope (2 percent grade) for drainage without creating slip risks. Edge your pathways clearly so borders don’t become tripping hazards, especially where grass meets harder surfaces.
Retaining Walls and Grade Changes
When your property has significant elevation changes, retaining walls become essential for creating usable, level spaces. These structures hold back soil on slopes, preventing erosion while creating terraced areas for patios, gardens, or lawn spaces.
For walls under three feet tall, many homeowners can tackle the project using interlocking blocks or timber systems. These materials don’t typically require mortar and include built-in drainage considerations. However, proper base preparation remains critical—you’ll need compacted gravel and level footings to prevent settling and wall failure.
Here’s where DIY limitations come into play: walls over four feet high, those bearing significant load, or any structure on unstable soil require professional engineering. Local building codes often mandate permits and inspections for taller walls, and for good reason. A failed retaining wall can cause property damage, injury, or even collapse onto neighboring properties.
Never skip drainage solutions. Water buildup behind retaining walls creates hydrostatic pressure that can topple even well-built structures. Include weep holes, drainage pipe, and gravel backfill in your design. Community reviews consistently highlight drainage as the number one cause of DIY retaining wall failure—learn from others’ experiences before you dig.
Smart Plant Selection and Placement
Right Plant, Right Place Philosophy
The smartest landscape designers don’t fight against nature—they work with it. This philosophy, known as “right plant, right place,” means selecting vegetation that naturally thrives in your existing conditions rather than battling to keep unsuitable plants alive.
Start by honestly assessing your site. Note which areas receive full sun (6+ hours daily), partial shade, or deep shade. Test your soil to determine if it’s clay, sandy, or loam, and check the pH level. Observe where water pools after rain and which spots dry out quickly.
Once you understand these conditions, choose plants adapted to them. Native species typically require less water, fertilizer, and pest control because they’ve evolved for your local climate. A moisture-loving fern will struggle in dry, sunny spots no matter how much you water it, while a sun-loving lavender will rot in damp shade.
This approach dramatically reduces ongoing landscape maintenance and costs. You’ll spend less on irrigation systems, soil amendments, and replacement plants. Many DIYers report cutting maintenance time by half simply by replacing struggling plants with better-suited alternatives.
Community feedback consistently shows that landscapes designed with this principle look better year-round and survive seasonal extremes with minimal intervention. Your local nursery staff can recommend specific varieties proven to succeed in your area’s unique conditions.
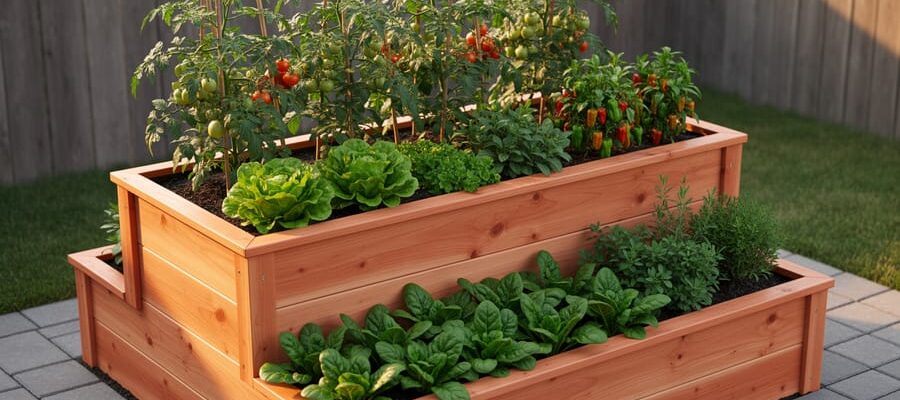
Layering for Function and Beauty
Strategic plant layering transforms your landscape from flat to functional while addressing common property challenges. This technique uses three height zones: groundcovers and low plants (under 2 feet), mid-level shrubs (2-6 feet), and tall specimens like trees or privacy hedges (6+ feet).
Start with your tallest layer for privacy screening or windbreaks, placing plants 3-5 feet apart depending on mature spread. This back layer blocks unwanted views and creates your outdoor room’s walls. Mid-level shrubs fill visual gaps and provide seasonal interest while requiring spacing of 2-4 feet. The lowest layer handles erosion control on slopes and reduces maintenance by suppressing weeds.
For erosion-prone areas, many DIYers find success with groundcovers planted 12-18 inches apart, letting them knit together within one growing season. Position taller plants at the top of slopes and cascade downward with progressively lower selections.
Frame desirable views by creating plant “windows” where you deliberately leave gaps in your layering. Think of this as editing, not just adding. Community feedback consistently shows that well-layered landscapes need less watering since taller plants provide shade for lower ones, and strategically dense planting chokes out weeds naturally. Before purchasing plants, verify mature sizes to avoid constant pruning, a common frustration among homeowners who underestimate growth rates.
Water Management: The Foundation of Functional Design
Water is the single most important factor in landscape functionality—get it wrong, and you’ll face erosion, foundation damage, dead plants, and muddy unusable areas. Get it right, and water becomes a valuable resource that sustains your landscape with minimal intervention.
Start by observing how water moves through your property during rain. Walk your yard during a storm and note where water pools, where it flows fastest, and where it drains well. This real-world assessment beats any paper plan. Understanding your property’s natural drainage patterns lets you work with gravity rather than against it.
Proper grading is your first defense against water problems. Your landscape should slope away from buildings at a minimum grade of 2 percent (about 2 inches of drop per 10 feet). For problem areas where water collects, you may need to regrade with a borrowed plate compactor or rent a skid steer for larger jobs. Community members consistently report that fixing grading issues upfront prevents costly repairs later.
When natural grading isn’t enough, drainage solutions come into play. French drains work brilliantly for persistent wet spots—a perforated pipe surrounded by gravel that redirects water to better locations. Dry creek beds serve double duty as attractive features and functional drainage channels. Swales, shallow vegetated channels that slow and absorb runoff, offer sustainable alternatives to hard drainage systems.
For irrigation, think efficiency from the start. Drip systems deliver water directly to plant roots with minimal waste, while soaker hoses work well for garden beds. Smart controllers adjust watering based on weather conditions, preventing the common mistake of irrigating during rain. Before investing in systems, familiarize yourself with available irrigation tools that match your landscape size and plant needs.
Consider rainwater harvesting through simple rain barrels or more elaborate cistern systems. This free resource reduces municipal water use while providing chlorine-free water that plants prefer. Even basic collection systems pay dividends during dry periods.
Common Mistakes That Sabotage Landscape Functionality
Community feedback reveals that even well-intentioned DIY landscape projects often fail due to preventable mistakes. Understanding these common pitfalls can save you time, money, and frustration.
Poor drainage planning tops the list of landscaping project mistakes. Many homeowners create beautiful gardens without considering where water flows during heavy rain. This leads to pooling around foundations, drowned plants, and eroded pathways. Before adding hardscaping or garden beds, observe your property during and after rainfall. Mark problem areas and plan accordingly. Installing a simple French drain or adjusting soil grades can prevent thousands in water damage. A plate compactor rental ensures proper base preparation for drainage solutions.
Pathway width represents another frequent oversight. User experiences show that paths narrower than 90 centimetres create bottlenecks, making it difficult to push wheelbarrows or accommodate two people walking side-by-side. Measure your garden tools and equipment before finalizing pathway dimensions. Consider access requirements for future maintenance equipment too.
Maintenance nightmares often stem from overambitious planting schemes. Community members report choosing high-maintenance plants without considering long-term care requirements. Fast-growing hedges that require weekly trimming quickly become burdens. Research mature plant sizes and growth rates before purchasing. Select species suited to your available maintenance time and local climate conditions.
Failing to account for underground utilities creates dangerous and costly problems. Before digging, contact utility companies to mark service lines. A cable locator can identify buried cables, preventing expensive damage and safety hazards.
Inadequate soil preparation underneath hardscaping surfaces causes premature settling and cracking. Proper base compaction using appropriate equipment prevents these issues. Skipping this step means redoing work within months rather than enjoying results for years.
Creating a landscape that works for your lifestyle doesn’t require a design degree or complicated blueprints. It simply takes purposeful planning before you break ground. By assessing your space honestly, understanding how you’ll actually use each area, and choosing materials that match your maintenance capacity, you’re already ahead of most landscape projects that prioritize appearance over function.
The beauty of functional landscape design is that you don’t need to tackle everything at once. Start with one zone that’s causing the most frustration—maybe that muddy pathway or the neglected corner by the garage. Apply the fundamentals you’ve learned, test what works, and build from there. Each completed project teaches you something valuable about your property and your preferences.
Don’t overlook the power of your local community when planning these projects. Fellow DIYers and neighbors who’ve tackled similar challenges often provide insights no manual can offer. Whether it’s borrowing specialized equipment for a weekend project or getting recommendations on what actually thrives in your climate zone, community knowledge and tool sharing make ambitious projects manageable and affordable.
Remember, investing time in thoughtful design upfront saves countless hours of maintenance and costly do-overs down the road. A well-planned landscape that functions smoothly for your daily life will always outperform something that just looks good in photos.
We’d love to hear about your landscape projects. What lessons have you learned? What unexpected challenges did you overcome? Share your experiences and help others navigate their own functional design journeys.
Related Posts
Post a Comment