
That aching wrist after a weekend project isn’t just fatigue—it’s your body signaling that something’s wrong. Every year, millions of workers and DIYers develop repetitive strain injuries, carpal tunnel syndrome, and chronic pain simply from using poorly designed tools or holding them incorrectly. The good news? Most of these injuries are completely preventable once you understand the basic principles of tool ergonomics.
Tool ergonomics is the science of designing and using tools that fit your body’s natural capabilities and limitations. When a tool forces your wrist into awkward angles, requires excessive grip strength, or creates vibration that travels through your hand and arm, it’s working against your body instead of with it. Over time, these small stresses compound into serious injuries that can sideline you from work or hobbies you love.
The solution starts with recognizing the warning signs: tingling fingers, persistent soreness, weakness in your grip, or pain that lingers after you’ve finished working. These symptoms tell you it’s time to reassess your tools and technique. Whether you’re a professional tradesperson handling tools daily or a homeowner tackling occasional projects, understanding ergonomic principles helps you work longer, safer, and more comfortably.
This guide breaks down everything you need to know about selecting ergonomic tools, adjusting your grip and posture, and implementing practical solutions that provide immediate relief. Because the best tool is one that gets the job done without getting you hurt.
What Tool Ergonomics Actually Means (And Why It Matters)
Tool ergonomics is simply the science of designing tools that work with your body instead of against it. Rather than expecting your hands, wrists, arms, and back to contort into uncomfortable positions to use a tool, ergonomic design adapts the tool to fit natural human movement and posture. Think of it as creating tools that feel like extensions of your body rather than awkward objects you’re fighting to control.
This isn’t just about comfort, though that certainly matters. Poor tool ergonomics leads to real, measurable consequences. According to workplace safety guidelines, repetitive strain injuries account for over 30% of workplace compensation claims in Australia, with hand tools being a major contributor. These injuries develop gradually through repeated awkward grips, excessive force, vibration exposure, and sustained uncomfortable positions.
For professional tradespeople, the impact goes beyond pain. Studies show that workers experiencing tool-related discomfort are 40% less productive and miss an average of 12 working days annually due to musculoskeletal disorders. That’s lost income, delayed projects, and potential long-term disability.
DIY enthusiasts and homeowners aren’t immune either. Weekend warriors often push through discomfort, thinking it’s normal to feel sore after using tools. But that nagging wrist pain after painting the fence or the numb fingers following a pruning session are warning signs, not badges of honor. Without proper ergonomic awareness, these seemingly minor issues can escalate into chronic conditions requiring medical intervention.
The good news? Understanding tool ergonomics empowers you to make smarter choices when selecting, renting, or using tools, protecting your body while actually improving your efficiency and results.
The Most Common Ergonomic Mistakes Tool Users Make
Gripping Too Hard (And What It’s Doing to Your Hands)
You’ve probably experienced it without knowing its name: death grip syndrome. It’s that instinct to squeeze your tools harder than necessary, and it’s wreaking havoc on your hands.
Why do we do this? Usually, it’s a combination of factors. Poor tool balance makes us compensate by gripping tighter. Vibration from power tools triggers an automatic squeeze response. Fatigue sets in, and paradoxically, we grip even harder to maintain control. Some tools simply have handles that are too smooth or too small, forcing us to overcompensate.
Here’s the problem: that excessive grip force doesn’t just make your hands tired. Over time, it causes real damage. The tendons in your fingers and wrist become inflamed, leading to conditions like trigger finger and tendonitis. The constant pressure compresses nerves running through your hand and wrist, potentially resulting in carpal tunnel syndrome or cubital tunnel syndrome. These aren’t minor annoyances—they’re cumulative injuries that can sideline you from work or hobbies for weeks or months.
The solution starts with awareness. Most tasks require only about 20-30% of your maximum grip strength, yet many of us routinely apply 70-80%. By choosing tools with better grip design and consciously relaxing your hold, you can prevent years of unnecessary damage.
Working at Awkward Angles
Your body wasn’t designed to work in awkward positions, yet many tasks force you into exactly those scenarios. When you’re reaching overhead to sand a ceiling, bending low to cut baseboards, or twisting sideways to drill into a tight corner, you’re not just working harder—you’re multiplying the strain on your body by three to five times compared to neutral positions.
Think about what happens when you extend your arm to paint above your head. Your shoulder muscles must hold up not just the weight of the tool, but also your entire arm while maintaining control and precision. Add repetitive motion to that equation, and you’ve created a recipe for rotator cuff strain or tendinitis.
The same principle applies to bending and twisting. Crouching while using a power tool forces your back muscles to stabilize your entire upper body while your hands manage the tool’s weight and vibration. Twisting at the waist compounds the problem by loading your spine unevenly, which is why so many people report lower back pain after renovation projects.
Here’s what you can do: reposition yourself or your workpiece whenever possible to bring the work closer to chest height. Use ladders, work platforms, or adjustable sawhorses to minimize reaching and bending. Take frequent micro-breaks to reset your posture—even 30 seconds of standing straight and rolling your shoulders can prevent cumulative strain.
Ignoring Vibration Damage
Hand-Arm Vibration Syndrome (HAVS) is a serious condition that develops gradually from prolonged exposure to vibrating tools. When you use power tools, the vibrations travel through your hands and arms, potentially damaging blood vessels, nerves, and joints over time. Many workers don’t realize they’re at risk until symptoms appear.
The worst offenders include jackhammers, angle grinders, chainsaws, impact wrenches, and rotary hammers. Even seemingly harmless sanders and polishers can cause problems with extended use. The issue isn’t usually a single session but cumulative exposure over months or years.
Watch for these early warning signs: tingling or numbness in your fingers, especially after work; difficulty picking up small objects; fingers turning white (called “white finger”) in cold conditions; reduced grip strength; or aching hands at night. One community member shared that he initially dismissed occasional finger numbness as “just part of the job” until he struggled to button his shirt one morning.
If you notice these symptoms, reduce your exposure immediately and consult a healthcare professional. Prevention includes taking regular breaks every 15-20 minutes, choosing anti-vibration tools when possible, and wearing padded gloves designed for vibration dampening. Remember, HAVS damage is often permanent, making early intervention crucial.
How to Choose Ergonomically Sound Tools
Handle Design That Actually Fits Your Hand
The perfect tool handle should feel like a natural extension of your hand, not something you’re fighting to control. Here’s what actually matters when evaluating handle design.
Grip diameter is your starting point. The ideal diameter allows your fingers to wrap comfortably around the handle with a slight gap between your fingertips and palm—typically 1.25 to 2 inches for most adults. If you’re squeezing too hard to maintain control or your fingers overlap significantly, the diameter is wrong for you.
Handle shape makes a huge difference in reducing fatigue. Look for slightly oval or contoured designs rather than perfectly round handles. These shapes naturally align with how your hand closes and distribute pressure more evenly across your palm. Pistol-grip tools should angle at roughly 19 degrees for optimal wrist positioning during downward force applications.
Texture matters more than you’d think. Too smooth and the tool slips, forcing you to grip harder. Too rough and you’ll develop hot spots and blisters. The sweet spot is a slightly cushioned, non-slip material that provides friction without abrasiveness—think rubber or foam overlays.
The one-size-fits-all approach fails because hand sizes vary dramatically. A handle comfortable for someone with large hands can cause finger cramping in smaller hands, while a compact grip might feel unstable to someone with a larger grip span.
Test before committing: hold the tool for at least 30 seconds in your working position. Your grip should feel secure without white-knuckling it.
Weight Distribution and Balance Points
A well-balanced tool can dramatically reduce arm and shoulder fatigue during extended use. The center of gravity—the point where a tool’s weight is evenly distributed—determines how much effort you’ll expend controlling it. Tools with forward-heavy balance force your muscles to work constantly to prevent tipping, while properly balanced tools feel almost weightless in action.
To test balance, hold a tool loosely by its handle in your working grip. A well-designed tool should feel stable without excessive gripping force. If the head droops immediately or pulls your wrist downward, that’s a sign of poor balance that will tire you quickly.
Look for tools where the center of gravity sits near or slightly behind your grip point. Manufacturers achieve this through strategic material placement—hollow handles, counterweights, or thoughtful component positioning. Many professional users report that switching to better-balanced tools eliminated chronic wrist pain they’d attributed to aging rather than poor tool design.
Before purchasing or renting, always test-hold tools in your natural working position, not just stationary. Move through typical motions to feel how weight distribution affects control and comfort during actual use.
Vibration Reduction Features
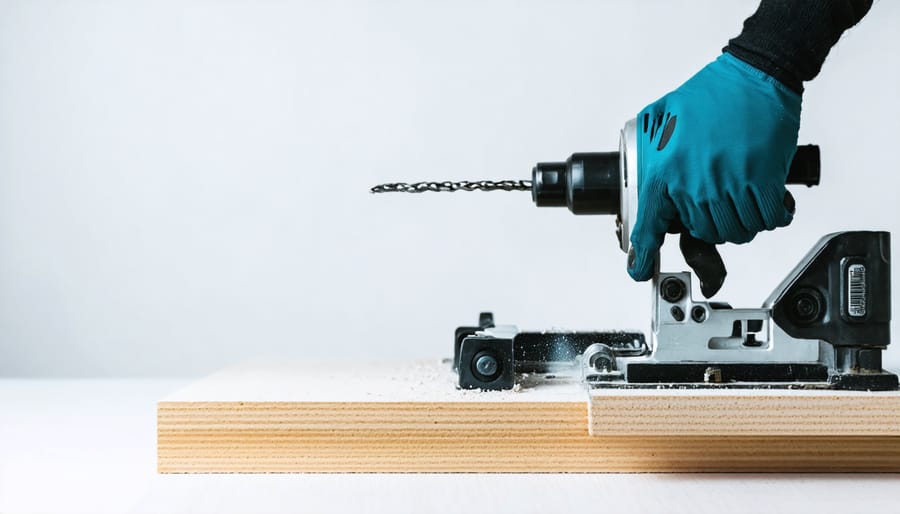
Modern power tools incorporate several anti-vibration technologies to reduce hand fatigue and prevent conditions like Hand-Arm Vibration Syndrome (HAVS). Look for tools with counterbalance systems, which use internal weights to offset vibration, and spring-mounted handles that absorb shock before it reaches your hands. Rubber grip overlays and dampening materials in the handle area provide an additional barrier against vibration transfer.
When reviewing product specifications, check the vibration emission value measured in meters per second squared (m/s²). Lower numbers indicate less vibration—anything under 2.5 m/s² is generally considered comfortable for extended use. Pay attention to whether specifications list separate values for drilling versus hammer drilling, as these can differ significantly.
User reviews often reveal real-world comfort levels that specs alone cannot convey. Search for comments mentioning “hand numbness,” “tingling,” or “all-day comfort” to gauge how tools perform during actual use. Community feedback frequently highlights which models maintain their vibration reduction effectiveness over time, which connects directly to proper tool maintenance practices. Worn components can significantly increase vibration levels.
Trigger and Control Placement
Controls should fall naturally under your fingers without forcing your hand into uncomfortable angles. The best trigger placement allows you to operate the tool with your index finger while maintaining a neutral wrist position—meaning your hand stays in a straight line with your forearm, not bent up, down, or sideways.
Look for tools where the trigger sits about one to two inches from the front of the handle. This positioning lets you grip firmly while keeping your finger relaxed when not actively pressing. Paddle switches often work better than small buttons because they distribute pressure across more of your finger, reducing fatigue during extended use.
Side-mounted controls are problematic if they require thumb stretching or force you to shift your grip repeatedly. When testing a tool, check whether you can reach all necessary switches without repositioning your hand or hyperextending any fingers. If you’re constantly adjusting your grip to access controls, you’re setting yourself up for repetitive strain.
For two-handed tools, secondary controls should be accessible to your support hand without requiring a twisted wrist or overextended reach.
Ergonomic Practices for Using Any Tool
Setting Up Your Work Height Correctly
Your work surface height dramatically impacts how your body feels at the end of the day. For most standing tasks like sawing or assembly work, position your work surface at elbow height when your arms hang naturally at your sides. This neutral position keeps your shoulders relaxed and your back straight. For tasks requiring downward force, like sanding or planing, lower the surface two to four inches below elbow height to use your body weight effectively without hunching. Precision work like electronics repair benefits from a slightly higher surface, about two inches above elbow height, so you’re not bending your neck forward to see details.
If you’re working on the floor or ground level, bring the work up to you whenever possible using sawhorses, workbenches, or sturdy platforms. Community members consistently report that adjusting work height eliminated their chronic back pain within days. For seated work, ensure your feet rest flat on the floor with thighs parallel to the ground, positioning tools within easy reach to avoid excessive stretching or twisting.
The Right Way to Grip Your Tools
The way you hold your tools makes a significant difference in preventing fatigue and injury. The golden rule is to grip with moderate pressure—imagine holding a tube of toothpaste that you don’t want to squeeze out. Many people grip tools far tighter than necessary, which quickly leads to hand cramping and arm fatigue.
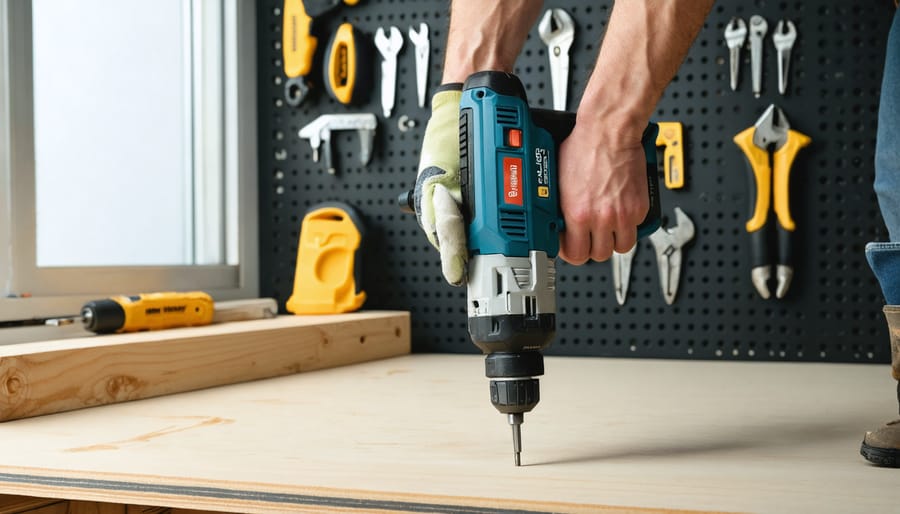
For power drills and drivers, position your dominant hand on the main handle with your index finger resting naturally on the trigger. Your supporting hand should stabilize the tool’s body, not clench it. Keep your wrist in a straight line with your forearm—avoid bending it up, down, or sideways. If you find yourself constantly angling your wrist, reposition yourself or the workpiece instead.
When using hammers or hand tools, hold them closer to the end of the handle for better leverage and less grip strain. Your thumb should wrap around the handle, not sit alongside your index finger. Between tasks, consciously relax your grip and shake out your hands.
For painting or scraping tasks lasting more than a few minutes, switch hands periodically to distribute the workload. This simple habit prevents overuse injuries that develop gradually over time.
Pay attention to feedback from your body. If you notice white knuckles, hand cramping, or tingling sensations, you’re gripping too tightly or maintaining awkward wrist positions that need immediate correction.
Taking Strategic Breaks (Before You Need Them)
Your body accumulates stress from tool use before you feel significant pain, making scheduled breaks essential rather than optional. Research shows that taking a 30-second micro-break every 10 minutes reduces muscle fatigue by up to 50% compared to working continuously.
Set a timer on your phone or smartwatch as a reminder system. During these brief pauses, shake out your hands, rotate your wrists and shoulders, and change your posture. For longer projects, take a full 5-minute break every hour to step away completely.
Incorporate simple stretches between tasks. Extend your arms forward with palms up, then gently pull fingers back toward your body to stretch forearms. Roll your shoulders backward in circles ten times. Open and close your fists rapidly 20 times to promote blood flow.
The 20-20-20 rule works for physical tasks too: every 20 minutes, spend 20 seconds doing something different that uses 20% of your current effort level. This variation prevents the repetitive strain that causes cumulative trauma. Listen to feedback from community members who’ve prevented injuries by making breaks non-negotiable parts of their workflow, not afterthoughts.
Positioning Your Body for Power, Not Pain
Your body position makes all the difference between finishing a project energized or finishing it in pain. The key is engaging your core and legs—your body’s powerhouses—rather than overworking your hands and wrists.
Start with your stance. Position your feet shoulder-width apart with one foot slightly forward for balance. This stable base lets you generate force from your legs and transfer it through your body, reducing strain on smaller muscle groups. Keep your knees slightly bent to absorb vibration and allow for natural movement.
When working at different heights, move your whole body closer to the task instead of reaching or hunching. If you’re drilling overhead, use a stable ladder to get closer rather than straining your arms and shoulders. For ground-level work, kneel on a cushioned pad instead of bending at the waist.
Engage your core muscles by keeping your back straight and pulling your belly button toward your spine. This creates a strong foundation and protects your lower back. When applying force, push or pull with your legs and torso—think of your arms as guides rather than the main power source.
Avoid twisting at the waist while holding heavy tools. Instead, pivot your feet and turn your entire body. This simple change prevents repetitive strain injuries that develop over time.
When to Use Ergonomic Accessories and Modifications
Grip Attachments and Padding
You don’t always need to invest in new tools to dramatically improve comfort. Grip attachments and padding offer budget-friendly solutions that transform how existing tools feel in your hands.
Foam grip sleeves slip over handles to add cushioning and increase diameter, reducing the pressure on your palm. They’re especially helpful on thin metal handles that dig into your skin during extended use. Look for closed-cell foam that won’t absorb moisture or oils from your hands.
Gel handle wraps provide superior shock absorption compared to foam. They dampen vibration effectively, making them ideal for power tools like drills and sanders. Many users report these wraps significantly reduce hand fatigue during multi-hour projects.
Heat-shrink tubing creates a custom grip surface that conforms to your tool’s handle shape. Simply slide it on and apply heat with a heat gun. This option works well for irregularly shaped handles where pre-formed grips won’t fit properly.
Anti-slip tape adds texture without bulk. Wrap it around smooth handles for better grip control, which means you can hold tools with less force and reduce muscle strain.
Before purchasing attachments, check community reviews to see what works for your specific tools. Some users find that combining solutions, like foam sleeves with anti-slip tape, delivers the best results for their particular needs.
Support Aids and Positioning Tools
You don’t have to white-knuckle your tools through every project. Support aids and positioning devices can dramatically reduce fatigue by taking the weight off your hands and arms while keeping your work at comfortable angles.
Tool stands are game-changers for equipment like grinders, drills, and sanders. They hold the tool steady at the right height and angle, so you’re not fighting gravity or awkward positions. Many users report being able to work twice as long without hand cramping when using stands for repetitive tasks.
Support arms with spring-balanced systems virtually eliminate tool weight. Think of them like those adjustable lamps that hold position wherever you move them, but engineered for power tools. They’re particularly valuable for overhead work or extended grinding sessions where arm fatigue sets in quickly.
Positioning jigs and fixtures might seem like extras, but they’re ergonomic essentials. A simple miter saw stand or drill press table means you’re moving the material rather than contorting yourself around a fixed tool. The difference in body strain is immediate and noticeable.
According to community feedback, the initial investment in these aids pays off within weeks through reduced soreness and increased productivity. Look for adjustable options that accommodate different tools and tasks for maximum versatility.
Personal Protective Equipment That Helps
Even the best ergonomic techniques benefit from the right proper protective equipment. Anti-vibration gloves are particularly valuable when using power tools like sanders, grinders, or jackhammers, as they reduce the transmission of vibrations that can cause hand-arm vibration syndrome over time. Look for gloves with gel or foam padding in the palm and finger areas. Wrist supports and braces help maintain neutral wrist position during repetitive tasks, preventing strain from awkward angles. Knee pads with cushioning reduce joint stress when working at ground level, while back support belts can provide additional stability during lifting tasks. Padded tool grips and sleeves offer another layer of protection, making handles more comfortable and reducing pressure points. Remember that PPE complements good technique rather than replacing it. Choose equipment that fits properly and doesn’t restrict your movement or grip, as poorly fitting protection can actually increase fatigue and reduce control.
Warning Signs You’re Damaging Your Body
Your body sends clear signals when tool use is causing harm, and recognizing these warning signs early can prevent temporary discomfort from becoming a permanent injury. Let’s be direct: pain is never normal, and it’s definitely not something you should push through.
The earliest indicator is often a dull ache or stiffness in your hands, wrists, forearms, or shoulders that appears during work or shortly after. You might notice tingling, numbness, or a “pins and needles” sensation in your fingers, particularly your thumb, index, and middle fingers. These symptoms suggest nerve irritation that won’t resolve on its own.
Watch for reduced grip strength where you struggle to hold objects you normally handle easily, or find yourself dropping tools unexpectedly. If you’re having trouble with fine motor tasks like buttoning shirts or opening jars after a day of tool use, your body is telling you something’s wrong.
Morning stiffness that takes more than 30 minutes to ease up, or pain that wakes you at night, indicates inflammation that’s progressed beyond minor irritation. Swelling around joints, particularly noticeable when you compare both hands or wrists side by side, requires immediate attention.
Pain that moves or radiates from one area to another, such as starting in your wrist and traveling up your forearm, suggests the condition is worsening. If you experience any of these symptoms consistently for more than a few days, stop the activity causing the problem immediately.
Don’t wait to seek professional medical advice. Early intervention makes an enormous difference in recovery time and outcomes. Continue using appropriate safety equipment while you address these issues, but remember that protection doesn’t replace proper ergonomics or medical care when symptoms appear.
What Real Users Say About Ergonomic Tools
The real-world feedback from tool users tells a consistent story. Professional contractors who’ve switched to ergonomic tools report noticeable differences within days. “I was skeptical at first,” shares Mike T., a framing carpenter with 15 years of experience. “But after switching to tools with anti-vibration handles, my hand numbness decreased significantly within the first week.” This learning curve concern comes up frequently in tool rental reviews, with most users reporting they adapt to ergonomic designs within 2-3 uses.
DIY homeowners echo similar experiences. Community feedback from weekend warriors consistently mentions two themes: initial awkwardness followed by appreciation. “The angled handle felt weird for about 20 minutes,” notes Sarah K., who rented an ergonomic circular saw for a deck project. “Then I realized I wasn’t constantly adjusting my wrist. Game changer for someone who only uses these tools occasionally.”
The rental aspect proves especially valuable for testing ergonomic features before committing to a purchase. Reviews frequently mention using rental periods as trial runs. One contractor shared, “I rent different brands to see which grip style works for my hand size. It’s cheaper than buying the wrong tool.”
Physical results vary by individual, but common improvements include reduced fatigue after long work sessions, fewer breaks needed, and less next-day soreness. Several users noted they could work longer hours without discomfort, though many emphasized that proper technique matters as much as the tool itself. The consensus: ergonomic tools make a measurable difference, but they’re not magic solutions if you ignore body mechanics.
Making the switch to more ergonomic tool use isn’t about admitting weakness or slowing down your work. It’s the opposite—it’s about working smarter so you can keep doing what you love for decades to come. Whether you’re a weekend warrior tackling home projects or a professional putting in full days on the job site, protecting your body means more enjoyable, productive work with less pain and fewer interruptions.
You don’t need to overhaul everything at once. Start small. Pick one or two changes that address your biggest pain points—maybe it’s switching to tools with better grip design, adjusting your work height, or simply taking those five-minute breaks every hour. Small adjustments compound over time into major benefits for your hands, wrists, back, and shoulders.
We want to hear from you. What ergonomic modifications have made the biggest difference in your workshop or on your job site? Which tools have surprised you with their comfort during long projects? Share your experiences and recommendations in the comments below. Your insight could be exactly what another reader needs to solve their own ergonomic challenges. Together, we can build a community that works smarter and healthier.
Related Posts

Post a Comment