
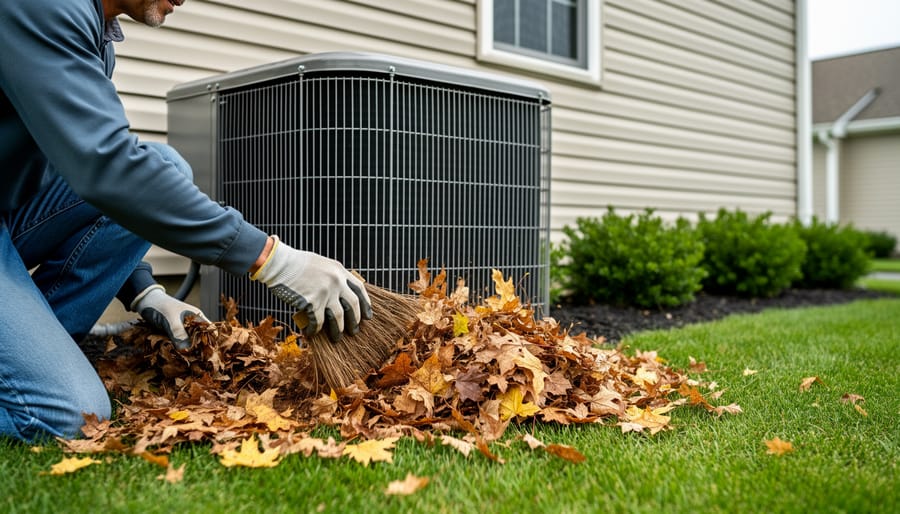
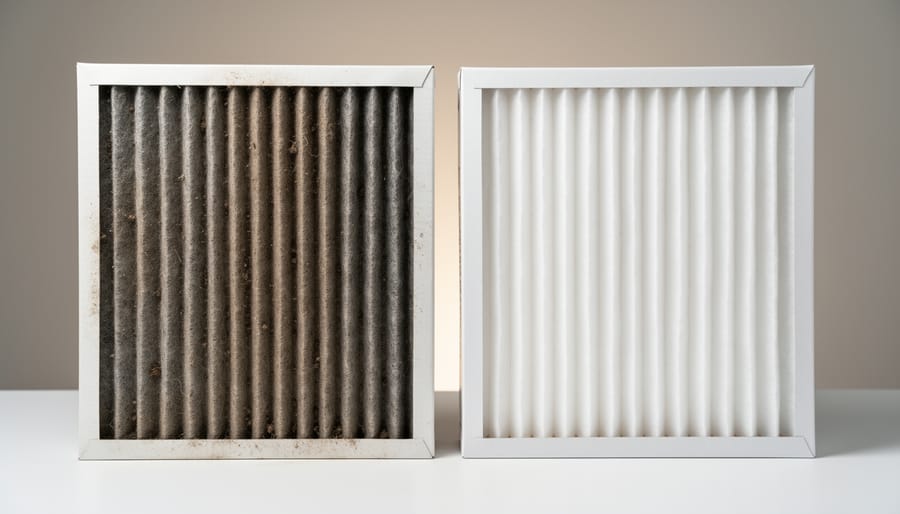
Check your air filter monthly and replace it when it appears dirty or clogged—a clean filter improves efficiency by up to 15% and prevents dust buildup that forces your system to work harder. Clear debris, leaves, and vegetation at least two feet away from your outdoor condenser unit to ensure proper airflow and prevent overheating that leads to costly breakdowns.
Inspect your condensate drain line every three months by pouring a cup of white vinegar through it to prevent algae growth and water damage—a clogged drain can shut down your entire system and cause flooding. Clean the evaporator and condenser coils annually before peak cooling season, as dirt accumulation acts as insulation that reduces heat absorption and can cut your system’s efficiency by 30%.
Schedule professional maintenance once per year to catch refrigerant leaks, electrical issues, and worn components before they fail. DIY maintenance handles 80% of routine care and costs under $50 annually in supplies, while preventing the average $300-500 emergency repair call. This checklist separates simple monthly tasks you can complete in 15 minutes from seasonal deep-cleaning projects and professional services, giving you confidence to extend your AC’s lifespan from the typical 10-12 years to 15-20 years through consistent care.
Why Your Air Conditioner Needs Regular Maintenance
Think of your air conditioner like your car—skip the regular maintenance, and you’re setting yourself up for a breakdown at the worst possible time. Regular AC maintenance isn’t just a nice-to-have; it’s the difference between a system that runs smoothly for 15-20 years and one that dies prematurely while costing you hundreds in emergency repairs.
Let’s talk dollars and cents first. A well-maintained air conditioner runs 15-20% more efficiently than a neglected one. That’s real money back in your pocket each billing cycle. Dirty filters alone can increase your energy consumption by up to 15%, while clogged coils force your system to work harder, driving up those summer electricity bills nobody enjoys.
Then there’s the issue of unexpected breakdowns. Picture this: it’s a scorching 38-degree Saturday afternoon, your house is full of guests, and your AC suddenly quits. Emergency repairs on weekends or holidays can cost double or triple the standard rate. Regular professional AC servicing and consistent system tune-ups catch small problems before they become expensive emergencies.
Your health matters too. AC systems circulate air throughout your home constantly. Without regular maintenance, they can spread dust, allergens, mold spores, and other contaminants. Families with asthma or allergies notice the difference immediately after a thorough cleaning and filter change.
The bottom line? A small investment in routine maintenance saves you from costly repairs, reduces energy bills, extends your equipment’s lifespan, and keeps your indoor air healthy. It’s preventative care that actually pays for itself.
Monthly AC Maintenance Tasks (15 Minutes or Less)
Check and Replace Air Filters
Start by turning off your AC system at the thermostat and circuit breaker for safety. Locate your air filter, typically found behind the return air grille or inside the air handler unit. Pull it out carefully and hold it up to a light source. If you can’t see light passing through or notice visible dirt buildup, it’s time for a replacement.
Most standard 1-inch filters should be replaced monthly during heavy use seasons, while thicker pleated filters (4-5 inches) can last 3-6 months. Disposable fiberglass filters cannot be cleaned and must be replaced. However, some permanent electrostatic filters can be vacuumed or rinsed with water, then completely dried before reinstalling.
When selecting a new filter, check the existing one’s dimensions printed on the frame. Choose filters with a MERV rating between 8-13 for optimal efficiency without restricting airflow. Higher ratings can strain your system if it’s not designed for them.
Common mistakes include installing filters backwards (look for airflow direction arrows), forcing incorrectly sized filters, or running the system without a filter. Never operate your AC without a filter in place, as this allows dust and debris to damage internal components. Many homeowners in our community recommend setting phone reminders to check filters regularly, preventing the costly consequences of neglected maintenance.
Inspect the Thermostat
Your thermostat acts as your AC system’s control center, so keeping it in good working order ensures efficient cooling. Start by testing accuracy: place a separate thermometer near your thermostat and compare readings after 15 minutes. If there’s more than a 2-degree difference, your thermostat may need recalibration or replacement.
Check battery levels if your thermostat uses them. Low batteries can cause erratic behavior or system shutdowns. Replace batteries annually as preventive maintenance, even if they seem fine. Most thermostats display a low-battery warning icon, but don’t wait for it.
Clean the thermostat’s interior by removing the cover and gently brushing away dust with a soft cloth or small brush. Dust buildup can affect sensor readings and button responsiveness.
Test basic functions by adjusting temperature settings up and down, verifying your AC responds appropriately. Listen for the click when the system engages. If your thermostat isn’t responding or displays error codes, consult your owner’s manual for troubleshooting steps. Community feedback suggests that outdated thermostats often cause more issues than homeowners realize, so consider upgrading to a programmable model for better control and energy savings.
Clear Drain Lines
Clogged condensate drain lines are one of the most common causes of AC water damage, but clearing them is surprisingly simple. Your air conditioner produces moisture as it cools, and this water needs somewhere to go. The condensate drain line carries it away from your unit, typically through a PVC pipe.
Start by locating your drain line. For central AC systems, look near your indoor air handler for a white PVC pipe, usually three-quarters to one inch in diameter. You’ll find an access point, often a T-shaped vent with a cap. Turn off your AC before beginning any maintenance.
Remove the cap and inspect for visible debris or buildup. Pour a cup of distilled white vinegar or a 50-50 bleach-water solution down the line to kill algae and mold. Let it sit for 30 minutes. For stubborn clogs, use a wet-dry vacuum at the outdoor end of the drain line to suction out blockages. Some homeowners report success using a plumbing snake for particularly tough clogs.
Flush the line with water to confirm it’s flowing freely. Check the drip pan beneath your air handler while you’re at it, cleaning away any standing water or slime. Repeat this process every one to three months during cooling season to prevent problems before they start.
Seasonal AC Maintenance Checklist
Spring: Getting Ready for Cooling Season
Before the first heatwave arrives, take time to prepare your air conditioning system for the busy cooling season ahead. This proactive approach helps you catch potential problems early and ensures reliable performance when you need it most.
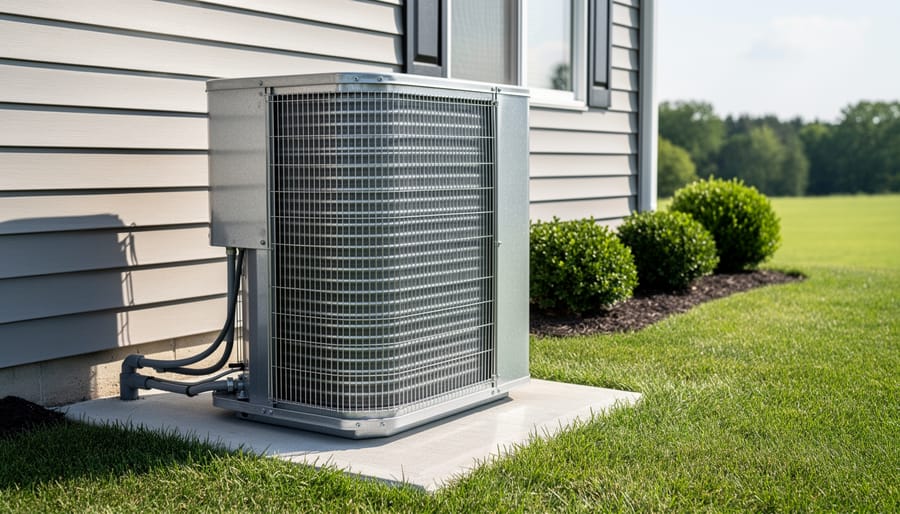
Start with your outdoor unit, also called the condenser. Walk around it and clear away any leaves, grass clippings, or debris that accumulated over winter. Trim back vegetation to maintain at least two feet of clearance on all sides. This airflow is essential for efficient operation. Check the unit’s base to ensure it sits level on the ground. A tilted condenser can lead to premature compressor failure.
Next, inspect the condenser coils, the metal fins visible on the outside of the unit. Dirty coils force your system to work harder and drive up energy costs. Use a garden hose with a spray nozzle to gently rinse the coils from the inside out. Avoid using a pressure washer, as the high pressure can bend the delicate fins and reduce efficiency. For stubborn grime, consider renting a coil cleaning solution sprayer from your local equipment rental center.
Watch for signs of refrigerant issues during your first few uses. If you notice ice forming on the refrigerant lines, weak airflow from vents, or the system running constantly without cooling properly, you may have a refrigerant leak or low charge. Refrigerant handling requires EPA certification, so this is definitely a job for professionals.
Schedule a professional tune-up if your system is more than five years old or you skipped maintenance last year. Technicians have specialized tools to check electrical connections, test capacitors, measure refrigerant levels accurately, and identify problems before they become expensive repairs.
Fall: Preparing Your AC for Winter
As temperatures drop and cooling season ends, taking time to properly winterize your AC protects your investment and ensures reliable performance next summer. Start by turning off power to the unit at both the thermostat and the circuit breaker for safety.
Give your outdoor condenser unit a thorough final cleaning. Remove any leaves, dirt, or debris that accumulated during the season. Gently spray down the fins with a garden hose from the inside out to clear trapped particles. Check for any damage or wear that might need professional attention before next season.
Inspect and clean the condensate drain line one last time. Pour a cup of distilled vinegar or bleach solution down the drain to prevent algae growth during winter months when the system sits idle.
For outdoor units in harsh winter climates, consider using a breathable cover designed specifically for air conditioners. These protect against ice, snow, and debris while allowing moisture to escape, preventing rust and mold. However, many HVAC professionals note that covers aren’t always necessary if your unit is designed for year-round outdoor exposure. Never use plastic tarps or non-breathable materials, as trapped moisture causes more harm than winter weather.
Document any issues you noticed throughout the season. This helps you remember what to address when scheduling professional maintenance in spring, keeping your system running efficiently for years to come.
What You Can DIY vs When to Hire a Professional
Most homeowners can safely handle routine tasks like cleaning or replacing air filters, clearing debris from outdoor units, and straightening bent fins with a fin comb. These require basic tools and minimal technical knowledge. You can also manage thermostat checks, condensate drain flushing with vinegar, and visual inspections of electrical connections—just never touch live wires.
However, call a professional for refrigerant issues, as handling coolant requires certification and specialized equipment. Electrical repairs, compressor problems, and strange noises beyond simple debris rattling all need expert diagnosis. If you notice ice buildup on coils, weak airflow despite clean filters, or unusual odors, don’t delay—these signal deeper problems. When considering system upgrades or new installations, research your AC installation considerations early and explore professional installation services for optimal results.
Safety first: Always disconnect power at the breaker before any maintenance. If you’re uncomfortable with a task or lack proper tools, hiring a qualified technician prevents costly mistakes and potential injury. Annual professional tune-ups complement your DIY efforts, catching issues before they become expensive repairs.

Essential Tools for AC Maintenance
Most air conditioning maintenance tasks require surprisingly few tools, many of which you probably already own. Here’s what you’ll need to keep your AC running smoothly without breaking the bank.
For basic monthly checks, start with a sturdy step ladder to safely access your unit, a screwdriver set (both Phillips and flathead), and a vacuum cleaner with brush attachments for removing dust and debris. A microfiber cloth and spray bottle with mild detergent solution work perfectly for cleaning vents and grilles. You’ll also want a flashlight or headlamp for inspecting darker areas around your system.
For seasonal deep cleaning, consider a coil cleaning brush or soft-bristle brush to gently clean the evaporator and condenser coils. A fin comb is essential for straightening bent aluminum fins on your outdoor unit, which improves airflow and efficiency. These specialty items typically cost under $20 each and last for years.
Some tasks require equipment that makes more sense to rent than buy. A wet-dry vacuum is invaluable for clearing condensate drain lines, and many hardware stores offer daily rentals for around $30. If you’re checking refrigerant levels, you’ll need a manifold gauge set, which can be rented from tool hire shops for approximately $20-40 per day.
Safety equipment shouldn’t be overlooked. Invest in a good pair of work gloves, safety glasses, and a dust mask, especially when working with older units. Many community members recommend keeping a multimeter handy for checking electrical connections, though this is optional for basic maintenance.
Remember, if a task requires specialized HVAC tools or feels beyond your comfort level, it’s always wise to call a professional.
Common AC Problems You Can Spot Early
Strange Noises and What They Mean
Your AC speaks to you through sounds—learning its language helps you catch problems early. Rattling typically indicates loose parts like screws, panels, or debris in the unit. Check and tighten what you can access safely, but if rattling persists, call a professional to prevent further damage.
Buzzing often points to electrical issues, loose wiring, or a failing contactor. This requires immediate professional attention for safety reasons. Don’t attempt electrical repairs yourself unless you’re qualified.
Grinding or squealing suggests worn bearings or belt problems in older systems. This is urgent—continuing to run the unit can cause motor failure. Turn off your AC and schedule service promptly.
Hissing may indicate a refrigerant leak, which needs professional repair immediately. Bubbling or gurgling sounds from drain lines are usually less urgent but signal clogs that need clearing.
Clicking at startup is normal, but constant clicking suggests a defective control or electrical component. High-pitched whistling often means restricted airflow from dirty filters—an easy DIY fix that should resolve quickly after filter replacement.
Performance Issues to Watch For
Your AC system will often tell you when it needs attention through several telltale signs. Weak airflow from your vents typically indicates clogged filters, blocked ducts, or failing fan motors that need immediate inspection. If you notice rooms cooling unevenly or taking longer to reach your set temperature, this suggests refrigerant issues, dirty coils, or thermostat problems requiring professional diagnosis.
Pay attention to frequent cycling, where your unit turns on and off more often than usual. This can stem from dirty filters, thermostat malfunctions, or an oversized system working inefficiently. A sudden spike in your energy bills without increased usage is another red flag, often pointing to components working harder due to neglected maintenance.
Strange noises like grinding, squealing, or banging warrant immediate attention, as they may indicate loose parts or motor issues. If your system struggles during peak demand and you need supplementary cooling, portable AC hire can provide temporary relief while you address underlying problems. Regular monitoring of these performance indicators helps you catch small issues before they become costly repairs.
Visual Warning Signs
Your AC unit often shows visible warning signs before major problems occur. Check for ice buildup on the refrigerant lines or evaporator coil, which typically indicates restricted airflow from dirty filters or low refrigerant levels. Water pooling around your indoor unit suggests a clogged condensate drain line that needs immediate clearing to prevent water damage and mold growth.
Inspect for rust or corrosion on the unit’s exterior, refrigerant lines, or mounting brackets. These signs point to moisture issues or aging components that could fail soon. Look for oil stains near the compressor, which signal potential refrigerant leaks requiring professional repair.
During operation, watch for unusual frost patterns on cooling coils or excessive condensation. Black or green discoloration around vents indicates mold growth that needs prompt attention for health reasons. Bent or damaged fins on the outdoor condenser reduce efficiency and should be straightened with a fin comb tool available at most hardware stores. If you notice multiple warning signs simultaneously, contact a certified HVAC technician before the problem escalates into costly repairs or complete system failure.
Creating Your Personal Maintenance Schedule
The key to successful AC maintenance is consistency, and that starts with a personalized schedule. Begin by marking your calendar with monthly tasks like filter checks on the first day of each month. Set recurring reminders on your phone or smart home device to ensure you never miss these quick inspections.
Create a simple maintenance log using a notebook or spreadsheet to track what you’ve done and when. Note the date, task completed, and any observations like unusual sounds or decreased airflow. This history becomes invaluable when troubleshooting problems or scheduling professional service. Many homeowners find success photographing their filter condition monthly to visually track performance over time.
Consider downloading a maintenance checklist and printing it to keep near your thermostat or in your home maintenance binder. Check off tasks as you complete them for that satisfying sense of accomplishment and clear documentation.
Align your seasonal deep-clean tasks with other home projects. Spring cleaning pairs perfectly with pre-summer AC prep, while fall yard work coincides with winterization tasks. By bundling maintenance with existing routines, you’re more likely to follow through consistently.
Share your experience with fellow DIYers in online communities. User feedback often reveals helpful tips and shortcuts that make maintenance easier and more effective for everyone.
Maintaining your air conditioning system doesn’t have to be overwhelming. By breaking down tasks into manageable monthly and seasonal actions, you’re taking control of your home comfort while saving money on energy bills and costly repairs. The beauty of regular AC maintenance is that each small step compounds over time, protecting your investment and keeping your system running efficiently for years to come.
Start simple today. Pick just one task from this checklist, whether it’s changing your filter or clearing debris from your outdoor unit. Even a single action moves you closer to a healthier, more efficient system.
We’d love to hear from you. What maintenance tasks have worked best for your AC system? Have you discovered any time-saving tips or run into challenges along the way? Share your experiences in the comments below. Your insights help build a community where everyone learns from real-world results, making home maintenance more accessible for all skill levels.
Related Posts

Post a Comment