
Home asbestos test kits deliver mixed results, with accuracy rates varying dramatically between laboratory-analyzed samples and instant field tests. Laboratory-based kits—where you collect samples and mail them to certified labs—typically achieve 95-98% accuracy when samples are collected properly, making them reasonably reliable for initial screening. Instant test kits that provide immediate results fall short, with false negatives occurring in up to 30% of cases according to independent studies.
The reliability hinges entirely on your sampling technique. Asbestos fibers distribute unevenly throughout building materials, meaning a single sample from popcorn ceiling or vinyl flooring can miss contaminated areas entirely. Professional inspectors typically collect 3-5 samples per suspect material and use specialized equipment to minimize fiber release during collection.
Cost comparison reveals the real decision point: quality mail-in test kits run $40-75 per sample, while professional inspections average $400-800 for whole-home assessment. For homeowners tackling minor renovations in post-1980 homes with low asbestos probability, DIY kits offer acceptable risk-to-cost ratios. However, pre-1980 homes undergoing major demolition, or any project disturbing multiple material types, warrant professional testing. Your safety protocol during sample collection matters as much as the test itself—improper technique can release dangerous fibers while producing unreliable results.
What Home Asbestos Test Kits Actually Do

The Two Types of DIY Kits
Home asbestos test kits come in two distinct varieties, each with different approaches to identifying asbestos in your materials.
Instant test kits provide on-the-spot results using chemical reagents that react to asbestos fibers. You apply a solution directly to the suspected material and wait for a color change, typically within 10-15 minutes. While convenient and fast, these kits have significant limitations. They can only detect certain types of asbestos and often produce false negatives when asbestos is present in low concentrations or mixed with other materials. The immediate results might seem appealing, but accuracy is questionable.
Mail-in lab analysis kits take a different approach. You collect samples from suspected materials following detailed instructions, seal them in provided containers, and ship them to an accredited laboratory. Professional technicians analyze your samples using polarized light microscopy (PLM) or transmission electron microscopy (TEM), the same methods used by certified inspectors. Results typically arrive within 5-10 business days.
The reliability gap between these options is substantial. Lab analysis kits offer accuracy rates above 95% when samples are collected properly, while instant tests deliver inconsistent results that many professionals consider unreliable for making renovation or remediation decisions.
What You’re Actually Testing For
Asbestos is a naturally occurring mineral fiber that was widely used in Australian construction materials from the 1940s through the 1980s due to its heat resistance, durability, and insulating properties. When these materials are disturbed or deteriorate, they release microscopic fibers into the air that can cause serious lung diseases, including mesothelioma and asbestosis, often decades after exposure.
For homeowners and tradespeople, identifying asbestos in homes is essential before any renovation or demolition work. You’ll commonly find it in cement sheeting (fibro), roof tiles, insulation, vinyl flooring, pipe lagging, textured wall and ceiling coatings, and even old electrical equipment. Homes built or renovated before 1990 are most at risk, though some products containing asbestos were used into the early 2000s.
The challenge is that asbestos cannot be identified by appearance alone. Different types of asbestos were mixed into various building materials, making visual identification unreliable. This is exactly why testing matters—disturbing asbestos-containing materials without proper precautions puts you, your family, and workers at serious health risk.
The Reliability Question: What the Evidence Shows
Accuracy of Lab-Based DIY Kits
Mail-in asbestos test kits that use accredited laboratories offer significantly better reliability than instant visual tests. These kits work by collecting a sample that you send to a certified lab for analysis using polarized light microscopy (PLM) or transmission electron microscopy (TEM), the same methods professionals use.
When properly collected and analyzed by an NVLAP-accredited (National Voluntary Laboratory Accreditation Program) or ISO-certified laboratory, these kits typically achieve accuracy rates of 95% or higher. The lab technicians examining your sample have specialized training and calibrated equipment, which removes much of the guesswork from the process.
However, accuracy depends heavily on your sample collection technique. False negatives often occur when samples miss the asbestos-containing material entirely or when you don’t collect enough material for proper analysis. For example, if your popcorn ceiling has asbestos in scattered patches and you sample a clean area, you’ll get a negative result that doesn’t reflect the true condition.
False positives are rare with accredited labs but can happen due to contamination during collection. Using separate tools and bags for each sample prevents cross-contamination between materials.
User reviews consistently highlight that lab-based kits provide peace of mind when used correctly. Many homeowners report matching results when they later hired professionals to verify, particularly when following collection instructions precisely. The key takeaway from community feedback: these kits are reliable tools when you can access the material safely and follow sampling protocols carefully, but they’re only as good as the sample you provide.
The Problem With Instant Test Kits
Instant asbestos test kits promise results within minutes using color-changing chemicals, but they’ve earned a poor reputation among safety professionals for good reason. These kits attempt to identify asbestos through a visual reaction, but the reality is that asbestos fibers are microscopic and can’t be reliably detected without laboratory equipment.
The biggest problem? False negatives are extremely common. The chemical reactions these kits rely on often fail to detect asbestos that’s actually present, giving you a dangerous false sense of security. Even worse, the testing process itself can disturb asbestos fibers and release them into the air, creating an immediate health hazard in your home.
Professional inspectors and lab technicians consistently advise against instant kits because asbestos identification requires polarized light microscopy or electron microscopy. These aren’t tools you can replicate at home. User reviews across community forums echo these concerns, with many DIYers sharing stories of instant kits showing negative results only to have lab tests later confirm asbestos was present.
If you’re considering testing materials in your home, skip the instant kits entirely. They’re not worth the risk to your health or the money you’ll spend on false results.
Where DIY Testing Falls Short
Even with careful attention to instructions, DIY asbestos testing has significant limitations. The most common pitfall is sampling error—taking material from the wrong spot or collecting an insufficient amount. One community member shared how they tested ceiling texture but missed the asbestos-laden pipe insulation hidden behind drywall. Cross-contamination during collection is another frequent mistake that can skew results.
These kits only test what you send in. If your home has multiple materials from different eras, you’d need several kits to get a complete picture, quickly making professional testing more cost-effective. Situations demanding professional evaluation include whole-house renovations, properties built before 1980 with extensive suspect materials, commercial buildings, and any scenario requiring legal documentation for real estate transactions or insurance claims. When health and safety regulations apply—especially for contractors—professional certified testing isn’t just recommended, it’s often legally required.
When DIY Testing Makes Sense (And When It Doesn’t)
Good Candidates for DIY Testing
Home asbestos test kits work best in specific, straightforward situations where you need quick answers without hiring a professional right away.
If you’re planning to remove or disturb a single material—like old floor tiles, pipe insulation, or ceiling texture—and want to know whether it contains asbestos before starting work, a DIY kit provides a reasonable screening option. You’ll collect one sample following the kit’s instructions and send it to a lab for analysis, giving you a definitive answer about that specific material.
Pre-purchase home screening is another practical use. Before buying an older property, testing suspicious materials yourself can help identify potential asbestos concerns during negotiations or inform your renovation budget. While not a substitute for a comprehensive professional inspection, it offers valuable preliminary information.
DIY kits also make sense when you’ve spotted something that looks like asbestos and want to confirm your suspicions before calling in professionals. This approach helps you make informed decisions about whether to proceed with a full assessment and what safety precautions to take in the meantime.
The key is understanding that home kits answer straightforward questions about individual materials. They’re most reliable when you know exactly what you’re testing and follow sampling procedures carefully. For complex situations involving multiple materials or extensive renovation plans, professional assessment remains the smarter choice.
When to Skip the DIY Route
While DIY asbestos test kits serve specific purposes well, certain situations absolutely demand professional assessment. Understanding when to step back from the DIY approach isn’t about questioning your abilities—it’s about recognizing scenarios where professional expertise and equipment become essential for safety and accuracy.
If you’re planning whole-house testing, the sheer number of samples required makes professional services more practical and cost-effective. Professionals can strategically sample multiple locations simultaneously, reducing overall testing time and providing comprehensive reports that cover your entire property. This becomes particularly important during major renovations or home purchases, where missing asbestos-containing materials could lead to expensive surprises down the track.
Never attempt DIY testing on visibly damaged, crumbling, or deteriorating materials. These situations pose immediate health risks, as disturbed asbestos releases dangerous fibres into the air. Professional assessors have specialized containment equipment and training to handle compromised materials safely, protecting both themselves and your household from exposure.
Commercial properties, rental units, and properties involved in legal disputes require certified professional testing. Regulatory compliance, insurance requirements, and legal documentation demand the kind of defensible results that only accredited laboratories and licensed inspectors can provide. Similarly, local councils often mandate professional certification before approving demolition or major renovation permits.
The decision between DIY versus professional services ultimately depends on your project scope, material condition, and legal requirements. When safety margins are tight or stakes are high, investing in professional assessment protects both your health and your wallet long-term.
How to Get Accurate Results If You Use a DIY Kit
Choosing a Reputable Kit
Not all home asbestos test kits deliver the same level of accuracy. The most important factor is laboratory accreditation. Look for kits that use labs certified by NVLAP (National Voluntary Laboratory Accreditation Program) or recognized by NIST (National Institute of Standards and Technology). These accreditations mean the lab follows strict testing protocols and undergoes regular quality checks.
Check what’s included in the kit before purchasing. A reliable kit should provide clear, step-by-step instructions that explain exactly how to collect samples safely, proper sample containers (usually sealable bags or vials), protective gloves, and a pre-paid envelope for mailing your sample. Avoid kits with vague instructions or missing safety equipment.
Turnaround time matters when you’re planning renovations. Most reputable labs process results within 3-7 business days, though expedited options may cost extra. Be wary of unusually fast results, as proper asbestos analysis takes time.
Price typically ranges from $30 to $70 per sample. Suspiciously cheap kits may cut corners on lab quality, while expensive doesn’t always mean better. Read community reviews from other homeowners who’ve used the specific kit. Their real-world experiences often reveal issues with unclear instructions, delayed results, or unhelpful customer service that product descriptions won’t mention.
Safe Sample Collection
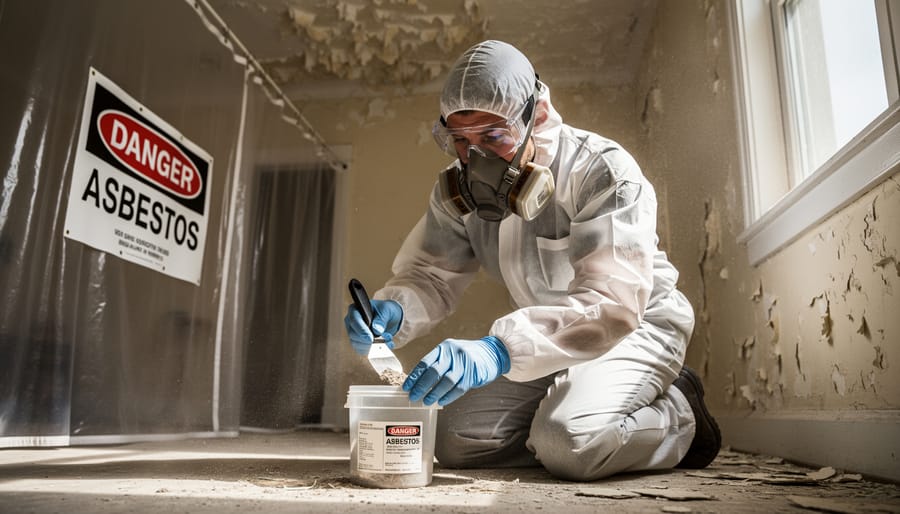
Before collecting any sample, safety must be your top priority. Asbestos fibres become dangerous when disturbed and released into the air, so proper precautions are essential.
Start by wearing proper safety equipment: a disposable coverall, gloves, and an N95 or P100 respirator mask. Keep others and pets away from the work area during collection.
The golden rule is to keep everything wet. Use a spray bottle filled with water and a few drops of dish soap to thoroughly saturate the material before touching it. This prevents fibres from becoming airborne. Work gently and avoid scraping, sanding, or breaking materials.
Take your sample by cutting a small piece with a utility knife, keeping the material wet throughout. Immediately place it in a sealed plastic bag or the container provided in your test kit. Label it clearly with the location and date.
For cleanup, wipe down surfaces with damp paper towels and dispose of everything in sealed plastic bags. Never sweep or vacuum, as this launches fibres into the air. Wash your hands thoroughly after removing gloves.
These precautions significantly reduce risk when handled correctly, though hiring professionals remains the safest option for extensive sampling.
Common Mistakes to Avoid
Even experienced DIYers can compromise test accuracy through simple oversights. Cross-contamination is surprisingly common—touching the sample area with bare hands, using dirty tools, or collecting samples near open windows can introduce fibers that skew results. Always wear disposable gloves and use fresh, clean tools for each sample location.
Taking insufficient samples is another frequent error. One homeowner reported testing only their popcorn ceiling and later discovering asbestos in floor tiles during renovation. Sample multiple materials and areas, especially in homes built before 1980 when asbestos use was widespread.
Many people waste money testing obviously newer materials that couldn’t contain asbestos, or miss high-risk materials like pipe insulation, textured coatings, and vinyl flooring. Research which materials in your home’s age group typically contained asbestos before purchasing a kit.
Misinterpreting results causes significant problems. A negative result only applies to the exact material tested—not adjacent areas or similar-looking materials elsewhere. Some users assume “trace amounts” mean safe, but any confirmed asbestos requires professional handling during disturbance. When results show positive or you’re uncertain, professional assessment remains the safest next step.
What to Do With Your Test Results
Getting your test results back is just the beginning—what you do next depends entirely on what those results tell you.
If your test comes back positive for asbestos, don’t panic, but do take it seriously. Your first step is to leave the material undisturbed—disturbing asbestos releases dangerous fibres into the air. Contact licensed asbestos abatement professionals immediately for a professional inspection and removal quote. Never attempt DIY removal of confirmed asbestos materials like asbestos ceiling tiles or insulation. Most states require licensed professionals for removal, and for good reason—proper containment, protective equipment, and disposal procedures are essential for safety. Get multiple quotes from certified abatement contractors and verify their licensing before proceeding.
Negative results offer some peace of mind, but remember the limitations we discussed earlier. A negative result only confirms that the specific sample you sent was asbestos-free—it doesn’t guarantee your entire home is clear. If you’re planning renovations affecting multiple areas, consider testing samples from each location separately. Many homeowners in our community recommend keeping documentation of negative results for future reference, especially if selling your home.
Inconclusive results require retesting with a fresh sample. This outcome often happens due to contamination, insufficient sample size, or unclear material composition. Review your sampling technique, ensure you’re collecting enough material (typically a teaspoon-sized amount), and avoid cross-contamination. If a second test remains inconclusive, it’s worth investing in a professional on-site inspection. Some materials are simply too complex or degraded for reliable home testing, and professional inspectors can assess the situation more comprehensively while ensuring your safety throughout the process.
The Cost Reality: DIY vs. Professional Testing
Let’s break down the real numbers behind asbestos testing to help you make an informed decision.
DIY home test kits typically range from $30 to $80 per sample. That sounds affordable upfront, but here’s what you need to know: most homes require multiple samples from different materials and locations to get a complete picture. Testing that suspicious ceiling texture, pipe insulation, and floor tiles? You’re already looking at $90 to $240, and you still need to pay additional lab fees in many cases.
Professional testing services cost between $200 and $800+, depending on your location and the scope of work. Yes, that’s significantly more expensive, but consider what you’re getting: trained inspectors who know exactly where to look, proper containment during sampling to prevent fiber release, multiple samples collected safely, and legally defensible results if you’re planning renovations or facing property transactions.
Here’s the honest assessment from homeowners who’ve been there: DIY kits make financial sense when you’re testing a single, easily accessible material in good condition and simply want peace of mind before a minor project. One community member shared, “I tested my basement tiles before laying new flooring. The $40 kit worked perfectly for my straightforward situation.”
However, if you’re dealing with damaged materials, planning major renovations, or need results for legal purposes, that extra $120-$700 for professional testing becomes worthwhile insurance. Professional results carry legal weight, provide comprehensive coverage, and eliminate the risk of improper handling that could expose your family to dangerous fibers.

Home asbestos test kits can be reliable tools when you use them correctly and understand their limitations. They offer an affordable, accessible first step for identifying potential asbestos in your home, especially for straightforward situations like testing a single material before a small renovation. The key is following sampling instructions precisely and choosing accredited laboratories for analysis.
However, these kits aren’t suitable replacements for professional assessments in high-risk scenarios. If you’re planning major renovations, dealing with damaged materials, or need comprehensive testing throughout your property, hiring a certified asbestos inspector remains the safer choice. Professionals bring expertise in proper sampling techniques, can assess hard-to-reach areas, and provide legally recognized documentation.
Your decision ultimately depends on your specific situation. Consider your project scope, comfort level with sampling procedures, and the consequences of a false negative result. For minor projects with low-risk materials, DIY kits may serve your needs well. For anything more complex, the investment in professional testing protects both your health and your wallet in the long run.
Whatever path you choose, prioritize safety above cost savings. Asbestos exposure carries serious health risks that no amount of money can undo. Make your decision based on informed judgment rather than convenience alone.
Related Posts

Post a Comment