
Measure your 8×5 bathroom space precisely before demolition begins—40 square feet requires strategic planning to maximize functionality without compromising comfort. Start by mapping your current plumbing locations, as relocating pipes and drains can add $1,500-$3,000 to your budget, while keeping fixtures in existing positions saves significantly on both labor and materials.
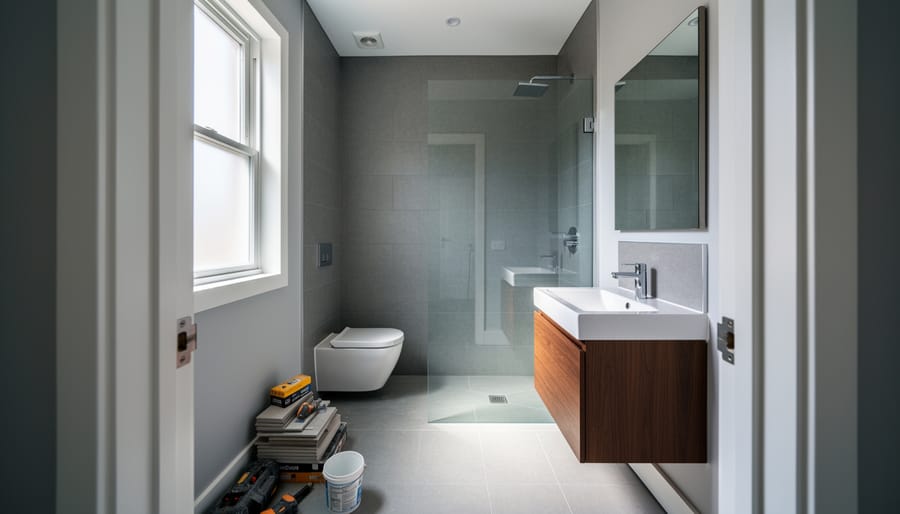
Choose a layout that prioritizes traffic flow: position the toilet against the 5-foot wall, install a 30-inch vanity opposite, and dedicate the remaining wall to a shower-tub combo or walk-in shower. This configuration provides adequate clearance (minimum 21 inches in front of the toilet) while meeting building codes in most jurisdictions.
Calculate material quantities accurately to avoid costly mid-project runs—you’ll need approximately 80-100 square feet of wall tile accounting for waste, 40 square feet of flooring, and specific amounts of cement board, grout, and adhesive based on your chosen finishes. Budget $8,000-$15,000 for a mid-range remodel, with DIY labor potentially reducing costs by 30-40%.
Rent professional-grade tools rather than purchasing equipment you’ll use once: tile saws, demolition hammers, and moisture meters are essential for quality results but represent significant upfront investment. Real homeowners in our community report that proper tool selection and preparation reduce project timelines from 4-6 weeks to 2-3 weeks for DIY renovations.
Why Your 8×5 Bathroom Needs a Different Approach
An 8×5 bathroom presents unique challenges that standard renovation guides often overlook. At just 40 square feet, this compact space falls into an awkward middle ground—it’s larger than a tiny powder room but smaller than most full bathrooms. This specific dimension means generic modern bathroom renovation ideas rarely translate well without significant adjustments.
Many homeowners mistakenly believe that small bathroom remodels are simpler and cheaper than larger projects. The reality is quite different. Working in confined spaces often requires specialized tools, precise measurements, and creative problem-solving that can actually increase complexity. You can’t just scale down a standard bathroom design—every inch matters when space is limited.
Another common misconception is that you need to sacrifice functionality for style in a compact bathroom. Community feedback from experienced renovators shows that with the right approach, an 8×5 layout can accommodate a full-size shower, toilet, vanity, and storage without feeling cramped. The key lies in understanding how these specific dimensions impact fixture placement, door swing clearance, and traffic flow.
The 8×5 configuration also demands different material considerations. Standard tile patterns may not align properly, pre-fabricated vanities might overwhelm the space, and standard plumbing fixture spacing won’t always work. You need dimension-specific solutions, not one-size-fits-all advice.
User experiences consistently highlight that attempting to follow generic bathroom remodel tutorials for this size leads to costly mistakes, wasted materials, and frustrated do-overs. Success requires acknowledging the unique constraints and opportunities that 40 square feet presents, then planning accordingly with the right tools and realistic expectations from the start.
Planning Your Layout: Making Every Inch Count
Standard vs. Space-Saving Fixtures
In an 8×5 bathroom, every inch counts, but you don’t have to compromise on comfort. Understanding the difference between standard and space-saving fixtures helps you make smart choices that maximize functionality.
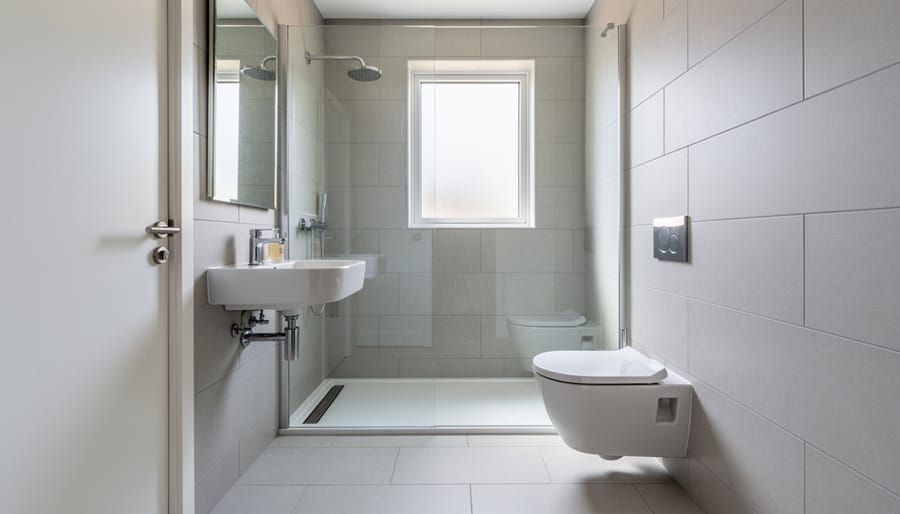
Standard toilets typically measure 28-30 inches from wall to front, while compact or round-bowl models range from 25-28 inches. In a 40-square-foot space, opting for a round-bowl toilet saves 2-3 inches compared to elongated models. Many homeowners find round bowls perfectly comfortable, though you’ll want to test them at a showroom first. Wall-hung toilets are another excellent option, creating visual space and making floor cleaning easier.
For sinks, pedestal and wall-mounted styles work better than traditional vanities in tight quarters. Standard vanities extend 21-24 inches from the wall, while corner sinks or narrow wall-mounted models can fit in 15-18 inches. However, consider storage needs carefully. A slim 16-inch vanity might provide just enough cabinet space without overwhelming the room. Community reviews consistently highlight that shallow-depth vanities, around 12-16 inches, offer the best balance.
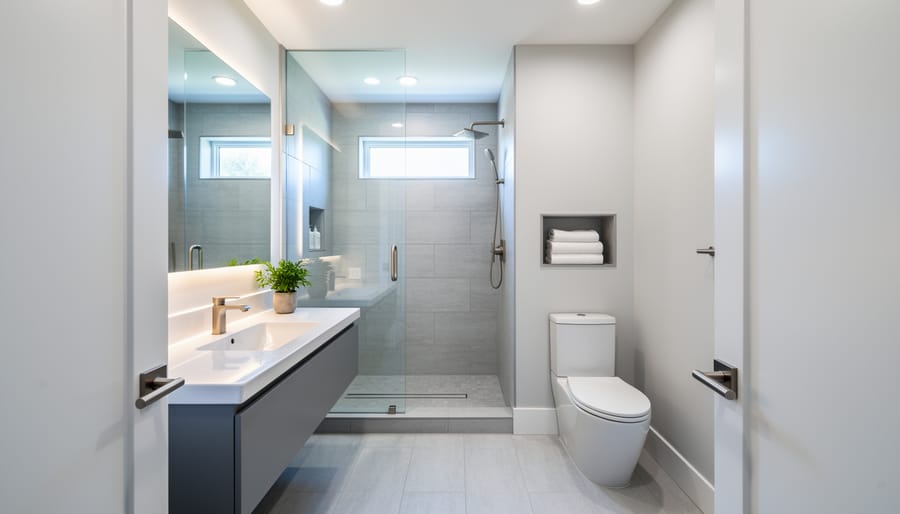
Shower and tub choices significantly impact your layout. Standard tub-shower combos measure 60×30 inches, consuming one entire wall in your 8-foot space. Corner showers starting at 32×32 inches or neo-angle units maximize floor space while providing comfortable showering room. If soaking is essential, Japanese-style deep tubs with smaller footprints offer a compromise. Walk-in showers with glass doors create an open feel that makes small bathrooms appear larger than enclosed tub-shower combinations.
The Three Layout Options That Actually Work
When you’re working with an 8×5 bathroom space, three primary layout configurations consistently deliver the best results. Each works best in specific situations, so understanding your home’s existing setup will save you significant time and money.
The Single-Wall Layout positions all fixtures along one 8-foot wall. This configuration works exceptionally well when your door sits on one of the 5-foot walls and your main plumbing stack runs along the opposite long wall. Community members report this design offers the most affordable remodel since you’re not relocating plumbing lines. Expect to arrange fixtures in this order: toilet, vanity, then tub or shower. This layout provides generous floor space in the center, making the bathroom feel more open.
The L-Shaped Layout places fixtures along two adjacent walls, typically the 8-foot wall and one 5-foot wall. Choose this when your door location allows it and you want to separate wet and dry zones. Many DIYers appreciate how this configuration creates a natural division between the shower area and the rest of the bathroom. One renovator from Ohio shared that this layout let them add a larger vanity without the room feeling cramped.
The Galley Layout runs fixtures down both 8-foot walls, working best when your door enters from a 5-foot end wall. This symmetrical approach feels balanced and maximizes storage potential. However, it requires plumbing on two walls, which increases costs if you’re moving drain lines. Professional installers recommend this layout when you’re already doing extensive plumbing work anyway.
Before finalizing your choice, locate your existing plumbing stack and measure your door swing path to avoid costly surprises.
Essential Tools and Equipment You’ll Need
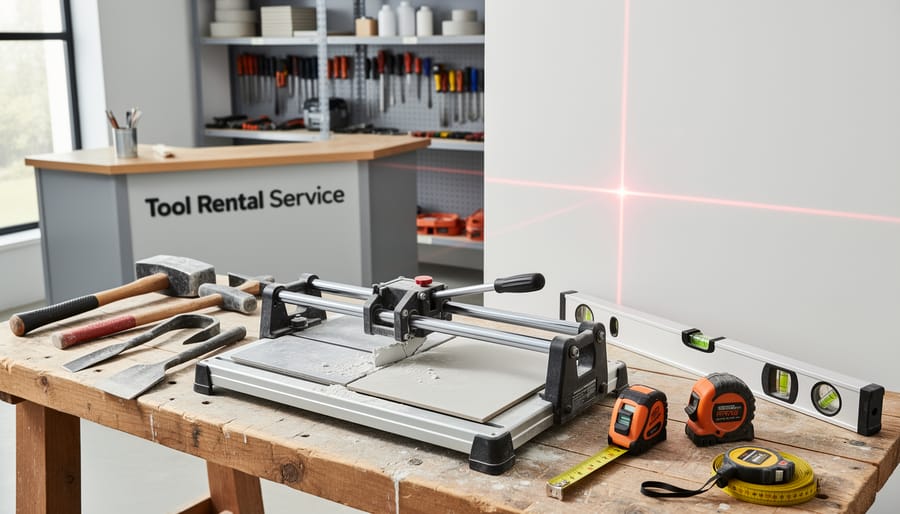
Demo and Rough-In Phase Tools
Demolition is where your 8×5 bathroom transformation truly begins, and having the right tools makes this messy job safer and more efficient. A reciprocating saw (often called a Sawzall) is your best friend for cutting through old plumbing, removing vanities, and slicing drywall. Most rental shops offer these for around $30-40 per day, and they’re worth every penny compared to manual demolition methods.
For tile removal, consider renting a floor scraper or tile chisel attachment for a rotary hammer. These power tools save your back and cut removal time dramatically. Community members recommend starting with a manual scraper for small areas to gauge the tile’s adhesion before committing to a rental.
Don’t overlook utility essentials like a drain snake for clearing old lines before new installation, heavy-duty pry bars for pulling up fixtures, and a shop vacuum rated for fine dust. Many DIYers report that dust containment is their biggest regret when skipping proper cleanup equipment.
Safety gear is non-negotiable during demo: wear safety glasses, respirators for dust and mold, heavy gloves, and steel-toed boots. One user’s feedback emphasized keeping a first-aid kit nearby, as old nails and sharp edges are common hazards in tight bathroom spaces.
Installation and Finishing Tools
Professional-grade installation and finishing tools transform a bathroom remodel from amateur to polished. Quality tile work requires precision equipment that many homeowners rent rather than purchase.
A wet saw is essential for cutting ceramic, porcelain, or natural stone tiles. These power tools use a diamond blade and water cooling system to create clean, accurate cuts without chipping. For smaller projects or touch-ups, a manual tile cutter (also called a snap cutter) works well on straight cuts through ceramic tile up to 3/8 inch thick.
Laser levels have revolutionized tile installation by projecting perfectly straight horizontal and vertical lines across walls and floors. This eliminates the tedious chalk-line method and ensures your tile rows stay level throughout the entire room. Even a basic cross-line laser level dramatically improves installation accuracy.
For finishing work, you’ll need trowels in various sizes for spreading thinset and grout, rubber grout floats for working material into joints, and large sponges for cleanup. A grout removal tool becomes necessary if you’re replacing existing tile.
Community feedback consistently highlights that investing in or renting quality installation tools saves time and reduces costly mistakes. Professional contractors emphasize that proper equipment produces results worth the rental cost.
Budget Breakdown: What an 8×5 Bathroom Remodel Really Costs
Understanding the real costs of an 8×5 bathroom remodel helps you plan effectively and avoid surprises. Here’s what you can expect to spend on a 40-square-foot renovation in Australia.
For a mid-range DIY renovation, budget between $8,000 and $15,000. Professional installations typically run $15,000 to $25,000 or more, depending on finishes and complexity.
Fixtures and fittings represent your largest expense category. A quality toilet costs $300-$800, while a vanity with basin runs $500-$1,500. Shower screens range from $400-$1,200, and a basic bathtub starts around $500. Tapware packages typically cost $200-$600. Budget fixtures can save money initially but may require earlier replacement.
Materials including tiles, waterproofing membranes, and substrate boards account for $2,000-$4,000. Floor tiles generally cost $30-$80 per square meter, while wall tiles range from $25-$100 per square meter. Don’t skimp on waterproofing, as this prevents costly water damage later.
Labour represents the biggest cost difference between DIY and professional approaches. Plumbers charge $80-$150 per hour, electricians $75-$130 per hour, and tilers $45-$100 per hour. A complete professional renovation involves 80-120 hours of skilled labour. By handling demolition, painting, and some installations yourself, you can save $5,000-$10,000.
Tool costs for DIY projects range from $500-$1,000 if purchasing, but renting specialized equipment like tile cutters, demolition hammers, and wet saws reduces this to $200-$400. Consider which tools you’ll use again versus those better suited for short-term rental.
Permits and inspections typically cost $200-$500, depending on your local council requirements. Never skip permits, as they protect your investment and ensure compliance with building codes.
The key to staying within budget is allocating funds where quality matters most: waterproofing, plumbing, and electrical work. Save on cosmetic elements where you’re comfortable with more affordable options.
Step-by-Step Remodel Timeline
Weeks 1-2: Planning and Demolition
Before swinging your first hammer, invest time in proper planning to avoid costly mistakes. Start by checking with your local council about permit requirements—most 8×5 bathroom remodels require building permits, especially if you’re moving plumbing or electrical fixtures. This process typically takes 1-2 weeks, so apply early.
While waiting for permits, finalize your material selections and order fixtures like your vanity, toilet, and shower base. Lead times can stretch 2-4 weeks for quality fixtures, so ordering early keeps your project on schedule. Create a detailed shopping list and compare prices across suppliers to stay within budget.
Once permits arrive, you’re ready for demolition. Start by turning off water and electricity to the bathroom at the main switches. Remove fixtures carefully—older toilets and vanities might have salvage value. When breaking up tiles, rent a quality demolition hammer and wear proper safety gear including goggles, dust masks, and heavy gloves.
Work systematically from top to bottom: remove light fixtures first, then vanity and toilet, followed by shower or tub, and finally tile and drywall. Keep debris contained with plastic sheeting in doorways. Plan for responsible waste removal—a standard 8×5 bathroom generates approximately 2-3 cubic meters of waste, requiring either a skip bin or multiple trailer loads.
Weeks 3-4: Rough-In and Waterproofing
During weeks three and four, your bathroom transformation moves behind the walls with critical infrastructure work. This phase requires careful attention to detail and often benefits from professional plumbing solutions, especially for complex configurations.
The rough-in process begins with relocating plumbing lines for your new layout. Drain pipes must maintain proper slope (typically 1/4 inch per foot) to prevent clogs. Water supply lines need secure mounting and appropriate sizing for fixtures. Many DIYers rent pipe cutters, threading tools, and soldering equipment for copper work, though PEX systems offer a more forgiving learning curve.
Electrical rough-in follows, positioning outlets at least 6 feet from water sources and installing GFCI protection. Ventilation fan wiring and heated floor cables (if planned) go in during this stage.
Waterproofing is non-negotiable in an 8×5 space. Apply waterproof membrane to shower walls extending 6 inches beyond wet areas. Seal seams with manufacturer-approved tape, paying special attention to corners and penetrations. Community members recommend RedGard or Schluter systems for reliability.
Before closing walls, schedule required inspections. Inspectors verify code compliance for plumbing connections, electrical work, and waterproofing. Address any issues immediately. This checkpoint protects your investment and ensures longevity.
Weeks 5-6: Installation and Finishing
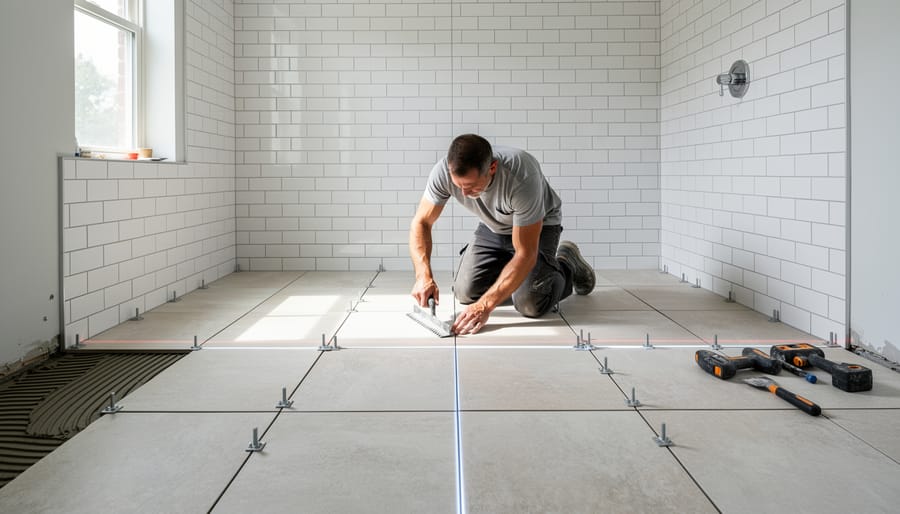
With the plumbing and electrical complete, you’re ready for the visible transformation. Start with tile installation using a rented wet saw for precise cuts and a notched trowel for proper adhesive coverage. Work from the center outward to maintain symmetry, using tile spacers to ensure consistent grout lines. Most DIYers report that floor tiling takes 1-2 days, while wall tiling (especially shower surrounds) requires 2-3 days depending on pattern complexity.
Allow 24 hours for tile adhesive to cure before grouting. A quality grout float makes application easier, and a grout sponge prevents haze buildup. According to community feedback, sealing grout after it cures (typically 72 hours) prevents staining and extends lifespan significantly.
Install fixtures methodically: toilet, vanity, then shower/tub. A basin wrench reaches tight spaces under sinks, while adjustable wrenches handle most other connections. Prime and paint walls with moisture-resistant paint, using an angled brush for edges and a roller for large areas.
Final touches include caulking around fixtures (use mildew-resistant silicone), installing mirrors and accessories, and checking all connections for leaks. Run water through all fixtures simultaneously to test drainage capacity. Professional installers recommend photographing all work for future reference and warranty documentation.
Common 8×5 Bathroom Mistakes (And How to Avoid Them)
Even experienced renovators stumble when tackling an 8×5 bathroom, but learning from others’ experiences can save you time, money, and frustration. Based on feedback from the DIY community, here are the most common pitfalls and how to sidestep them.
Poor ventilation planning tops the list of common bathroom design mistakes. Many renovators focus on aesthetics and forget that moisture management is critical in a 40-square-foot space. Without proper exhaust fans or adequate airflow, you’ll face mold and paint damage within months. Community members recommend installing an exhaust fan rated for at least 50 cubic feet per minute (CFM) and ensuring it vents outside, not into your roof cavity.
Ignoring the wet area regulations is another frequent error. Australian standards require specific waterproofing measures, and cutting corners here leads to expensive water damage down the track. Always hire a licensed waterproofer or use compliant DIY waterproofing systems, and allow proper curing time before tiling.
Underestimating storage needs frustrates many homeowners post-renovation. In an 8×5 bathroom, every centimeter counts. Users report that recessed shelving, wall-mounted cabinets, and corner units maximize usable space without crowding the room. Plan your storage solutions during the design phase, not as an afterthought.
Choosing style over function with fixtures causes regret later. That rainfall showerhead might look luxurious, but if your water pressure can’t support it, you’ll be disappointed. Similarly, pedestal sinks look sleek but offer zero storage underneath. Test water pressure before committing to fixtures, and balance aesthetics with practical daily use.
Finally, DIYers often rush the planning stage and skip creating a detailed material list. This leads to multiple trips to the hardware store, project delays, and budget blowouts. Measure twice, list everything including fasteners and adhesives, and add 10 percent extra for tiles and other materials to account for cuts and breakage.
What the Tool Hire Community Says: Real Renovation Stories
When we reached out to DIYers who’ve tackled 8×5 bathroom remodels, several common themes emerged that could save you time, money, and headaches.
Sarah from Portland shared her biggest lesson: “I wish I’d rented a rotary hammer drill from day one instead of struggling with my regular drill on the tile removal. What took me two days should’ve taken four hours.” Her tip echoes advice from multiple renovators who emphasized investing in the right tools rather than making do with underpowered equipment.
The demolition phase consistently came up as more challenging than expected. Mike, a first-time renovator, noted: “The dust was unbelievable. Rent an industrial shop vacuum and actually seal off the rest of your house. We didn’t, and we were cleaning for weeks afterward.” He gave his rented tile removal equipment five stars but admitted he underestimated how much protective gear and containment supplies he’d need.
Community members universally praised the value of renting specialty tools rather than buying. “A tile saw costs hundreds, but I used it for maybe six hours total,” explained Jennifer. “Renting made perfect sense and freed up budget for better fixtures.”
One repeated piece of wisdom: buffer time is essential. Nearly every renovator we spoke with mentioned their project took 25-50 percent longer than planned. Tom’s advice resonated: “Rent tools for an extra day or two beyond what you think you’ll need. Returning early gets you a refund, but scrambling for last-minute extensions is stressful and sometimes impossible on weekends.”
The consensus? Planning thoroughly, renting appropriate tools, and learning from others’ experiences transforms an 8×5 bathroom remodel from overwhelming to achievable.
Transforming your 8×5 bathroom doesn’t have to be overwhelming when you approach it with the right planning and resources. Throughout this guide, we’ve covered everything from layout optimization and budgeting to the specific tools you’ll need at each stage of your project. The key to success lies in thorough preparation: measure twice, create a realistic timeline, and don’t rush the critical steps like waterproofing and proper ventilation installation.
Remember that having the right tools makes all the difference between a frustrating experience and a smooth renovation. Tool rental services offer an affordable way to access professional-grade equipment without the long-term investment, particularly for specialized items you’ll only use once. From demolition hammers to tile saws and paint sprayers, renting gives you quality tools exactly when you need them.
Before breaking ground, finalize your design plan, secure necessary permits, and create a detailed materials list. Connect with your local community through renovation forums and reviews to learn from others who’ve tackled similar projects. With careful planning, the right equipment, and a step-by-step approach, you’re ready to transform your 8×5 bathroom into a space that perfectly matches your vision and needs.
Related Posts

Post a Comment