
Assess your damaged vinyl furniture by examining the tear size, location, and material condition before committing to repair or replacement. Tears under three inches in low-stress areas like chair backs typically cost $5-15 in materials to fix yourself, while replacing the same piece runs $200-800. Clean the damaged area thoroughly with rubbing alcohol, then apply vinyl repair compound that matches your furniture’s texture and color, smoothing it level with the surrounding surface using a grain pad for realistic results.
Consider replacement when structural damage extends beyond the vinyl surface, when multiple large tears compromise seating integrity, or when the furniture’s frame shows signs of failure. Professional repair services charge $75-150 per piece but deliver seamless results on high-value items like vintage chairs or designer sofas. DIY repairs work best on small punctures, cigarette burns, and surface scratches where color matching isn’t critical.
Gather essential tools before starting: vinyl repair kits with heat-activated compounds, grain matching papers, palette knives for application, and hair dryers for curing. Most repairs take 30-60 minutes plus drying time, making this an achievable weekend project that extends furniture life by 3-5 years. This guide walks you through cost comparisons, damage assessment criteria, and step-by-step repair techniques to help you make the right decision for your situation.
The Real Cost of Replacement vs. Repair
When deciding between furniture replacement vs repair, understanding the actual dollar amounts can make the choice clear. Here’s a breakdown of what you can expect to pay for common vinyl furniture repairs versus buying new.
For dining chairs with vinyl seats, replacement typically costs $80-$200 per chair, depending on quality. DIY vinyl repair using a patch kit runs $15-$25 for materials that can fix multiple chairs, while professional repair services charge $40-$75 per chair. The savings become even more significant when repairing a full set of six chairs, where DIY costs remain under $30 compared to $480-$1,200 for replacements.
Vinyl couches present a larger investment decision. A mid-range replacement sofa costs $800-$2,500, whereas a basic vinyl repair kit for small tears costs $20-$35. Professional upholstery repair for significant damage ranges from $150-$400, still substantially less than replacement. Even factoring in tool rental for heat guns or specialty equipment (typically $15-$30 per day), repair remains the economical choice.
Car seats with vinyl damage face similar economics. Automotive upholstery replacement starts at $200-$500 per seat, while DIY repair kits designed for car interiors cost $25-$45. Professional automotive vinyl repair typically runs $100-$250 per seat, offering a middle ground for those wanting quality results without the full replacement expense.
Office chairs show the most dramatic savings potential. Quality ergonomic office chairs cost $300-$800 new, but vinyl seat repairs using patch kits cost just $15-$30 for DIY or $60-$120 through professionals. Community reviews consistently show that proper vinyl repair extends chair life by 3-5 years.
The numbers clearly favor repair in most scenarios, particularly when damage is localized to small tears, burns, or scratches rather than structural failure. Even accounting for your time investment, repair delivers substantial savings while keeping functional furniture out of landfills.
When Vinyl Furniture Is Worth Repairing
Damage Types That Repair Well
Good news for vinyl furniture owners: many common types of damage are surprisingly repairable with the right approach and materials. Small tears up to two inches long respond exceptionally well to vinyl repair kits, which typically include patching materials and color-matched compounds. These kits can make tears virtually invisible when applied correctly.
Punctures from sharp objects, including pet claws or dropped items, are among the easiest damages to fix. The repair process involves cleaning the area, applying a backing patch from underneath, and filling with liquid vinyl. Burns and heat marks often penetrate only the surface layer, making them ideal candidates for sanding and color restoration techniques.
Cracks in the vinyl surface, particularly those caused by drying or age, can be filled and sealed effectively to prevent further spreading. Scuffs and surface scratches usually require only cleaning and color touch-ups rather than extensive patching. Worn areas where the texture has faded or the color has lightened can be revitalized using vinyl dyes and conditioners.
The key factor determining repair success is catching the damage early. Fresh tears are easier to align and bond than older ones where the edges have curled or dried out. Community feedback consistently shows that addressing these damage types promptly leads to repairs lasting several years.
Red Flags That Signal Replacement
While many vinyl furniture issues are repairable, certain conditions make replacement the smarter choice. If your vinyl shows extensive cracking across multiple surfaces or deep tears that expose significant padding underneath, you’re looking at repairs that quickly add up in time and materials.
Structural damage is a critical factor. Check the furniture frame by sitting in different positions and listening for creaks or feeling wobbles. If the wood or metal framework is broken, warped, or loose at joints, repair costs often exceed the furniture’s value. Frame repairs require carpentry skills beyond typical vinyl fixes.
Mold and mildew growth between the vinyl and padding presents serious health concerns. Surface mold might clean off, but if you detect musty odors or see dark staining that won’t remove with cleaning, the contamination has likely penetrated the cushioning. This isn’t salvageable through DIY methods.
Run a simple cost analysis: add up repair materials, any tool rentals needed, and your time investment. Community feedback consistently shows that when repairs approach 50-60 percent of replacement cost, buying new makes financial sense. Factor in that new furniture includes warranties and modern improvements in vinyl durability. If you’re spending significant money on an aging piece with marginal remaining lifespan, replacement delivers better long-term value.
Quality and Sentimental Value Considerations
Not all vinyl furniture holds equal value, and sometimes repair makes sense even when replacement might seem more practical. High-quality pieces from reputable manufacturers often feature superior construction, genuine leather backing, and durable vinyl coatings that will outlast budget alternatives. These items typically cost significantly more to replace, making professional repair economically sound even for extensive damage.
Sentimental value also plays a crucial role in repair decisions. Family heirlooms, vintage mid-century pieces, or furniture tied to special memories deserve preservation efforts regardless of repair costs. A dining chair from your grandparents’ home or a beloved recliner where you rocked your children carries irreplaceable emotional weight.
When assessing whether to repair high-value pieces, consider the furniture’s original cost, current replacement value, and condition of the underlying structure. If the frame remains solid and only the vinyl covering needs attention, repair often proves worthwhile. Community reviews from fellow DIYers suggest that investing in quality repair materials and taking time to properly restore cherished pieces typically yields satisfying results that extend furniture life by many years.
Essential Tools and Materials for Vinyl Repair
Basic DIY Repair Kit Essentials
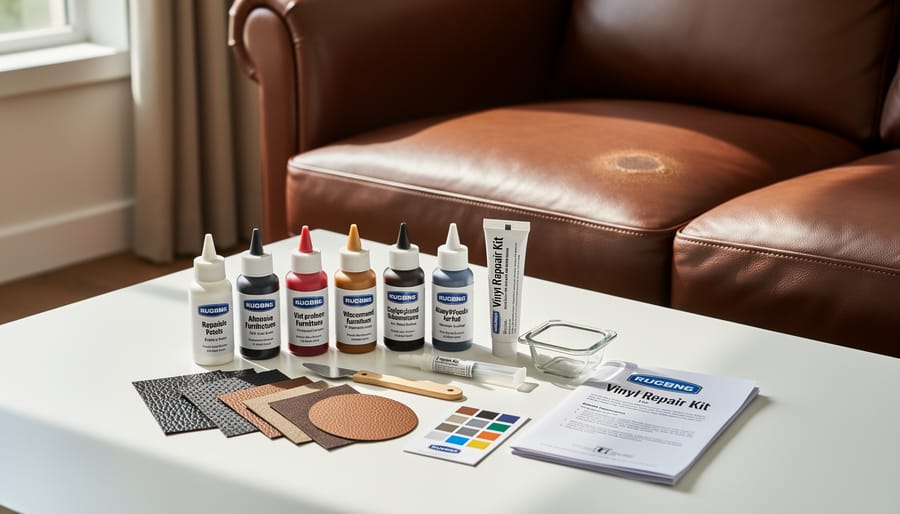
Building a basic vinyl repair kit requires surprisingly few items, and most can be sourced for under £50 total. Here’s what you’ll need and what to expect cost-wise.
A vinyl repair compound is your foundation material. These come in liquid or paste form and typically cost £8-15 per kit. Choose a compound that matches your furniture’s flexibility, as some are designed for rigid applications while others work better on soft, pliable surfaces.
Quality vinyl adhesive runs about £5-12 and is essential for securing loose sections or reattaching separated seams. Look for products specifically formulated for upholstery rather than general-purpose glues.
Grain papers or texture sheets help recreate the surface pattern of your vinyl. These typically cost £3-8 per sheet and come in various patterns. Many repair kits include a selection, which offers good value if you’re unsure of your exact texture.
A heat tool or iron is necessary for proper bonding. If you don’t own a heat gun (£15-30), a household iron on low heat often works adequately for small repairs.
Colorants or tinting agents (£6-12) let you match your furniture’s exact shade. Start with primary colours and mix to match.
Backing fabric (£3-5 per metre) reinforces tears from behind, and basic cleaning supplies including rubbing alcohol and lint-free cloths (under £5) prepare surfaces properly.
Community feedback consistently highlights that buying a complete repair kit (£25-40) often provides better value than purchasing items separately, especially for first-time repairs.
Tools Worth Renting for Larger Jobs
For larger vinyl furniture repair projects, renting professional-grade equipment can deliver better results without the hefty purchase price. A quality heat gun is essential for working vinyl patches seamlessly into damaged areas. These tools offer precise temperature control between 100-650°C, preventing scorching while ensuring proper adhesion. Rental costs typically run $15-25 per day, far more economical than buying a professional unit for $150-300.
Commercial vinyl repair kits available through hire include comprehensive color-matching systems with dozens of pigment options, grain pattern tools, and compound formulations not found in retail versions. These professional kits rent for around $30-50 daily and can tackle multiple furniture pieces or larger damaged sections.
Consider renting upholstery stretching tools and pneumatic staplers if your repair involves reupholstering entire sections. These specialized tools ensure tight, professional-looking results that handheld methods struggle to achieve. Just as you might repair power tools rather than replace them, renting quality equipment lets you restore vinyl furniture cost-effectively while achieving tradesperson-level finishes. Most hire shops offer daily or weekend rates, and staff can demonstrate proper usage before you leave.
Step-by-Step Vinyl Furniture Repair Methods
Repairing Small Tears and Punctures
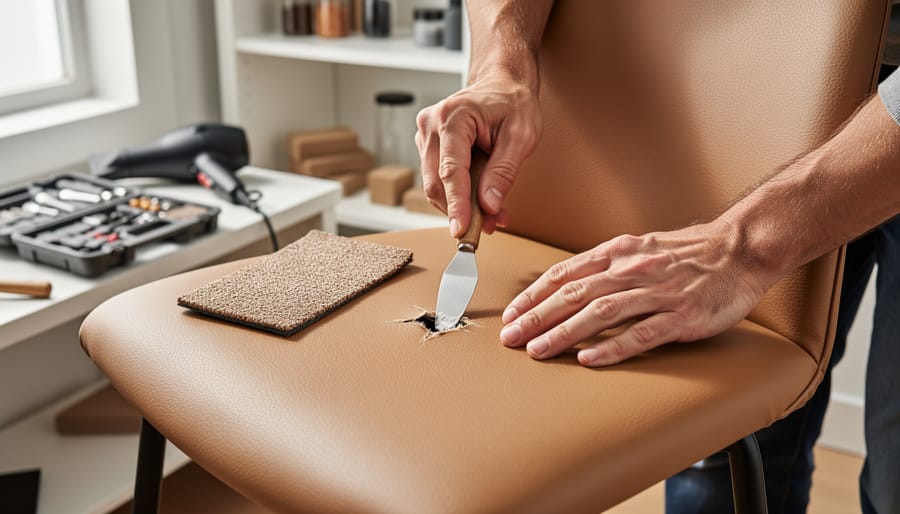
Small tears and punctures under three inches are among the easiest vinyl furniture repairs to tackle yourself. Start by thoroughly cleaning the damaged area with rubbing alcohol and a lint-free cloth, removing any dirt, oils, or debris. Allow it to dry completely before proceeding.
For tears, you’ll need to stabilize the area with backing material. Cut a piece of adhesive-backed canvas or heavy paper slightly larger than the tear and insert it through the opening using tweezers. Position it carefully beneath the vinyl, sticky side up, then press the edges of the tear down onto the backing. This prevents the repair from sinking inward.
Next, apply vinyl repair compound to fill the damaged area. Most kits include a grain-matching pad that creates texture while the compound is still wet. Apply thin layers rather than one thick application, allowing each to dry before adding the next. Build up the compound until it’s slightly above the surrounding surface, then use the grain pad pressed firmly against the area to replicate the vinyl’s original texture pattern.
Color matching is crucial for invisible repairs. Mix the colorants provided in your repair kit to match your furniture’s exact shade. Test the color on an inconspicuous area first. Apply the color using a sponge or brush according to the product instructions, working it into the textured compound.
Pro tip from the DIY community: Take a photo of your furniture in natural light and bring it when shopping for repair kits to ensure better color matching. Allow the repair to cure for at least 24 hours before using the furniture.
Fixing Cracks and Worn Areas
Cracked vinyl loses its flexibility over time, but you can restore it with the right approach. Start by cleaning the area thoroughly with a mild soap solution and letting it dry completely. For hairline cracks, apply a vinyl conditioner or heat-activated repair compound designed to penetrate and soften the material. Gently work the product into the crack using a soft cloth, which helps the vinyl regain some flexibility before sealing.
For deeper cracks and worn areas, you’ll need to rebuild the surface using a layering technique. Apply a thin coat of liquid vinyl repair compound that matches your furniture’s color, spreading it evenly across the damaged area with a spatula. Let each layer dry according to the manufacturer’s instructions, typically 20-30 minutes. Build up multiple thin layers rather than one thick application to prevent cracking as it cures. Most repairs require 3-5 layers for proper coverage.
Once you’ve achieved the desired thickness, use a grain pad or texture tool to match the surrounding vinyl pattern while the final layer is still slightly tacky. This creates a seamless finish that blends with the original surface. Allow 24 hours for complete curing before using the furniture.
Community tip: Many DIYers recommend practicing the layering technique on scrap vinyl first to perfect your application method before tackling visible furniture surfaces.
Addressing Burns and Heat Damage
Burns and heat damage present unique challenges because they physically alter the vinyl’s surface structure rather than just marking it. Small cigarette burns or contact marks from hot items often create permanent indentations that simple cleaning won’t fix.
For minor surface burns where the vinyl hasn’t melted through completely, start by carefully trimming away any raised, charred material using sharp scissors or a craft knife. Work slowly to avoid enlarging the damaged area. Once leveled, you can apply a vinyl repair compound that matches your furniture’s color. These compounds, available at most hardware stores, fill shallow depressions and bond to the surrounding material.
Deeper burns that penetrate the vinyl layer require patching. You’ll need a vinyl patch slightly larger than the damaged area, adhesive backing or vinyl cement, and a heat tool specifically designed for vinyl repair work. Cut the patch to size, ensuring it matches the grain direction of your furniture. Apply the adhesive, position the patch carefully, and use the heat tool to seal the edges. Some repair kits include grain papers that imprint texture onto the patch while the adhesive sets, creating a more seamless finish.
Be honest in your assessment: burns larger than a coin or multiple burns in visible areas often make replacement more practical than extensive patching, which can look obvious despite careful work.
Color Matching and Finishing Touches
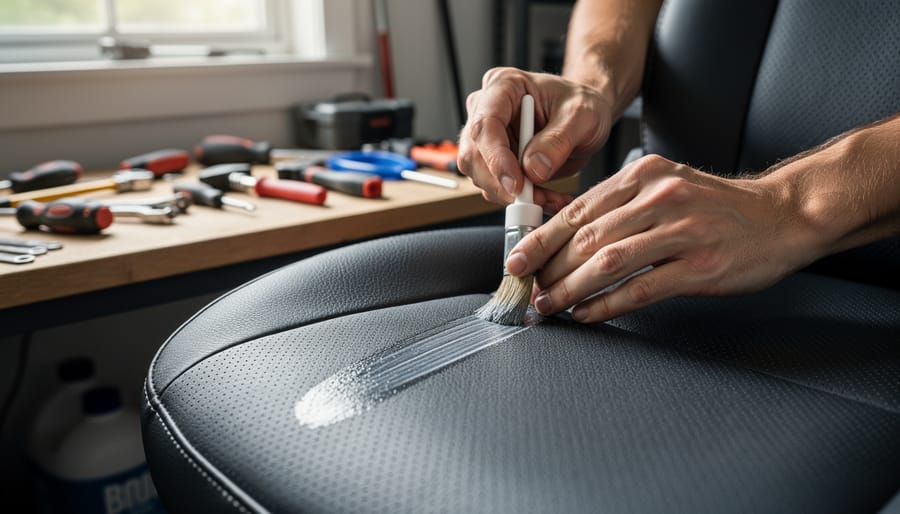
Achieving a professional-looking finish requires careful color matching and proper sealing. Start by testing your vinyl repair compound or paint on an inconspicuous area, as colors can appear different once dried. Many hardware stores offer vinyl color matching services, or you can purchase tinting kits to customize the shade. Apply thin, even coats rather than one thick application, allowing each layer to dry completely. This builds up the color gradually for better blending.
The same surface preparation techniques that ensure paint adhesion also help your repair last longer. Once the color matches seamlessly, apply a vinyl sealant or clear topcoat to protect your work. These products create a barrier against UV rays, moisture, and daily wear. Use a soft cloth or foam applicator to apply the sealant in circular motions, feathering the edges to blend with the surrounding material.
Allow at least 24 hours for complete curing before using the furniture. Pro tip from our community: keep leftover repair materials labeled with the furniture piece and date for future touch-ups. Regular maintenance with vinyl-safe cleaners will extend the life of both the repair and your furniture overall.
Common Mistakes That Waste Time and Money
Even straightforward vinyl furniture repairs can go sideways when you make common but avoidable mistakes. Understanding these pitfalls before you start will save you both time and money.
One of the biggest mistakes is using the wrong type of repair product. Not all vinyl repair kits work on every type of vinyl. Marine-grade vinyl, automotive vinyl, and furniture vinyl have different textures and flexibility requirements. Using an automotive kit on furniture vinyl often results in a repair that’s too stiff and cracks within weeks. Always check the product specifications match your furniture type.
Skipping surface preparation is another costly error. Many DIYers rush straight to applying patch material without properly cleaning the damaged area. Oils, dirt, and old conditioners prevent adhesion, causing repairs to peel away after a few uses. Take the extra ten minutes to clean with rubbing alcohol and let it dry completely.
Temperature matters more than most people realize. Working in conditions below 60°F or above 85°F affects how repair compounds cure. Cold environments prevent proper bonding, while excessive heat can cause bubbling. If your workspace isn’t temperature-controlled, wait for better conditions rather than pushing ahead.
Overfilling tears and punctures is surprisingly common. Applying too much filler creates a raised bump that’s uncomfortable and obvious. Build up repair material in thin layers instead, allowing each to dry before adding the next. This takes patience but produces professional-looking results.
Finally, many people attempt repairs on furniture that’s genuinely beyond saving. If the vinyl has multiple large tears, severe sun damage with cracking across entire surfaces, or the underlying foam is deteriorated, you’re throwing good money after bad. Sometimes replacement truly is the smarter financial decision, even though it’s tempting to try saving a few dollars with repairs.
When to Call a Professional Instead
While DIY vinyl repair works well for minor damage, certain situations warrant professional intervention. Large tears exceeding 6 inches, severe structural damage to the furniture frame, or multiple damaged areas across the piece often prove more cost-effective when handled by experts. Professionals typically charge between £50-150 for standard repairs, depending on damage extent and furniture size.
Consider professional help when dealing with high-value designer furniture, antiques, or pieces with sentimental significance where colour matching and invisible repairs are crucial. Specialists possess industrial-grade materials, colour-matching technology, and techniques that achieve factory-quality results difficult to replicate at home. Automotive upholstery specialists and furniture restoration experts often handle vinyl repairs, though their expertise levels vary.
Warning signs you need professional assistance include damage exposing foam padding, burns requiring extensive reconstruction, or tears along seams affecting structural integrity. If your initial DIY attempt worsens the damage or your repair becomes noticeable after completion, stop and consult a professional before causing irreversible harm.
Finding qualified repair services requires research. Check online reviews focusing on vinyl-specific work, request before-and-after photos of similar repairs, and obtain written quotes detailing materials and methods. Local upholstery shops, furniture restoration businesses, and mobile repair services serve different needs and price points.
Community feedback consistently shows that attempting complex repairs without proper experience often costs more long-term. When repair quotes exceed 50-60% of replacement cost for standard furniture, replacement becomes the sensible financial choice. However, for quality pieces or when replacement isn’t immediately feasible, professional repair preserves functionality and extends furniture life considerably.
Maintaining Repaired Vinyl to Prevent Future Damage
Once you’ve completed your vinyl furniture repair, proper maintenance becomes essential to protect your investment and prevent future damage. Start by establishing a regular cleaning routine using a soft, damp cloth to wipe down surfaces weekly. Avoid harsh chemicals or abrasive cleaners that can break down the vinyl’s protective coating. Instead, use a mild soap solution or vinyl-specific cleaner, and always dry thoroughly to prevent moisture buildup that can weaken repairs.
Position furniture away from direct sunlight and heat sources, as UV exposure and excessive heat cause vinyl to crack, fade, and peel. Consider protecting furniture from damage by using window treatments or UV-protective sprays designed for vinyl surfaces.
Apply a vinyl conditioner every three to six months to keep the material supple and prevent drying. This is particularly important for repaired areas, which may be more susceptible to stress. Address spills immediately by blotting rather than rubbing, as grinding liquid into seams can compromise repairs.
Inspect your furniture monthly for early signs of wear like small tears or loose seams. Catching problems early makes them easier and cheaper to fix. When moving furniture, lift rather than drag to avoid stressing seams and repaired sections.
After your initial repair work, proper cleaning after repairs ensures adhesives cure properly and surfaces remain pristine. With consistent care, your repaired vinyl furniture can provide years of additional service.
Repairing vinyl furniture yourself isn’t just about fixing a tear or scuff—it’s about taking control of your home maintenance costs and extending the life of furniture you already own. By choosing repair over replacement, you could save hundreds of dollars while developing valuable skills that apply to other household projects. The techniques covered here are accessible to anyone willing to invest a few hours and modest materials cost.
Remember, every successful repair starts with proper assessment and the right tools for the job. If you don’t own specialized equipment like heat guns or pneumatic staplers, consider borrowing or renting rather than purchasing tools you’ll rarely use. Many tool hire services offer flexible rental periods and expert advice to help you get the job done efficiently.
We’d love to hear about your vinyl repair experiences. Share your before-and-after photos, ask questions, or offer tips that worked well for you. Your insights help others in the community make informed decisions and build confidence in their own repair abilities. Whether you’ve just completed your first patch or you’re a seasoned DIYer, your feedback matters. What challenges did you face? What techniques worked best? Join the conversation and help fellow furniture savers succeed.
Related Posts

Post a Comment