
Plan your material orders precisely by calculating exact quantities needed before starting any project. This single step eliminates over-ordering—the primary source of construction and renovation waste—and can slash material costs by 15-30% while keeping excess supplies out of landfills.
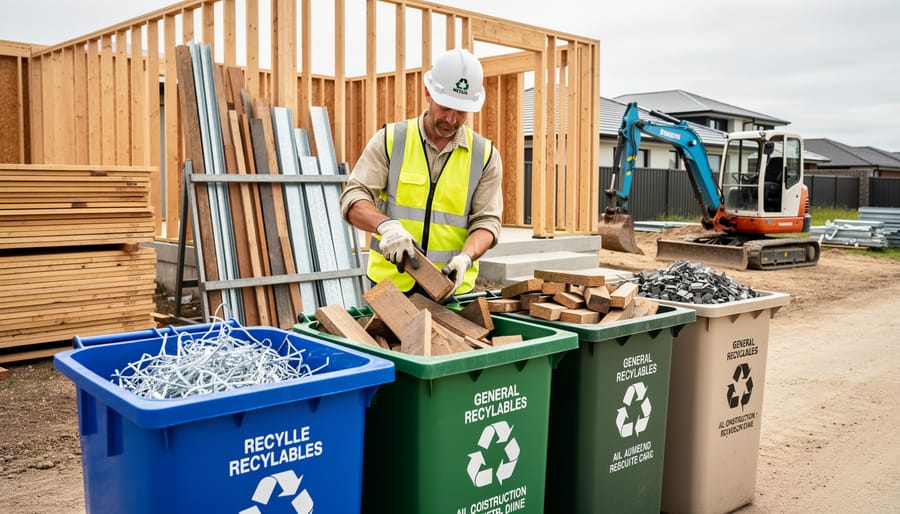
Segregate waste streams on-site from day one using clearly labeled containers for wood, metal, drywall, and packaging materials. Over 75% of construction waste is recyclable when properly sorted, transforming disposal costs into potential revenue as recycling facilities often pay for clean, separated materials like scrap metal and cardboard.
Rent equipment instead of purchasing to eliminate the waste generated from manufacturing, packaging, and eventually disposing of rarely-used tools. Equipment rental reduces the environmental footprint of tool production while giving you access to well-maintained, efficient machinery that completes jobs faster with less material waste from errors.
Repurpose cut-offs and remnants immediately rather than discarding them. That leftover timber becomes blocking, shims, or stakes. Excess concrete fills post holes. Offcut plasterboard patches small repairs. Keeping a designated area for reusable materials on every job site prevents usable resources from becoming landfill waste.
The financial case for zero waste is compelling: projects implementing these strategies report 20-40% reductions in disposal fees while simultaneously cutting material purchasing costs. For tradespeople and DIY enthusiasts alike, waste reduction isn’t just environmental responsibility—it’s a direct path to improved profit margins and project efficiency that pays dividends on every job.
Why Traditional Waste Management Is Costing You Money
Most builders and DIYers don’t realize how quickly waste management eats into their project budgets. Let’s break down where your money actually goes.
First up, skip hire fees can set you back anywhere from $200 to $600 per bin, depending on size and duration. For a typical home renovation, you might need two or three bins over the project timeline. That’s potentially $1,800 before you’ve even factored in disposal charges for specific materials like concrete, asbestos, or treated timber, which often attract premium rates.
But the visible costs are just the start. Consider a professional tradie working on a bathroom refit. Every trip to the skip means tools down and time wasted. If you’re making six trips a day to dispose of tiles, fixtures, and packaging, that’s easily 30 minutes of billable time lost. Multiply that across a week-long job and you’re looking at several hours of lost productivity.
Then there’s the cost of materials you’re literally throwing away. That half-sheet of plasterboard, the offcuts of timber, or the excess gravel sitting in the corner all represent money spent that generated zero value. Industry estimates suggest construction waste accounts for 10-15% of materials purchased on average projects.
Home renovators face similar challenges. You might spend $80 on timber for decking, only to bin $15 worth of usable offcuts because you haven’t planned for responsible rubbish removal. Multiply this across every material type, and the wasted money adds up quickly.
The real kicker? Much of this waste is completely avoidable with proper planning and the right approach.
What Zero Waste Actually Means for Your Project
Zero waste doesn’t mean producing absolutely no rubbish on your project. That’s a common misconception that stops many people from even trying. In practical terms, zero waste means diverting 90% or more of your project waste away from landfills through strategic planning, reusing materials, and proper recycling.
Think of it as a target rather than an absolute rule. If you’re currently sending everything to a skip, getting to 90% diversion is a massive achievement that makes a real difference.
The approach breaks down into three simple principles: buy only what you need, use everything you buy, and ensure leftover materials get a second life through recycling or donation. It’s not about spending hours sorting through tiny scraps or making your project more complicated. Smart planning at the start saves you time and money later.
Many tradespeople and DIYers who’ve adopted these practices report they actually save time because they’re not dealing with overflowing skips or multiple waste collections. They also save money by ordering more accurately and selling or donating usable leftovers rather than paying disposal fees.
The key is starting with realistic expectations. Your first zero waste project might hit 70% diversion, and that’s excellent progress. As you learn which strategies work for your type of work, reaching that 90% target becomes straightforward. You’ll find that much of zero waste is simply being more thoughtful about what comes onto your site and planning where it goes when you’re done with it.
Plan Before You Build: Waste Prevention Strategies
Accurate Material Estimation and Tool Selection
The foundation of any zero waste project starts well before you pick up a tool. Proper planning and accurate material estimation can dramatically reduce construction waste while saving you significant money on unnecessary materials.
Start by using digital material calculators, which are now freely available online for most projects. These tools factor in dimensions, wastage rates, and cutting patterns to give you precise quantities. For flooring, tiling, or decking projects, these calculators can prevent the common mistake of over-ordering by 20-30% “just in case.” Simply input your measurements, and the calculator does the complex math, accounting for standard waste allowances of typically 5-10%.
When it comes to cutting materials, precision is everything. This is where hiring specialized tools makes environmental and financial sense. A quality tile cutter, mitre saw with laser guide, or panel saw ensures clean, accurate cuts the first time, eliminating costly mistakes and wasted materials. Purchasing these specialized tools for occasional use doesn’t make economic sense, especially when rental options provide access to professional-grade equipment.
Consider hiring measuring tools like laser distance measurers and digital angle finders too. These remove guesswork and the old “measure twice, cut once” becomes genuinely effective. Many hire centres now stock these precision tools at daily rates that cost less than a single sheet of wasted material.
Community feedback consistently shows that tradespeople who invest time in proper planning and use the right hired equipment reduce material waste by up to 40% compared to rushed projects with inadequate tools.
Design for Deconstruction
Design for deconstruction is a game-changing approach that treats building materials as temporary assemblies rather than permanent fixtures. The principle is simple: use reversible fasteners like screws and bolts instead of nails or adhesives, making future disassembly straightforward. This means materials retain their value and can move to new projects rather than skips.
For construction projects, modular components are your best friend. Standard dimensions like 600mm or 1200mm modules allow materials to fit multiple applications without cutting waste. Think plasterboard sheets, timber studs, or insulation panels that can transfer between jobs. One tradesperson shared how switching to modular shelving systems reduced offcuts by 40 percent across their projects.
Practical tips for homeowners include choosing furniture with mechanical fixings you can undo, opting for clip-together flooring instead of glued alternatives, and selecting paint over permanent finishes when possible. For renovations, photograph assembly sequences to help future deconstruction. Keep fasteners organized by project so reassembly is painless.
The key is planning ahead. Before starting any project, ask yourself: how will this come apart? This mindset shift protects both your wallet and the environment while maintaining quality and durability.
Material Substitution for Reusability
Selecting the right materials from the start significantly reduces waste and saves money over a project’s lifetime. Metal components typically outlast plastic alternatives and maintain higher resale or recycling value—think metal toolboxes instead of plastic storage bins. When sourcing timber, choose untreated wood wherever possible, as it can be composted, repurposed, or recycled without contaminating other materials. Treated timber often ends up in landfill due to chemical content.
Standardized components are game-changers for reusability. When building temporary structures or frameworks, use common sizes of screws, bolts, and fixtures that can be easily removed and reused across multiple projects. This approach also means you’re more likely to have spare parts on hand. Community feedback consistently highlights that modular systems—like scaffolding or formwork made from standard components—deliver better long-term value despite higher initial costs. Consider materials with established recycling streams in your area too. Aluminum, steel, and certain grades of cardboard have reliable collection and processing systems, making them practical choices for zero waste goals.
On-Site Waste Sorting That Actually Works
Setting Up Your Sorting Station
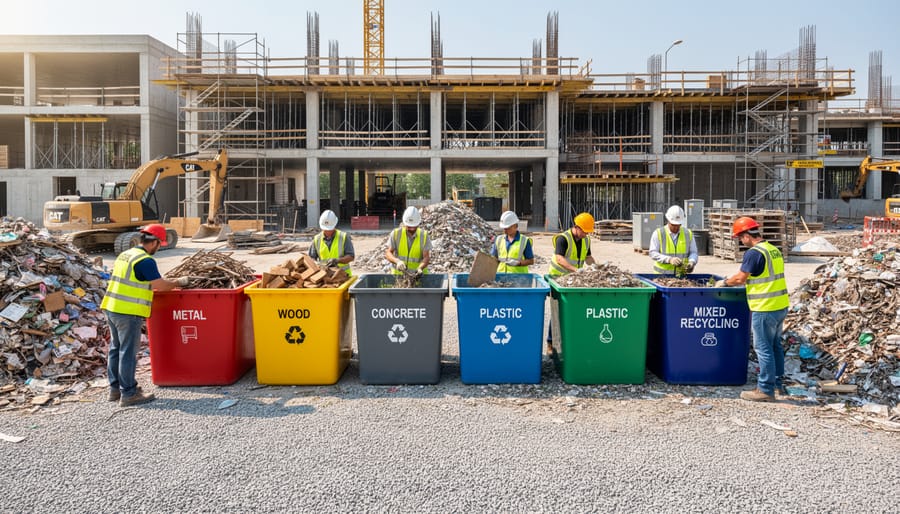
Creating an effective sorting station starts with understanding your specific waste streams. Most construction and DIY projects generate five main categories: timber, metal, cardboard and packaging, concrete or masonry, and general waste. Before you begin, walk through your project plan and identify which materials you’ll be working with.
Choose a location that’s accessible but won’t obstruct workflow. On larger sites, position your station near the main work area but away from heavy machinery traffic. For cramped home projects, consider using a corner of your driveway or garden, keeping walkways clear for safety.
Use clearly labeled containers or designated ground areas for each waste type. Bright, weatherproof labels with both text and color coding work best when multiple people are working on site. For example, use blue for metal, brown for timber, and yellow for cardboard. This visual system helps everyone sort correctly, even during busy periods.
Size your containers appropriately. A standard 240-liter wheelie bin suits most cardboard needs, while timber often requires larger skips or designated ground space. Keep smaller buckets handy for screws, nails, and fixings that can be reused or recycled separately.
Position your most-used waste streams closest to where the work happens. If you’re doing primarily carpentry, place the timber bin within a few steps of your cutting area. This convenience prevents the temptation to toss everything into general waste when you’re rushing.
For DIY spaces, collapsible containers or stackable crates maximize flexibility when you’re not actively working, helping you reclaim your space between project phases.
Making It Stick: Getting Your Team or Family On Board
Getting your crew or household to embrace zero waste practices doesn’t have to feel like herding cats. The secret is making sorting and waste reduction so straightforward that it becomes second nature rather than an added burden.
Start by making bins impossible to miss or misuse. Color-code your sorting stations with clear photo labels showing exactly what goes where. A picture of clean wood scraps, metal offcuts, or cardboard packaging speaks louder than written instructions. Place bins right where waste is generated, not across the worksite or garage where they’ll be ignored.
Hold a quick 10-minute kickoff session to explain the why behind the effort. When your team understands that proper sorting saves money on skip fees and creates opportunities to sell scrap metal or reuse materials, they’re more likely to participate. Share real numbers from community-driven reviews of other businesses or DIYers who’ve cut waste disposal costs significantly.
Address pushback directly by listening to concerns. If someone says sorting takes too long, watch their workflow and adjust bin placement. If they claim they don’t know what goes where, create a simple one-page cheat sheet they can reference.
Build it into existing routines rather than treating it as extra work. End-of-day cleanup should already include tidying the workspace, so integrate sorting into that process. Assign rotating responsibility for checking bins and contamination, making everyone accountable without overwhelming anyone.
Celebrate wins publicly. When you avoid a skip rental or sell a load of copper wire, share that success with the team who made it possible.
Reuse and Repurpose: Getting More from Your Materials
Offcuts and Leftover Material Management
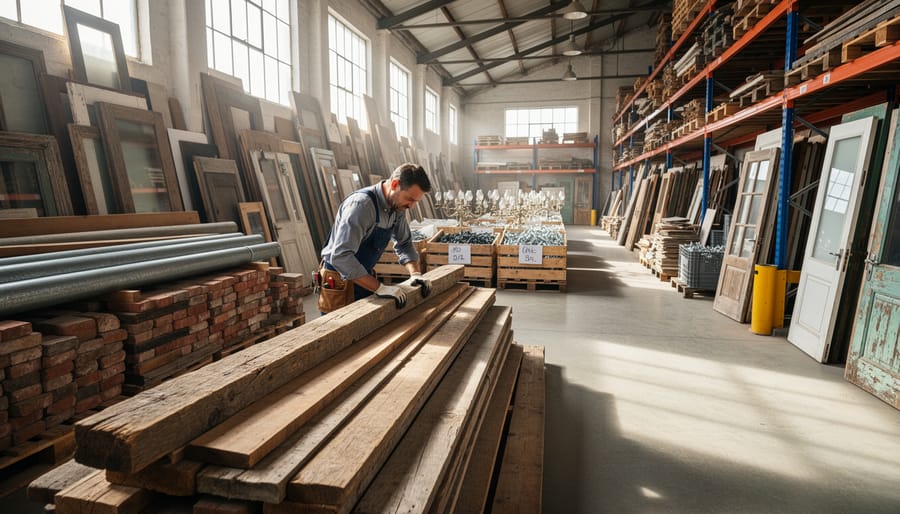
Proper management of offcuts and leftover materials can significantly reduce waste while saving money on future projects. Start by creating a dedicated storage system that keeps materials visible and accessible. Sort remnants by material type—timber, metal, plastics, and composites—using clearly labeled bins or wall-mounted racks. Include size labels on each piece to quickly identify what’s available without rummaging through your entire stock.
Track your materials using a simple inventory system, whether that’s a notebook, spreadsheet, or mobile app. Note dimensions, quantities, and potential uses. Before purchasing new materials, always check your offcuts inventory first. Many seemingly unusable scraps can serve as shims, templates, or test pieces for tool settings.
Community tool libraries and material exchanges offer excellent resources for extending the life of surplus materials. These platforms connect people who have excess materials with those who need them, creating a circular economy at the local level. Many accept donations of quality offcuts and make them available to members at minimal cost. Similarly, online community groups and neighborhood sharing platforms let you list available materials or find specific pieces for upcoming projects. These exchanges reduce landfill waste while building community connections and keeping costs down. Consider joining or starting a materials exchange in your area to maximize resource sharing.
Packaging and Container Reuse
Before discarding packaging materials, consider their reuse potential on site or at home. Wooden pallets make excellent temporary fencing, raised garden beds, or firewood storage racks. Five-gallon buckets with intact handles serve as tool caddies, mixing containers, or water carriers. Cardboard boxes can protect finished surfaces during subsequent work phases or organize materials in storage areas.
Always inspect containers for structural integrity before repurposing. Check for cracks, sharp edges, or chemical residue that could pose hazards. Containers that previously held hazardous materials should never be reused for food or water storage, even after cleaning. Remove or cover any protruding nails or staples from pallets to prevent injuries.
Clean packaging thoroughly before alternative use, especially if switching from construction to domestic purposes. Many tradespeople share creative reuse ideas through online communities, offering proven solutions you can adapt to your projects. This approach not only diverts waste from landfills but also reduces your material costs. Label repurposed containers clearly to avoid confusion and maintain site safety standards.
Demolition Salvage Opportunities
Careful deconstruction transforms demolition waste into valuable resources. Rather than smashing through walls with sledgehammers, plan a methodical approach that preserves materials for reuse or resale. Start by removing intact fixtures like light fittings, taps, and door handles, which fetch good prices at salvage yards. Next, carefully remove doors, windows, and architraves using pry bars and reciprocating saws to avoid damage.
Timber framing, floorboards, and weatherboards often hold significant value, particularly hardwoods and period features. Remove nails promptly to prevent warping and store materials flat in dry conditions. Bricks cleaned of mortar can be sold or reused, especially heritage varieties.
Local salvage yards, online marketplaces, and community groups are eager buyers for quality materials. Organizations like Habitat for Humanity ReStore accept donations of building materials, providing tax receipts while supporting housing projects. Document materials with clear photos and accurate measurements to attract buyers. Many tradespeople report recouping 20-30% of project costs through strategic salvage, whilst significantly reducing skip hire expenses and landfill contributions.
Recycling Options for Every Material Type
Construction Materials: Concrete, Bricks, and Aggregates
Crushing and reprocessing concrete, bricks, and aggregates offers a cost-effective alternative to skip hire while reducing landfill waste. Mobile crushers can transform construction rubble into reusable aggregate on-site, eliminating disposal fees that typically range from £150-£300 per skip load.
For smaller projects, manual crushing works for limited quantities, but hiring specialized equipment makes sense when you’re dealing with over two tonnes of material. Crushed concrete works brilliantly as hardcore for driveways, paths, and foundations, saving around 40% compared to purchasing new aggregate. Brick rubble, once crushed, serves as excellent drainage material or sub-base.
The decision to reprocess depends on three factors: volume (larger quantities justify equipment hire), accessibility (can crushing equipment reach your site?), and intended reuse (do you have an immediate application?). Many hire centers now offer compact crushers suitable for residential projects, with daily rates around £80-£150. Before crushing, remove any contaminants like wood, metal, or plastics, as clean material processes more efficiently and produces better-quality aggregate. Check with your local planning authority, as some areas require permits for on-site crushing due to noise and dust concerns.
Metals, Plastics, and Timber Recycling
Different materials require specific preparation to maximize recycling value and secure potential rebates. For metals, separate ferrous (magnetic) from non-ferrous materials like copper, aluminum, and brass, as the latter fetch higher prices at scrap yards. Remove any attached plastics, rubber, or other contaminants, and check current scrap metal prices before dropping off—rates fluctuate, so timing can boost returns. Many dealers offer collection services for larger quantities.
Plastic waste from construction projects, particularly PVC piping and acrylic sheets, should be sorted by resin type (look for the numbered triangle symbol). Clean plastics free from oils and adhesives are more likely to be accepted. Some specialized recyclers pay for bulk quantities of single-type plastics.
Timber recycling depends on condition and treatment. Untreated softwood and hardwood offcuts work well for community firewood programs or can be resold through online marketplaces. Treated timber requires proper disposal due to chemical content—never burn it. Plywood and MDF have limited recycling options but can sometimes be repurposed for temporary site protection. Always remove nails, screws, and metal fixtures before recycling. Document your recycling efforts with photos and receipts to demonstrate waste reduction on projects where this matters for client or regulatory requirements.
Finding Local Recycling Services and Collection Points
Start by checking your local council website for kerbside collection schedules and drop-off locations for specific materials like metals, timber, and electronics. Most councils provide detailed guides on what they accept and how to prepare materials for collection.
Search online directories for specialist recyclers in your area who handle construction waste, plastics, or hazardous materials. Many accept clean, sorted materials and some even pay for scrap metal and copper. Community recycling centers often take items that regular bins won’t, including paint, batteries, and chemical products.
Don’t overlook tool hire companies as recycling resources. Some locations accept packaging materials, offcuts, and even damaged equipment for proper disposal or refurbishment. When booking waste management services, ask about their recycling partnerships and material recovery rates.
Join local trade groups or online forums where members share recommendations for reliable recyclers and drop-off points. These community insights often reveal lesser-known services that offer better rates or more convenient locations.
Tools and Equipment That Support Zero Waste Goals
Precision Cutting and Material Optimization Tools
Accurate measurements and clean cuts are fundamental to minimizing material waste on any project. When you hire precision tools like laser levels, track saws, and digital measuring devices, you’re investing in accuracy that pays dividends through reduced off-cuts and fewer costly mistakes.
Laser levels eliminate the guesswork in marking cutting lines, ensuring your measurements translate accurately across large sheets or multiple pieces. This precision means you can confidently plan tight cutting layouts that maximize every inch of material. Track saws deliver straight, splinter-free cuts without the need for multiple passes or corrections that waste material and time.
Digital measuring tools, including laser distance measurers and digital angle finders, remove human error from the equation. According to user reviews, these tools have helped both professionals and DIYers reduce cutting errors by up to 40%, translating directly into material savings.
The beauty of hiring rather than buying these specialized tools is accessing professional-grade accuracy without the capital investment. Many users report that rental costs are recovered within a single project through reduced material waste alone, making this an economically sound choice that also supports sustainability goals.

Waste Processing Equipment You Can Hire
Processing waste on-site significantly reduces disposal costs and transportation needs while making materials easier to recycle or reuse. Crusher hire equipment compacts construction rubble, bricks, and concrete into reusable aggregate, cutting landfill waste by up to 80%. These machines transform bulky debris into material you can use for hardcore or sub-base layers on the same project.
Wood chippers handle timber offcuts, branches, and pallets, converting them into mulch or biomass fuel. This equipment proves particularly valuable for landscaping projects or site clearances where green waste accumulates quickly. The processed wood chips can enhance soil quality or provide pathway coverage.
Compactors reduce general waste volume by 70-90%, meaning fewer skip collections and lower transportation emissions. They work well for packaging materials, cardboard, and mixed non-recyclable waste. Many hire centres offer different compactor sizes suited to residential renovations through to commercial builds, ensuring you only pay for the capacity you need while maintaining efficient waste management throughout your project.
Real-World Success Stories and Cost Savings
Real-world tradespeople are proving that zero waste practices deliver tangible results. Take Manchester-based carpenter James Mitchell, who reduced his project waste by 60% simply by creating a cutting plan before starting jobs. “I used to eyeball measurements and order extra materials ‘just in case,'” he explains. “Now I calculate exactly what I need and use offcut timber for smaller projects. I’ve saved roughly £800 in the past year alone.”
Plumber Sarah Chen from Bristol discovered unexpected time savings when she started separating copper, brass, and steel waste on-site. “The scrap metal dealers pay different rates, and I was leaving money on the table,” she notes. By dedicating just 15 minutes per job to proper sorting, she’s earned an additional £1,200 annually while keeping materials out of landfills.
DIY enthusiast Marcus Thompson transformed his home renovation approach after implementing a simple waste tracking system. “I photographed my skip contents after each phase and realized I was throwing away usable insulation and timber,” he shares. On his next project, he listed excess materials on community sharing platforms, recouping £350 and helping three neighbors with their projects.
Landscaper Emma Davies credits tool hire with her zero waste success. “Renting specialized equipment means I’m not storing rarely-used machines that eventually break down and get scrapped,” she explains. “Plus, hire companies maintain equipment properly, so there’s less waste from premature tool failure.”
We want to hear your story. Have you implemented zero waste practices that saved money or improved efficiency? Share your experiences, photos, and cost savings in the comments below. Your insights help build a practical resource for the entire trades community.
Common Challenges and How to Overcome Them
Let’s be honest: adopting zero waste practices isn’t always straightforward, but real users have shared valuable insights on overcoming common hurdles.
Time constraints rank as the top challenge. Between project deadlines and labor costs, sorting waste feels like a luxury. The solution? Integrate waste separation into your workflow from day one. Set up clearly labeled bins at the start of each project phase. According to feedback from experienced contractors, this front-loaded approach actually saves time during cleanup, as there’s no scrambling to separate materials later. Consider this part of your construction site safety protocols—organized sites reduce hazards and improve efficiency.
Contaminated waste streams present another obstacle. Mixed materials often can’t be recycled, forcing everything into general waste. Prevention is key: designate specific areas for different materials and brief your team or household members before starting. One tradesperson shared that photographing and displaying proper sorting methods on-site reduced contamination by 80%.
Limited local recycling facilities frustrate many users, particularly in regional areas. The workaround involves building relationships with local salvage yards, community recycling centers, and demolition waste processors. Many accept materials standard facilities won’t. User reviews highlight success with online marketplaces for offloading reusable materials—what you can’t recycle might be perfect for someone else’s project.
Initial setup effort deters some from starting. Begin small: focus on one waste stream like timber or metal before expanding. Users consistently report that once systems are established, maintaining them requires minimal effort. The financial returns from reduced skip hire costs typically appear within the first few projects, providing tangible motivation to continue.
Remember, zero waste isn’t about achieving perfection overnight. It’s about making consistent progress toward reducing waste on every project you tackle. Even implementing one or two of these strategies can make a significant difference to both your bottom line and the environment. The financial benefits often surprise people most—reducing skip hire costs, recovering value from scrap materials, and improving site efficiency can genuinely impact your profit margins.
Start small and build momentum. Perhaps begin by setting up a proper sorting system on your next project, or commit to accurately measuring materials before ordering. As these practices become second nature, add another strategy. The cumulative effect of these changes adds up quickly, both in waste diverted from landfill and money saved.
The beauty of zero waste solutions is that they’re scalable. Whether you’re a weekend DIYer renovating a single room or a professional managing multiple sites, these principles adapt to your needs. Many of our community members have found creative approaches we haven’t covered here, and that’s where you come in.
We’d love to hear what’s working for you. Head to our community section and share your own zero waste tips, challenges you’ve overcome, or questions about implementing these strategies. Your experience could be exactly what another reader needs to hear. Together, we can build a practical resource that helps everyone work smarter, save money, and reduce waste.
Related Posts

Post a Comment